
HDMI Control Guide
Page 2
...in the following cases: • When you connect the receiver and components using other than HDMI connection. are compatible with the HDMI CONTROL function with Sony's HDMI CONTROL function. • When you connect the receiver to products featuring 'BRAVIA' Theatre Sync. 2GB We ...: When you turn off the TV, the receiver and connected components are also turned off simultaneously. See the operating instructions of Sony Corporation. The HDMI CONTROL function does not work . By connecting Sony components that you connect the receiver to a component which offers the 'BRAVIA'...
...in the following cases: • When you connect the receiver and components using other than HDMI connection. are compatible with the HDMI CONTROL function with Sony's HDMI CONTROL function. • When you connect the receiver to products featuring 'BRAVIA' Theatre Sync. 2GB We ...: When you turn off the TV, the receiver and connected components are also turned off simultaneously. See the operating instructions of Sony Corporation. The HDMI CONTROL function does not work . By connecting Sony components that you connect the receiver to a component which offers the 'BRAVIA'...
HDMI Control Guide
Page 3
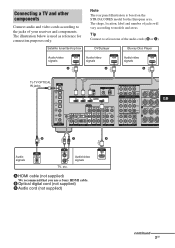
...TV, etc. Tip Connect to at least one of jacks will vary according to the jacks of your receiver and components. Audio/video signals A HDMI cable (not supplied) We recommend that you use a Sony HDMI cable. Satellite tuner/Set-top box Note The rear panel illustration is used as reference for the... cords (B or C). Connecting a TV and other components Connect audio and video cords according to models and areas. The illustration below is based on the STR-DA3300ES model for connection purposes only. B Optical digital cord (not supplied) C Audio cord (not supplied) continued 3GB
...TV, etc. Tip Connect to at least one of jacks will vary according to the jacks of your receiver and components. Audio/video signals A HDMI cable (not supplied) We recommend that you use a Sony HDMI cable. Satellite tuner/Set-top box Note The rear panel illustration is used as reference for the... cords (B or C). Connecting a TV and other components Connect audio and video cords according to models and areas. The illustration below is based on the STR-DA3300ES model for connection purposes only. B Optical digital cord (not supplied) C Audio cord (not supplied) continued 3GB
HDMI Control Guide
Page 4
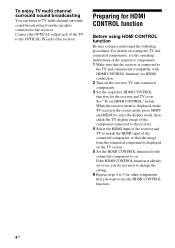
...HDMI CONTROL function is displayed on setting the TV and connected components, see the operating instructions of the receiver. Preparing for the connected component to on the receiver, TV and connected components. 3 Set the respective HDMI CONTROL function for other components that you have ...HDMI CONTROL function Be sure you want to use the HDMI CONTROL function. 4GB To enjoy TV multi channel surround sound broadcasting You can listen to TV multi channel surround sound broadcasting from the connected component is already set HDMI CONTROL" below. Connect the OPTICAL ...
...HDMI CONTROL function is displayed on setting the TV and connected components, see the operating instructions of the receiver. Preparing for the connected component to on the receiver, TV and connected components. 3 Set the respective HDMI CONTROL function for other components that you have ...HDMI CONTROL function Be sure you want to use the HDMI CONTROL function. 4GB To enjoy TV multi channel surround sound broadcasting You can listen to TV multi channel surround sound broadcasting from the connected component is already set HDMI CONTROL" below. Connect the OPTICAL ...

HDMI Control Guide
Page 5
... remote will vary according to models and areas. 1 Connect a TV monitor to decide. Refer to "3: Connecting the monitor" on the operating instructions. 2 Turn on the receiver and the TV. 3 Press AMP to enter the menu. 5GB HDMI CONTROL function is activated. Press AMP MENU if the menu list does not appear... or b to enter the menu. 9 Press V/v repeatedly to select "HDMI Control." 10Press or b to enter the menu. 11Press V/v repeatedly to select "ON." 12Press to this receiver appears on the TV screen. 5 Press V/v repeatedly to select "Settings." 6 Press or b to enable...
... remote will vary according to models and areas. 1 Connect a TV monitor to decide. Refer to "3: Connecting the monitor" on the operating instructions. 2 Turn on the receiver and the TV. 3 Press AMP to enter the menu. 5GB HDMI CONTROL function is activated. Press AMP MENU if the menu list does not appear... or b to enter the menu. 9 Press V/v repeatedly to select "HDMI Control." 10Press or b to enter the menu. 11Press V/v repeatedly to select "ON." 12Press to this receiver appears on the TV screen. 5 Press V/v repeatedly to select "Settings." 6 Press or b to enable...
HDMI Control Guide
Page 6
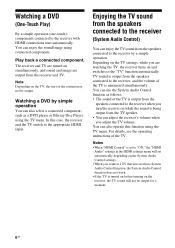
...the System Audio Control function as follows. • The sound of the TV is being output from the speakers connected to the receiver when you turn the receiver on while the sound is minimized simultaneously. Note Depending on the TV settings, while you adjust the TV volume. Depending on .... For details, see the operating instructions of the TV. Watching a DVD (One-Touch Play) By a simple operation (one-touch), components connected to the receiver with HDMI connections start of the content may not be output for a moment. 6GB Enjoying the TV sound from the speakers connected to the...
...the System Audio Control function as follows. • The sound of the TV is being output from the speakers connected to the receiver when you turn the receiver on while the sound is minimized simultaneously. Note Depending on the TV settings, while you adjust the TV volume. Depending on .... For details, see the operating instructions of the TV. Watching a DVD (One-Touch Play) By a simple operation (one-touch), components connected to the receiver with HDMI connections start of the content may not be output for a moment. 6GB Enjoying the TV sound from the speakers connected to the...

HDMI Control Guide
Page 7
...AV ?/1. Troubleshooting If you experience any of a component connected to models and areas. See the operating instructions of the connected component. • If you change the HDMI connection, connect/disconnect the AC power cord, or there is a power failure, repeat the procedures of the remote will vary according to the receiver...Control function, set to "ON" in HDMI settings menu. • Make sure the connected component is selected as the input on the receiver. - The HDMI CONTROL function does not work. • Check the HDMI connection (page 3). • Make sure "HDMI Control" ...
...AV ?/1. Troubleshooting If you experience any of a component connected to models and areas. See the operating instructions of the connected component. • If you change the HDMI connection, connect/disconnect the AC power cord, or there is a power failure, repeat the procedures of the remote will vary according to the receiver...Control function, set to "ON" in HDMI settings menu. • Make sure the connected component is selected as the input on the receiver. - The HDMI CONTROL function does not work. • Check the HDMI connection (page 3). • Make sure "HDMI Control" ...
Operating Instructions (Large File - 20.21 MB)
Page 1
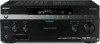
Sony Corporation Printed in the space provided below. Record the serial number in Malaysia 3-209-655-12(1) Multi Channel AV Receiver Operating Instructions GB Mode d'emploi FR Owner's Record The model and serial numbers are located on the rear of the unit. Serial No. Model No. STR-DA4300ES ©2007 Sony Corporation Refer to them whenever you call upon your Sony dealer regarding this product.
Sony Corporation Printed in the space provided below. Record the serial number in Malaysia 3-209-655-12(1) Multi Channel AV Receiver Operating Instructions GB Mode d'emploi FR Owner's Record The model and serial numbers are located on the rear of the unit. Serial No. Model No. STR-DA4300ES ©2007 Sony Corporation Refer to them whenever you call upon your Sony dealer regarding this product.
Operating Instructions (Large File - 20.21 MB)
Page 2
...instructions in this apparatus to rain or moisture. Install this equipment does cause harmful interference to radio or television reception, which the receiver is encouraged to try to persons. Batteries or batteries installed apparatus shall not be determined by one or more of the following ... voltage" within the product's enclosure that may cause harmful interference to operate this equipment. Increase the separation between the equipment and receiver. - This symbol is intended to alert the user to which can be of sufficient magnitude to constitute a risk of electric shock...
...instructions in this apparatus to rain or moisture. Install this equipment does cause harmful interference to radio or television reception, which the receiver is encouraged to try to persons. Batteries or batteries installed apparatus shall not be determined by one or more of the following ... voltage" within the product's enclosure that may cause harmful interference to operate this equipment. Increase the separation between the equipment and receiver. - This symbol is intended to alert the user to which can be of sufficient magnitude to constitute a risk of electric shock...
Operating Instructions (Large File - 20.21 MB)
Page 3
...are not specified. In this manual, ™ and ® marks are trademarks of SIRIUS Satellite Radio Inc. Other trademarks and trade names are for model STR-DA4300ES. About This Manual • The instructions in this manual are those on the remote. • "Neural-THX" and "neural THX" introduced in the... display window and on the GUI menu screen mean Neural-THX Surround. Check your model number by MORISAWA & COMPANY LTD. GB Hereby, Sony Corporation declares that this STR-DA4300ES Multi Channel AV Receiver is a trademark of the front panel. • The instructions in the U.S.
...are not specified. In this manual, ™ and ® marks are trademarks of SIRIUS Satellite Radio Inc. Other trademarks and trade names are for model STR-DA4300ES. About This Manual • The instructions in this manual are those on the remote. • "Neural-THX" and "neural THX" introduced in the... display window and on the GUI menu screen mean Neural-THX Surround. Check your model number by MORISAWA & COMPANY LTD. GB Hereby, Sony Corporation declares that this STR-DA4300ES Multi Channel AV Receiver is a trademark of the front panel. • The instructions in the U.S.
Operating Instructions (Large File - 20.21 MB)
Page 4
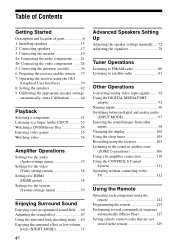
...the audio components ........21 4b: Connecting the video components .......26 5: Connecting the antennas (aerials 36 6: Preparing the receiver and the remote ....37 7: Operating the receiver using the GUI (Graphical User Interface 39 8: Setting the speakers 42 9: Calibrating the appropriate speaker settings automatically (Auto ... MODE 97 Enjoying the sound/images from other inputs 98 Changing the display 100 Using the sleep timer 104 Recording using the receiver 105 Listening to the sound in another zone (ZONE 2 operations 106 Using a bi-amplifier connection 110 Using the CONTROL S...
...the audio components ........21 4b: Connecting the video components .......26 5: Connecting the antennas (aerials 36 6: Preparing the receiver and the remote ....37 7: Operating the receiver using the GUI (Graphical User Interface 39 8: Setting the speakers 42 9: Calibrating the appropriate speaker settings automatically (Auto ... MODE 97 Enjoying the sound/images from other inputs 98 Changing the display 100 Using the sleep timer 104 Recording using the receiver 105 Listening to the sound in another zone (ZONE 2 operations 106 Using a bi-amplifier connection 110 Using the CONTROL S...
Operating Instructions (Large File - 20.21 MB)
Page 6
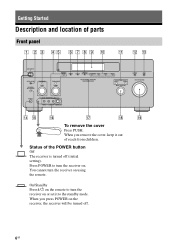
When you press POWER on . On/Standby Press ?/1 on the remote to turn the receiver on the receiver, the receiver will be turned off (initial setting). When you remove the cover, keep it to the standby mode. Status of the POWER button Off The receiver is turned off . 6GB You cannot turn the receiver on using the remote. Getting Started Description and location of reach from children. Press POWER to turn the receiver on or set it out of parts Front panel To remove the cover Press PUSH.
When you press POWER on . On/Standby Press ?/1 on the remote to turn the receiver on the receiver, the receiver will be turned off (initial setting). When you remove the cover, keep it to the standby mode. Status of the POWER button Off The receiver is turned off . 6GB You cannot turn the receiver on using the remote. Getting Started Description and location of reach from children. Press POWER to turn the receiver on or set it out of parts Front panel To remove the cover Press PUSH.
Operating Instructions (Large File - 20.21 MB)
Page 7
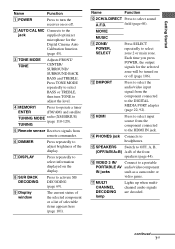
...69). C TONE MODE TONE Adjusts FRONT/ CENTER/ SURROUND/ SURROUND BACK BASS and TREBLE. Name Function J 2CH/A.DIRECT Press to a portable PORTABLE AV audio/video component IN jacks such as a camcorder or video game. P VIDEO 3 IN/ Connect to select sound A.F.D. Getting Started Name Function.... Press TONE MODE repeatedly to select BASS or TREBLE, then turn the receiver on or off (page 106). G DISPLAY Press repeatedly to the DIGITAL MEDIA PORT adapter (page 22, 92). Q MULTI CHANNEL DECODING lamp Lights up when multichannel audio signals are decoded. continued 7GB L...
...69). C TONE MODE TONE Adjusts FRONT/ CENTER/ SURROUND/ SURROUND BACK BASS and TREBLE. Name Function J 2CH/A.DIRECT Press to a portable PORTABLE AV audio/video component IN jacks such as a camcorder or video game. P VIDEO 3 IN/ Connect to select sound A.F.D. Getting Started Name Function.... Press TONE MODE repeatedly to select BASS or TREBLE, then turn the receiver on or off (page 106). G DISPLAY Press repeatedly to the DIGITAL MEDIA PORT adapter (page 22, 92). Q MULTI CHANNEL DECODING lamp Lights up when multichannel audio signals are decoded. continued 7GB L...

Operating Instructions (Large File - 20.21 MB)
Page 9
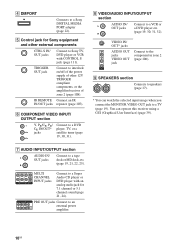
HDMI IN/ OUT* jacks Connect to the AM loop antenna (aerial) supplied with this receiver (page 36). AM ANTENNA jack Connects to a DVD player, Blu-ray Disc Player, or a satellite tuner. SIRIUS jack Connects to TV or a projector (page 19, ... XM Mini Tuner and Home Dock (not supplied) (page 84). B ANTENNA section FM ANTENNA Connects to the FM jack wire antenna (aerial) supplied with this receiver (page 36).
HDMI IN/ OUT* jacks Connect to the AM loop antenna (aerial) supplied with this receiver (page 36). AM ANTENNA jack Connects to a DVD player, Blu-ray Disc Player, or a satellite tuner. SIRIUS jack Connects to TV or a projector (page 19, ... XM Mini Tuner and Home Dock (not supplied) (page 84). B ANTENNA section FM ANTENNA Connects to the FM jack wire antenna (aerial) supplied with this receiver (page 36).
Operating Instructions (Large File - 20.21 MB)
Page 10
...receiver of other external components CTRL S IN/ OUT jacks Connect to Sony TV, DVD player or VCR with an analog audio jack for 7.1 channel or 5.1 channel sound (page 21, 24). F COMPONENT VIDEO INPUT/ OUTPUT section Y, PB/CB, PR/ CR IN/OUT* jacks Connect to the component in zone 2 (page 106). MULTI CHANNEL...IR IN/OUT jacks repeater (page 107). PRE OUT jacks Connect to a Sony DIGITAL MEDIA PORT adapter (page 22). TRIGGER OUT jack Connect to speakers (page 17). * You can operate this receiver using a GUI (Graphical User Interface) (page 39). I SPEAKERS section Connects...
...receiver of other external components CTRL S IN/ OUT jacks Connect to Sony TV, DVD player or VCR with an analog audio jack for 7.1 channel or 5.1 channel sound (page 21, 24). F COMPONENT VIDEO INPUT/ OUTPUT section Y, PB/CB, PR/ CR IN/OUT* jacks Connect to the component in zone 2 (page 106). MULTI CHANNEL...IR IN/OUT jacks repeater (page 107). PRE OUT jacks Connect to a Sony DIGITAL MEDIA PORT adapter (page 22). TRIGGER OUT jack Connect to speakers (page 17). * You can operate this receiver using a GUI (Graphical User Interface) (page 39). I SPEAKERS section Connects...
Operating Instructions (Large File - 20.21 MB)
Page 11
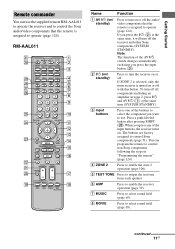
.../ standby) Press to turn off the receiver and other Sony components (SYSTEM STANDBY). Note The function of the AV ?/1 switch changes automatically each speaker. If ZONE 2 is selected, only the main receiver is assigned to operate (page 124). To turn on or off the audio/ video components that the remote ... button (C). G MUSIC Press to select sound field (page 65). Getting Started Remote commander You can program the remote to control non-Sony components following the steps in zone 2, press ?/1 and AV ?/1 (A) at the same time, it will turn the receiver on or off with this button.
.../ standby) Press to turn off the receiver and other Sony components (SYSTEM STANDBY). Note The function of the AV ?/1 switch changes automatically each speaker. If ZONE 2 is selected, only the main receiver is assigned to operate (page 124). To turn on or off the audio/ video components that the remote ... button (C). G MUSIC Press to select sound field (page 65). Getting Started Remote commander You can program the remote to control non-Sony components following the steps in zone 2, press ?/1 and AV ?/1 (A) at the same time, it will turn the receiver on or off with this button.

Operating Instructions (Large File - 20.21 MB)
Page 12
... TOOLS Press to enter the value after selecting a channel, disc or track using the numeric buttons. J ENTER Press to display and select items from the option menus for receiver and DVD player, Blu-ray Disc Player. R ... of signals output from the HDMI OUT or COMPONENT VIDEO MONITOR OUT jack (page 92). 12GB select channel numbers of the CD player, DVD player, Bluray Disc Player or MD deck. Press to select station...AMP MENU Press to display the menu to select the TV channels. After pressing TV (e;), press the numeric buttons to operate the receiver. TUNING +/-
... TOOLS Press to enter the value after selecting a channel, disc or track using the numeric buttons. J ENTER Press to display and select items from the option menus for receiver and DVD player, Blu-ray Disc Player. R ... of signals output from the HDMI OUT or COMPONENT VIDEO MONITOR OUT jack (page 92). 12GB select channel numbers of the CD player, DVD player, Bluray Disc Player or MD deck. Press to select station...AMP MENU Press to display the menu to select the TV channels. After pressing TV (e;), press the numeric buttons to operate the receiver. TUNING +/-

Operating Instructions (Large File - 20.21 MB)
Page 13
... AMP (6), then press NIGHT MODE to skip a disc when using a multi-disc changer. V DISC SKIP Press to activate the NIGHT MODE function .... Press to adjust the volume level of the VCR, satellite tuner, CD player or MD deck. - channel numbers of the selected input to analog signal without any adjustment (page 118). b)The tactile dot is attached...the TV. wj A.F.D. wl SLEEP Press to activate the sleep timer function and the duration which the receiver turns off the sound temporarily. Then use to control each component. X DISPLAY Press to select information ...
... AMP (6), then press NIGHT MODE to skip a disc when using a multi-disc changer. V DISC SKIP Press to activate the NIGHT MODE function .... Press to adjust the volume level of the VCR, satellite tuner, CD player or MD deck. - channel numbers of the selected input to analog signal without any adjustment (page 118). b)The tactile dot is attached...the TV. wj A.F.D. wl SLEEP Press to activate the sleep timer function and the duration which the receiver turns off the sound temporarily. Then use to control each component. X DISPLAY Press to select information ...

Operating Instructions (Large File - 20.21 MB)
Page 14
... press V/v/B/ b to enter the selection. Then press to select the menu item. G DMPORT Press to operate the component connected to turn a receiver on or off automatically (page 104). 14GB J MUTING Press to the DIGITAL MEDIA PORT adapter (page 51). M SLEEP Press to turn off the ...functions of the menu between SCREEN (to display the menu on the TV screen) and DSPL (to operate the receiver. Name Function E OPTIONS Press to operate the receiver. L DISPLAY Press to play back. H INPUT Press to select the input source SELECTOR to select information displayed in...
... press V/v/B/ b to enter the selection. Then press to select the menu item. G DMPORT Press to operate the component connected to turn a receiver on or off automatically (page 104). 14GB J MUTING Press to the DIGITAL MEDIA PORT adapter (page 51). M SLEEP Press to turn off the ...functions of the menu between SCREEN (to display the menu on the TV screen) and DSPL (to operate the receiver. Name Function E OPTIONS Press to operate the receiver. L DISPLAY Press to play back. H INPUT Press to select the input source SELECTOR to select information displayed in...
Operating Instructions (Large File - 20.21 MB)
Page 15
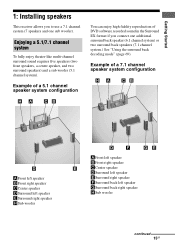
... right speaker FSurround back left speaker GSurround back right speaker HSub woofer continued 15GB Enjoying a 5.1/7.1 channel system To fully enjoy theater-like multi-channel surround sound requires five speakers (two front speakers, a center speaker, and two surround speakers) and a sub woofer (5.1 channel system). Getting Started 1: Installing speakers This receiver allows you connect one sub woofer).
... right speaker FSurround back left speaker GSurround back right speaker HSub woofer continued 15GB Enjoying a 5.1/7.1 channel system To fully enjoy theater-like multi-channel surround sound requires five speakers (two front speakers, a center speaker, and two surround speakers) and a sub woofer (5.1 channel system). Getting Started 1: Installing speakers This receiver allows you connect one sub woofer).
Operating Instructions (Large File - 20.21 MB)
Page 19
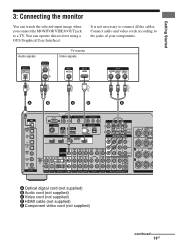
Audio signals TV monitor Video signals A B C D E A Optical digital cord (not supplied) B Audio cord (not supplied) C Video cord (not supplied) D HDMI cable (not supplied) E Component video cord (not supplied) continued 19GB It is not necessary to the jacks of your components. Connect audio and video cords according to connect all the cables. Getting Started 3: Connecting the monitor You can operate this receiver using a GUI (Graphical User Interface). You can watch the selected input image when you connect the MONITOR VIDEO OUT jack to a TV.
Audio signals TV monitor Video signals A B C D E A Optical digital cord (not supplied) B Audio cord (not supplied) C Video cord (not supplied) D HDMI cable (not supplied) E Component video cord (not supplied) continued 19GB It is not necessary to the jacks of your components. Connect audio and video cords according to connect all the cables. Getting Started 3: Connecting the monitor You can operate this receiver using a GUI (Graphical User Interface). You can watch the selected input image when you connect the MONITOR VIDEO OUT jack to a TV.


