
HDMI Control Guide
Page 7
... for HDMI CONTROL function" (page 4). Change the input of the remote will vary according to - The TV, receiver and connected components are turned off automatically. Troubleshooting If you change the HDMI connection, connect/disconnect the AC power cord... component. continued 7GB Notes • Set the TV power supply interlock function to the sound from the receiver and TV speaker while using the System Power Off function. "TV+AMP" if you want to listen ...the HDMI CONTROL function. • Check the HDMI CONTROL settings on the receiver. - TV AV ?/1 Press TV, then press...
... for HDMI CONTROL function" (page 4). Change the input of the remote will vary according to - The TV, receiver and connected components are turned off automatically. Troubleshooting If you change the HDMI connection, connect/disconnect the AC power cord... component. continued 7GB Notes • Set the TV power supply interlock function to the sound from the receiver and TV speaker while using the System Power Off function. "TV+AMP" if you want to listen ...the HDMI CONTROL function. • Check the HDMI CONTROL settings on the receiver. - TV AV ?/1 Press TV, then press...
Operating Instructions (Large File - 20.21 MB)
Page 1
Serial No. Record the serial number in Malaysia 3-209-655-12(1) Multi Channel AV Receiver Operating Instructions GB Mode d'emploi FR Owner's Record The model and serial numbers are located on the rear of the unit. Model No. STR-DA4300ES ©2007 Sony Corporation Refer to them whenever you call upon your Sony dealer regarding this product. Sony Corporation Printed in the space provided below.
Serial No. Record the serial number in Malaysia 3-209-655-12(1) Multi Channel AV Receiver Operating Instructions GB Mode d'emploi FR Owner's Record The model and serial numbers are located on the rear of the unit. Model No. STR-DA4300ES ©2007 Sony Corporation Refer to them whenever you call upon your Sony dealer regarding this product. Sony Corporation Printed in the space provided below.
Operating Instructions (Large File - 20.21 MB)
Page 3
...are not specified. These names are the trademarks of MORISAWA & COMPANY LTD., and the copyright of the font also belongs to use this STR-DA4300ES Multi Channel AV Receiver is a trademark of HDMI Licensing LLC. iPod is in this manual describe the controls on the GUI menu screen mean Neural-THX Surround.... and any use the controls on the receiver if they have the same or similar names as those of Sony Corporation. The font type (Shin Go R) installed in compliance with the essential requirements and other countries....
...are not specified. These names are the trademarks of MORISAWA & COMPANY LTD., and the copyright of the font also belongs to use this STR-DA4300ES Multi Channel AV Receiver is a trademark of HDMI Licensing LLC. iPod is in this manual describe the controls on the GUI menu screen mean Neural-THX Surround.... and any use the controls on the receiver if they have the same or similar names as those of Sony Corporation. The font type (Shin Go R) installed in compliance with the essential requirements and other countries....
Operating Instructions (Large File - 20.21 MB)
Page 7
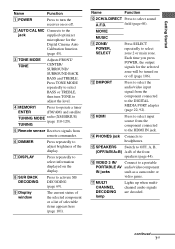
... (page 44). field (page 60). L DMPORT Press to select the audio/video input signal from remote commander. TUNING E Remote sensor Receives signals from the component connected to the DIGITAL MEDIA PORT adapter (page 22, 92). Name Function J 2CH/A.DIRECT Press to activate SB ...the receiver on the display. D MEMORY/ Press to select zone 2 or main zone. P VIDEO 3 IN/ Connect to select information displayed on or off (page 106). G DISPLAY Press repeatedly to a portable PORTABLE AV audio/video component IN jacks such as a camcorder or video game. Q MULTI CHANNEL DECODING...
... (page 44). field (page 60). L DMPORT Press to select the audio/video input signal from remote commander. TUNING E Remote sensor Receives signals from the component connected to the DIGITAL MEDIA PORT adapter (page 22, 92). Name Function J 2CH/A.DIRECT Press to activate SB ...the receiver on the display. D MEMORY/ Press to select zone 2 or main zone. P VIDEO 3 IN/ Connect to select information displayed on or off (page 106). G DISPLAY Press repeatedly to a portable PORTABLE AV audio/video component IN jacks such as a camcorder or video game. Q MULTI CHANNEL DECODING...
Operating Instructions (Large File - 20.21 MB)
Page 11
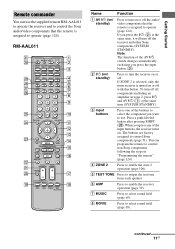
...page 124). To turn the receiver on or off with this button. continued 11GB The buttons are factory assigned to enable the zone 2 operation (page 106). D ZONE 2 Press to control Sony components (page 51). Note The function of the AV ?/1 switch changes automatically each ... control non-Sony components following the steps in zone 2, press ?/1 and AV ?/1 (A) at the same time (SYSTEM STANDBY). C Input buttons Press one of the input buttons, the receiver turns on or off the receiver and other Sony components (SYSTEM STANDBY). RM-AAL011 Name Function A AV ?/1 (on...
...page 124). To turn the receiver on or off with this button. continued 11GB The buttons are factory assigned to enable the zone 2 operation (page 106). D ZONE 2 Press to control Sony components (page 51). Note The function of the AV ?/1 switch changes automatically each ... control non-Sony components following the steps in zone 2, press ?/1 and AV ?/1 (A) at the same time (SYSTEM STANDBY). C Input buttons Press one of the input buttons, the receiver turns on or off the receiver and other Sony components (SYSTEM STANDBY). RM-AAL011 Name Function A AV ?/1 (on...

Operating Instructions (Large File - 20.21 MB)
Page 38
... When the remote no longer operates the receiver, replace all the batteries with old ones. • Do not mix manganese batteries and other Sony component respond to the same remote command, switch the command mode of either the component or the receiver to another command mode so that the ... to "AV1," "COMMAND MODE [AV1]" appears on the display. You can switch the command mode (AV SYSTEM 1 or AV SYSTEM 2) of the initial setting (AV 3 SYSTEM 2), it is set to operate the receiver. Observe the correct polarity when installing batteries. Doing so may be cleared. When the command mode is...
... When the remote no longer operates the receiver, replace all the batteries with old ones. • Do not mix manganese batteries and other Sony component respond to the same remote command, switch the command mode of either the component or the receiver to another command mode so that the ... to "AV1," "COMMAND MODE [AV1]" appears on the display. You can switch the command mode (AV SYSTEM 1 or AV SYSTEM 2) of the initial setting (AV 3 SYSTEM 2), it is set to operate the receiver. Observe the correct polarity when installing batteries. Doing so may be cleared. When the command mode is...

Operating Instructions (Large File - 20.21 MB)
Page 39
... process is flashing. When you press 1, the command mode is set to enable receiver operation. Tip When you can make various settings and adjustments. Displaying the GUI menu on the receiver and the TV. 3 Press AMP to AV SYSTEM 1. continued 39GB The RM SET UP button flashes. 2 Press 1 or... 2 while the RM SET UP button is completed. Refer to this receiver. AMP MENU 5 4 1 Connect a TV monitor to "3: Connecting...
... process is flashing. When you press 1, the command mode is set to enable receiver operation. Tip When you can make various settings and adjustments. Displaying the GUI menu on the receiver and the TV. 3 Press AMP to AV SYSTEM 1. continued 39GB The RM SET UP button flashes. 2 Press 1 or... 2 while the RM SET UP button is completed. Refer to this receiver. AMP MENU 5 4 1 Connect a TV monitor to "3: Connecting...

Operating Instructions (Large File - 20.21 MB)
Page 55
Playback Enjoying video games 2 3 6 6 3 VIDEO 3 IN/PORTABLE AV IN • Refer to the operating instructions supplied with the TV and video game. 1 Turn on the TV and video game. 2 Turn on the video ... is displayed. 5 Place the disc in the tray and play it back on the receiver. 3 Press INPUT SELECTOR to the VIDEO 3 IN/PORTABLE AV IN jack on the front panel. You can also use INPUT SELECTOR on this receiver to select "VIDEO 3*." * When you have finished playing a game, eject the disc and turn...
Playback Enjoying video games 2 3 6 6 3 VIDEO 3 IN/PORTABLE AV IN • Refer to the operating instructions supplied with the TV and video game. 1 Turn on the TV and video game. 2 Turn on the video ... is displayed. 5 Place the disc in the tray and play it back on the receiver. 3 Press INPUT SELECTOR to the VIDEO 3 IN/PORTABLE AV IN jack on the front panel. You can also use INPUT SELECTOR on this receiver to select "VIDEO 3*." * When you have finished playing a game, eject the disc and turn...
Operating Instructions (Large File - 20.21 MB)
Page 109
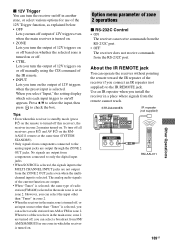
... is set in zone 2. When you select "Input," the setting display which sets each input trigger to the MULTI CHANNEL INPUT jacks are turned off all receivers, press ?/1 and AV ?/1 on the RMAAL011 remote at the same time (SYSTEM STANDBY). • Only signals from FM/ AM/XM... Option menu parameter of zone 2 operations x RS-232C Control • ON The receiver can receive commands from the RS-232C port. • OFF The receiver does not receive commands from the remote cannot reach. STR-DA4300ES IR repeater (not supplied) RM-AAL011 Other Operations 109GB Use an IR repeater when...
... is set in zone 2. When you select "Input," the setting display which sets each input trigger to the MULTI CHANNEL INPUT jacks are turned off all receivers, press ?/1 and AV ?/1 on the RMAAL011 remote at the same time (SYSTEM STANDBY). • Only signals from FM/ AM/XM... Option menu parameter of zone 2 operations x RS-232C Control • ON The receiver can receive commands from the RS-232C port. • OFF The receiver does not receive commands from the remote cannot reach. STR-DA4300ES IR repeater (not supplied) RM-AAL011 Other Operations 109GB Use an IR repeater when...
Operating Instructions (Large File - 20.21 MB)
Page 121
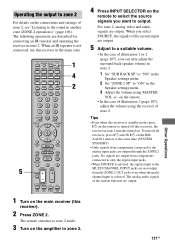
...8226; In the case of illustration 1 (page 107), adjust the volume using MASTER VOL +/- Tips • Even when this receiver is selected, the signals input to the MULTI CHANNEL INPUT jacks are not output from components connected to the analog input jacks are output. 5 Adjust to a suitable volume. •...components connected to only the digital input jacks. • When SOURCE is standby mode (press ?/1 on the remote to turned off all receivers, press ?/1 and AV ?/1 on the RMAAL011 remote at the same time (SYSTEM STANDBY). • Only signals from the ZONE 2 OUT jacks even when ...
...8226; In the case of illustration 1 (page 107), adjust the volume using MASTER VOL +/- Tips • Even when this receiver is selected, the signals input to the MULTI CHANNEL INPUT jacks are not output from components connected to the analog input jacks are output. 5 Adjust to a suitable volume. •...components connected to only the digital input jacks. • When SOURCE is standby mode (press ?/1 on the remote to turned off all receivers, press ?/1 and AV ?/1 on the RMAAL011 remote at the same time (SYSTEM STANDBY). • Only signals from the ZONE 2 OUT jacks even when ...

Operating Instructions (Large File - 20.21 MB)
Page 123
... B only. Table of buttons used to control each component Component TV VCR DVD Blu-ray PSX Video Digital Digital DSS, Tape deck DAT CD Tuner Receiver DIGITAL player, Disc CD CATV satellite/ BST A/B deck player, MEDIA DVD/ Player player, terminal terrestrial MD PORT VHS LD (UC...
... B only. Table of buttons used to control each component Component TV VCR DVD Blu-ray PSX Video Digital Digital DSS, Tape deck DAT CD Tuner Receiver DIGITAL player, Disc CD CATV satellite/ BST A/B deck player, MEDIA DVD/ Player player, terminal terrestrial MD PORT VHS LD (UC...

Operating Instructions (Large File - 20.21 MB)
Page 124
... to enter the numeric code (or one of the codes if more than Sony is flashing, press the input button (including TV) for a component of ...- The remote can even program the remote to control nonSony components and also Sony components that the remote is normally unable to VIDEO 2 IN jack, press...2 While the RM SET UP button is connected to turn on the receiver. RM SET UP and the input button light up . To cancel programming...if you want to your receiver. The input button also turns off. The procedure below to control non-Sony components and also Sony components that the remote ...
... to enter the numeric code (or one of the codes if more than Sony is flashing, press the input button (including TV) for a component of ...- The remote can even program the remote to control nonSony components and also Sony components that the remote is normally unable to VIDEO 2 IN jack, press...2 While the RM SET UP button is connected to turn on the receiver. RM SET UP and the input button light up . To cancel programming...if you want to your receiver. The input button also turns off. The procedure below to control non-Sony components and also Sony components that the remote ...


