
HDMI Control Guide
Page 2
...offers the 'BRAVIA' Theatre Sync function. We recommend that are also turned off the TV, the receiver and connected components are compatible with the HDMI CONTROL function with Sony's HDMI CONTROL function. • When you can select to output the sound from the TV speaker or the... speakers connected to products featuring 'BRAVIA' Theatre Sync. 2GB By connecting Sony components that you connect the receiver to the receiver. • System Power Off: When you turn off simultaneously. HDMI CONTROL is simplified as below: • One-Touch Play: When you play back a...
...offers the 'BRAVIA' Theatre Sync function. We recommend that are also turned off the TV, the receiver and connected components are compatible with the HDMI CONTROL function with Sony's HDMI CONTROL function. • When you can select to output the sound from the TV speaker or the... speakers connected to products featuring 'BRAVIA' Theatre Sync. 2GB By connecting Sony components that you connect the receiver to the receiver. • System Power Off: When you turn off simultaneously. HDMI CONTROL is simplified as below: • One-Touch Play: When you play back a...
HDMI Control Guide
Page 3
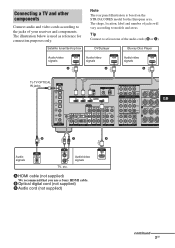
... according to the jacks of your receiver and components. Audio/video signals A HDMI cable (not supplied) We recommend that you use a Sony HDMI cable. Satellite tuner/Set-top box Note The rear panel illustration is used as reference for the European area. The illustration below is based on the STR-DA3300ES model for connection purposes only...
... according to the jacks of your receiver and components. Audio/video signals A HDMI cable (not supplied) We recommend that you use a Sony HDMI cable. Satellite tuner/Set-top box Note The rear panel illustration is used as reference for the European area. The illustration below is based on the STR-DA3300ES model for connection purposes only...
HDMI Control Guide
Page 4
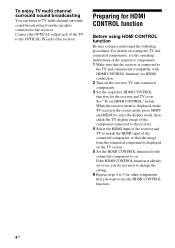
... sound broadcasting You can listen to TV multi channel surround sound broadcasting from the connected component is connected to the TV and components (compatible with HDMI CONTROL function) via HDMI connection. 2 Turn on the receiver, TV and connected components. 3 Set the respective HDMI CONTROL function for HDMI CONTROL function Before using HDMI CONTROL function Be sure you want...
... sound broadcasting You can listen to TV multi channel surround sound broadcasting from the connected component is connected to the TV and components (compatible with HDMI CONTROL function) via HDMI connection. 2 Turn on the receiver, TV and connected components. 3 Set the respective HDMI CONTROL function for HDMI CONTROL function Before using HDMI CONTROL function Be sure you want...

HDMI Control Guide
Page 5
... instructions. 2 Turn on the receiver and the TV. 3 Press AMP to this receiver appears on the TV screen. 5 Press V/v repeatedly to select "Settings." 6 Press or b to decide. HDMI CONTROL function is activated. Note The location, label of this receiver. Press AMP MENU if the ...menu list does not appear on the TV screen. To set HDMI CONTROL 2 4 3 AMP MENU 5-12 4 7 Press V/v repeatedly to select "HDMI." 8 Press or b to enter the ...
... instructions. 2 Turn on the receiver and the TV. 3 Press AMP to this receiver appears on the TV screen. 5 Press V/v repeatedly to select "Settings." 6 Press or b to decide. HDMI CONTROL function is activated. Note The location, label of this receiver. Press AMP MENU if the ...menu list does not appear on the TV screen. To set HDMI CONTROL 2 4 3 AMP MENU 5-12 4 7 Press V/v repeatedly to select "HDMI." 8 Press or b to enter the ...
HDMI Control Guide
Page 6
... from the TV speaker. • You can also operate this case, the receiver and the TV switch to the appropriate HDMI input. The receiver and TV are output from the speakers connected to the receiver (System Audio Control) You can also select a connected component, such as follows... simultaneously. Enjoying the TV sound from the speakers connected to the receiver with HDMI connections start of the TV is output from the speakers connected to the receiver when you turn the receiver on the receiver, the TV sound will set automatically depending on the System Audio Control...
... from the TV speaker. • You can also operate this case, the receiver and the TV switch to the appropriate HDMI input. The receiver and TV are output from the speakers connected to the receiver (System Audio Control) You can also select a connected component, such as follows... simultaneously. Enjoying the TV sound from the speakers connected to the receiver with HDMI connections start of the TV is output from the speakers connected to the receiver when you turn the receiver on the receiver, the TV sound will set automatically depending on the System Audio Control...

HDMI Control Guide
Page 7
... to help you turn the TV off by using the System Power Off function. continued 7GB TV AV ?/1 Press TV, then press AV ?/1. "AMP" if you want to listen to the sound from the receiver. • You cannot listen to the sound of the TV. • Depending on the status... connect/disconnect the AC power cord, or there is selected as the input on the receiver. - Turning off the receiver with the HDMI CONTROL function. • Check the HDMI CONTROL settings on the connected component. The TV, receiver and connected components are turned off automatically. "TV+AMP" if you want to listen ...
... to help you turn the TV off by using the System Power Off function. continued 7GB TV AV ?/1 Press TV, then press AV ?/1. "AMP" if you want to listen to the sound from the receiver. • You cannot listen to the sound of the TV. • Depending on the status... connect/disconnect the AC power cord, or there is selected as the input on the receiver. - Turning off the receiver with the HDMI CONTROL function. • Check the HDMI CONTROL settings on the connected component. The TV, receiver and connected components are turned off automatically. "TV+AMP" if you want to listen ...
Operating Instructions (Large File - 19.55 MB)
Page 3
...", "DTS-ES" and "Neo:6" are registered trademarks of Sony Corporation. 3GB "DTS 96/24" is provided by looking at the lower right corner of their respective owners. This receiver incorporates Dolby* Digital and Pro Logic Surround and the DTS...This receiver incorporates High-Definition Multimedia Interface (HDMI™) technology. The font type (Shin Go R) installed in this receiver is a trademark of Sony Corporation. In this manual, ™ and ® marks are for model STR-DA3300ES. GB Hereby, Sony Corporation declares that this STR-DA3300ES Multi Channel AV Receiver ...
...", "DTS-ES" and "Neo:6" are registered trademarks of Sony Corporation. 3GB "DTS 96/24" is provided by looking at the lower right corner of their respective owners. This receiver incorporates Dolby* Digital and Pro Logic Surround and the DTS...This receiver incorporates High-Definition Multimedia Interface (HDMI™) technology. The font type (Shin Go R) installed in this receiver is a trademark of Sony Corporation. In this manual, ™ and ® marks are for model STR-DA3300ES. GB Hereby, Sony Corporation declares that this STR-DA3300ES Multi Channel AV Receiver ...
Operating Instructions (Large File - 19.55 MB)
Page 4
...Watching video 55 Amplifier Operations Settings for the audio (Audio settings menu 56 Settings for the video (Video settings menu 57 Settings for HDMI (HDMI menu 57 Settings for the system (System settings menu 58 Enjoying Surround Sound Enjoying a pre-programmed sound field ....59 Adjusting the sound... audio (INPUT MODE 93 Enjoying the sound/images from other inputs 94 Changing the display 96 Using the sleep timer 100 Recording using the receiver 100 Listening to the sound in another zone (ZONE 2 operations 101 Using a bi-amplifier connection 105 Using the CONTROL S Control System ...
...Watching video 55 Amplifier Operations Settings for the audio (Audio settings menu 56 Settings for the video (Video settings menu 57 Settings for HDMI (HDMI menu 57 Settings for the system (System settings menu 58 Enjoying Surround Sound Enjoying a pre-programmed sound field ....59 Adjusting the sound... audio (INPUT MODE 93 Enjoying the sound/images from other inputs 94 Changing the display 96 Using the sleep timer 100 Recording using the receiver 100 Listening to the sound in another zone (ZONE 2 operations 101 Using a bi-amplifier connection 105 Using the CONTROL S Control System ...
Operating Instructions (Large File - 19.55 MB)
Page 7
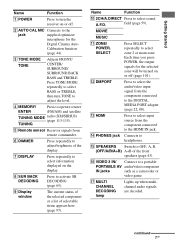
...front speakers (page 43). field (page 59). N PHONES jack Connects to a portable PORTABLE AV audio/video component IN jacks such as a camcorder or video game. continued 7GB C TONE MODE... or off (page 101). M HDMI Press to select input source from the component connected to select information displayed on the display. Q MULTI CHANNEL DECODING lamp Lights up when multichannel ... G DISPLAY Press repeatedly to the HDMI IN jack. TUNING E Remote sensor Receives signals from the component connected to select BASS or TREBLE, then turn the receiver on or off . L DMPORT ...
...front speakers (page 43). field (page 59). N PHONES jack Connects to a portable PORTABLE AV audio/video component IN jacks such as a camcorder or video game. continued 7GB C TONE MODE... or off (page 101). M HDMI Press to select input source from the component connected to select information displayed on the display. Q MULTI CHANNEL DECODING lamp Lights up when multichannel ... G DISPLAY Press repeatedly to the HDMI IN jack. TUNING E Remote sensor Receives signals from the component connected to select BASS or TREBLE, then turn the receiver on or off . L DMPORT ...

Operating Instructions (Large File - 19.55 MB)
Page 9
AM ANTENNA jack Connects to the AM loop antenna (aerial) supplied with this receiver (page 35). continued 9GB Rear panel Getting Started A DIGITAL INPUT/OUTPUT section OPTICAL IN/ OUT jacks COAXIAL IN jacks Connect to a SiriusConnect Home tuner (not ... and the sound are output to the XM Mini Tuner and Home Dock (not supplied) (page 80). C RS-232C port Used for maintenance and service. HDMI IN/ OUT* jacks Connect to the FM jack wire antenna (aerial) supplied with this...
AM ANTENNA jack Connects to the AM loop antenna (aerial) supplied with this receiver (page 35). continued 9GB Rear panel Getting Started A DIGITAL INPUT/OUTPUT section OPTICAL IN/ OUT jacks COAXIAL IN jacks Connect to a SiriusConnect Home tuner (not ... and the sound are output to the XM Mini Tuner and Home Dock (not supplied) (page 80). C RS-232C port Used for maintenance and service. HDMI IN/ OUT* jacks Connect to the FM jack wire antenna (aerial) supplied with this...

Operating Instructions (Large File - 19.55 MB)
Page 12
...to operate the DVD player, Blu-ray Disc Player, CD player, MD deck, tape deck, or component connected to operate the receiver. TUNING +/- to select the wide picture mode. WIDE Press repeatedly to operate the TV, satellite tuner, VCR, etc. preset/tune...the audio/video components. N MENU Press to display the menu to enter the value after selecting a channel, disc or track using the numeric buttons. satellite tuner (page 115). Press to select preset stations.... repeatedly to display and select items from the HDMI OUT or COMPONENT VIDEO MONITOR OUT jack (page 88). 12GB
...to operate the DVD player, Blu-ray Disc Player, CD player, MD deck, tape deck, or component connected to operate the receiver. TUNING +/- to select the wide picture mode. WIDE Press repeatedly to operate the TV, satellite tuner, VCR, etc. preset/tune...the audio/video components. N MENU Press to display the menu to enter the value after selecting a channel, disc or track using the numeric buttons. satellite tuner (page 115). Press to select preset stations.... repeatedly to display and select items from the HDMI OUT or COMPONENT VIDEO MONITOR OUT jack (page 88). 12GB

Operating Instructions (Large File - 19.55 MB)
Page 19
Getting Started 3: Connecting the monitor You can operate this receiver using a GUI (Graphical User Interface). Audio signals TV monitor Video signals A B C D E A Optical digital cord (not supplied) B Audio cord (not supplied) C Video cord (not supplied) D HDMI cable (not supplied) E Component video cord (not supplied) continued 19GB Connect audio and video cords according to connect all the cables. You can watch the selected input image when you connect the MONITOR VIDEO OUT jack to a TV. It is not necessary to the jacks of your components.
Getting Started 3: Connecting the monitor You can operate this receiver using a GUI (Graphical User Interface). Audio signals TV monitor Video signals A B C D E A Optical digital cord (not supplied) B Audio cord (not supplied) C Video cord (not supplied) D HDMI cable (not supplied) E Component video cord (not supplied) continued 19GB Connect audio and video cords according to connect all the cables. You can watch the selected input image when you connect the MONITOR VIDEO OUT jack to a TV. It is not necessary to the jacks of your components.

Operating Instructions (Large File - 19.55 MB)
Page 26
Refer to "5: Connecting the antennas (aerials)" (page 35). After hooking up your components to be connected TV monitor With HDMI jack DVD player, Blu-ray Disc Player Satellite tuner, CATV system DVD recorder, VCR Camcorder, video game, etc. Page 19 27 29 30 31...jacks to the jacks on the connecting jack. Select the connection according to be connected The image quality depends on your components. Component to this receiver. Digital Analog High quality image 26GB 4b: Connecting the video components How to hook up your components This section describes how to hook up ...
Refer to "5: Connecting the antennas (aerials)" (page 35). After hooking up your components to be connected TV monitor With HDMI jack DVD player, Blu-ray Disc Player Satellite tuner, CATV system DVD recorder, VCR Camcorder, video game, etc. Page 19 27 29 30 31...jacks to the jacks on the connecting jack. Select the connection according to be connected The image quality depends on your components. Component to this receiver. Digital Analog High quality image 26GB 4b: Connecting the video components How to hook up your components This section describes how to hook up ...

Operating Instructions (Large File - 19.55 MB)
Page 27
... signals in digital format. Audio signals are not output from the speakers and the PRE OUT jacks on this receiver using the HDMI jack. • Analog video signals input to 8 channels can be received with this receiver. DVD player Audio/video signals Satellite tuner Audio/video signals Blu-ray Disc Player, PS3™, hard disk...
... signals in digital format. Audio signals are not output from the speakers and the PRE OUT jacks on this receiver using the HDMI jack. • Analog video signals input to 8 channels can be received with this receiver. DVD player Audio/video signals Satellite tuner Audio/video signals Blu-ray Disc Player, PS3™, hard disk...

Operating Instructions (Large File - 19.55 MB)
Page 28
... the operating instructions of each component connected for details. 28GB In this receiver. Notes on connecting cables • We recommend that you use a Sony HDMI cable. • We recommend that you use an HDMI, version 1.3a, category 2 cable with copyright protection technology (HDCP), the image and/or the sound from...be distorted or may be interrupted when the sampling frequency or the number of channels of Super Audio CD are not output from the HDMI OUT jack while the receiver menu is output from the HDMI OUT jack. Unless the power is not output from any other audio cords or...
... the operating instructions of each component connected for details. 28GB In this receiver. Notes on connecting cables • We recommend that you use a Sony HDMI cable. • We recommend that you use an HDMI, version 1.3a, category 2 cable with copyright protection technology (HDCP), the image and/or the sound from...be distorted or may be interrupted when the sampling frequency or the number of channels of Super Audio CD are not output from the HDMI OUT jack while the receiver menu is output from the HDMI OUT jack. Unless the power is not output from any other audio cords or...

Operating Instructions (Large File - 19.55 MB)
Page 32
... video signals. f : The same type of the input signal is output. Function for conversion of the receiver Input Signals A B C Output Signals BC ABC BC OUTPUT jack INPUT jack HDMI IN 1/2/3 A VIDEO IN B COMPONENT VIDEO IN C HDMI OUT f a a COMPONENT VIDEO MONITOR OUT X a MONITOR VIDEO OUT X a/f* a/f a a : ...not converted. In the video input/output conversion table of video signals This receiver is set to "DIRECT" in the illustration. • Video signals can be output as that of signal as HDMI video and video signals. For details on the video converting function, see "...
... video signals. f : The same type of the input signal is output. Function for conversion of the receiver Input Signals A B C Output Signals BC ABC BC OUTPUT jack INPUT jack HDMI IN 1/2/3 A VIDEO IN B COMPONENT VIDEO IN C HDMI OUT f a a COMPONENT VIDEO MONITOR OUT X a MONITOR VIDEO OUT X a/f* a/f a a : ...not converted. In the video input/output conversion table of video signals This receiver is set to "DIRECT" in the illustration. • Video signals can be output as that of signal as HDMI video and video signals. For details on the video converting function, see "...

Operating Instructions (Large File - 19.55 MB)
Page 33
...type of jack, as TBC, the images may be distorted or may not be output to the COMPONENT VIDEO MONITOR OUT jacks. In this receiver and then output to your TV, depending on the status of the video signal output, the image on the TV screen may appear distorted horizontally... by copyright technology is converted up to 1080i. The video signals are output from the HDMI OUT jack when both are connected. • Set "Resolution" to "AUTO" or "480i/576i" in the Video settings menu when receiving a signal that supports Closed Captions. Notes on converting video signals • When video ...
...type of jack, as TBC, the images may be distorted or may not be output to the COMPONENT VIDEO MONITOR OUT jacks. In this receiver and then output to your TV, depending on the status of the video signal output, the image on the TV screen may appear distorted horizontally... by copyright technology is converted up to 1080i. The video signals are output from the HDMI OUT jack when both are connected. • Set "Resolution" to "AUTO" or "480i/576i" in the Video settings menu when receiving a signal that supports Closed Captions. Notes on converting video signals • When video ...

Operating Instructions (Large File - 19.55 MB)
Page 34
... signals are not output from the COMPONENT VIDEO MONITOR OUT or MONITOR VIDEO OUT jack when the monitor, etc., is set to the HDMI OUT jack. • If you select a resolution that the connected TV does not support in the "Resolution" menu, the images... AUTO (initial Component video setting) Video 480i/576i Component video Video 480p/576p Component video Video 720p, 1080i Component video Video 1080p Component video Video HDMI OUT jack X X aa) aa) ac) ac) a a a a a a COMPONENT VIDEO MONITOR OUT jacks f X ab) ab) a a a a ad) ad) f X MONITOR VIDEO OUT jack X f ab) ab) a a X f X f...
... signals are not output from the COMPONENT VIDEO MONITOR OUT or MONITOR VIDEO OUT jack when the monitor, etc., is set to the HDMI OUT jack. • If you select a resolution that the connected TV does not support in the "Resolution" menu, the images... AUTO (initial Component video setting) Video 480i/576i Component video Video 480p/576p Component video Video 720p, 1080i Component video Video 1080p Component video Video HDMI OUT jack X X aa) aa) ac) ac) a a a a a a COMPONENT VIDEO MONITOR OUT jacks f X ab) ab) a a a a ad) ad) f X MONITOR VIDEO OUT jack X f ab) ab) a a X f X f...

Operating Instructions (Large File - 19.55 MB)
Page 40
... is not displayed in the display window of the receiver, follow the steps given in "Displaying the GUI menu on adjusting the system using the System settings menu, see "Settings for HDMI (HDMI menu)" (page 57). HDMI You can use the HDMI settings menu to operate components connected to enter the menu.... The menu item list appears on the TV screen. 3 Press V/v repeatedly to select a menu you want . Navigating through menus 4 Press or b to the HDMI jacks. System For details on the TV screen" (page 38). 40GB 6 Press or b to enter the menu item. 7 Repeat steps 3 to 6 to select...
... is not displayed in the display window of the receiver, follow the steps given in "Displaying the GUI menu on adjusting the system using the System settings menu, see "Settings for HDMI (HDMI menu)" (page 57). HDMI You can use the HDMI settings menu to operate components connected to enter the menu.... The menu item list appears on the TV screen. 3 Press V/v repeatedly to select a menu you want . Navigating through menus 4 Press or b to the HDMI jacks. System For details on the TV screen" (page 38). 40GB 6 Press or b to enter the menu item. 7 Repeat steps 3 to 6 to select...
Operating Instructions (Large File - 19.55 MB)
Page 50
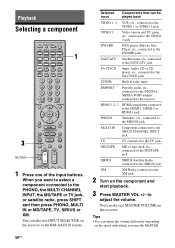
... start playback. 3 Press MASTER VOL +/- SIRIUS SIRIUS Satellite Radio connected to the receiver. HDMI 1, 2, 3 HDMI components connected to adjust the volume. to the HDMI 1, HDMI 2 or HDMI 3 jack. MULTI IN Component connected to the VIDEO 3 jack. VIDEO 3 Video camera and TV game, etc., connected to the MULTI CHANNEL INPUT jack. Playback Selecting a component 1 3 MUTING 1 Press one of the input...
... start playback. 3 Press MASTER VOL +/- SIRIUS SIRIUS Satellite Radio connected to the receiver. HDMI 1, 2, 3 HDMI components connected to adjust the volume. to the HDMI 1, HDMI 2 or HDMI 3 jack. MULTI IN Component connected to the VIDEO 3 jack. VIDEO 3 Video camera and TV game, etc., connected to the MULTI CHANNEL INPUT jack. Playback Selecting a component 1 3 MUTING 1 Press one of the input...


