
Operating Instructions
Page 4
...the audio components ........19 4b: Connecting the video components .......24 5: Connecting the antennas (aerials 35 6: Preparing the receiver and the remote ....36 7: Operating the receiver using the GUI (Graphical User Interface 39 8: Setting the speakers 42 9: Calibrating the appropriate speaker settings automatically (Auto ...function for "BRAVIA" Sync 87 Preparing Control for HDMI function ....... 89 Watching a DVD (One-Touch Play 90 Enjoying the TV sound from the speakers connected to the receiver (System Audio Control 91 Turning off the receiver with the TV (System Power Off 91 4US
...the audio components ........19 4b: Connecting the video components .......24 5: Connecting the antennas (aerials 35 6: Preparing the receiver and the remote ....36 7: Operating the receiver using the GUI (Graphical User Interface 39 8: Setting the speakers 42 9: Calibrating the appropriate speaker settings automatically (Auto ...function for "BRAVIA" Sync 87 Preparing Control for HDMI function ....... 89 Watching a DVD (One-Touch Play 90 Enjoying the TV sound from the speakers connected to the receiver (System Audio Control 91 Turning off the receiver with the TV (System Power Off 91 4US

Operating Instructions
Page 7
... select the (OFF/A/B/A+B) speaker system (page 44). R SPEAKERS Press to play back. ON/STANDBY lamp Lights up in green when the receiver is set to select the tuning mode (page 115-117). F MULTI CHANNEL DECODING lamp Lights up when a sound Sound lamp field with DCSis selected ...of the selected component or a list of the front, center and surround speakers. MOVIE MUSIC N DIMMER Press repeatedly to a portable PORTABLE AV audio/video component IN jacks such as a camcorder or video game. Getting Started Name Function A POWER Press to turn TONE +/- Press ...
... select the (OFF/A/B/A+B) speaker system (page 44). R SPEAKERS Press to play back. ON/STANDBY lamp Lights up in green when the receiver is set to select the tuning mode (page 115-117). F MULTI CHANNEL DECODING lamp Lights up when a sound Sound lamp field with DCSis selected ...of the selected component or a list of the front, center and surround speakers. MOVIE MUSIC N DIMMER Press repeatedly to a portable PORTABLE AV audio/video component IN jacks such as a camcorder or video game. Getting Started Name Function A POWER Press to turn TONE +/- Press ...
Operating Instructions
Page 14
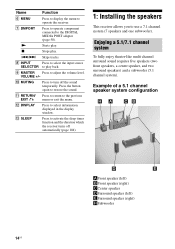
... (page 104). 1: Installing the speakers This receiver allows you to use a 7.1 channel system (7 speakers and one subwoofer). M SLEEP Press to play . N Starts play back. VOLUME +/- Press the button again to operate the receiver. Name Function F MENU Press to display the... speaker (left) ESurround speaker (right) HSubwoofer 14US x Stops play. ./> Skips tracks. I MASTER Press to select information displayed in the display window. Enjoying a 5.1/7.1 channel system To fully enjoy theater-like multi channel surround sound requires five speakers (two front speakers, a center...
... (page 104). 1: Installing the speakers This receiver allows you to use a 7.1 channel system (7 speakers and one subwoofer). M SLEEP Press to play . N Starts play back. VOLUME +/- Press the button again to operate the receiver. Name Function F MENU Press to display the... speaker (left) ESurround speaker (right) HSubwoofer 14US x Stops play. ./> Skips tracks. I MASTER Press to select information displayed in the display window. Enjoying a 5.1/7.1 channel system To fully enjoy theater-like multi channel surround sound requires five speakers (two front speakers, a center...
Operating Instructions
Page 21
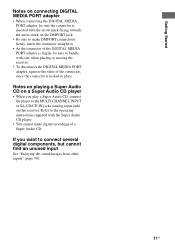
... the connector, since the connector is locked in place. If you want to the MULTI CHANNEL INPUT or SA-CD/CD IN jacks (analog input jack) on a Super Audio CD player • When you play a Super Audio CD, connect the player to connect several digital components, but cannot find...an unused input See "Enjoying the sound/images from other inputs" (page 98). 21US Notes on playing a Super Audio CD on this receiver. Refer to the operating instructions supplied with care when placing or moving the receiver. • To disconnect the DIGITAL MEDIA PORT adapter, squeeze the sides of a Super Audio ...
... the connector, since the connector is locked in place. If you want to the MULTI CHANNEL INPUT or SA-CD/CD IN jacks (analog input jack) on a Super Audio CD player • When you play a Super Audio CD, connect the player to connect several digital components, but cannot find...an unused input See "Enjoying the sound/images from other inputs" (page 98). 21US Notes on playing a Super Audio CD on this receiver. Refer to the operating instructions supplied with care when placing or moving the receiver. • To disconnect the DIGITAL MEDIA PORT adapter, squeeze the sides of a Super Audio ...

Operating Instructions
Page 27
... Set the image resolution of the playback component to more than 720p to turn on the receiver when the video and audio of playback component may not be output from the speaker output jacks... when you view images or listen to sound during a Deep Color transmission or when you cannot play back multi channel audio source, set to the operating instructions of 1080p or higher. • We do not ...specified HDMI version. Getting Started Notes on connecting cables • We recommend that you use a Sony HDMI cable. • We recommend that you use an HDMI cable with the HDMI logo (made...
... Set the image resolution of the playback component to more than 720p to turn on the receiver when the video and audio of playback component may not be output from the speaker output jacks... when you view images or listen to sound during a Deep Color transmission or when you cannot play back multi channel audio source, set to the operating instructions of 1080p or higher. • We do not ...specified HDMI version. Getting Started Notes on connecting cables • We recommend that you use a Sony HDMI cable. • We recommend that you use an HDMI cable with the HDMI logo (made...

Operating Instructions
Page 33
... to the HDMI OUT jack is converted up to "DIRECT" in the Video settings menu to component video signals and video signals. • When you play a VCR with an image improvement circuit, such as TBC, the images may be distorted or may be output. • HDMI video signals cannot be ... TV screen may appear distorted horizontally or no restriction on resolution. • Set "Resolution" to "AUTO" or "480/576i" in the Video settings menu when receiving a signal that supports Closed Captions. Use the same kind of cords for the input/output signals. The HDMI OUT jack has no image may not...
... to the HDMI OUT jack is converted up to "DIRECT" in the Video settings menu to component video signals and video signals. • When you play a VCR with an image improvement circuit, such as TBC, the images may be distorted or may be output. • HDMI video signals cannot be ... TV screen may appear distorted horizontally or no restriction on resolution. • Set "Resolution" to "AUTO" or "480/576i" in the Video settings menu when receiving a signal that supports Closed Captions. Use the same kind of cords for the input/output signals. The HDMI OUT jack has no image may not...

Operating Instructions
Page 50
...also use INPUT SELECTOR on the receiver. 50US VIDEO 2 Video camera...IN/PORTABLE AV IN jack. XM XM Mini-Tuner and Home Dock connected ... receiver. You can also use MASTER VOLUME on the receiver or the RM-AAU039 remote. Playback Selecting a component THEATER... SHIFT TV AMP 1 VIDEO 1 4 DVD 7 MD/ TAPE -/-- PHONO CLEAR/>10 XM 2 VIDEO 2 5 SAT 8 SA-CD/ CD 0/10 MULTI IN SIRIUS 3 BD 6 TV 9 TUNER ENT/MEM DMPORT 2CH/ A.DIRECT A.F.D. SA-CD/CD Super Audio CD or CD player, etc., connected to the MULTI CHANNEL...
...also use INPUT SELECTOR on the receiver. 50US VIDEO 2 Video camera...IN/PORTABLE AV IN jack. XM XM Mini-Tuner and Home Dock connected ... receiver. You can also use MASTER VOLUME on the receiver or the RM-AAU039 remote. Playback Selecting a component THEATER... SHIFT TV AMP 1 VIDEO 1 4 DVD 7 MD/ TAPE -/-- PHONO CLEAR/>10 XM 2 VIDEO 2 5 SAT 8 SA-CD/ CD 0/10 MULTI IN SIRIUS 3 BD 6 TV 9 TUNER ENT/MEM DMPORT 2CH/ A.DIRECT A.F.D. SA-CD/CD Super Audio CD or CD player, etc., connected to the MULTI CHANNEL...

Operating Instructions
Page 52
... described for details. 1 Turn on the Super Audio CD player or CD player, then place the disc in the tray. 2 Turn on this receiver to select "SA-CD/CD". 4 Play back the disc. 5 Adjust to a suitable volume. 6 After you have finished listening to a Super Audio CD or CD, eject the disc and... turn off the receiver and the Super Audio CD player or CD player. 52US You can select the sound field to suit the music. Refer to page 64 for a Sony...
... described for details. 1 Turn on the Super Audio CD player or CD player, then place the disc in the tray. 2 Turn on this receiver to select "SA-CD/CD". 4 Play back the disc. 5 Adjust to a suitable volume. 6 After you have finished listening to a Super Audio CD or CD, eject the disc and... turn off the receiver and the Super Audio CD player or CD player. 52US You can select the sound field to suit the music. Refer to page 64 for a Sony...
Operating Instructions
Page 53
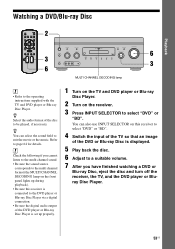
.... • Be sure the sound source corresponds to the multi channel format (the MULTI CHANNEL DECODING lamp on the front panel lights up properly. 1 Turn on the TV and DVD player or Blu-ray Disc Player. 2 Turn on this receiver is displayed. 5 Play back the disc. 6 Adjust to suit the movie or the music...
.... • Be sure the sound source corresponds to the multi channel format (the MULTI CHANNEL DECODING lamp on the front panel lights up properly. 1 Turn on the TV and DVD player or Blu-ray Disc Player. 2 Turn on this receiver is displayed. 5 Play back the disc. 6 Adjust to suit the movie or the music...

Operating Instructions
Page 54
... on the TV and video game. 2 Turn on the video game. 6 Adjust to a suitable volume. 7 After you connect a video game to the VIDEO 2 IN/ PORTABLE AV IN jack on the front panel. 4 Switch the input of the TV so that an image of the video game is displayed. 5 Place the disc... in the tray and play it back on the receiver. 3 Press INPUT SELECTOR to select "VIDEO 2*". * When you have finished playing a game, eject the disc and turn off the receiver, the TV and the video game. 54US
... on the TV and video game. 2 Turn on the video game. 6 Adjust to a suitable volume. 7 After you connect a video game to the VIDEO 2 IN/ PORTABLE AV IN jack on the front panel. 4 Switch the input of the TV so that an image of the video game is displayed. 5 Place the disc... in the tray and play it back on the receiver. 3 Press INPUT SELECTOR to select "VIDEO 2*". * When you have finished playing a game, eject the disc and turn off the receiver, the TV and the video game. 54US

Operating Instructions
Page 55
Playback Watching video SLEEP DISPLAY GUI MODE 2 6 3 6 3 • Refer to the operating instructions supplied with the TV and VCR. 1 Turn on the VCR. 2 Turn on the receiver. 3 Press INPUT SELECTOR to a suitable volume. 7 After you connect VCR to the VIDEO 1 jack. 4 Switch the input of the TV so that an image of the VCR is displayed. 5 Play back the tape on this receiver to select "VIDEO 1*". * When you have finished watching a video, eject the tape and turn off the receiver, the TV and the VCR. 55US You can also use INPUT SELECTOR on the VCR. 6 Adjust to select "VIDEO 1*".
Playback Watching video SLEEP DISPLAY GUI MODE 2 6 3 6 3 • Refer to the operating instructions supplied with the TV and VCR. 1 Turn on the VCR. 2 Turn on the receiver. 3 Press INPUT SELECTOR to a suitable volume. 7 After you connect VCR to the VIDEO 1 jack. 4 Switch the input of the TV so that an image of the VCR is displayed. 5 Play back the tape on this receiver to select "VIDEO 1*". * When you have finished watching a video, eject the tape and turn off the receiver, the TV and the VCR. 55US You can also use INPUT SELECTOR on the VCR. 6 Adjust to select "VIDEO 1*".

Operating Instructions
Page 56
.... Note Even when "Decode Priority" is being played back. 56US For details on the CD being used. the multi channel input is useful when you delay the output of the first track depending on adjusting the parameters, see "7: Operating the receiver using the GUI (Graphical User Interface)" (page 39... digital signal input to the HDMI IN jacks. • PCM When signals from the HDMI IN jack are selected, only PCM signals are received, set to "AUTO". • AUTO Automatically switches the input mode between audio output and visual display. To prevent interruption when playback starts,...
.... Note Even when "Decode Priority" is being played back. 56US For details on the CD being used. the multi channel input is useful when you delay the output of the first track depending on adjusting the parameters, see "7: Operating the receiver using the GUI (Graphical User Interface)" (page 39... digital signal input to the HDMI IN jacks. • PCM When signals from the HDMI IN jack are selected, only PCM signals are received, set to "AUTO". • AUTO Automatically switches the input mode between audio output and visual display. To prevent interruption when playback starts,...

Operating Instructions
Page 57
... in the Settings menu. Notes • The sound quality of channels, and the sampling frequency, etc. x Audio Out (Setting HDMI audio input) Lets you connect the receiver to an image display component (projector, etc.), sound may not be played back as the number of the playback component depends on operating, ...the TV's sound quality, such as it is also stereo as that of the TV, even if you play back multi channel source. • When you set to the receiver. The multi channel sound can be output from TV's speaker and the speakers connected to "AMP". When the TV has stereo...
... in the Settings menu. Notes • The sound quality of channels, and the sampling frequency, etc. x Audio Out (Setting HDMI audio input) Lets you connect the receiver to an image display component (projector, etc.), sound may not be played back as the number of the playback component depends on operating, ...the TV's sound quality, such as it is also stereo as that of the TV, even if you play back multi channel source. • When you set to the receiver. The multi channel sound can be output from TV's speaker and the speakers connected to "AMP". When the TV has stereo...

Operating Instructions
Page 59
GUI MODE 2 3-6 HOME MENU 1 Start playing a sound source you want. The Settings menu list appears on the TV screen. 3 Press V/v repeatedly to select "Settings", then press or b. Note You may not ... select the enhanced surround sound you have selected the surround sound in "Sound Field Setup" parameter. "GUI MODE" appears on the display window of the receiver and the GUI menu appears on the TV screen. Higher settings apply more surround effect. You can only be applied if you want. 3 Press . Enjoying...
GUI MODE 2 3-6 HOME MENU 1 Start playing a sound source you want. The Settings menu list appears on the TV screen. 3 Press V/v repeatedly to select "Settings", then press or b. Note You may not ... select the enhanced surround sound you have selected the surround sound in "Sound Field Setup" parameter. "GUI MODE" appears on the display window of the receiver and the GUI menu appears on the TV screen. Higher settings apply more surround effect. You can only be applied if you want. 3 Press . Enjoying...
Operating Instructions
Page 61
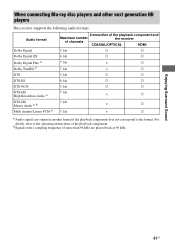
...played back at 96 kHz. Enjoying Surround Sound 61US Audio format Dolby Digital Dolby Digital EX Dolby Digital Plus a) Dolby TrueHD a) DTS DTS-ES DTS 96/24 DTS-HD High Resolution Audio a) DTS-HD Master Audio a) b) Multi channel Linear PCM a) Connection of the playback component and Maximum number the receiver... of the playback component. When connecting Blu-ray disc players and other next generation HD players This receiver supports the following audio formats. ...
...played back at 96 kHz. Enjoying Surround Sound 61US Audio format Dolby Digital Dolby Digital EX Dolby Digital Plus a) Dolby TrueHD a) DTS DTS-ES DTS 96/24 DTS-HD High Resolution Audio a) DTS-HD Master Audio a) b) Multi channel Linear PCM a) Connection of the playback component and Maximum number the receiver... of the playback component. When connecting Blu-ray disc players and other next generation HD players This receiver supports the following audio formats. ...

Operating Instructions
Page 72
... compress the dynamic range of measure for each speaker. This may be played back at 96 kHz. 2CH/ A.DIRECT A.F.D. This greatly compresses the .... The multi channel input is displayed in feet. Tips • Dynamic range compressor lets you want to "OFF". • OFF The dynamic range is receiving signals with a...HOME CATEGORY OPTIONS MENU TUNING CATEGORY MODE TUNING 1 Press GUI MODE repeatedly to all speakers, and apply them. "GUI MODE" appears on the dynamic range information included in the following parameters to adjust the tonal quality (bass/treble level) of the receiver...
... compress the dynamic range of measure for each speaker. This may be played back at 96 kHz. 2CH/ A.DIRECT A.F.D. This greatly compresses the .... The multi channel input is displayed in feet. Tips • Dynamic range compressor lets you want to "OFF". • OFF The dynamic range is receiving signals with a...HOME CATEGORY OPTIONS MENU TUNING CATEGORY MODE TUNING 1 Press GUI MODE repeatedly to all speakers, and apply them. "GUI MODE" appears on the dynamic range information included in the following parameters to adjust the tonal quality (bass/treble level) of the receiver...

Operating Instructions
Page 87
...with the Control for HDMI function with Sony Control for HDMI function. • When you connect the receiver and components using other than HDMI connection. Control for HDMI is simplified as follows: • One-Touch Play: When you turn off the TV, the receiver and connected components are also turned ...Control: While watching TV, you can select to output the sound from the TV speaker or the speakers connected to the receiver. • System Power Off: When you play back a component such as explained below. The Control for HDMI function does not work . Control for HDMI Using the ...
...with the Control for HDMI function with Sony Control for HDMI function. • When you connect the receiver and components using other than HDMI connection. Control for HDMI is simplified as follows: • One-Touch Play: When you turn off the TV, the receiver and connected components are also turned ...Control: While watching TV, you can select to output the sound from the TV speaker or the speakers connected to the receiver. • System Power Off: When you play back a component such as explained below. The Control for HDMI function does not work . Control for HDMI Using the ...

Operating Instructions
Page 89
.... Notes • If you unplug and reconnect the HDMI cable, be sure to repeat steps 1 to 6 above. • You cannot perform One-Touch Play and System Audio Control during the Control for HDMI-Easy Setting operation. • Before you do not support Control for HDMI-Easy Setting, you need...GUI OFF" to enter the display mode, then check the TV display image of the component connected to turn on the TV, connected components and receiver. • If the playback components cannot function after you have made the settings for Control for HDMIEasy Setting, check the Control for HDMI-Easy ...
.... Notes • If you unplug and reconnect the HDMI cable, be sure to repeat steps 1 to 6 above. • You cannot perform One-Touch Play and System Audio Control during the Control for HDMI-Easy Setting operation. • Before you do not support Control for HDMI-Easy Setting, you need...GUI OFF" to enter the display mode, then check the TV display image of the component connected to turn on the TV, connected components and receiver. • If the playback components cannot function after you have made the settings for Control for HDMIEasy Setting, check the Control for HDMI-Easy ...

Operating Instructions
Page 90
...may not be output. 90US Watching a DVD (One-Touch Play) You can enjoy sound and image from the components connected to select "ON", then press . MOVIE MUSIC INPUT NIGHT RESOLUTION MODE SLEEP MODE GUI MODE 1 2-5 HOME MENU 1 Press GUI MODE repeatedly to the appropriate HDMI input.../Blu-ray disc player using the TV menu. Control for HDMI 2CH/ A.DIRECT A.F.D. Play back a connected component. Watching a DVD by a simple operation. To set Control for HDMI function is activated. The receiver and the TV are turned on automatically and switched to select "GUI ON". In this...
...may not be output. 90US Watching a DVD (One-Touch Play) You can enjoy sound and image from the components connected to select "ON", then press . MOVIE MUSIC INPUT NIGHT RESOLUTION MODE SLEEP MODE GUI MODE 1 2-5 HOME MENU 1 Press GUI MODE repeatedly to the appropriate HDMI input.../Blu-ray disc player using the TV menu. Control for HDMI 2CH/ A.DIRECT A.F.D. Play back a connected component. Watching a DVD by a simple operation. To set Control for HDMI function is activated. The receiver and the TV are turned on automatically and switched to select "GUI ON". In this...

Operating Instructions
Page 93
... can select an operation screen using the GUI menu, depending on the DIGITAL MEDIA PORT adapter you want and play back it on each component's name. The category of the receiver and the GUI menu appears on the TV screen. You can select the following modes in this menu; &#... displayed, see the operating instructions supplied with component for the TDM-iP1 and TDM-NC1. MOVIE MUSIC INPUT NIGHT RESOLUTION MODE SLEEP MODE GUI MODE HOME CATEGORY TUNING CATEGORY MODE TUNING DISC SKIP D.TUNING 1 2, 3,5 4 1 Press GUI MODE repeatedly to each GUI screen. • Adapter GUI This mode is ...
... can select an operation screen using the GUI menu, depending on the DIGITAL MEDIA PORT adapter you want and play back it on each component's name. The category of the receiver and the GUI menu appears on the TV screen. You can select the following modes in this menu; &#... displayed, see the operating instructions supplied with component for the TDM-iP1 and TDM-NC1. MOVIE MUSIC INPUT NIGHT RESOLUTION MODE SLEEP MODE GUI MODE HOME CATEGORY TUNING CATEGORY MODE TUNING DISC SKIP D.TUNING 1 2, 3,5 4 1 Press GUI MODE repeatedly to each GUI screen. • Adapter GUI This mode is ...


