
Operating Guide
Page 1
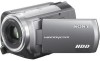
Printed on how to use the camcorder. © 2006 Sony Corporation Printed in Japan Also refer to "Handycam Handbook" (PDF) By referring to "Handycam Handbook" (PDF) contained in the supplied CD-ROM, you can be found at our Customer Support Website. 2-887-134-11(1) Operating Guide DCR-SR40/SR60/SR80 US Additional information on this product and answers to frequently asked questions can find more detailed information on 100% recycled paper using VOC (Volatile Organic Compound)-free vegetable oil based ink.
Printed on how to use the camcorder. © 2006 Sony Corporation Printed in Japan Also refer to "Handycam Handbook" (PDF) By referring to "Handycam Handbook" (PDF) contained in the supplied CD-ROM, you can be found at our Customer Support Website. 2-887-134-11(1) Operating Guide DCR-SR40/SR60/SR80 US Additional information on this product and answers to frequently asked questions can find more detailed information on 100% recycled paper using VOC (Volatile Organic Compound)-free vegetable oil based ink.
Operating Guide
Page 4
... related matters only. Regulatory Information Declaration of Conformity Trade Name: SONY Model No.: DCR-SR60, DCR-SR80 Responsible Party: Sony Electronics Inc. Declaration of Conformity Trade Name: SONY Model No.: DCR-SR40 Responsible Party: Sony Electronics Inc. Notes DCR-SR40, DCR-SR60 and DCR-SR80 are located on the bottom. CAUTION You are recyclable. ...-ION BATTERIES Lithium-Ion batteries are cautioned that may result. ACSerial No. CAUTION Replace the battery with the Handycam Station Model DCRAC162 and AC Adaptor Model AC-L25A/L25B. Refer to operate this product.
... related matters only. Regulatory Information Declaration of Conformity Trade Name: SONY Model No.: DCR-SR60, DCR-SR80 Responsible Party: Sony Electronics Inc. Declaration of Conformity Trade Name: SONY Model No.: DCR-SR40 Responsible Party: Sony Electronics Inc. Notes DCR-SR40, DCR-SR60 and DCR-SR80 are located on the bottom. CAUTION You are recyclable. ...-ION BATTERIES Lithium-Ion batteries are cautioned that may result. ACSerial No. CAUTION Replace the battery with the Handycam Station Model DCRAC162 and AC Adaptor Model AC-L25A/L25B. Refer to operate this product.
Operating Guide
Page 6
...is not possible due to "Handycam Handbook" (PDF). 6 You cannot dub copyright protected software on disposal/transfer • If you perform [HDD FORMAT]* or formatting the camcorder, you may not delete data from being damaged, save your camcorder • The hard disk of the camcorder. When a drop occurs, or... scenes may damage the hard disk drive of the camcorder. • TV color systems differ depending on the LCD screen (p.29). In case of this manual are based on the model DCR-SR80. • The on the operating system of the camcorder, it using your recorded ...
...is not possible due to "Handycam Handbook" (PDF). 6 You cannot dub copyright protected software on disposal/transfer • If you perform [HDD FORMAT]* or formatting the camcorder, you may not delete data from being damaged, save your camcorder • The hard disk of the camcorder. When a drop occurs, or... scenes may damage the hard disk drive of the camcorder. • TV color systems differ depending on the LCD screen (p.29). In case of this manual are based on the model DCR-SR80. • The on the operating system of the camcorder, it using your recorded ...
Operating Guide
Page 8
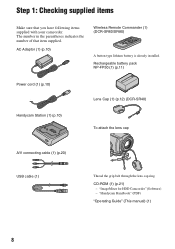
... cable (1) (p.20) USB cable (1) Thread the grip belt through the lens cap ring. AC Adaptor (1) (p.10) Wireless Remote Commander (1) (DCR-SR60/SR80) A button-type lithium battery is already installed. "ImageMixer for HDD Camcorder" (Software) - "Handycam Handbook" (PDF) "Operating Guide" (This manual) (1) 8 CD-ROM (1) (p.21) - The number in the parentheses indicates the number of that...
... cable (1) (p.20) USB cable (1) Thread the grip belt through the lens cap ring. AC Adaptor (1) (p.10) Wireless Remote Commander (1) (DCR-SR60/SR80) A button-type lithium battery is already installed. "ImageMixer for HDD Camcorder" (Software) - "Handycam Handbook" (PDF) "Operating Guide" (This manual) (1) 8 CD-ROM (1) (p.21) - The number in the parentheses indicates the number of that...
Operating Guide
Page 9
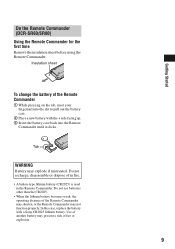
... the + side facing up. 3 Insert the battery case back into the Remote Commander until it clicks. Getting Started On the Remote Commander (DCR-SR60/SR80) Using the Remote Commander for the first time Remove the insulation sheet before using the Remote Commander. Use of the Remote Commander 1 While... pressing on the tab, inset your fingernail into the slit to pull out the battery case. 2 Place a new battery with a Sony CR2025 lithium battery. Do not recharge, disassemble or dispose of the Remote Commander may shorten, or the Remote Commander may not function properly. Do ...
... the + side facing up. 3 Insert the battery case back into the Remote Commander until it clicks. Getting Started On the Remote Commander (DCR-SR60/SR80) Using the Remote Commander for the first time Remove the insulation sheet before using the Remote Commander. Use of the Remote Commander 1 While... pressing on the tab, inset your fingernail into the slit to pull out the battery case. 2 Place a new battery with a Sony CR2025 lithium battery. Do not recharge, disassemble or dispose of the Remote Commander may shorten, or the Remote Commander may not function properly. Do ...
Operating Guide
Page 11
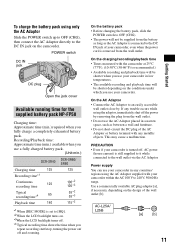
Recording/Playback time: Approximate time (min.) available when you use a fully charged battery pack. (Unit:min.) DCR-SR40 DCR-SR60/ SR80 Charging time 125 Recording time*1 Continuous 125 recording time Typical recording time*4 65 Playback time 140 125 100*2 105*3 55*2 55*3 115*2 *1 ...the wall outlet via the AC Adaptor. AC-L25A/ L25B [a] [b] 11 Getting Started On the charging/recording/playback time • Times measured with your camcorder within the AC 100 V to 240 V, 50/60 Hz range. On the battery pack • Before changing the battery pack, slide the POWER switch...
Recording/Playback time: Approximate time (min.) available when you use a fully charged battery pack. (Unit:min.) DCR-SR40 DCR-SR60/ SR80 Charging time 125 Recording time*1 Continuous 125 recording time Typical recording time*4 65 Playback time 140 125 100*2 105*3 55*2 55*3 115*2 *1 ...the wall outlet via the AC Adaptor. AC-L25A/ L25B [a] [b] 11 Getting Started On the charging/recording/playback time • Times measured with your camcorder within the AC 100 V to 240 V, 50/60 Hz range. On the battery pack • Before changing the battery pack, slide the POWER switch...
Operating Guide
Page 13
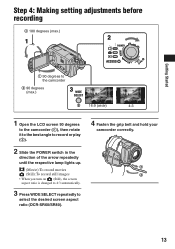
Step 4: Making setting adjustments before recording 2 180 degrees (max.) 1 2 Getting Started 1 90 degrees to the camcorder 2 90 degrees (max.) 3 16:9 (wide) 4:3 1 Open the LCD screen 90 degrees to the camcorder (1), then rotate it to the best angle to record or play (2). 2 Slide the POWER switch in the direction of the arrow repeatedly until... • When you turn on (Still), the screen aspect ratio is changed to 4:3 automatically. 3 Press WIDE SELECT repeatedly to select the desired screen aspect ratio (DCR-SR60/SR80). 4 Fasten the grip belt and hold your camcorder correctly. 13
Step 4: Making setting adjustments before recording 2 180 degrees (max.) 1 2 Getting Started 1 90 degrees to the camcorder 2 90 degrees (max.) 3 16:9 (wide) 4:3 1 Open the LCD screen 90 degrees to the camcorder (1), then rotate it to the best angle to record or play (2). 2 Slide the POWER switch in the direction of the arrow repeatedly until... • When you turn on (Still), the screen aspect ratio is changed to 4:3 automatically. 3 Press WIDE SELECT repeatedly to select the desired screen aspect ratio (DCR-SR60/SR80). 4 Fasten the grip belt and hold your camcorder correctly. 13
Operating Guide
Page 14
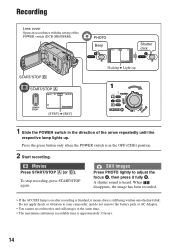
...Shutter click P-MENU Flashing b Lights up . Movies Press START/STOP A (or B). Still Images Press PHOTO lightly to your camcorder, and do not remove the battery pack or AC Adaptor. • You cannot record movies and still images at the same ... the respective lamp lights up 1 1 Slide the POWER switch in accordance with the setting of the POWER switch (DCR-SR60/SR80). When disappears, the image has been recorded. • If the ACCESS lamp is on after recording is ... then press it means data is still being written onto the hard disk. To stop recording, press START/STOP again.
...Shutter click P-MENU Flashing b Lights up . Movies Press START/STOP A (or B). Still Images Press PHOTO lightly to your camcorder, and do not remove the battery pack or AC Adaptor. • You cannot record movies and still images at the same ... the respective lamp lights up 1 1 Slide the POWER switch in accordance with the setting of the POWER switch (DCR-SR60/SR80). When disappears, the image has been recorded. • If the ACCESS lamp is on after recording is ... then press it means data is still being written onto the hard disk. To stop recording, press START/STOP again.
Operating Guide
Page 16
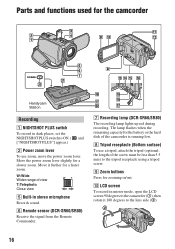
...hard disk of the camcorder is running low. 8 Tripod receptacle (Bottom surface) To use zoom, move the power zoom lever. LCD screen To record in mirror mode, open the LCD screen 90 degrees to the camcorder (1), then rotate it further for a faster zoom. Parts and functions used for the camcorder Handycam... Wider range of view T:Telephoto Close view 5 Built-in stereo microphone Records sound. 6 Remote sensor (DCR-SR60/SR80) Receive the signal from the Remote Commander. 7 Recording lamp (DCR-SR60/SR80) The recording lamp lights up red during recording. Move it 180 degrees to the lens side (2)....
...hard disk of the camcorder is running low. 8 Tripod receptacle (Bottom surface) To use zoom, move the power zoom lever. LCD screen To record in mirror mode, open the LCD screen 90 degrees to the camcorder (1), then rotate it further for a faster zoom. Parts and functions used for the camcorder Handycam... Wider range of view T:Telephoto Close view 5 Built-in stereo microphone Records sound. 6 Remote sensor (DCR-SR60/SR80) Receive the signal from the Remote Commander. 7 Recording lamp (DCR-SR60/SR80) The recording lamp lights up red during recording. Move it 180 degrees to the lens side (2)....

Operating Guide
Page 17
...on the LCD screen. 3 Touch the portion you want to the instructions on the camcorder. To cancel the back light function, press BACK LIGHT again. During Easy Handycam operation, you may not use the camcorder with W (Wide angle)/T (Telephoto). qh EASY button Refer to magnify. 2 Magnify... Connect with the A/V connecting cable. A frame appears on your camcorder to other optional accessories. w; qg DISP/BATT INFO button You can be automatically operated. Connecting to the shoulder belt hook. ql REMOTE jack (DCR-SR60/SR80) Connect other devices qj qk ql ....... qj DC IN jack...
...on the LCD screen. 3 Touch the portion you want to the instructions on the camcorder. To cancel the back light function, press BACK LIGHT again. During Easy Handycam operation, you may not use the camcorder with W (Wide angle)/T (Telephoto). qh EASY button Refer to magnify. 2 Magnify... Connect with the A/V connecting cable. A frame appears on your camcorder to other optional accessories. w; qg DISP/BATT INFO button You can be automatically operated. Connecting to the shoulder belt hook. ql REMOTE jack (DCR-SR60/SR80) Connect other devices qj qk ql ....... qj DC IN jack...
Operating Guide
Page 18
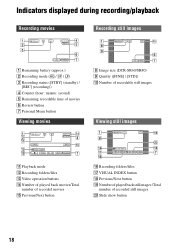
... INDEX button qk Previous/Next button ql Number of played back still images /Total number of recorded movies qg Previous/Next button P-MENU 8 Image size (DCR-SR60/SR80) 9 Quality ([FINE] / [STD]) q; Slide show button 18
... INDEX button qk Previous/Next button ql Number of played back still images /Total number of recorded movies qg Previous/Next button P-MENU 8 Image size (DCR-SR60/SR80) 9 Quality ([FINE] / [STD]) q; Slide show button 18
Operating Guide
Page 26
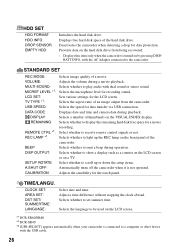
...the LCD screen or on the LCD screen. *1 DCR-SR60/SR80 *2 DCR-SR40 *3 [USB SELECT] appears automatically when your camcorder is connected to a computer or other device with the AC Adaptor connected to the camcorder. DISP OUTPUT: Selects whether to display the remaining hard disk free space for recording sound. CLOCK SET: AREA SET... for a movie recording. SETUP ROTATE: Select whether to light up or down the setup items. A.SHUT OFF: Automatically turns off the camcorder when it is turned on the hard disk drive from the camcorder. STANDARD SET REC MODE: Selects image quality of the...
...the LCD screen or on the LCD screen. *1 DCR-SR60/SR80 *2 DCR-SR40 *3 [USB SELECT] appears automatically when your camcorder is connected to a computer or other device with the AC Adaptor connected to the camcorder. DISP OUTPUT: Selects whether to display the remaining hard disk free space for recording sound. CLOCK SET: AREA SET... for a movie recording. SETUP ROTATE: Select whether to light up or down the setup items. A.SHUT OFF: Automatically turns off the camcorder when it is turned on the hard disk drive from the camcorder. STANDARD SET REC MODE: Selects image quality of the...
Operating Guide
Page 31
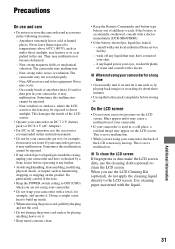
... V (battery pack) or DC 8.4 V (AC Adaptor). • For DC or AC operation, use the accessories recommended in your camcorder with a doctor immediately (DCR-SR60/SR80). • If the battery electrolytic liquid has leaked, - Blurs appear and it . • Keep metal contacts clean. •...example, and operate it . This damages the inside the casing, unplug your camcorder and have contacted your eyes, wash with a doctor. Sometimes this instruction manual. • Do not let your local authorized Sony service facility. - Be particularly careful of water and consult with plenty of...
... V (battery pack) or DC 8.4 V (AC Adaptor). • For DC or AC operation, use the accessories recommended in your camcorder with a doctor immediately (DCR-SR60/SR80). • If the battery electrolytic liquid has leaked, - Blurs appear and it . • Keep metal contacts clean. •...example, and operate it . This damages the inside the casing, unplug your camcorder and have contacted your eyes, wash with a doctor. Sometimes this instruction manual. • Do not let your local authorized Sony service facility. - Be particularly careful of water and consult with plenty of...
Operating Guide
Page 33
...INDOOR] (3 200 K), [OUTDOOR] (5 800 K) Minimum illumination DCR-SR40 5 lx (lux) (F1.8) 0 lx (lux) (in the NightShot plus function) DCR-SR60/SR80 7 lx (lux) (F1.8) 0 lx (lux) (in this format can have additional information such as your camcorder's setting information at the time of which is a file ... Movie MPEG2-PS Still image Exif *1 Ver.2.2 Recording/playback time DCR-SR40/SR60 HQ:Approx. 440 min. SP: Approx. 1 300 min. Specifications System Video compression format MPEG2/JPEG (Still images) Hard Disk DCR-SR40/SR60 30 GB DCR-SR80 60 GB When measuring media capacity, 1GB equals 1 billion ...
...INDOOR] (3 200 K), [OUTDOOR] (5 800 K) Minimum illumination DCR-SR40 5 lx (lux) (F1.8) 0 lx (lux) (in the NightShot plus function) DCR-SR60/SR80 7 lx (lux) (F1.8) 0 lx (lux) (in this format can have additional information such as your camcorder's setting information at the time of which is a file ... Movie MPEG2-PS Still image Exif *1 Ver.2.2 Recording/playback time DCR-SR40/SR60 HQ:Approx. 440 min. SP: Approx. 1 300 min. Specifications System Video compression format MPEG2/JPEG (Still images) Hard Disk DCR-SR40/SR60 30 GB DCR-SR80 60 GB When measuring media capacity, 1GB equals 1 billion ...
Operating Guide
Page 34
...kilohms)), Input impedance more than 47 kΩ (kilohms), Output impedance less than 2.2 kΩ (kilohms) USB jack mini-B Handycam Station Input/Output connectors DCRA-C162 (DCR-SR40) Audio/Video output 10 pin connector Video signal: 1 Vp-p, 75 Ω (ohms), unbalanced Luminance signal: 1 Vp-p,...16:9) Total number of pixels 123 200 (560 × 220) General Power requirements 7.2 V (battery pack) 8.4 V (AC Adaptor) Average power consumption DCR-SR40 2.2 W DCR-SR60/SR80 2.8 W Operating temperature 0°C to + 40°C (32°F to 104°F) Storage temperature -20°C to + 60°C ...
...kilohms)), Input impedance more than 47 kΩ (kilohms), Output impedance less than 2.2 kΩ (kilohms) USB jack mini-B Handycam Station Input/Output connectors DCRA-C162 (DCR-SR40) Audio/Video output 10 pin connector Video signal: 1 Vp-p, 75 Ω (ohms), unbalanced Luminance signal: 1 Vp-p,...16:9) Total number of pixels 123 200 (560 × 220) General Power requirements 7.2 V (battery pack) 8.4 V (AC Adaptor) Average power consumption DCR-SR40 2.2 W DCR-SR60/SR80 2.8 W Operating temperature 0°C to + 40°C (32°F to 104°F) Storage temperature -20°C to + 60°C ...
Handycam Handbook
Page 1
Handycam Handbook DCR-SR40/SR60/SR80 2-698-880-11(1) Enjoying with your Hard Disk 13 Drive Handycam Getting Started 16 Easy Handycam 27 Recording /Playback 32 Using the Setup items 47 Editing images 66 Dubbing, Printing 70 Performing with a computer 77 Troubleshooting 101 Additional Information 117 Glossary, Index 124 © 2006 Sony Corporation
Handycam Handbook DCR-SR40/SR60/SR80 2-698-880-11(1) Enjoying with your Hard Disk 13 Drive Handycam Getting Started 16 Easy Handycam 27 Recording /Playback 32 Using the Setup items 47 Editing images 66 Dubbing, Printing 70 Performing with a computer 77 Troubleshooting 101 Additional Information 117 Glossary, Index 124 © 2006 Sony Corporation

Handycam Handbook
Page 5
... authority to the following two conditions: (1) This device may call: Sony Customer Information Center 1-800222-SONY (7669). Regulatory Information Declaration of Conformity Trade Name: SONY Model No.: DCR-SR60, DCR-SR80 Responsible Party: Sony Electronics Inc. Operation is subject to operate this device must accept any...only. Address: 16530 Via Esprillo, San Diego, CA 92127 U.S.A Telephone number: 858-942-2230 This device complies with the Handycam Station Model DCRAC162 and AC Adaptor Model AC-L25A/L25B. Record the serial number in the U.S.A. For more information regarding this...
... authority to the following two conditions: (1) This device may call: Sony Customer Information Center 1-800222-SONY (7669). Regulatory Information Declaration of Conformity Trade Name: SONY Model No.: DCR-SR60, DCR-SR80 Responsible Party: Sony Electronics Inc. Operation is subject to operate this device must accept any...only. Address: 16530 Via Esprillo, San Diego, CA 92127 U.S.A Telephone number: 858-942-2230 This device complies with the Handycam Station Model DCRAC162 and AC Adaptor Model AC-L25A/L25B. Record the serial number in the U.S.A. For more information regarding this...

Handycam Handbook
Page 7
...the Carl Zeiss lens Your camcorder is equipped with a Carl Zeiss lens, which was developed jointly by Carl Zeiss, in each local language are used on this Handbook are based on the model DCR-SR80. • The on-screen displays in Germany, and Sony Corporation, and produces superior images...of light from what you need a NTSC system-based TV. • Television programs, films, video tapes, and other DCR-SR40/ SR60/SR80. The number value indicates the amount of the camcorder. • TV color systems differ depending on the countries/regions. Notes on the Setup items, LCD screen and lens...
...the Carl Zeiss lens Your camcorder is equipped with a Carl Zeiss lens, which was developed jointly by Carl Zeiss, in each local language are used on this Handbook are based on the model DCR-SR80. • The on-screen displays in Germany, and Sony Corporation, and produces superior images...of light from what you need a NTSC system-based TV. • Television programs, films, video tapes, and other DCR-SR40/ SR60/SR80. The number value indicates the amount of the camcorder. • TV color systems differ depending on the countries/regions. Notes on the Setup items, LCD screen and lens...
Handycam Handbook
Page 9
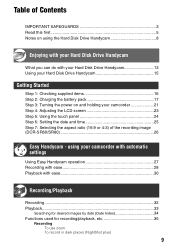
... 9 using the Hard Disk Drive Handycam 8 Enjoying with your Hard Disk Drive Handycam What you can do with your Hard Disk Drive Handycam 13 Using your Hard Disk Drive Handycam 15 Getting Started Step 1: Checking supplied items 16 Step 2: Charging the battery pack 17 Step 3: Turning the power on using your camcorder 21 Step 4: Adjusting... the LCD screen 23 Step 5: Using the touch panel 24 Step 6: Setting the date and time 25 Step 7: Selecting the aspect ratio (16:9 or 4:3) of the recording image (DCR-SR60/SR80 26 Easy Handycam -
... 9 using the Hard Disk Drive Handycam 8 Enjoying with your Hard Disk Drive Handycam What you can do with your Hard Disk Drive Handycam 13 Using your Hard Disk Drive Handycam 15 Getting Started Step 1: Checking supplied items 16 Step 2: Charging the battery pack 17 Step 3: Turning the power on using your camcorder 21 Step 4: Adjusting... the LCD screen 23 Step 5: Using the touch panel 24 Step 6: Setting the date and time 25 Step 7: Selecting the aspect ratio (16:9 or 4:3) of the recording image (DCR-SR60/SR80 26 Easy Handycam -
Handycam Handbook
Page 10
...check available free hard disk space To turn off the operation confirmation beep To initialize the settings (Reset) Other part names and functions Checking/Deleting the last scene (Review/Review deleting 38 Indicators displayed during recording/playback 39 Remote Commander (DCR-SR60/SR80 41 ...camcorder to the recording conditions (EXPOSURE/WHITE BAL./STEADYSHOT, etc.) STILL SET 56 Settings for still images (BURST/QUALITY/IMAGE SIZE, etc.) PICT.APPLI 57 Special effects on images or additional functions on recording/playback (PICT.EFFECT/D.EFFECT, etc.) HDD SET 58 Settings for the hard disk...
...check available free hard disk space To turn off the operation confirmation beep To initialize the settings (Reset) Other part names and functions Checking/Deleting the last scene (Review/Review deleting 38 Indicators displayed during recording/playback 39 Remote Commander (DCR-SR60/SR80 41 ...camcorder to the recording conditions (EXPOSURE/WHITE BAL./STEADYSHOT, etc.) STILL SET 56 Settings for still images (BURST/QUALITY/IMAGE SIZE, etc.) PICT.APPLI 57 Special effects on images or additional functions on recording/playback (PICT.EFFECT/D.EFFECT, etc.) HDD SET 58 Settings for the hard disk...


