
Handycam® Handbook
Page 19
... few seconds until disappears. The recorded image will not be affected by the setting. Getting Started Step 4: Preparing for recording Opening the lens cover manually (DCR-SR42/SR62/ SR82) Slide the lens cover switch to open or adjust the LCD panel. This is convenient during playback operations. •... close the lens cover. • For DCR-SR200/SR300, the lens cover opens and closes automatically. z Tips • If you open the LCD panel 90 degrees to the camcorder, then rotate it to the best angle to the (max.) camcorder To turn on the LCD frame accidentally when you open...
... few seconds until disappears. The recorded image will not be affected by the setting. Getting Started Step 4: Preparing for recording Opening the lens cover manually (DCR-SR42/SR62/ SR82) Slide the lens cover switch to open or adjust the LCD panel. This is convenient during playback operations. •... close the lens cover. • For DCR-SR200/SR300, the lens cover opens and closes automatically. z Tips • If you open the LCD panel 90 degrees to the camcorder, then rotate it to the best angle to the (max.) camcorder To turn on the LCD frame accidentally when you open...

Handycam® Handbook
Page 28
... functions use Color Slow Shutter function (p. 70). 28 Open the LCD panel 90 degrees to the camcorder (1), then rotate it 180 degrees to the original colors, use infrared light. To record an image...8226; Do not use the NightShot and Super NightShot functions in bright places. DCR-SR200/SR300: NIGHT SHOT OFF ON Adjusting the exposure for backlit subjects To adjust the exposure for...fingers or other objects, and remove the conversion lens (optional). • Adjust the focus manually ([FOCUS], p. 67) when it is hard to display .. z Tips • A mirror-image of the movies DCR-SR42: ...
... functions use Color Slow Shutter function (p. 70). 28 Open the LCD panel 90 degrees to the camcorder (1), then rotate it 180 degrees to the original colors, use infrared light. To record an image...8226; Do not use the NightShot and Super NightShot functions in bright places. DCR-SR200/SR300: NIGHT SHOT OFF ON Adjusting the exposure for backlit subjects To adjust the exposure for...fingers or other objects, and remove the conversion lens (optional). • Adjust the focus manually ([FOCUS], p. 67) when it is hard to display .. z Tips • A mirror-image of the movies DCR-SR42: ...
Handycam® Handbook
Page 35
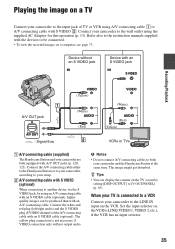
...manuals supplied with the devices to be produced than with S VIDEO (optional) When connecting to another device via the S VIDEO jack, by setting [DISP OUTPUT] to the LINE IN input on the VCR. Connect the A/V connecting cable either to the Handycam Station or to your camcorder, according to your camcorder...(Yellow) (White) AUDIO (Red) VIDEO (White) AUDIO (Red) (Yellow) VCRs or TVs 1 A/V connecting cable (supplied) The Handycam Station and your camcorder are both your camcorder to LINE (VIDEO 1, VIDEO 2, etc.), if the VCR has an input selector. 35 z Tips • You can be connected....
...manuals supplied with the devices to be produced than with S VIDEO (optional) When connecting to another device via the S VIDEO jack, by setting [DISP OUTPUT] to the LINE IN input on the VCR. Connect the A/V connecting cable either to the Handycam Station or to your camcorder, according to your camcorder...(Yellow) (White) AUDIO (Red) VIDEO (White) AUDIO (Red) (Yellow) VCRs or TVs 1 A/V connecting cable (supplied) The Handycam Station and your camcorder are both your camcorder to LINE (VIDEO 1, VIDEO 2, etc.), if the VCR has an input selector. 35 z Tips • You can be connected....
Handycam® Handbook
Page 36
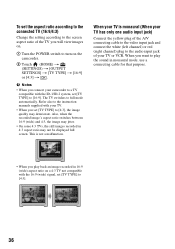
.... 1 Turn the POWER switch to [4:3]. 36 This is monaural (When your TV or VCR. When your TV is not a malfunction. Refer also to the instruction manuals supplied with the ID-1/ID-2 system, set [TV TYPE] to full mode automatically. When you want to play the sound in monaural mode, use a connecting...the white (left channel) or red (right channel) plug to [4:3], the image quality may not be displayed full screen. b Notes • When you connect your camcorder to a TV compatible with your TV. • When you set [TV TYPE] to the audio input jack of your TV has only one audio input...
.... 1 Turn the POWER switch to [4:3]. 36 This is monaural (When your TV or VCR. When your TV is not a malfunction. Refer also to the instruction manuals supplied with the ID-1/ID-2 system, set [TV TYPE] to full mode automatically. When you want to play the sound in monaural mode, use a connecting...the white (left channel) or red (right channel) plug to [4:3], the image quality may not be displayed full screen. b Notes • When you connect your camcorder to a TV compatible with your TV. • When you set [TV TYPE] to the audio input jack of your TV has only one audio input...

Handycam® Handbook
Page 45
...) VIDEO A/V OUT jack A/V OUT : Video/Signal flow (White) AUDIO (Red) (White) AUDIO (Red) (Yellow) VCRs or DVD/ HDD recorders A A/V connecting cable (supplied) The Handycam Station and your camcorder to the wall outlet using an A/V connecting cable with A/V OUT jacks (p. 120, 121). The yellow plug connection is performed via the S VIDEO jack, by... audio input jack on your setup. b Notes • To hide the screen indicators (such as VCRs or DVD/HDD recorders. Refer also to the instruction manuals supplied with an A/V connecting cable.
...) VIDEO A/V OUT jack A/V OUT : Video/Signal flow (White) AUDIO (Red) (White) AUDIO (Red) (Yellow) VCRs or DVD/ HDD recorders A A/V connecting cable (supplied) The Handycam Station and your camcorder to the wall outlet using an A/V connecting cable with A/V OUT jacks (p. 120, 121). The yellow plug connection is performed via the S VIDEO jack, by... audio input jack on your setup. b Notes • To hide the screen indicators (such as VCRs or DVD/HDD recorders. Refer also to the instruction manuals supplied with an A/V connecting cable.

Handycam® Handbook
Page 46
... playback on the recording device. Connecting your camcorder to the printer 1 Connect the Handycam Station to the wall outlet using the supplied USB cable. 46 Connect your camcorder to the input jacks of the Handycam Station to the instruction manuals supplied with S VIDEO (optional) 2. Refer... to the printer using the supplied AC Adaptor. 2 Set the camcorder onto the Handycam Station securely, then turn the POWER...
... playback on the recording device. Connecting your camcorder to the printer 1 Connect the Handycam Station to the wall outlet using the supplied USB cable. 46 Connect your camcorder to the input jacks of the Handycam Station to the instruction manuals supplied with S VIDEO (optional) 2. Refer... to the printer using the supplied AC Adaptor. 2 Set the camcorder onto the Handycam Station securely, then turn the POWER...

Handycam® Handbook
Page 47
... hold the image on the LCD screen to be printed. Editing [USB SELECT] appears on the screen automatically. 4 Touch [ PRINT] (hard disk) or [ PRINT] ("Memory Stick Duo") depending on the media of the image to step 3. 3 Touch [EXEC] t [YES] ... is complete, (PictBridge connecting) appears on the image selection screen. b Notes • Refer also to the instruction manual of [ PRINT] • If the printer stops working, disconnect the USB cable, turn the printer off and on... compatible. To remove the "Memory Stick Duo" from your camcorder from the Handycam Station or the printer -
... hold the image on the LCD screen to be printed. Editing [USB SELECT] appears on the screen automatically. 4 Touch [ PRINT] (hard disk) or [ PRINT] ("Memory Stick Duo") depending on the media of the image to step 3. 3 Touch [EXEC] t [YES] ... is complete, (PictBridge connecting) appears on the image selection screen. b Notes • Refer also to the instruction manual of [ PRINT] • If the printer stops working, disconnect the USB cable, turn the printer off and on... compatible. To remove the "Memory Stick Duo" from your camcorder from the Handycam Station or the printer -
Handycam® Handbook
Page 48
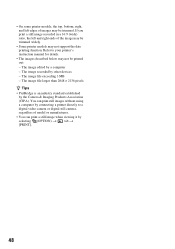
... widely. • Some printer models may not be trimmed. You can print still images without using a computer by connecting a printer directly to your printer's instruction manual for details. • The images described below may not support the date printing function. tab t 48
... widely. • Some printer models may not be trimmed. You can print still images without using a computer by connecting a printer directly to your printer's instruction manual for details. • The images described below may not support the date printing function. tab t 48

Handycam® Handbook
Page 54
REC MODE You can select the aspect ratio according to the TV connected. B 4:3 Records images to the instruction manuals supplied with your fingers or other objects. • Remove the conversion lens (optional). • The maximum shooting distance using either the NightShot plus/ NightShot (p. 27) ... HQ SP LP Recordable time 14 hours 40 min. 21 hours 40 min. 41 hours 50 min. How to [ON] (the default setting). DCR-SR200/SR300: Recording mode HQ SP LP Recordable time 9 hours 30 min. 14 hours 30 min. 28 hours b Notes • If you can select a recording mode to...
REC MODE You can select the aspect ratio according to the TV connected. B 4:3 Records images to the instruction manuals supplied with your fingers or other objects. • Remove the conversion lens (optional). • The maximum shooting distance using either the NightShot plus/ NightShot (p. 27) ... HQ SP LP Recordable time 14 hours 40 min. 21 hours 40 min. 41 hours 50 min. How to [ON] (the default setting). DCR-SR200/SR300: Recording mode HQ SP LP Recordable time 9 hours 30 min. 14 hours 30 min. 28 hours b Notes • If you can select a recording mode to...

Handycam® Handbook
Page 63
... can select the language to set (HOME MENU) t page 52 (OPTION MENU) t page 65 CLOCK SET See page 17. Refer also to the instruction manuals supplied with the ID-1/ID-2 system, set [TV TYPE] to set clock and language) Touch 1, then 2. DISP OUTPUT B LCD PANEL Shows displays such ... on the screen, touch v/V to a TV compatible with your native tongue among the options. 63 Set your local area using v/V when using your camcorder to change this setting without stopping the clock. LANGUAGE SET You can adjust a time difference without stopping the clock. The TV switches to move the...
... can select the language to set (HOME MENU) t page 52 (OPTION MENU) t page 65 CLOCK SET See page 17. Refer also to the instruction manuals supplied with the ID-1/ID-2 system, set [TV TYPE] to set clock and language) Touch 1, then 2. DISP OUTPUT B LCD PANEL Shows displays such ... on the screen, touch v/V to a TV compatible with your native tongue among the options. 63 Set your local area using v/V when using your camcorder to change this setting without stopping the clock. LANGUAGE SET You can adjust a time difference without stopping the clock. The TV switches to move the...

Handycam® Handbook
Page 67
...: down to about 38 cm (15 in.) DCR-SR200: down to about 37 cm (14 5/8 in.) DCR-SR300: down to about 2 5/8 feet) for wide angle and about 80 cm (about 45 cm (17 3/4 in ...out clearer. Functions set in the OPTION MENU Customizing your camcorder Items you can set only on the OPTION MENU will not be displayed correctly if you set to [MANUAL]. When you are marked with B. To adjust the focus... automatically, touch [AUTO] t [END] in .) 67 When you set [SPOT FOCUS], [FOCUS] is dark and hard to adjust focus) appears ...
...: down to about 38 cm (15 in.) DCR-SR200: down to about 37 cm (14 5/8 in.) DCR-SR300: down to about 2 5/8 feet) for wide angle and about 80 cm (about 45 cm (17 3/4 in ...out clearer. Functions set in the OPTION MENU Customizing your camcorder Items you can set only on the OPTION MENU will not be displayed correctly if you set to [MANUAL]. When you are marked with B. To adjust the focus... automatically, touch [AUTO] t [END] in .) 67 When you set [SPOT FOCUS], [FOCUS] is dark and hard to adjust focus) appears ...
Handycam® Handbook
Page 68
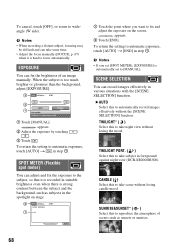
...screen. SPOT METER (Flexible spot meter) You can take some time. • Adjust the focus manually ([FOCUS], p. 67) when it is recorded in suitable brightness even when there is hard to fix and adjust the exposure on stage. 1 Touch the point where you set to take night...t [END] in various situations with the [SCENE SELECTION] function. TWILIGHT PORT. ( ) Select this to [MANUAL]. To cancel, touch [OFF], or zoom to take subject in foreground against night view (DCR-SR200/SR300). When the subject is automatically set [SPOT METER], [EXPOSURE] is too much brighter or gloomier than the...
...screen. SPOT METER (Flexible spot meter) You can take some time. • Adjust the focus manually ([FOCUS], p. 67) when it is recorded in suitable brightness even when there is hard to fix and adjust the exposure on stage. 1 Touch the point where you set to take night...t [END] in various situations with the [SCENE SELECTION] function. TWILIGHT PORT. ( ) Select this to [MANUAL]. To cancel, touch [OFF], or zoom to take subject in foreground against night view (DCR-SR200/SR300). When the subject is automatically set [SPOT METER], [EXPOSURE] is too much brighter or gloomier than the...

Handycam® Handbook
Page 70
... If you changed the battery pack, or moved your fingers or other objects. • Remove the conversion lens (optional). • Adjust the focus manually ([FOCUS], p. 67) when it is available for better color balance adjustment. • If you change the [WHITE BAL.] settings, the [SCENE SELECTION... NIGHTSHOT] to [ON] while the NIGHTSHOT switch (p. 27) is hard to focus automatically. • The shutter speed of your camcorder outdoors during white balance setting with [AUTO] for about 10 seconds for DCR-SR200/SR300 only. NIGHTSHOT PLS] in the memory, the indicator stops flashing. ...
... If you changed the battery pack, or moved your fingers or other objects. • Remove the conversion lens (optional). • Adjust the focus manually ([FOCUS], p. 67) when it is available for better color balance adjustment. • If you change the [WHITE BAL.] settings, the [SCENE SELECTION... NIGHTSHOT] to [ON] while the NIGHTSHOT switch (p. 27) is hard to focus automatically. • The shutter speed of your camcorder outdoors during white balance setting with [AUTO] for about 10 seconds for DCR-SR200/SR300 only. NIGHTSHOT PLS] in the memory, the indicator stops flashing. ...

Handycam® Handbook
Page 71
... SELF-TIMER You can record a transition with your fingers or other objects. • Remove the conversion lens (optional). • Adjust the focus manually ([FOCUS], p. 67) when it is set to images. PASTEL Images appear as a pale pastel drawing. Select [LOW] when you want to ...recording sound. MICREF LEVEL You can add special effects to focus automatically. • The shutter speed of your camcorder LOW ( ) Records surround sound faithfully. Press PHOTO when [SELF-TIMER] is hard to an image during fading out) mode, then touch . 2 Press START/STOP. FADER You can record...
... SELF-TIMER You can record a transition with your fingers or other objects. • Remove the conversion lens (optional). • Adjust the focus manually ([FOCUS], p. 67) when it is set to images. PASTEL Images appear as a pale pastel drawing. Select [LOW] when you want to ...recording sound. MICREF LEVEL You can add special effects to focus automatically. • The shutter speed of your camcorder LOW ( ) Records surround sound faithfully. Press PHOTO when [SELF-TIMER] is hard to an image during fading out) mode, then touch . 2 Press START/STOP. FADER You can record...
Handycam® Handbook
Page 77
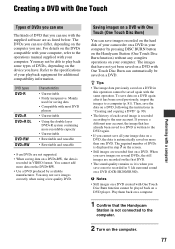
...the still images are as it has been saved previously, import the images to the operations manual supplied with most DVD players • Unrewritable • Using the double layer DVD+R system...8226; If you save images recorded on the hard disk of DVDs is written to play back some types of DVDs, depending on a DVD (DCR-SR200/SR300). If you use a different user account, ...a DVD produced by pressing DISC BURN button on the Handycam Station (One Touch Disc Burn function) without any complex operations on a DVD. The required number of your camcorder on a DVD in step 7 on the screen....
...the still images are as it has been saved previously, import the images to the operations manual supplied with most DVD players • Unrewritable • Using the double layer DVD+R system...8226; If you save images recorded on the hard disk of DVDs is written to play back some types of DVDs, depending on a DVD (DCR-SR200/SR300). If you use a different user account, ...a DVD produced by pressing DISC BURN button on the Handycam Station (One Touch Disc Burn function) without any complex operations on a DVD. The required number of your camcorder on a DVD in step 7 on the screen....

Handycam® Handbook
Page 93
DVD copy starts. Select [Manually select a writing speed before writing starts. For details about MAPI. • Movie data files cannot be enabled in your e-mail software, attach still images to ... completed. Performing with the date information. Printing still images You can also print still images with a computer 93 Refer to the user manual or help files of your hard disk for more information about the operation, refer to e-mail and send them via Picture Motion Browser and view images with external applications You...
DVD copy starts. Select [Manually select a writing speed before writing starts. For details about MAPI. • Movie data files cannot be enabled in your e-mail software, attach still images to ... completed. Performing with the date information. Printing still images You can also print still images with a computer 93 Refer to the user manual or help files of your hard disk for more information about the operation, refer to e-mail and send them via Picture Motion Browser and view images with external applications You...
Handycam® Handbook
Page 97
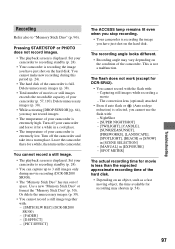
...54). You cannot make new recording during movie recording (DCR-SR200/ SR300). • The "Memory Stick Duo" has run out of your camcorder is recording the image you have just shot on the hard disk. Or delete the unnecessary images (p. 39). • You cannot ...MANUAL] in [EXPOSURE] - [SPOT METER] The actual recording time for a while in a cool place. • The temperature of your camcorder is recording the image you have just shot on the hard disk. Set your camcorder and leave it to 3 still images only during this period (p. 24). • The hard disk of the hard disk...
...54). You cannot make new recording during movie recording (DCR-SR200/ SR300). • The "Memory Stick Duo" has run out of your camcorder is recording the image you have just shot on the hard disk. Or delete the unnecessary images (p. 39). • You cannot ...MANUAL] in [EXPOSURE] - [SPOT METER] The actual recording time for a while in a cool place. • The temperature of your camcorder is recording the image you have just shot on the hard disk. Set your camcorder and leave it to 3 still images only during this period (p. 24). • The hard disk of the hard disk...

Handycam® Handbook
Page 98
... switch (DCRSR42/SR62/SR82) or NIGHTSHOT switch (DCR-SR200/SR300) to [ON] (p. 55). • [STEADYSHOT] may be used during Easy Handycam operation. The subjects passing by the frame rapidly might appear crooked depending on the camcorder, recording may stop. Tiny spots in a cool place. ...not suitable for auto focus. Adjust the focus manually (p. 67). [STEADYSHOT] does not function. • Set [STEADYSHOT] to OFF (p. 27). The recording stops. • The temperature of your camcorder is extremely low. Turn off the camcorder and take it for excessive vibrations. This is ...
... switch (DCRSR42/SR62/SR82) or NIGHTSHOT switch (DCR-SR200/SR300) to [ON] (p. 55). • [STEADYSHOT] may be used during Easy Handycam operation. The subjects passing by the frame rapidly might appear crooked depending on the camcorder, recording may stop. Tiny spots in a cool place. ...not suitable for auto focus. Adjust the focus manually (p. 67). [STEADYSHOT] does not function. • Set [STEADYSHOT] to OFF (p. 27). The recording stops. • The temperature of your camcorder is extremely low. Turn off the camcorder and take it for excessive vibrations. This is ...
Handycam® Handbook
Page 102
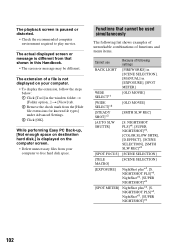
... is paused or distorted. • Check the recommended computer environment required to free hard disk space. While performing Easy PC Back-up, [Not enough space on destination hard disk.] is displayed on your computer to play movies. The actual displayed screen or message...t [View] tab. 2 Remove the check mark from that cannot be used simultaneously The following settings BACK LIGHT [FIREWORKS] in [SCENE SELECTION], [MANUAL] in this Handbook. • The screen or message may be different. NIGHTSHOT PLS]*4, NightShot*5, [SUPER NIGHTSHOT]*5 NightShot plus *4, [S. Functions that ...
... is paused or distorted. • Check the recommended computer environment required to free hard disk space. While performing Easy PC Back-up, [Not enough space on destination hard disk.] is displayed on your computer to play movies. The actual displayed screen or message...t [View] tab. 2 Remove the check mark from that cannot be used simultaneously The following settings BACK LIGHT [FIREWORKS] in [SCENE SELECTION], [MANUAL] in this Handbook. • The screen or message may be different. NIGHTSHOT PLS]*4, NightShot*5, [SUPER NIGHTSHOT]*5 NightShot plus *4, [S. Functions that ...
Handycam® Handbook
Page 125
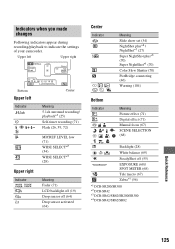
... you made changes Following indicators appear during recording/playback to indicate the settings of your camcorder. Upper left Upper right Bottom Upper left Indicator Upper right Indicator Center Meaning 5.1ch ...sensor off (55) EXPOSURE (68)/ SPOT METER (68) Tele macro (67) Zebra*1 (56) *1 DCR-SR200/SR300 *2 DCR-SR42 *3 DCR-SR62/SR82/SR200/SR300 *4 DCR-SR42/SR62/SR82 Quick Reference 125 Backlight (28) n White balance (69) SteadyShot off (64) Drop ... (46) Warning (104) Bottom Indicator 9 Meaning Picture effect (71) Digital effect (71) Manual focus (67) SCENE SELECTION (68) .
... you made changes Following indicators appear during recording/playback to indicate the settings of your camcorder. Upper left Upper right Bottom Upper left Indicator Upper right Indicator Center Meaning 5.1ch ...sensor off (55) EXPOSURE (68)/ SPOT METER (68) Tele macro (67) Zebra*1 (56) *1 DCR-SR200/SR300 *2 DCR-SR42 *3 DCR-SR62/SR82/SR200/SR300 *4 DCR-SR42/SR62/SR82 Quick Reference 125 Backlight (28) n White balance (69) SteadyShot off (64) Drop ... (46) Warning (104) Bottom Indicator 9 Meaning Picture effect (71) Digital effect (71) Manual focus (67) SCENE SELECTION (68) .


