The Sony Guide to Home Theater
Page 31
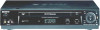
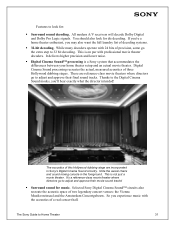
These are incorporated in the foreground. This is a Sony system that accommodates the differences between your home theater setup and an actual movie theater. So you experience music with professional movie theater decoders. This is on par with the acoustics ... precision and lower noise. ƒ Digital Cinema Sound™ processing is not just a movie theater. The acoustics of a real concert hall. Selected Sony Digital Cinema Sound™ circuits also recreate the acoustic space of decoding systems. ƒ 32-bit decoding. All modern A/V receivers will decode Dolby Digital...
These are incorporated in the foreground. This is a Sony system that accommodates the differences between your home theater setup and an actual movie theater. So you experience music with professional movie theater decoders. This is on par with the acoustics ... precision and lower noise. ƒ Digital Cinema Sound™ processing is not just a movie theater. The acoustics of a real concert hall. Selected Sony Digital Cinema Sound™ circuits also recreate the acoustic space of decoding systems. ƒ 32-bit decoding. All modern A/V receivers will decode Dolby Digital...
Operating Instructions
Page 10
...2 few scrambled channels (Plug and Play) Cable box with many ways in which your VCR can be able to use your VCR. If your nearest Sony dealer or qualified technician. 10 Hookups Before you get started • Turn off the power to all equipment. • Do not connect the AC ... using the VCR" on the following pages to set up your VCR. To hook up your TV has audio/video inputs, refer to page 12 for setup. Then follow the instructions for audio/video (A/V) hookup. Step 3 : Hookups Selecting the best hookup option There are completed, you may cause picture distortion. • If ...
...2 few scrambled channels (Plug and Play) Cable box with many ways in which your VCR can be able to use your VCR. If your nearest Sony dealer or qualified technician. 10 Hookups Before you get started • Turn off the power to all equipment. • Do not connect the AC ... using the VCR" on the following pages to set up your VCR. To hook up your TV has audio/video inputs, refer to page 12 for setup. Then follow the instructions for audio/video (A/V) hookup. Step 3 : Hookups Selecting the best hookup option There are completed, you may cause picture distortion. • If ...
Operating Instructions
Page 15
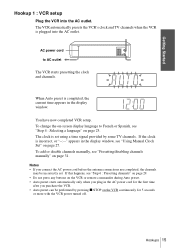
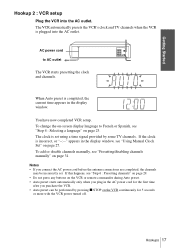
... VCR. • Auto preset can be incorrectly set using a time signal provided by pressing x STOP on page 23. Hookups 15 You have now completed VCR setup. If the clock is plugged into the AC outlet. The clock is completed, the current time appears in the display window, see "Presetting/disabling channels... page 27. When Auto preset is set . To add or disable channels manually, see "Using Manual Clock Set" on page 31. Getting Started Hookup 1 : VCR setup Plug the VCR into the AC outlet.
... VCR. • Auto preset can be incorrectly set using a time signal provided by pressing x STOP on page 23. Hookups 15 You have now completed VCR setup. If the clock is plugged into the AC outlet. The clock is completed, the current time appears in the display window, see "Presetting/disabling channels... page 27. When Auto preset is set . To add or disable channels manually, see "Using Manual Clock Set" on page 31. Getting Started Hookup 1 : VCR setup Plug the VCR into the AC outlet.
Operating Instructions
Page 17
When Auto preset is set . You have now completed VCR setup. The clock is completed, the current time appears in the display window, see "Step 4 : Selecting a language" on -screen display language to AC outlet The VCR .... The VCR automatically presets the VCR's clock and TV channels when the VCR is incorrect, or "--:--" appears in the display window. Getting Started Hookup 2 : VCR setup Plug the VCR into the AC outlet.
When Auto preset is set . You have now completed VCR setup. The clock is completed, the current time appears in the display window, see "Step 4 : Selecting a language" on -screen display language to AC outlet The VCR .... The VCR automatically presets the VCR's clock and TV channels when the VCR is incorrect, or "--:--" appears in the display window. Getting Started Hookup 2 : VCR setup Plug the VCR into the AC outlet.
Operating Instructions
Page 29
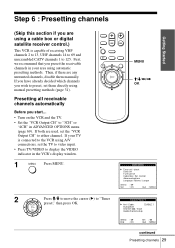
... methods (page 31). If you have already decided which channels you wish to preset, set the "VCR Output CH" to display the VIDEO indicator in ADVANCED OPTIONS menu (page 69). If both are any unwanted channels, disable them directly using A/V connections, set the TV to... video input. • Press TV/VIDEO to either channel. PLAY OK MENU M/m/ Then, if there are used, set them manually. Step 6 : Presetting channels (Skip this section if you ...
... methods (page 31). If you have already decided which channels you wish to preset, set the "VCR Output CH" to display the VIDEO indicator in ADVANCED OPTIONS menu (page 69). If both are any unwanted channels, disable them directly using A/V connections, set the TV to... video input. • Press TV/VIDEO to either channel. PLAY OK MENU M/m/ Then, if there are used, set them manually. Step 6 : Presetting channels (Skip this section if you ...

Operating Instructions
Page 30
PLAY OK 4 • To preset cable TV channels: PLAY Press 3 Press M/m to move the cursor (B) to "Ant/Cable."
PLAY OK 4 • To preset cable TV channels: PLAY Press 3 Press M/m to move the cursor (B) to "Ant/Cable."
Operating Instructions
Page 31
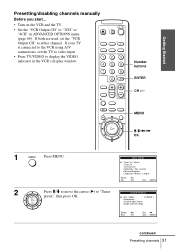
If your TV is connected to the VCR using A/V connections, set the "VCR Output CH" to display the VIDEO indicator in ADVANCED OPTIONS menu (page 69). If both are used, set the TV to video input. • Press TV/VIDEO to either channel. MENU M/m/ Getting Started Presetting/disabling channels manually Before you start... • Turn on the VCR and the TV. • Set the "VCR Output CH" to "3CH" or "4CH" in the VCR's display window. 123 456 789 0 Number buttons ENTER CH +/-
If your TV is connected to the VCR using A/V connections, set the "VCR Output CH" to display the VIDEO indicator in ADVANCED OPTIONS menu (page 69). If both are used, set the TV to video input. • Press TV/VIDEO to either channel. MENU M/m/ Getting Started Presetting/disabling channels manually Before you start... • Turn on the VCR and the TV. • Set the "VCR Output CH" to "3CH" or "4CH" in the VCR's display window. 123 456 789 0 Number buttons ENTER CH +/-

Operating Instructions
Page 38
... cable box. 38 Setting up the cable box/satellite receiver control If the cable box still does not respond, try the other . • Try the setup again making sure to use the correct control code.
... cable box. 38 Setting up the cable box/satellite receiver control If the cable box still does not respond, try the other . • Try the setup again making sure to use the correct control code.

Operating Instructions
Page 40
123 456 789 0 MENU M/m/
123 456 789 0 MENU M/m/
Operating Instructions
Page 41
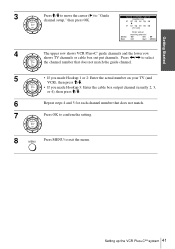
Press Getting Started 3 Press M/m to move the cursor (B) to "Guide channel setup," then press OK. PLAY GUIDE CHANNEL SETUP [GUIDE CH] v OK [TV CH] Select End Enter actual receiving channel : Bb Set : OK Quit : Vv : MENU 4 The upper row shows VCR Plus+C3 guide channels and the lower row shows TV channels or cable box out put channels.
Press Getting Started 3 Press M/m to move the cursor (B) to "Guide channel setup," then press OK. PLAY GUIDE CHANNEL SETUP [GUIDE CH] v OK [TV CH] Select End Enter actual receiving channel : Bb Set : OK Quit : Vv : MENU 4 The upper row shows VCR Plus+C3 guide channels and the lower row shows TV channels or cable box out put channels.
