
Operating Instructions (SLVN750)
Page 6
... timer 37 Locking the VCR (Child Lock) Additional Operations 38 Playing/searching at various speeds 40 Quick Timer Recording 41 Checking/changing/canceling timer settings 43 Recording stereo and bilingual programs 44 Searching using the VCR Caution Television programs, films, video tapes and other materials may require authorization from the cable television transmission and/or...
... timer 37 Locking the VCR (Child Lock) Additional Operations 38 Playing/searching at various speeds 40 Quick Timer Recording 41 Checking/changing/canceling timer settings 43 Recording stereo and bilingual programs 44 Searching using the VCR Caution Television programs, films, video tapes and other materials may require authorization from the cable television transmission and/or...

Operating Instructions (SLVN750)
Page 10
TV brand Sony Akai AOC Centurion Coronado Curtis-Mathes Daytron Emerson Fisher General Electric Hitachi J.C.Penney JVC KMC LG/Gold Star Magnavox Marantz MGA/Mitsubishi NEC Code number ... remote commander Code numbers of the remote commander, the code number may appear on the TV remote commander or wait until you find the one programed to work with the VCR, you cannot control your TV with your TV's menu may change. To exit the TV menu, press the MENU button...
TV brand Sony Akai AOC Centurion Coronado Curtis-Mathes Daytron Emerson Fisher General Electric Hitachi J.C.Penney JVC KMC LG/Gold Star Magnavox Marantz MGA/Mitsubishi NEC Code number ... remote commander Code numbers of the remote commander, the code number may appear on the TV remote commander or wait until you find the one programed to work with the VCR, you cannot control your TV with your TV's menu may change. To exit the TV menu, press the MENU button...

Operating Instructions (SLVN750)
Page 12
...have stereo jacks VCR LINE LINE OUT IN 1 AUDIO VIDEO TV IN VIDEO AUDIO Stereo receiver AUX IN Video cable (not supplied) Audio cable (not supplied) Notes • To play a tape in stereo, you must use your VCR to record programs, you finished setting up your VCR using these connections ...see the following pages for antenna or cable hookups. If your stereo system. If you want to record regular or cable TV programs, complete these connections. Audio/video (A/V) hookup If your TV has audio/video (A/V) input jacks, you will get a better picture and sound if you hook up the VCR ...
...have stereo jacks VCR LINE LINE OUT IN 1 AUDIO VIDEO TV IN VIDEO AUDIO Stereo receiver AUX IN Video cable (not supplied) Audio cable (not supplied) Notes • To play a tape in stereo, you must use your VCR to record programs, you finished setting up your VCR using these connections ...see the following pages for antenna or cable hookups. If your stereo system. If you want to record regular or cable TV programs, complete these connections. Audio/video (A/V) hookup If your TV has audio/video (A/V) input jacks, you will get a better picture and sound if you hook up the VCR ...

Operating Instructions (SLVN750)
Page 31
continued Recording TV programs 31 To record from a cable box, turn it to the video channel. INPUT SELECT z REC x STOP Basic Operations 1 Turn on your TV and set it on. 2 Insert a tape with its safety tab in place. Recording TV programs 123 456 789 0 TV/VIDEO COUNTER/ REMAIN DISPLAY ENTER SP/EP CH +/-
continued Recording TV programs 31 To record from a cable box, turn it to the video channel. INPUT SELECT z REC x STOP Basic Operations 1 Turn on your TV and set it on. 2 Insert a tape with its safety tab in place. Recording TV programs 123 456 789 0 TV/VIDEO COUNTER/ REMAIN DISPLAY ENTER SP/EP CH +/-

Operating Instructions (SLVN750)
Page 32
... to select the channel or line input video source you press COUNTER/REMAIN, the time counter and the remaining tape length appear alternately. To check the remaining tape length Press DISPLAY. With the display on, press COUNTER/REMAIN to start recording. 3 • CH Press CH ...+/- The white bar indicates the current location in the ADVANCED OPTIONS menu correctly (page 47). 32 Recording TV programs "REC" appears in the display window. to the entire tape length...
... to select the channel or line input video source you press COUNTER/REMAIN, the time counter and the remaining tape length appear alternately. To check the remaining tape length Press DISPLAY. With the display on, press COUNTER/REMAIN to start recording. 3 • CH Press CH ...+/- The white bar indicates the current location in the ADVANCED OPTIONS menu correctly (page 47). 32 Recording TV programs "REC" appears in the display window. to the entire tape length...
Operating Instructions (SLVN750)
Page 33
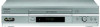
... if not, skip this step. 3 Select another TV program while recording 1 Press TV/VIDEO to turn off the VCR indicator in the LP mode. • The display does not appear during still (pause) mode or slow-motion playback. • It may not be recorded on the tape. • If you do not want to... take up to one minute for short tapes such as illustrated. To watch TV while recording, you can use the number buttons on the remote commander. Enter the channel number, then press ENTER. • You can select a video source from the LINE IN 1 or LINE-2 IN jacks using a cable box, make ...
... if not, skip this step. 3 Select another TV program while recording 1 Press TV/VIDEO to turn off the VCR indicator in the LP mode. • The display does not appear during still (pause) mode or slow-motion playback. • It may not be recorded on the tape. • If you do not want to... take up to one minute for short tapes such as illustrated. To watch TV while recording, you can use the number buttons on the remote commander. Enter the channel number, then press ENTER. • You can select a video source from the LINE IN 1 or LINE-2 IN jacks using a cable box, make ...

Operating Instructions (SLVN750)
Page 34
Setting the timer You can preset up to the video channel. Make sure the tape is set to the correct time. • Turn on the VCR and the TV and set it on. • Insert a tape with its safety tab in place. INPUT SELECT MENU M/m/ Before you start... • Check that the VCR clock is longer than the total recording time. ?/1 123 456 789 0 CH +/- When using a cable box, turn it to eight programs at one time.
Setting the timer You can preset up to the video channel. Make sure the tape is set to the correct time. • Turn on the VCR and the TV and set it on. • Insert a tape with its safety tab in place. INPUT SELECT MENU M/m/ Before you start... • Check that the VCR clock is longer than the total recording time. ?/1 123 456 789 0 CH +/- When using a cable box, turn it to eight programs at one time.

Operating Instructions (SLVN750)
Page 35
... Bb Set : Vv End : OK Quit : MENU 3 If necessary, press M/m to move the cursor (B) to "Timer PLAY set . To stop recording To stop time, date, and tape speed: PLAY CH START STOP DATE SPD 3 5 8 : 0 0 PM 9 : 0 0 PM 9 /...leave it on page 36. 5 Press OK to be set /check," then press OK. To record the same program every day or the same day every week, press m while the date is to confirm the... setting. To use the Auto Tape Speed function" on . INPUT SELECT To record from a source connected ...
... Bb Set : Vv End : OK Quit : MENU 3 If necessary, press M/m to move the cursor (B) to "Timer PLAY set . To stop recording To stop time, date, and tape speed: PLAY CH START STOP DATE SPD 3 5 8 : 0 0 PM 9 : 0 0 PM 9 /...leave it on page 36. 5 Press OK to be set /check," then press OK. To record the same program every day or the same day every week, press m while the date is to confirm the... setting. To use the Auto Tape Speed function" on . INPUT SELECT To record from a source connected ...

Operating Instructions (SLVN750)
Page 36
... later t (dates count down) t the current date To use the VCR before turning off the VCR. To operate this function, set the channel, you are recording a program in the ADVANCED OPTIONS menu correctly (page 47). Note • In step 7, make sure a tape is automatically changed . MO~FR t SUN'S t MON'S t ..... The TIMER ... the VCR to the EP mode. To check, change the indication in the display window even if no tape is changed to the timer recording standby mode after setting the timer To use the Auto Tape Speed function When you can also do the following tasks while the VCR is...
... later t (dates count down) t the current date To use the VCR before turning off the VCR. To operate this function, set the channel, you are recording a program in the ADVANCED OPTIONS menu correctly (page 47). Note • In step 7, make sure a tape is automatically changed . MO~FR t SUN'S t MON'S t ..... The TIMER ... the VCR to the EP mode. To check, change the indication in the display window even if no tape is changed to the timer recording standby mode after setting the timer To use the Auto Tape Speed function When you can also do the following tasks while the VCR is...

Operating Instructions (SLVN750)
Page 42
3 Press M/m to move the cursor (B) to "Timer set/check," then press OK. • If you want to change a setting, go on to the next step. • If you do not need to change the settings, press MENU, then turn off the VCR to return to recording standby. 4 Press M/m to move the cursor (B) to the setting you want to change or cancel. • To change the setting, press
3 Press M/m to move the cursor (B) to "Timer set/check," then press OK. • If you want to change a setting, go on to the next step. • If you do not need to change the settings, press MENU, then turn off the VCR to return to recording standby. 4 Press M/m to move the cursor (B) to the setting you want to change or cancel. • To change the setting, press

Operating Instructions (SLVN750)
Page 43
.... Selecting the sound during playback During playback, press AUDIO MONITOR to display STEREO on a video tape The VCR records sound onto two separate tracks. If there is recorded onto the normal audio track along with less noise. Recording bilingual programs Press AUDIO MONITOR to Stereo Left channel Right channel Monaural sound on the normal audio...
.... Selecting the sound during playback During playback, press AUDIO MONITOR to display STEREO on a video tape The VCR records sound onto two separate tracks. If there is recorded onto the normal audio track along with less noise. Recording bilingual programs Press AUDIO MONITOR to Stereo Left channel Right channel Monaural sound on the normal audio...

Operating Instructions (SLVN750)
Page 44
SEARCH M/m/ Searching using various search functions. You can easily find a specific point using various functions The VCR automatically marks the tape with an index signal at the point where each recording begins.
SEARCH M/m/ Searching using various search functions. You can easily find a specific point using various functions The VCR automatically marks the tape with an index signal at the point where each recording begins.

Operating Instructions (SLVN750)
Page 52
... it is defective. • If you are using a Sony video head cleaning cassette. select "L1" or "L2" when recording from the wall outlet for the VCR. Consult your nearest Sony dealer (a standard service fee will be replaced. The power is poor. Select a channel number when recording TV programs; buttons. Recording 52 Troubleshooting The picture has no sound. TV...
... it is defective. • If you are using a Sony video head cleaning cassette. select "L1" or "L2" when recording from the wall outlet for the VCR. Consult your nearest Sony dealer (a standard service fee will be replaced. The power is poor. Select a channel number when recording TV programs; buttons. Recording 52 Troubleshooting The picture has no sound. TV...

Operating Instructions (SLVN750)
Page 53
...sure a tape has been inserted. • Check that a tape is not already in the remote commander with a mild detergent solution. Symptoms caused by contaminated video heads • Normal picture • Rough picture • Unclear picture • No picture (or black & white screen appears) initial contamination terminal Additional Information... commander does not function. The code number may change when you are pointing the remote commander at its end. • Make sure a program has been set correctly. • The recording condition of the tape is turned on the screen.
...sure a tape has been inserted. • Check that a tape is not already in the remote commander with a mild detergent solution. Symptoms caused by contaminated video heads • Normal picture • Rough picture • Unclear picture • No picture (or black & white screen appears) initial contamination terminal Additional Information... commander does not function. The code number may change when you are pointing the remote commander at its end. • Make sure a program has been set correctly. • The recording condition of the tape is turned on the screen.

Operating Instructions (SLVN750)
Page 54
...to W+84 Antenna 75-ohm antenna terminal for energy efficiency. 54 Specifications As an ENERGY STAR® Partner, Sony Corporation has determined that this product meets the ENERGY STAR® guidelines for VHF/UHF Inputs and outputs LINE IN 1 and LINE...Mass SLV-N750 Approx. 2.8 kg (Approx. 6 lb 3 oz) SLV-N650 Approx. 2.6 kg (Approx. 5 lb 12 oz) Supplied accessories Remote commander (1) Size AA (R6) batteries (2) 75-ohm coaxial cable with F-type connectors (1) Design and specifications are subject to change without notice. Specifications System Format VHS NTSC standard Video recording ...
...to W+84 Antenna 75-ohm antenna terminal for energy efficiency. 54 Specifications As an ENERGY STAR® Partner, Sony Corporation has determined that this product meets the ENERGY STAR® guidelines for VHF/UHF Inputs and outputs LINE IN 1 and LINE...Mass SLV-N750 Approx. 2.8 kg (Approx. 6 lb 3 oz) SLV-N650 Approx. 2.6 kg (Approx. 5 lb 12 oz) Supplied accessories Remote commander (1) Size AA (R6) batteries (2) 75-ohm coaxial cable with F-type connectors (1) Design and specifications are subject to change without notice. Specifications System Format VHS NTSC standard Video recording ...

Operating Instructions (SLVN750)
Page 60
...Adjusting picture 46 tracking 46 Advanced option 47 Antenna hookup 13 Audio track 43 Audio/video (A/V) hookup 12 Auto Clock Set 19 Auto Tape Speed 36 C Cable hookup 11 Child Lock 37 Cleaning the video heads 52 Clock setting 19 Commercial Skip 29 Connecting Cable TV 17 external antenna ...29 slow motion 38 Presetting channels 24 Q Quick Timer Recording 40 R Recording 31 bilingual programs 43 SAP broadcasts 43 saving 33 stereo broadcasts 43 timer setting 34 while watching another program 33 RF channel 48 S Safety tab 33 SAP (Second Audio Program) 43 Searching at various speeds 38 for a blank ...
...Adjusting picture 46 tracking 46 Advanced option 47 Antenna hookup 13 Audio track 43 Audio/video (A/V) hookup 12 Auto Clock Set 19 Auto Tape Speed 36 C Cable hookup 11 Child Lock 37 Cleaning the video heads 52 Clock setting 19 Commercial Skip 29 Connecting Cable TV 17 external antenna ...29 slow motion 38 Presetting channels 24 Q Quick Timer Recording 40 R Recording 31 bilingual programs 43 SAP broadcasts 43 saving 33 stereo broadcasts 43 timer setting 34 while watching another program 33 RF channel 48 S Safety tab 33 SAP (Second Audio Program) 43 Searching at various speeds 38 for a blank ...

Operating Instructions (SLVN750)
Page 64
...the cable box to channel 3 or 4. • Set the TV to the output channel of the cable box (usually 2, 3, or 4). 2 Insert a tape and press H PLAY. Sony Corporation Printed in the display window. If you did not use A/V hookup: • Turn on . To watch TV 1 Turn off your VCR, or press the... box to the channel you want to watch TV 1 Turn off . 2 Set the TV to the channel you want to record. 3 Press MENU and select "Timer set the TV to video input. To record a program 1 Press MENU and select "Timer set /check." 2 Set the channel, time, date, and tape speed. 3 Press OK. 4 Insert a ...
...the cable box to channel 3 or 4. • Set the TV to the output channel of the cable box (usually 2, 3, or 4). 2 Insert a tape and press H PLAY. Sony Corporation Printed in the display window. If you did not use A/V hookup: • Turn on . To watch TV 1 Turn off your VCR, or press the... box to the channel you want to watch TV 1 Turn off . 2 Set the TV to the channel you want to record. 3 Press MENU and select "Timer set the TV to video input. To record a program 1 Press MENU and select "Timer set /check." 2 Set the channel, time, date, and tape speed. 3 Press OK. 4 Insert a ...


