Warranty Card
Page 1
... to any accessories) against defects in either its option, for warranty replacement fee information. For your authorized dealer, call : Sony VCR Customer Information Services Center 1-800-VHS-SONY Or Visit Sony VHS Service Website: www.sony.com/vcrhelp For an accessory or part not available from the date of original purchase, if this Product (including...
... to any accessories) against defects in either its option, for warranty replacement fee information. For your authorized dealer, call : Sony VCR Customer Information Services Center 1-800-VHS-SONY Or Visit Sony VHS Service Website: www.sony.com/vcrhelp For an accessory or part not available from the date of original purchase, if this Product (including...
Operating Instructions
Page 2
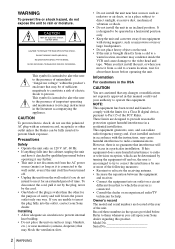
... and cassettes away from the AC power source (mains) as long as radiators or air ducts, or in a place subject to the video head and tape. If you call upon your Sony dealer ...• This unit is not disconnected from equipment with the instructions, may condense inside the VCR and cause damage to direct sunlight, excessive dust, mechanical vibration or shock. • Do ...location, wait for an extended period of safety and will not occur in a residential installation. Record these numbers in the literature accompanying the appliance. These limits are unable to insert the plug fully...
... and cassettes away from the AC power source (mains) as long as radiators or air ducts, or in a place subject to the video head and tape. If you call upon your Sony dealer ...• This unit is not disconnected from equipment with the instructions, may condense inside the VCR and cause damage to direct sunlight, excessive dust, mechanical vibration or shock. • Do ...location, wait for an extended period of safety and will not occur in a residential installation. Record these numbers in the literature accompanying the appliance. These limits are unable to insert the plug fully...
Operating Instructions
Page 3
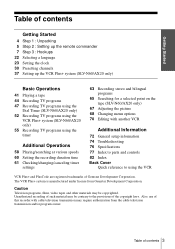
... Playing a tape 44 Recording TV programs 47 Recording TV programs using the Dial Timer (SLV-N60/AX20 only) 52 Recording TV programs using the VCR Plus+ system (SLV-N60/AX20 only) 55 Recording TV programs using the VCR VCR Plus+ and PlusCode are registered trademarks of Gemstar Development Corporation. Table of the copyright laws. Caution Television programs, films, video tapes and other...
... Playing a tape 44 Recording TV programs 47 Recording TV programs using the Dial Timer (SLV-N60/AX20 only) 52 Recording TV programs using the VCR Plus+ system (SLV-N60/AX20 only) 55 Recording TV programs using the VCR VCR Plus+ and PlusCode are registered trademarks of Gemstar Development Corporation. Table of the copyright laws. Caution Television programs, films, video tapes and other...
Operating Instructions
Page 4
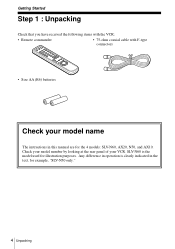
Check your model number by looking at the rear panel of your model name The instructions in the text, for example, "SLV-N50 only." 4 Unpacking Getting Started Step 1 : Unpacking Check that you have received the following items with the VCR: • Remote commander • 75-ohm coaxial cable with F-type connectors • Size AA (R6) batteries Check your VCR. Any difference in operation is the model used for the 4 models: SLV-N60, AX20, N50, and AX10. SLV-N60 is clearly indicated in this manual are for illustration purposes.
Check your model number by looking at the rear panel of your model name The instructions in the text, for example, "SLV-N50 only." 4 Unpacking Getting Started Step 1 : Unpacking Check that you have received the following items with the VCR: • Remote commander • 75-ohm coaxial cable with F-type connectors • Size AA (R6) batteries Check your VCR. Any difference in operation is the model used for the 4 models: SLV-N60, AX20, N50, and AX10. SLV-N60 is clearly indicated in this manual are for illustration purposes.
Operating Instructions
Page 5
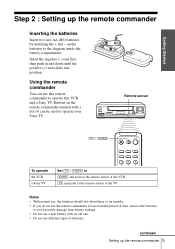
...to operate this VCR and a Sony TV. Buttons on the batteries to avoid possible damage from battery leakage. • Do not use a new battery with a dot (•) can use different types of batteries. Remote sensor [TV] / [VIDEO] To operate the VCR a Sony TV 123 Set [TV] / [VIDEO] to [VIDEO] and point... at the remote sensor at the VCR [TV] and point at the remote sensor at the TV Notes • With normal use, the...
...to operate this VCR and a Sony TV. Buttons on the batteries to avoid possible damage from battery leakage. • Do not use a new battery with a dot (•) can use different types of batteries. Remote sensor [TV] / [VIDEO] To operate the VCR a Sony TV 123 Set [TV] / [VIDEO] to [VIDEO] and point... at the remote sensor at the VCR [TV] and point at the remote sensor at the TV Notes • With normal use, the...
Operating Instructions
Page 6
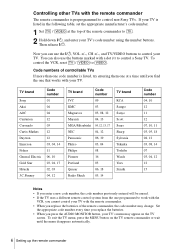
...the one programmed to work with the VCR, you cannot control your TV with the remote commander. • When you can also use the ?/1, VOL +/-, CH +/-, and TV/VIDEO buttons to [TV]. 2 Hold down ?/1, and enter your TV. TV brand Sony Akai AOC Centurion Coronado Curtis-Mathes Daytron... TV screen. Now you replace the batteries of the remote commander to control your TV is preprogrammed to [VIDEO]. To control the VCR, reset [TV] / [VIDEO] to control non-Sony TVs. If your TV. Controlling other TVs with the remote commander The remote commander is listed in the following...
...the one programmed to work with the VCR, you cannot control your TV with the remote commander. • When you can also use the ?/1, VOL +/-, CH +/-, and TV/VIDEO buttons to [TV]. 2 Hold down ?/1, and enter your TV. TV brand Sony Akai AOC Centurion Coronado Curtis-Mathes Daytron... TV screen. Now you replace the batteries of the remote commander to control your TV is preprogrammed to [VIDEO]. To control the VCR, reset [TV] / [VIDEO] to control non-Sony TVs. If your TV. Controlling other TVs with the remote commander The remote commander is listed in the following...
Operating Instructions
Page 7
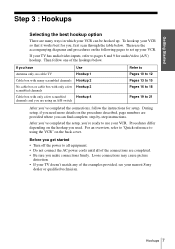
Then use your TV has audio/video inputs, refer to pages 8 and 9 for audio/video (A/V) hookup. Then follow the instructions for you, first scan through the table below . Hookups 7 If your VCR. During setup, if you need more details on the following pages to all equipment. • Do not ...few scrambled Hookup 4 channels and you are provided where you can be hooked up your nearest Sony dealer or qualified technician. Before you get started • Turn off the power to set up your VCR. Procedures differ depending on the back cover. For an overview, refer to "Quick reference ...
Then use your TV has audio/video inputs, refer to pages 8 and 9 for audio/video (A/V) hookup. Then follow the instructions for you, first scan through the table below . Hookups 7 If your VCR. During setup, if you need more details on the following pages to all equipment. • Do not ...few scrambled Hookup 4 channels and you are provided where you can be hooked up your nearest Sony dealer or qualified technician. Before you get started • Turn off the power to set up your VCR. Procedures differ depending on the back cover. For an overview, refer to "Quick reference ...
Operating Instructions
Page 8
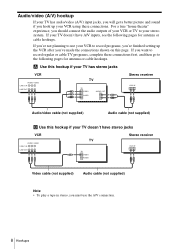
... a true "home theater" experience, you should connect the audio outputs of your VCR or TV to your VCR using these connections first, and then go to record regular or cable TV programs, complete these connections. Audio/video (A/V) hookup If your TV has audio/video (A/V) input jacks, you will get a better picture and sound if you...
... a true "home theater" experience, you should connect the audio outputs of your VCR or TV to your VCR using these connections first, and then go to record regular or cable TV programs, complete these connections. Audio/video (A/V) hookup If your TV has audio/video (A/V) input jacks, you will get a better picture and sound if you...
Operating Instructions
Page 9
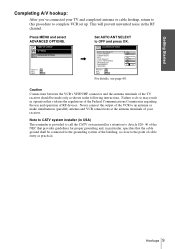
... OFF ON AUTO ON ON L H For details, see page 68. This will prevent unwanted noise in the following instructions. Caution Connections between the VCR's VHF/UHF connector and the antenna terminals of the TV receiver should be connected to the grounding system of the building, as close to the..., Set AUTO ANT SELECT to do so may result in USA) This reminder is provided to call the CATV system installer's attention to complete VCR set up. Hookups 9 Note to CATV system installer (in operation that the cable ground shall be made only as practical. Never connect the output...
... OFF ON AUTO ON ON L H For details, see page 68. This will prevent unwanted noise in the following instructions. Caution Connections between the VCR's VHF/UHF connector and the antenna terminals of the TV receiver should be connected to the grounding system of the building, as close to the..., Set AUTO ANT SELECT to do so may result in USA) This reminder is provided to call the CATV system installer's attention to complete VCR set up. Hookups 9 Note to CATV system installer (in operation that the cable ground shall be made only as practical. Never connect the output...

Operating Instructions
Page 10
... to the VHF/UHF IN connector. B UHF or VHF C UHF B Use this hookup if you're using a VHF-only antenna (you get channels 2-13 only) VCR VHF/UHF IN OUT Rear of TV VHF/UHF A Match the type of connector on your or VHF TV: A, B, or C. For details, see page 73... (you get channels 2-13 and channels 14 and higher) • UHF-only antenna (you get channels 14 and higher) • Separate VHF and UHF antennas VCR VHF/UHF IN OUT Rear of TV VHF/UHF A Match the type of connector on your or TV: A, B, or C. VHF B For connector types B and C, no...
... to the VHF/UHF IN connector. B UHF or VHF C UHF B Use this hookup if you're using a VHF-only antenna (you get channels 2-13 only) VCR VHF/UHF IN OUT Rear of TV VHF/UHF A Match the type of connector on your or VHF TV: A, B, or C. For details, see page 73... (you get channels 2-13 and channels 14 and higher) • UHF-only antenna (you get channels 14 and higher) • Separate VHF and UHF antennas VCR VHF/UHF IN OUT Rear of TV VHF/UHF A Match the type of connector on your or TV: A, B, or C. VHF B For connector types B and C, no...
Operating Instructions
Page 11
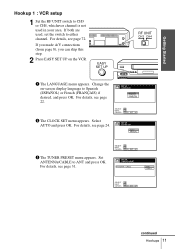
ANTENNA / CABLE ANT CABLE SELECT : NEXT : OK CANCEL : EASY SET UP continued Hookups 11 Getting Started Hookup 1 : VCR setup 1 Set the RF UNIT switch to CH3 or CH4, whichever channel is not used , set the switch to either channel. SET UP CLOCK SET .... For details, see page 24. EASY SET UP RF UNIT CH3 CH4 1 The LANGUAGE menu appears. For details, see page 22. Change the on the VCR. Select AUTO and press OK. For details, see page 31. SET UP LANGUAGE ENGLISH ESPAÑOL FRANÇAIS SELECT : NEXT : OK CANCEL : EASY...
ANTENNA / CABLE ANT CABLE SELECT : NEXT : OK CANCEL : EASY SET UP continued Hookups 11 Getting Started Hookup 1 : VCR setup 1 Set the RF UNIT switch to CH3 or CH4, whichever channel is not used , set the switch to either channel. SET UP CLOCK SET .... For details, see page 24. EASY SET UP RF UNIT CH3 CH4 1 The LANGUAGE menu appears. For details, see page 22. Change the on the VCR. Select AUTO and press OK. For details, see page 31. SET UP LANGUAGE ENGLISH ESPAÑOL FRANÇAIS SELECT : NEXT : OK CANCEL : EASY...
Operating Instructions
Page 12
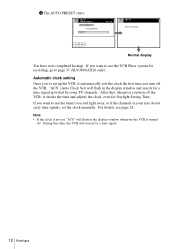
... PLEASE WAIT Normal display You have now completed hookup. 4 The AUTO PRESET starts. If you 've set up the VCR, it checks the time and adjusts the clock, even for recording, go to record right away, or if the channels in your area do not carry time signals, set , "ACS" will flash in... clock is turned off the VCR. Automatic clock setting Once you want to use the VCR Plus+ system for Daylight Saving Time. If you turn off . After that, whenever you turn off the VCR, it automatically sets the clock the first time you want to use the timer to page 37 (SLV-N60/AX20 only).
... PLEASE WAIT Normal display You have now completed hookup. 4 The AUTO PRESET starts. If you 've set up the VCR, it checks the time and adjusts the clock, even for recording, go to record right away, or if the channels in your area do not carry time signals, set , "ACS" will flash in... clock is turned off the VCR. Automatic clock setting Once you want to use the VCR Plus+ system for Daylight Saving Time. If you turn off . After that, whenever you turn off the VCR, it automatically sets the clock the first time you want to use the timer to page 37 (SLV-N60/AX20 only).

Operating Instructions
Page 13
... B types B and C, no or UHF UHF connection is required. Getting Started Hookup 2 Connecting a cable box with many scrambled channels Recommended use Use this hookup • Record any channel by selecting the channel on the cable box What you can do with the cable box turned off •...; Record one channel while watching another channel Wall Cable box IN OUT VCR VHF/UHF IN OUT Rear of TV VHF/UHF A Match the type of connector on your cable system scrambles...
... B types B and C, no or UHF UHF connection is required. Getting Started Hookup 2 Connecting a cable box with many scrambled channels Recommended use Use this hookup • Record any channel by selecting the channel on the cable box What you can do with the cable box turned off •...; Record one channel while watching another channel Wall Cable box IN OUT VCR VHF/UHF IN OUT Rear of TV VHF/UHF A Match the type of connector on your cable system scrambles...
Operating Instructions
Page 14
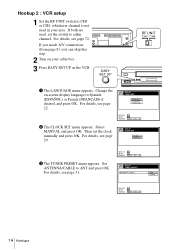
If both are used in your cable box. 3 Press EASY SET UP on the VCR. Change the on-screen display language to ANT and press OK. For details, see page 72. For details, see page 29. SET UP TUNER PRESET ... ENGLISH ESPAÑOL FRANÇAIS SELECT : NEXT : OK CANCEL : EASY SET UP 2 The CLOCK SET menu appears. For details, see page 31. Hookup 2 : VCR setup 1 Set the RF UNIT switch to CH3 or CH4, whichever channel is not used , set the clock manually and press OK.
If both are used in your cable box. 3 Press EASY SET UP on the VCR. Change the on-screen display language to ANT and press OK. For details, see page 72. For details, see page 29. SET UP TUNER PRESET ... ENGLISH ESPAÑOL FRANÇAIS SELECT : NEXT : OK CANCEL : EASY SET UP 2 The CLOCK SET menu appears. For details, see page 31. Hookup 2 : VCR setup 1 Set the RF UNIT switch to CH3 or CH4, whichever channel is not used , set the clock manually and press OK.
Operating Instructions
Page 15
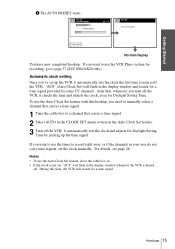
... the time signal. Notes • To use the timer to record right away, or if the channels in the CLOCK SET menu to page 37 (SLV-N60/AX20 only). During this hookup, you turn on . • If the clock is turned off the VCR, it automatically sets the clock the first time you want... to use the Auto Clock Set feature, leave the cable box on the Auto Clock Set feature. 3 Turn off the VCR. Hookups 15...
... the time signal. Notes • To use the timer to record right away, or if the channels in the CLOCK SET menu to page 37 (SLV-N60/AX20 only). During this hookup, you turn on . • If the clock is turned off the VCR, it automatically sets the clock the first time you want... to use the Auto Clock Set feature, leave the cable box on the Auto Clock Set feature. 3 Turn off the VCR. Hookups 15...

Operating Instructions
Page 16
Also use Use this hookup if you can 't do not have a cable box. UHF 16 Hookups What you do • Record scrambled channels that require a cable box Wall VCR VHF/UHF IN OUT Connect this hookup if your TV: A, VHF B, or C. B For connector or UHF types B and C, no cable box, or a cable... TV if you can do with this hookup • Record any unscrambled channel by selecting the channel on your cable system scrambles only a few channels. Cable box IN OUT Rear of TV VHF/UHF A Match the type of connector or on the VCR What you don't have a cable box. Hookup 3 ...
Also use Use this hookup if you can 't do not have a cable box. UHF 16 Hookups What you do • Record scrambled channels that require a cable box Wall VCR VHF/UHF IN OUT Connect this hookup if your TV: A, VHF B, or C. B For connector or UHF types B and C, no cable box, or a cable... TV if you can do with this hookup • Record any unscrambled channel by selecting the channel on your cable system scrambles only a few channels. Cable box IN OUT Rear of TV VHF/UHF A Match the type of connector or on the VCR What you don't have a cable box. Hookup 3 ...
Operating Instructions
Page 17
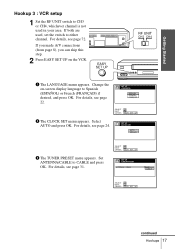
... ANT CABLE SELECT : NEXT : OK CANCEL : EASY SET UP continued Hookups 17 For details, see page 24. Change the on the VCR. For details, see page 72. Getting Started Hookup 3 : VCR setup 1 Set the RF UNIT switch to CH3 or CH4, whichever channel is not used , set the switch to either channel...
... ANT CABLE SELECT : NEXT : OK CANCEL : EASY SET UP continued Hookups 17 For details, see page 24. Change the on the VCR. For details, see page 72. Getting Started Hookup 3 : VCR setup 1 Set the RF UNIT switch to CH3 or CH4, whichever channel is not used , set the switch to either channel...

Operating Instructions
Page 18
...WAIT Normal display You have now completed hookup. During this time, the VCR will search for recording, go to page 37 (SLV-N60/AX20 only). "ACS" (Auto Clock Set) will flash in the display window whenever the VCR is turned off the VCR, it automatically sets the clock the first time you turn off the... VCR. If you want to use the timer to use the VCR Plus+ system for...
...WAIT Normal display You have now completed hookup. During this time, the VCR will search for recording, go to page 37 (SLV-N60/AX20 only). "ACS" (Auto Clock Set) will flash in the display window whenever the VCR is turned off the VCR, it automatically sets the clock the first time you turn off the... VCR. If you want to use the timer to use the VCR Plus+ system for...

Operating Instructions
Page 19
... a cable box with this hookup allows you can do • Record one scrambled channel while watching another channel (the A/B switch is set to B) What you to B) Wall Splitter Cable box IN OUT A/B switch A B VCR VHF/UHF IN OUT Rear of TV VHF/UHF A Match the type...only a few scrambled channels, using an A/B switch Recommended use By using an A/B switch (not supplied), this hookup • Record any unscrambled channel by selecting the channel directly on the VCR (the A/B switch is VHF required. B For connector types B and or UHF C, no UHF connection is set to A)...
... a cable box with this hookup allows you can do • Record one scrambled channel while watching another channel (the A/B switch is set to B) What you to B) Wall Splitter Cable box IN OUT A/B switch A B VCR VHF/UHF IN OUT Rear of TV VHF/UHF A Match the type...only a few scrambled channels, using an A/B switch Recommended use By using an A/B switch (not supplied), this hookup • Record any unscrambled channel by selecting the channel directly on the VCR (the A/B switch is VHF required. B For connector types B and or UHF C, no UHF connection is set to A)...
Operating Instructions
Page 20
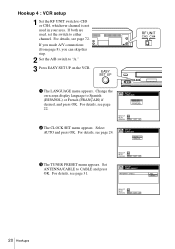
... CH3 CH4 1 The LANGUAGE menu appears. Set ANTENNA/CABLE to either channel. Change the on-screen display language to "A." 3 Press EASY SET UP on the VCR. If you made A/V connections (from page 8), you can skip this step. 2 Set the A/B switch to Spanish (ESPAÑOL) or French (FRANÇAIS) if... desired, and press OK. Hookup 4 : VCR setup 1 Set the RF UNIT switch to CH3 or CH4, whichever channel is not used , set the switch to CABLE and press OK. SELECT : NEXT...
... CH3 CH4 1 The LANGUAGE menu appears. Set ANTENNA/CABLE to either channel. Change the on-screen display language to "A." 3 Press EASY SET UP on the VCR. If you made A/V connections (from page 8), you can skip this step. 2 Set the A/B switch to Spanish (ESPAÑOL) or French (FRANÇAIS) if... desired, and press OK. Hookup 4 : VCR setup 1 Set the RF UNIT switch to CH3 or CH4, whichever channel is not used , set the switch to CABLE and press OK. SELECT : NEXT...

