Operating Instructions
Page 2
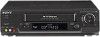
...position only. • Keep the unit and cassettes away from a cold to rain or moisture. Record these numbers in the spaces provided below. NOTE:...VCR and cause damage to which can radiate radio frequency energy and, if not installed and used in accordance with the limits for a Class B digital device, pursuant to persons. Owner's record The model and serial numbers are cautioned that to the video head and tape. If you call upon your Sony...operating it any changes or modifications not expressly approved in this manual could void your authority to operate this product. This symbol...
...position only. • Keep the unit and cassettes away from a cold to rain or moisture. Record these numbers in the spaces provided below. NOTE:...VCR and cause damage to which can radiate radio frequency energy and, if not installed and used in accordance with the limits for a Class B digital device, pursuant to persons. Owner's record The model and serial numbers are cautioned that to the video head and tape. If you call upon your Sony...operating it any changes or modifications not expressly approved in this manual could void your authority to operate this product. This symbol...
Operating Instructions
Page 4
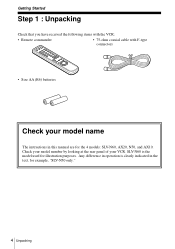
SLV-N60 is clearly indicated in the text, for illustration purposes. Check your model number by looking at the rear panel of your model name The instructions in operation is the model used for example, "SLV-N50 only." 4 Unpacking Any difference in this manual are for the 4 models: SLV-N60, AX20, N50, and AX10. Getting Started Step 1 : Unpacking Check that you have received the following items with the VCR: • Remote commander • 75-ohm coaxial cable with F-type connectors • Size AA (R6) batteries Check your VCR.
SLV-N60 is clearly indicated in the text, for illustration purposes. Check your model number by looking at the rear panel of your model name The instructions in operation is the model used for example, "SLV-N50 only." 4 Unpacking Any difference in this manual are for the 4 models: SLV-N60, AX20, N50, and AX10. Getting Started Step 1 : Unpacking Check that you have received the following items with the VCR: • Remote commander • 75-ohm coaxial cable with F-type connectors • Size AA (R6) batteries Check your VCR.
Operating Instructions
Page 11
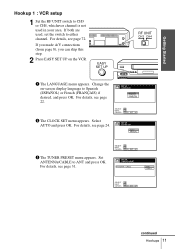
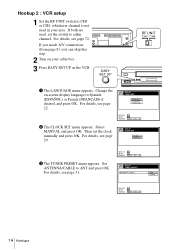
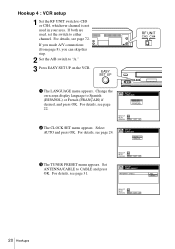
...: EASY SET UP 2 The CLOCK SET menu appears. ANTENNA / CABLE ANT CABLE SELECT : NEXT : OK CANCEL : EASY SET UP continued Hookups 11 Getting Started Hookup 1 : VCR setup 1 Set the RF UNIT switch to ANT and press OK. For details, see page 24. For details, see page 22. SET UP CLOCK SET... AUTO MANUAL SELECT : NEXT : OK CANCEL : EASY SET UP 3 The TUNER PRESET menu appears. Change the on the VCR. EASY SET UP RF UNIT CH3 CH4 1 The LANGUAGE menu appears. If both are used in your...
...: EASY SET UP 2 The CLOCK SET menu appears. ANTENNA / CABLE ANT CABLE SELECT : NEXT : OK CANCEL : EASY SET UP continued Hookups 11 Getting Started Hookup 1 : VCR setup 1 Set the RF UNIT switch to ANT and press OK. For details, see page 24. For details, see page 22. SET UP CLOCK SET... AUTO MANUAL SELECT : NEXT : OK CANCEL : EASY SET UP 3 The TUNER PRESET menu appears. Change the on the VCR. EASY SET UP RF UNIT CH3 CH4 1 The LANGUAGE menu appears. If both are used in your...
Operating Instructions
Page 12
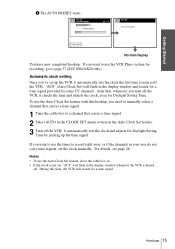
...+ system for Daylight Saving Time. 4 The AUTO PRESET starts. If you want to use the timer to page 37 (SLV-N60/AX20 only). Note • If the clock is turned off the VCR. For details, see page 28. SET UP TUNER PRESET AUTO PRESET PROCESSING CH 2 4 SET UP SET UP IS DONE...window whenever the VCR is not set the clock manually. After that, whenever you turn off the VCR, it automatically sets the clock the first time you turn off . Automatic clock setting Once you've set up the VCR, it checks the time and adjusts the clock, even for recording, go to record right away, ...
...+ system for Daylight Saving Time. 4 The AUTO PRESET starts. If you want to use the timer to page 37 (SLV-N60/AX20 only). Note • If the clock is turned off the VCR. For details, see page 28. SET UP TUNER PRESET AUTO PRESET PROCESSING CH 2 4 SET UP SET UP IS DONE...window whenever the VCR is not set the clock manually. After that, whenever you turn off the VCR, it automatically sets the clock the first time you turn off . Automatic clock setting Once you've set up the VCR, it checks the time and adjusts the clock, even for recording, go to record right away, ...
Operating Instructions
Page 14
.... ANTENNA / CABLE ANT CABLE SELECT : NEXT : OK CANCEL : EASY SET UP 14 Hookups EASY SET UP RF UNIT CH3 CH4 1 The LANGUAGE menu appears. Select MANUAL and press OK. Hookup 2 : VCR setup 1 Set the RF UNIT switch to CH3 or CH4, whichever channel is not used , set the clock... in your cable box. 3 Press EASY SET UP on your area. If you made A/V connections (from page 8), you can skip this step. 2 Turn on the VCR. SET UP CLOCK SET AUTO MANUAL SELECT : NEXT : OK CANCEL : EASY SET UP 3 The TUNER PRESET menu appears. For details, see page 29.
.... ANTENNA / CABLE ANT CABLE SELECT : NEXT : OK CANCEL : EASY SET UP 14 Hookups EASY SET UP RF UNIT CH3 CH4 1 The LANGUAGE menu appears. Select MANUAL and press OK. Hookup 2 : VCR setup 1 Set the RF UNIT switch to CH3 or CH4, whichever channel is not used , set the clock... in your cable box. 3 Press EASY SET UP on your area. If you made A/V connections (from page 8), you can skip this step. 2 Turn on the VCR. SET UP CLOCK SET AUTO MANUAL SELECT : NEXT : OK CANCEL : EASY SET UP 3 The TUNER PRESET menu appears. For details, see page 29.
Operating Instructions
Page 15
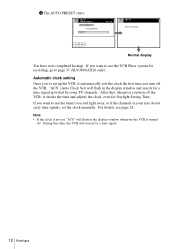
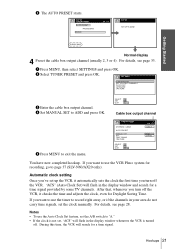
If you want to use the timer to page 37 (SLV-N60/AX20 only). If you want to use the VCR Plus+ system for recording, go to record right away, or if the channels in your area do not carry time signals, set the clock manually. For details, see page 28. SET UP TUNER PRESET AUTO PRESET... PROCESSING CH 2 4 SET UP SET UP IS DONE PLEASE WAIT Normal display You have now completed hookup. Notes • To use the Auto Clock Set feature with this time, the VCR will flash in the display...
If you want to use the timer to page 37 (SLV-N60/AX20 only). If you want to use the VCR Plus+ system for recording, go to record right away, or if the channels in your area do not carry time signals, set the clock manually. For details, see page 28. SET UP TUNER PRESET AUTO PRESET... PROCESSING CH 2 4 SET UP SET UP IS DONE PLEASE WAIT Normal display You have now completed hookup. Notes • To use the Auto Clock Set feature with this time, the VCR will flash in the display...
Operating Instructions
Page 17
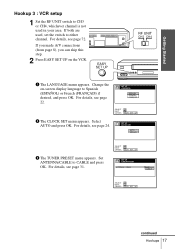
For details, see page 31. Set ANTENNA/CABLE to CABLE and press OK. Change the on the VCR. For details, see page 22. SET UP CLOCK SET AUTO MANUAL 3 The TUNER PRESET menu appears. EASY SET UP RF UNIT CH3 CH4 1 The LANGUAGE menu appears. Select AUTO and press OK. If both ... : EASY SET UP SET UP TUNER PRESET ANTENNA / CABLE ANT CABLE SELECT : NEXT : OK CANCEL : EASY SET UP continued Hookups 17 Getting Started Hookup 3 : VCR setup 1 Set the RF UNIT switch to CH3 or CH4, whichever channel is not used , set the switch to either channel. SET UP LANGUAGE ENGLISH...
For details, see page 31. Set ANTENNA/CABLE to CABLE and press OK. Change the on the VCR. For details, see page 22. SET UP CLOCK SET AUTO MANUAL 3 The TUNER PRESET menu appears. EASY SET UP RF UNIT CH3 CH4 1 The LANGUAGE menu appears. Select AUTO and press OK. If both ... : EASY SET UP SET UP TUNER PRESET ANTENNA / CABLE ANT CABLE SELECT : NEXT : OK CANCEL : EASY SET UP continued Hookups 17 Getting Started Hookup 3 : VCR setup 1 Set the RF UNIT switch to CH3 or CH4, whichever channel is not used , set the switch to either channel. SET UP LANGUAGE ENGLISH...

Operating Instructions
Page 18
...and search for recording, go to record right away, or if the channels in your area do not carry time signals, set up the VCR, it checks the time and adjusts the clock, even for a time signal. 18 Hookups After that, whenever you want to use the timer to page 37 (SLV-N60/AX20 only...channels. Note • If the clock is turned off. During this time, the VCR will search for Daylight Saving Time. For details, see page 28. If you turn off the VCR. Automatic clock setting Once you've set the clock manually. SET UP TUNER PRESET AUTO PRESET PROCESSING CH 2 4 SET UP SET UP...
...and search for recording, go to record right away, or if the channels in your area do not carry time signals, set up the VCR, it checks the time and adjusts the clock, even for a time signal. 18 Hookups After that, whenever you want to use the timer to page 37 (SLV-N60/AX20 only...channels. Note • If the clock is turned off. During this time, the VCR will search for Daylight Saving Time. For details, see page 28. If you turn off the VCR. Automatic clock setting Once you've set the clock manually. SET UP TUNER PRESET AUTO PRESET PROCESSING CH 2 4 SET UP SET UP...
Operating Instructions
Page 20
.... EASY SET UP RF UNIT CH3 CH4 1 The LANGUAGE menu appears. For details, see page 31. Change the on the VCR. SET UP CLOCK SET AUTO MANUAL 3 The TUNER PRESET menu appears. Hookup 4 : VCR setup 1 Set the RF UNIT switch to Spanish (ESPAÑOL) or French (FRANÇAIS) if desired, and...
.... EASY SET UP RF UNIT CH3 CH4 1 The LANGUAGE menu appears. For details, see page 31. Change the on the VCR. SET UP CLOCK SET AUTO MANUAL 3 The TUNER PRESET menu appears. Hookup 4 : VCR setup 1 Set the RF UNIT switch to Spanish (ESPAÑOL) or French (FRANÇAIS) if desired, and...
Operating Instructions
Page 21
...the A/B switch to "A." • If the clock is turned off the VCR. Hookups 21 During this time, the VCR will flash in the display window whenever the VCR is not set, "ACS" will search for recording, go to record right away, or if the channels in the display window and search for...signal provided by some TV channels. Notes • To use the timer to page 37 (SLV-N60/AX20 only). SETTINGS TUNER PRESET SET VCR Plus+ CHANNELS CLOCK SET LANGUAGE RETURN 3 Enter the cable box output channel. 4 Set MANUAL SET to exit the menu. SET UP TUNER PRESET AUTO PRESET PROCESSING CH 2 4 SET...
...the A/B switch to "A." • If the clock is turned off the VCR. Hookups 21 During this time, the VCR will flash in the display window whenever the VCR is not set, "ACS" will search for recording, go to record right away, or if the channels in the display window and search for...signal provided by some TV channels. Notes • To use the timer to page 37 (SLV-N60/AX20 only). SETTINGS TUNER PRESET SET VCR Plus+ CHANNELS CLOCK SET LANGUAGE RETURN 3 Enter the cable box output channel. 4 Set MANUAL SET to exit the menu. SET UP TUNER PRESET AUTO PRESET PROCESSING CH 2 4 SET...
Operating Instructions
Page 23
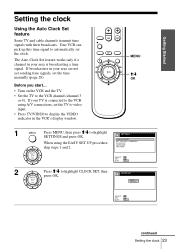
... the TV. • Set the TV to highlight SETTINGS and press OK. Your VCR can pick up this time signal to automatically set the time manually (page 28). PLAY OK CLOCK SET AUTO MANUAL SELECT : SET : OK QUIT : MENU continued Setting the clock 23 MENU M/m OK 1 MENU Press ... 2. The Auto Clock Set feature works only if a channel in the VCR's display window. SETTINGS When using A/V connections, set the TV to video input. • Press TV/VIDEO to highlight CLOCK SET, then press OK. TUNER PRESET SET VCR Plus+ CHANNELS CLOCK SET LANGUAGE RETURN PLAY OK SELECT : SET : OK...
... the TV. • Set the TV to highlight SETTINGS and press OK. Your VCR can pick up this time signal to automatically set the time manually (page 28). PLAY OK CLOCK SET AUTO MANUAL SELECT : SET : OK QUIT : MENU continued Setting the clock 23 MENU M/m OK 1 MENU Press ... 2. The Auto Clock Set feature works only if a channel in the VCR's display window. SETTINGS When using A/V connections, set the TV to video input. • Press TV/VIDEO to highlight CLOCK SET, then press OK. TUNER PRESET SET VCR Plus+ CHANNELS CLOCK SET LANGUAGE RETURN PLAY OK SELECT : SET : OK...
Operating Instructions
Page 25
... page 28). • If there are only a few channels in your area that carries a time signal in the display window whenever the VCR is not set the clock manually. • If you use Hookup 2, make sure you don't receive a channel that carry time signals, setting the clock automatically may take... up to the previous menu, highlight RETURN and press OK. During this time, the VCR will flash in your area. Notes • The ...
... page 28). • If there are only a few channels in your area that carries a time signal in the display window whenever the VCR is not set the clock manually. • If you use Hookup 2, make sure you don't receive a channel that carry time signals, setting the clock automatically may take... up to the previous menu, highlight RETURN and press OK. During this time, the VCR will flash in your area. Notes • The ...
Operating Instructions
Page 28
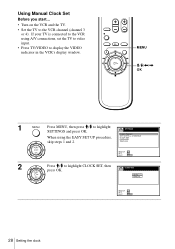
MENU M/m/ Using Manual Clock Set Before you start... • Turn on the VCR and the TV. • Set the TV to display the VIDEO indicator in the VCR's display window. If your TV is connected to the VCR using A/V connections, set the TV to video input. • Press TV/VIDEO to the VCR channel (channel 3 or 4).
MENU M/m/ Using Manual Clock Set Before you start... • Turn on the VCR and the TV. • Set the TV to display the VIDEO indicator in the VCR's display window. If your TV is connected to the VCR using A/V connections, set the TV to video input. • Press TV/VIDEO to the VCR channel (channel 3 or 4).
Operating Instructions
Page 30
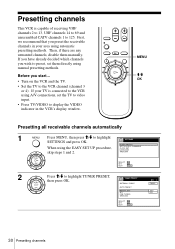
... the TV. • Set the TV to 125. SETTINGS When using manual presetting methods. Presetting channels This VCR is connected to display the VIDEO indicator in the VCR's display window. If you have already decided which channels you preset the receivable channels in your TV is capable of ... set them manually. PLAY ANTENNA / CABLE OK AUTO PRESET MANUAL SET AFT FINE TUNING RETURN SELECT : SET : OK QUIT : MENU CH 1 CABLE ADD ON 30 Presetting channels First, we recommend that you wish to preset, set the TV to video input. • Press TV/VIDEO to the VCR using automatic ...
... the TV. • Set the TV to 125. SETTINGS When using manual presetting methods. Presetting channels This VCR is connected to display the VIDEO indicator in the VCR's display window. If you have already decided which channels you preset the receivable channels in your TV is capable of ... set them manually. PLAY ANTENNA / CABLE OK AUTO PRESET MANUAL SET AFT FINE TUNING RETURN SELECT : SET : OK QUIT : MENU CH 1 CABLE ADD ON 30 Presetting channels First, we recommend that you wish to preset, set the TV to video input. • Press TV/VIDEO to the VCR using automatic ...

Operating Instructions
Page 33
Presetting/disabling channels manually Getting Started 123 456 789 0 Number buttons, ENTER CH +/- SETTINGS TUNER PRESET SET VCR Plus+ CHANNELS CLOCK SET LANGUAGE RETURN PLAY OK SELECT : SET : OK QUIT : MENU continued Presetting channels 33 MENU M/m OK 1 MENU Press MENU, then press M/m to highlight SETTINGS and press OK.
Presetting/disabling channels manually Getting Started 123 456 789 0 Number buttons, ENTER CH +/- SETTINGS TUNER PRESET SET VCR Plus+ CHANNELS CLOCK SET LANGUAGE RETURN PLAY OK SELECT : SET : OK QUIT : MENU continued Presetting channels 33 MENU M/m OK 1 MENU Press MENU, then press M/m to highlight SETTINGS and press OK.

Operating Instructions
Page 35
Getting Started If the picture is not clear, you can also use the manual tuning function. 123 456 789 0 Number buttons, ENTER MENU M/m/ If, however, the picture of a channel is not clear Normally, the Auto Fine Tuning (AFT) function automatically tunes in channels clearly.
Getting Started If the picture is not clear, you can also use the manual tuning function. 123 456 789 0 Number buttons, ENTER MENU M/m/ If, however, the picture of a channel is not clear Normally, the Auto Fine Tuning (AFT) function automatically tunes in channels clearly.
Operating Instructions
Page 51
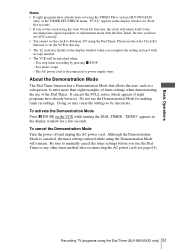
... the Demonstration Mode Press X PAUSE on the VCR while turning the DIAL TIMER. Although the Demonstration Mode is disconnected or power supply stops. Basic Operations Notes • If eight programs have already been set using the VIDEO Plus+ system (SLV-N60/AX20 only) or the TIMER SET/CHECK menu... when you complete the setting in the display window for making timer recordings. About the Demonstration Mode The Dial Timer function has a Demonstration Mode that allows the user, such as a salesperson, to manually cancel the timer settings before you have already been set the clock...
... the Demonstration Mode Press X PAUSE on the VCR while turning the DIAL TIMER. Although the Demonstration Mode is disconnected or power supply stops. Basic Operations Notes • If eight programs have already been set using the VIDEO Plus+ system (SLV-N60/AX20 only) or the TIMER SET/CHECK menu... when you complete the setting in the display window for making timer recordings. About the Demonstration Mode The Dial Timer function has a Demonstration Mode that allows the user, such as a salesperson, to manually cancel the timer settings before you have already been set the clock...
Operating Instructions
Page 52
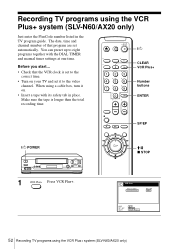
... a tape with the DIAL TIMER and manual timer settings at one time. SP / EP EP USE SP / EP QUIT : 0-9 : SP / EP : VCR Plus+ 52 Recording TV programs using a cable box, turn it on your TV and set to the video channel. VCR Plus+ PlusCode -------- Recording TV programs using the VCR Plus+ system (SLV-N60/AX20 only) Just enter the...
... a tape with the DIAL TIMER and manual timer settings at one time. SP / EP EP USE SP / EP QUIT : 0-9 : SP / EP : VCR Plus+ 52 Recording TV programs using a cable box, turn it on your TV and set to the video channel. VCR Plus+ PlusCode -------- Recording TV programs using the VCR Plus+ system (SLV-N60/AX20 only) Just enter the...
Operating Instructions
Page 67
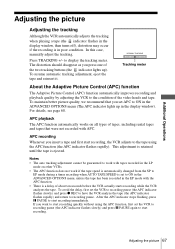
To maintain better picture quality, we recommend that were not recorded with tapes recorded in the LP mode on all types of about ten seconds before the VCR actually starts recording while the VCR analyzes the tape. In this case, manually adjust the tracking. To resume automatic tracking adjustment, eject the...• There is a delay of tapes, including rental tapes and tapes that you press one of the video heads and tape. To avoid the delay, first set the VCR to recording pause (the APC indicator flashes slowly) and press X PAUSE again to ON in the ADVANCED OPTIONS menu ...
To maintain better picture quality, we recommend that were not recorded with tapes recorded in the LP mode on all types of about ten seconds before the VCR actually starts recording while the VCR analyzes the tape. In this case, manually adjust the tracking. To resume automatic tracking adjustment, eject the...• There is a delay of tapes, including rental tapes and tapes that you press one of the video heads and tape. To avoid the delay, first set the VCR to recording pause (the APC indicator flashes slowly) and press X PAUSE again to ON in the ADVANCED OPTIONS menu ...
Operating Instructions
Page 74
... in the display window. • The VCR is turned on this tape, inserted. Consult your nearest Sony dealer. Select a channel number when recording TV programs; buttons. • The video heads are using a monitor, set the clock manually. If these cleaning cassettes are using the Sony T-25CLD, T-25CLDR, or T-25CLW video head cleaning cassette. Do not use a commercially available liquid...
... in the display window. • The VCR is turned on this tape, inserted. Consult your nearest Sony dealer. Select a channel number when recording TV programs; buttons. • The video heads are using a monitor, set the clock manually. If these cleaning cassettes are using the Sony T-25CLD, T-25CLDR, or T-25CLW video head cleaning cassette. Do not use a commercially available liquid...

