Warranty Card
Page 1
... WARRANTY IS THE EXCLUSIVE REMEDY OF THE CONSUMER. For your authorized dealer, call : Sony VCR Customer Information Services Center 1-800-VHS-SONY Or Visit Sony VHS Service Website: www.sony.com/vcrhelp For an accessory or part not available from the Product. SONY SHALL NOT BE LIABLE FOR ANY INCIDENTAL OR CONSEQUENTIAL DAMAGES FOR BREACH OF...
... WARRANTY IS THE EXCLUSIVE REMEDY OF THE CONSUMER. For your authorized dealer, call : Sony VCR Customer Information Services Center 1-800-VHS-SONY Or Visit Sony VHS Service Website: www.sony.com/vcrhelp For an accessory or part not available from the Product. SONY SHALL NOT BE LIABLE FOR ANY INCIDENTAL OR CONSEQUENTIAL DAMAGES FOR BREACH OF...
Correction Notice
Page 1
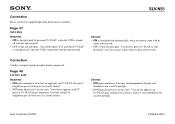
SLV-N51 Correct • ON to start playback automatically, when you insert a tape with its safety tab removed. • OFF to turn off Auto play . You need to press ?/1 and then H PLAY to start playback, when the VCR is turned off with the tape inserted. • OFF to turn off Auto...OUI pour commencer la lecture en appuyant sur H PLAY, lorsque le magnétoscope est éteint avec la cassette insérée. • NON pour désactiver la lecture auto. Sony Corporation © 2001 0-395-841-01(1) You need to press H PLAY to start playback, even if you insert...
SLV-N51 Correct • ON to start playback automatically, when you insert a tape with its safety tab removed. • OFF to turn off Auto play . You need to press ?/1 and then H PLAY to start playback, when the VCR is turned off with the tape inserted. • OFF to turn off Auto...OUI pour commencer la lecture en appuyant sur H PLAY, lorsque le magnétoscope est éteint avec la cassette insérée. • NON pour désactiver la lecture auto. Sony Corporation © 2001 0-395-841-01(1) You need to press H PLAY to start playback, even if you insert...
Dimensions Diagram
Page 1
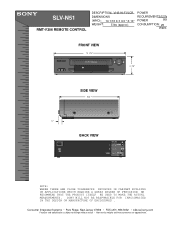
...; b2b.sel.sony.com Features and specifications subject to change without notice. • Non-metric weights and measurements are approximate. SLV-N51 RMT-V306 REMOTE CONTROL MDDEEOSSDCCERRLII:PPTTIIOONN:: VHS HI-FI VCR DIMENSIONS (W(WWEHHIGDDH...))::T: 14 1/16 X 3 3/4 " X 10" WEIGHT: 5 lbs (approx) POWER REQUIREMENTS:120V POWER 60H CONSUMPTION: 25 Watts FRONT VIEW 14 1/16" HI-FI Stereo R 3 7/8" SIDE VIEW 10 " 1" AC IN BACK VIEW LINE LINE IN OUT IN L VHF/UHF R OUT VIDEO...
...; b2b.sel.sony.com Features and specifications subject to change without notice. • Non-metric weights and measurements are approximate. SLV-N51 RMT-V306 REMOTE CONTROL MDDEEOSSDCCERRLII:PPTTIIOONN:: VHS HI-FI VCR DIMENSIONS (W(WWEHHIGDDH...))::T: 14 1/16 X 3 3/4 " X 10" WEIGHT: 5 lbs (approx) POWER REQUIREMENTS:120V POWER 60H CONSUMPTION: 25 Watts FRONT VIEW 14 1/16" HI-FI Stereo R 3 7/8" SIDE VIEW 10 " 1" AC IN BACK VIEW LINE LINE IN OUT IN L VHF/UHF R OUT VIDEO...
Operating Instructions
Page 2
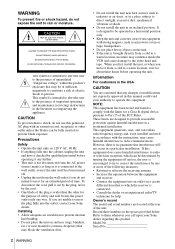
... in a horizontal position only. • Keep the unit and cassettes away from the AC power source (mains) as long as radiators...which the receiver is brought directly from a cold to the video head and tape. Record these numbers in a particular installation. Installing • Allow adequate... tested and found to comply with the instructions, may condense inside the VCR and cause damage to a warm location, wait for a Class B digital...moisture may cause harmful interference to operate this manual could void your Sony dealer. It is intended to alert the user to the presence of...
... in a horizontal position only. • Keep the unit and cassettes away from the AC power source (mains) as long as radiators...which the receiver is brought directly from a cold to the video head and tape. Record these numbers in a particular installation. Installing • Allow adequate... tested and found to comply with the instructions, may condense inside the VCR and cause damage to a warm location, wait for a Class B digital...moisture may cause harmful interference to operate this manual could void your Sony dealer. It is intended to alert the user to the presence of...
Operating Instructions
Page 5
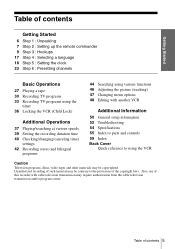
... Lock) Additional Operations 37 Playing/searching at various speeds 39 Setting the recording duration time 40 Checking/changing/canceling timer settings 42 Recording stereo and bilingual programs 44 Searching using the VCR Caution Television programs, films, video tapes and other materials may require authorization from the cable television transmission and/or program owner. Also...
... Lock) Additional Operations 37 Playing/searching at various speeds 39 Setting the recording duration time 40 Checking/changing/canceling timer settings 42 Recording stereo and bilingual programs 44 Searching using the VCR Caution Television programs, films, video tapes and other materials may require authorization from the cable television transmission and/or program owner. Also...
Operating Instructions
Page 6
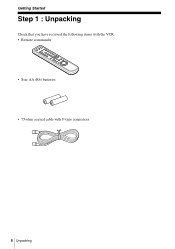
Getting Started Step 1 : Unpacking Check that you have received the following items with the VCR: • Remote commander • Size AA (R6) batteries • 75-ohm coaxial cable with F-type connectors 6 Unpacking
Getting Started Step 1 : Unpacking Check that you have received the following items with the VCR: • Remote commander • Size AA (R6) batteries • 75-ohm coaxial cable with F-type connectors 6 Unpacking
Operating Instructions
Page 7
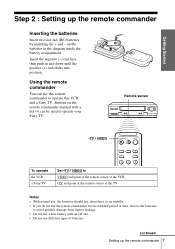
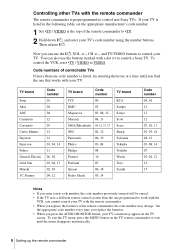
... to operate this remote commander to the diagram inside the battery compartment. Remote sensor •TV / VIDEO To operate the VCR a Sony TV 123 Set •TV / VIDEO to VIDEO and point at the remote sensor at the VCR •TV and point at the remote sensor at the TV Notes • With normal use, the...
... to operate this remote commander to the diagram inside the battery compartment. Remote sensor •TV / VIDEO To operate the VCR a Sony TV 123 Set •TV / VIDEO to VIDEO and point at the remote sensor at the VCR •TV and point at the remote sensor at the TV Notes • With normal use, the...
Operating Instructions
Page 8
... MONITOR button, your TV. To exit the TV menu, press the MENU button on the TV screen. Then release ?/1. To control the VCR, reset •TV / VIDEO to control non-Sony TVs. If your TV is listed, try entering them one that works with a dot (•) to •TV. 2 Hold down .... 8 Setting up the remote commander Now you replace the batteries of the remote commander to control a Sony TV. Code numbers of controllable TVs If more than one programmed to work with the VCR, you cannot control your TV with the remote commander. • When you can also use the ?/1,...
... MONITOR button, your TV. To exit the TV menu, press the MENU button on the TV screen. Then release ?/1. To control the VCR, reset •TV / VIDEO to control non-Sony TVs. If your TV is listed, try entering them one that works with a dot (•) to •TV. 2 Hold down .... 8 Setting up the remote commander Now you replace the batteries of the remote commander to control a Sony TV. Code numbers of controllable TVs If more than one programmed to work with the VCR, you cannot control your TV with the remote commander. • When you can also use the ?/1,...
Operating Instructions
Page 9
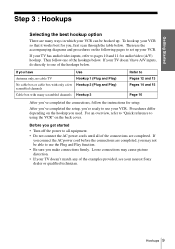
...one of the hookups below . For an overview, refer to "Quick reference to pages 10 and 11 for audio/video (A/V) hookup. If your nearest Sony dealer or qualified technician. If your VCR. Hookups 9 If you , first scan through the table below. Procedures differ depending on the back cover. Then use...Play function. • Be sure you 've completed the connections, follow one of the examples provided, see your TV has audio/video inputs, refer to using the VCR" on the hookup you may cause picture distortion. • If your TV doesn't match any of the hookups below . Loose ...
...one of the hookups below . For an overview, refer to "Quick reference to pages 10 and 11 for audio/video (A/V) hookup. If your nearest Sony dealer or qualified technician. If your VCR. Hookups 9 If you , first scan through the table below. Procedures differ depending on the back cover. Then use...Play function. • Be sure you 've completed the connections, follow one of the examples provided, see your TV has audio/video inputs, refer to using the VCR" on the hookup you may cause picture distortion. • If your TV doesn't match any of the hookups below . Loose ...
Operating Instructions
Page 10
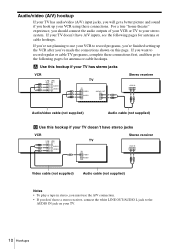
... your TV doesn't have stereo jacks VCR LINE LINE OUT IN 1 AUDIO VIDEO TV IN VIDEO AUDIO Stereo receiver AUX IN Video cable (not supplied) Audio cable (not supplied) Notes • To play a tape in stereo, you must use your VCR to record programs, you're finished setting up your VCR using these connections first, and then...
... your TV doesn't have stereo jacks VCR LINE LINE OUT IN 1 AUDIO VIDEO TV IN VIDEO AUDIO Stereo receiver AUX IN Video cable (not supplied) Audio cable (not supplied) Notes • To play a tape in stereo, you must use your VCR to record programs, you're finished setting up your VCR using these connections first, and then...
Operating Instructions
Page 11
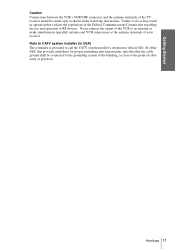
... that violates the regulations of the Federal Communications Commission regarding the use and operation of RF devices. Hookups 11 Never connect the output of the VCR to do so may result in operation that the cable ground shall be made only as practical. Getting Started Caution Connections between the... VCR's VHF/UHF connector and the antenna terminals of the TV receiver should be connected to the grounding system of the building, as close to the ...
... that violates the regulations of the Federal Communications Commission regarding the use and operation of RF devices. Hookups 11 Never connect the output of the VCR to do so may result in operation that the cable ground shall be made only as practical. Getting Started Caution Connections between the... VCR's VHF/UHF connector and the antenna terminals of the TV receiver should be connected to the grounding system of the building, as close to the ...
Operating Instructions
Page 12
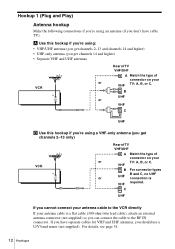
C UHF If you cannot connect your antenna cable to the VCR directly If your antenna cable is VHF required. B UHF or VHF C UHF B Use this hookup...; VHF/UHF antenna (you get channels 2-13 and channels 14 and higher) • UHF-only antenna (you get channels 2-13 only) VCR IN OUT Rear of TV VHF/UHF A Match the type of connector on your or TV: A, B, or C. A Use this hookup ... you're using a VHF-only antenna (you get channels 14 and higher) • Separate VHF and UHF antennas VCR IN OUT Rear of TV VHF/UHF A Match the type of connector on your or VHF TV: A, B, or C.
C UHF If you cannot connect your antenna cable to the VCR directly If your antenna cable is VHF required. B UHF or VHF C UHF B Use this hookup...; VHF/UHF antenna (you get channels 2-13 and channels 14 and higher) • UHF-only antenna (you get channels 2-13 only) VCR IN OUT Rear of TV VHF/UHF A Match the type of connector on your or TV: A, B, or C. A Use this hookup ... you're using a VHF-only antenna (you get channels 14 and higher) • Separate VHF and UHF antennas VCR IN OUT Rear of TV VHF/UHF A Match the type of connector on your or VHF TV: A, B, or C.
Operating Instructions
Page 13
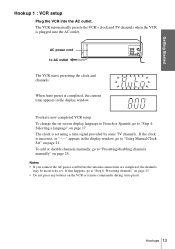
...AC power cord to "Using Manual Clock Set" on page 17. If this happens, go to AC outlet The VCR starts presetting the clock and channels. Getting Started Hookup 1 : VCR setup Plug the VCR into the AC outlet. To change the on-screen display language to French or Spanish, go to "Presetting/disabling... channels manually" on the VCR or remote commander during Auto preset. To add or disable channels manually, go to "Step 6 :Presetting channels" on page 23. • Do not press ...
...AC power cord to "Using Manual Clock Set" on page 17. If this happens, go to AC outlet The VCR starts presetting the clock and channels. Getting Started Hookup 1 : VCR setup Plug the VCR into the AC outlet. To change the on-screen display language to French or Spanish, go to "Presetting/disabling... channels manually" on the VCR or remote commander during Auto preset. To add or disable channels manually, go to "Step 6 :Presetting channels" on page 23. • Do not press ...
Operating Instructions
Page 14
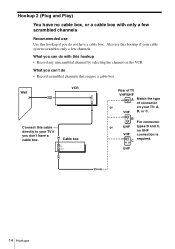
B For connector or UHF types B and C, no cable box, or a cable box with this hookup • Record any unscrambled channel by selecting the channel on your cable system scrambles only a few scrambled channels Recommended use this cable directly to your TV if .... Hookup 2 (Plug and Play) You have no UHF VHF connection is C required. Also use Use this hookup if you do • Record scrambled channels that require a cable box Wall VCR IN OUT Connect this hookup if your TV: A, VHF B, or C. Cable box IN OUT Rear of TV VHF/UHF A Match the type...
B For connector or UHF types B and C, no cable box, or a cable box with this hookup • Record any unscrambled channel by selecting the channel on your cable system scrambles only a few scrambled channels Recommended use this cable directly to your TV if .... Hookup 2 (Plug and Play) You have no UHF VHF connection is C required. Also use Use this hookup if you do • Record scrambled channels that require a cable box Wall VCR IN OUT Connect this hookup if your TV: A, VHF B, or C. Cable box IN OUT Rear of TV VHF/UHF A Match the type...

Operating Instructions
Page 15
.... If this happens, go to "Using Manual Clock Set" on the VCR or remote commander during Auto preset. If the clock is completed, the current time appears in the display window, go to "Step 4: Selecting a language" on ... before the antenna connections are completed, the channels may be incorrectly set using a time signal provided by some TV channels. The VCR automatically presets the VCR's clock and TV channels when the VCR is set . The clock is plugged into the AC outlet. AC power cord to "Presetting/disabling channels manually" on page...
.... If this happens, go to "Using Manual Clock Set" on the VCR or remote commander during Auto preset. If the clock is completed, the current time appears in the display window, go to "Step 4: Selecting a language" on ... before the antenna connections are completed, the channels may be incorrectly set using a time signal provided by some TV channels. The VCR automatically presets the VCR's clock and TV channels when the VCR is set . The clock is plugged into the AC outlet. AC power cord to "Presetting/disabling channels manually" on page...
Operating Instructions
Page 16
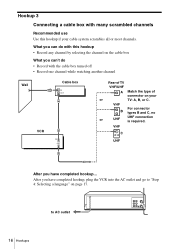
... the VCR into the AC outlet and go to AC outlet 16 Hookups to "Step 4: Selecting a language" on page 17. VHF C UHF After you have completed hookup... VHF For connector B types B and C, no or UHF UHF connection is required. What you can do with this hookup • Record any channel... hookup if your or TV: A, B, or C. Hookup 3 Connecting a cable box with the cable box turned off • Record one channel while watching another channel Wall Cable box IN OUT VCR IN OUT Rear of TV VHF/UHF A Match the type of connector on your cable system scrambles all or most...
... the VCR into the AC outlet and go to AC outlet 16 Hookups to "Step 4: Selecting a language" on page 17. VHF C UHF After you have completed hookup... VHF For connector B types B and C, no or UHF UHF connection is required. What you can do with this hookup • Record any channel... hookup if your or TV: A, B, or C. Hookup 3 Connecting a cable box with the cable box turned off • Record one channel while watching another channel Wall Cable box IN OUT VCR IN OUT Rear of TV VHF/UHF A Match the type of connector on your cable system scrambles all or most...
Operating Instructions
Page 17
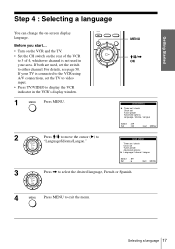
... exit the menu. MENU M/m/, OK MAIN MENU Timer set / check Clock set the TV to video input. • Press TV/VIDEO to "Language/Idioma/Langue." Before you start... • Turn on the VCR and the TV. • Set the CH switch on -screen display language. PLAY OK MAIN MENU Timer set / ...check Clock set the switch to select the desired language, French or Spanish. For details, see page 50. If both are used in the VCR's display window. 1 MENU Press MENU. Getting Started Step 4 : Selecting a language You can change the on the rear of 4, whichever channel is connected to...
... exit the menu. MENU M/m/, OK MAIN MENU Timer set / check Clock set the TV to video input. • Press TV/VIDEO to "Language/Idioma/Langue." Before you start... • Turn on the VCR and the TV. • Set the CH switch on -screen display language. PLAY OK MAIN MENU Timer set / ...check Clock set the switch to select the desired language, French or Spanish. For details, see page 50. If both are used in the VCR's display window. 1 MENU Press MENU. Getting Started Step 4 : Selecting a language You can change the on the rear of 4, whichever channel is connected to...

Operating Instructions
Page 18
... switch to automatically set the time manually (page 21). For details, see page 50. When using A/V connections, set the TV to video input. • Press TV/VIDEO to display the VCR indicator in your area is connected to 3 of 4, whichever channel is not used , set ," then press OK. If both are... not yet sending time signals, set the clock. Your VCR can pick up this time signal to either channel. If your area. Step 5 :...
... switch to automatically set the time manually (page 21). For details, see page 50. When using A/V connections, set the TV to video input. • Press TV/VIDEO to display the VCR indicator in your area is connected to 3 of 4, whichever channel is not used , set ," then press OK. If both are... not yet sending time signals, set the clock. Your VCR can pick up this time signal to either channel. If your area. Step 5 :...
Operating Instructions
Page 19
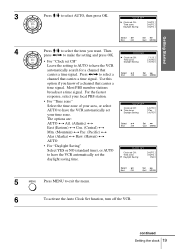
Getting Started 3 Press M/m to select the item you want. Then CLOCK SET press PLAY OK CLOCK SET Clock set CH: Time zone: Daylight Saving: [ AUTO ] [ AUTO ] [ AUTO ] Select : Vv End : OK Set : Bb Quit : MENU 4 Press M/m to select AUTO, then press OK.
Getting Started 3 Press M/m to select the item you want. Then CLOCK SET press PLAY OK CLOCK SET Clock set CH: Time zone: Daylight Saving: [ AUTO ] [ AUTO ] [ AUTO ] Select : Vv End : OK Set : Bb Quit : MENU 4 Press M/m to select AUTO, then press OK.
Operating Instructions
Page 21
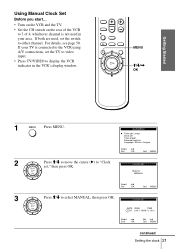
... the TV. • Set the CH switch on the rear of the VCR to 3 of 4, whichever channel is connected to the VCR using A/V connections, set the TV to video input. • Press TV/VIDEO to display the VCR indicator in the VCR's display window. PLAY CLOCK SET OK DATE YEAR TIME 1 / 0 1 2 0 0 1 MON 12 : 0 0 AM Select : Bb...
... the TV. • Set the CH switch on the rear of the VCR to 3 of 4, whichever channel is connected to the VCR using A/V connections, set the TV to video input. • Press TV/VIDEO to display the VCR indicator in the VCR's display window. PLAY CLOCK SET OK DATE YEAR TIME 1 / 0 1 2 0 0 1 MON 12 : 0 0 AM Select : Bb...


