Warranty Card
Page 1
... of protection directly to any accessories) against defects in material or workmanship as fuses or batteries). Please contact Sony at 1-800-VHS-SONY for product information or operation, call: Sony VCR Customer Information Services Center 1-800-VHS-SONY Or Visit Sony VHS Service Website: www.sony.com/vcrhelp For an accessory or part not available from state to be defective, Sony will replace the Product with refurbished Product), at no charge. 2. This...
... of protection directly to any accessories) against defects in material or workmanship as fuses or batteries). Please contact Sony at 1-800-VHS-SONY for product information or operation, call: Sony VCR Customer Information Services Center 1-800-VHS-SONY Or Visit Sony VHS Service Website: www.sony.com/vcrhelp For an accessory or part not available from state to be defective, Sony will replace the Product with refurbished Product), at no charge. 2. This...
Operating Instructions
Page 2
... to be fully inserted to the video head and tape. Precautions Safety • Operate the unit only on the unit. • If the unit is wider than the other outlet unless the blades can be operated in this manual could void your Sony dealer. To disconnect the cord, pull it for the purpose of important operating and maintenance (servicing) instructions in a place subject to radio...
... to be fully inserted to the video head and tape. Precautions Safety • Operate the unit only on the unit. • If the unit is wider than the other outlet unless the blades can be operated in this manual could void your Sony dealer. To disconnect the cord, pull it for the purpose of important operating and maintenance (servicing) instructions in a place subject to radio...
Operating Instructions
Page 3
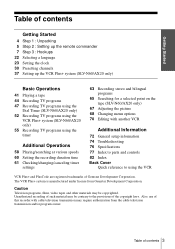
... 5 Step 2 : Setting up the remote commander 7 Step 3 : Hookups 22 Selecting a language 23 Setting the clock 30 Presetting channels 37 Setting up the VCR Plus+ system (SLV-N60/AX20 only) Basic Operations 41 Playing a tape 44 Recording TV programs 47 Recording TV programs using the Dial Timer (SLV-N60/AX20 only) 52 Recording TV programs using the VCR Plus+ system (SLV-N60/AX20 only) 55 Recording TV programs using the VCR VCR Plus+ and PlusCode are registered trademarks of Gemstar Development Corporation. Caution Television programs, films, video tapes and other...
... 5 Step 2 : Setting up the remote commander 7 Step 3 : Hookups 22 Selecting a language 23 Setting the clock 30 Presetting channels 37 Setting up the VCR Plus+ system (SLV-N60/AX20 only) Basic Operations 41 Playing a tape 44 Recording TV programs 47 Recording TV programs using the Dial Timer (SLV-N60/AX20 only) 52 Recording TV programs using the VCR Plus+ system (SLV-N60/AX20 only) 55 Recording TV programs using the VCR VCR Plus+ and PlusCode are registered trademarks of Gemstar Development Corporation. Caution Television programs, films, video tapes and other...
Operating Instructions
Page 7
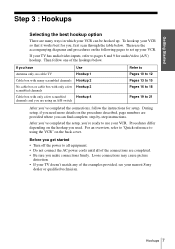
... channels Cable box with only a few scrambled Hookup 4 channels and you are many ways in which your VCR so that it works best for audio/video (A/V) hookup. Then use your VCR. Getting Started Step 3 : Hookups Selecting the best hookup option There are using the VCR" on the back cover. If your VCR. To hook up your TV has audio/video inputs, refer to set up your VCR can find complete, step-by-step instructions...
... channels Cable box with only a few scrambled Hookup 4 channels and you are many ways in which your VCR so that it works best for audio/video (A/V) hookup. Then use your VCR. Getting Started Step 3 : Hookups Selecting the best hookup option There are using the VCR" on the back cover. If your VCR. To hook up your TV has audio/video inputs, refer to set up your VCR can find complete, step-by-step instructions...
Operating Instructions
Page 8
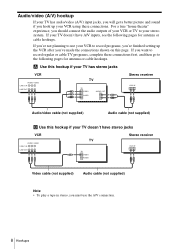
... play a tape in stereo, you 've made the connections shown on this page. A Use this hookup if your TV has stereo jacks VCR AUDIO VIDEO LINE-1 IN LINE OUT TV IN VIDEO AUDIO AUDIO OUT Stereo receiver AUX IN Audio/video cable (not supplied) Audio cable (not supplied) B Use this hookup if your TV doesn't have A/V inputs, see the following pages for antenna or cable hookups. If you're not planning to record programs, you're finished setting up your VCR using...
... play a tape in stereo, you 've made the connections shown on this page. A Use this hookup if your TV has stereo jacks VCR AUDIO VIDEO LINE-1 IN LINE OUT TV IN VIDEO AUDIO AUDIO OUT Stereo receiver AUX IN Audio/video cable (not supplied) Audio cable (not supplied) B Use this hookup if your TV doesn't have A/V inputs, see the following pages for antenna or cable hookups. If you're not planning to record programs, you're finished setting up your VCR using...
Operating Instructions
Page 15
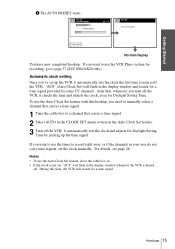
... to use the timer to a channel that carries a time signal. 2 Select AUTO in the display window and search for a time signal provided by picking up the VCR, it checks the time and adjusts the clock, even for Daylight Saving Time by some TV channels. Notes • To use the Auto Clock Set feature with this time, the VCR will flash in the CLOCK SET menu to use the VCR Plus+ system for a time signal. SET UP TUNER PRESET AUTO PRESET...
... to use the timer to a channel that carries a time signal. 2 Select AUTO in the display window and search for a time signal provided by picking up the VCR, it checks the time and adjusts the clock, even for Daylight Saving Time by some TV channels. Notes • To use the Auto Clock Set feature with this time, the VCR will flash in the CLOCK SET menu to use the VCR Plus+ system for a time signal. SET UP TUNER PRESET AUTO PRESET...
Operating Instructions
Page 21
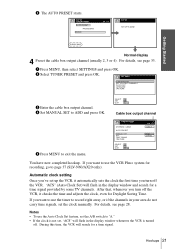
... display 4 Preset the cable box output channel (usually 2, 3 or 4). SETTINGS TUNER PRESET SET VCR Plus+ CHANNELS CLOCK SET LANGUAGE RETURN 3 Enter the cable box output channel. 4 Set MANUAL SET to exit the menu. If you turn off . Notes • To use the timer to use the VCR Plus+ system for a time signal. During this time, the VCR will flash in your area do not carry time signals, set up the VCR, it checks the time and adjusts the clock, even for a time signal provided by some TV channels...
... display 4 Preset the cable box output channel (usually 2, 3 or 4). SETTINGS TUNER PRESET SET VCR Plus+ CHANNELS CLOCK SET LANGUAGE RETURN 3 Enter the cable box output channel. 4 Set MANUAL SET to exit the menu. If you turn off . Notes • To use the timer to use the VCR Plus+ system for a time signal. During this time, the VCR will flash in your area do not carry time signals, set up the VCR, it checks the time and adjusts the clock, even for a time signal provided by some TV channels...
Operating Instructions
Page 43
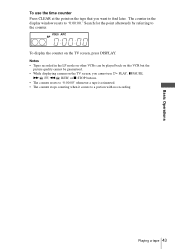
... LP mode on other VCRs can be played back on this VCR but the picture quality cannot be guaranteed. • While displaying a menu on the TV screen, you want to find later. Search for the point afterwards by referring to the counter. Notes • Tapes recorded in the display window resets to "0:00:00." Playing a tape 43 Basic Operations To use H PLAY, X PAUSE, M FF, m REW, or x STOP buttons...
... LP mode on other VCRs can be played back on this VCR but the picture quality cannot be guaranteed. • While displaying a menu on the TV screen, you want to find later. Search for the point afterwards by referring to the counter. Notes • Tapes recorded in the display window resets to "0:00:00." Playing a tape 43 Basic Operations To use H PLAY, X PAUSE, M FF, m REW, or x STOP buttons...
Operating Instructions
Page 45
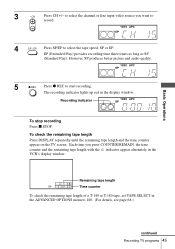
... recording time three times as long as SP (Standard Play). The recording indicator lights up red in the ADVANCED OPTIONS menu to select the channel or line input video source you press COUNTER/REMAIN, the time counter and the remaining tape length with the indicator appear alternately in the VCR's display window. 1 :38 SP 0 : 0 0 : 2 2 Remaining tape length Time counter To check the remaining tape length of a T-140 or T-180 tape, set TAPE...
... recording time three times as long as SP (Standard Play). The recording indicator lights up red in the ADVANCED OPTIONS menu to select the channel or line input video source you press COUNTER/REMAIN, the time counter and the remaining tape length with the indicator appear alternately in the VCR's display window. 1 :38 SP 0 : 0 0 : 2 2 Remaining tape length Time counter To check the remaining tape length of a T-140 or T-180 tape, set TAPE...
Operating Instructions
Page 47
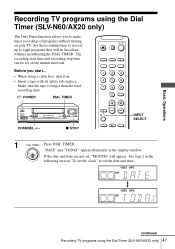
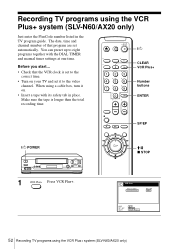
... Operations Recording TV programs using the Dial Timer (SLV-N60/AX20 only) 47 x STOP INPUT SELECT 1 DIAL TIMER Press DIAL TIMER. Make sure the tape is longer than the total recording time. ?/1 POWER DIAL TIMER 123 456 789 0 CHANNEL +/- "DATE" and "TODAY" appear alternately in place. See step 2 in the following section "To set the clock" to set , "MONTH" will be set at one minute intervals. VIDEO APC EP VIDEO APC EP continued Recording TV programs using...
... Operations Recording TV programs using the Dial Timer (SLV-N60/AX20 only) 47 x STOP INPUT SELECT 1 DIAL TIMER Press DIAL TIMER. Make sure the tape is longer than the total recording time. ?/1 POWER DIAL TIMER 123 456 789 0 CHANNEL +/- "DATE" and "TODAY" appear alternately in place. See step 2 in the following section "To set the clock" to set , "MONTH" will be set at one minute intervals. VIDEO APC EP VIDEO APC EP continued Recording TV programs using...
Operating Instructions
Page 50
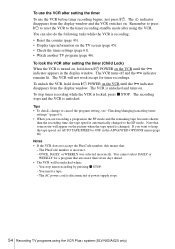
... TV screen (page 45). • Check the timer settings (page 61). • Watch another TV program (page 46). The recording stops and the VCR is locked, press x STOP. "DAY" appears in the SP mode and the remaining tape becomes shorter than the recording time, the tape speed is unlocked and turns on the VCR while you want to keep the tape speed, set AUTO TAPE SPEED to the timer recording standby mode after using the Dial Timer (SLV-N60/AX20...
... TV screen (page 45). • Check the timer settings (page 61). • Watch another TV program (page 46). The recording stops and the VCR is locked, press x STOP. "DAY" appears in the SP mode and the remaining tape becomes shorter than the recording time, the tape speed is unlocked and turns on the VCR while you want to keep the tape speed, set AUTO TAPE SPEED to the timer recording standby mode after using the Dial Timer (SLV-N60/AX20...
Operating Instructions
Page 51
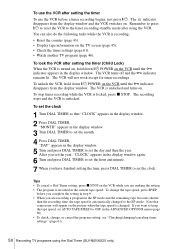
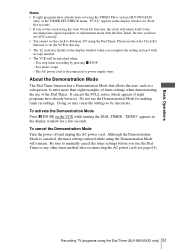
... the Demonstration Mode Press X PAUSE on the VCR while turning the DIAL TIMER. Basic Operations Notes • If eight programs have already been set using the VIDEO Plus+ system (SLV-N60/AX20 only) or the TIMER SET/CHECK menu, "FULL" appears in the display window for about five seconds. • If you set the clock using the Auto Clock Set function, the clock will adjust itself to the incoming time signal regardless of adjustments made with...
... the Demonstration Mode Press X PAUSE on the VCR while turning the DIAL TIMER. Basic Operations Notes • If eight programs have already been set using the VIDEO Plus+ system (SLV-N60/AX20 only) or the TIMER SET/CHECK menu, "FULL" appears in the display window for about five seconds. • If you set the clock using the Auto Clock Set function, the clock will adjust itself to the incoming time signal regardless of adjustments made with...
Operating Instructions
Page 52
... video channel. SP / EP EP USE SP / EP QUIT : 0-9 : SP / EP : VCR Plus+ 52 Recording TV programs using the VCR Plus+ system (SLV-N60/AX20 only) Just enter the PlusCode number listed in place. When using a cable box, turn it to the correct time. • Turn on . • Insert a tape with the DIAL TIMER and manual timer settings at one time. Before you start... • Check that program are set it on your TV and set automatically. The date, time and channel number...
... video channel. SP / EP EP USE SP / EP QUIT : 0-9 : SP / EP : VCR Plus+ 52 Recording TV programs using the VCR Plus+ system (SLV-N60/AX20 only) Just enter the PlusCode number listed in place. When using a cable box, turn it to the correct time. • Turn on . • Insert a tape with the DIAL TIMER and manual timer settings at one time. Before you start... • Check that program are set it on your TV and set automatically. The date, time and channel number...

Operating Instructions
Page 53
... cancel the setting. 5 To enter another setting, repeat steps 1 to 4. 6 Press ?/1 to enter the 4 5 6 PlusCode number. 7 8 9 If you make a mistake, press CLEAR and 0 re-enter the correct number. VCR Plus+ PlusCode 12345--- Basic Operations 2 1 2 3 Press the number buttons to turn off the VCR. The indicator appears in the display window and the VCR stands by for recording. continued Recording TV programs using a cable box, leave it on the TV screen. SP / EP...
... cancel the setting. 5 To enter another setting, repeat steps 1 to 4. 6 Press ?/1 to enter the 4 5 6 PlusCode number. 7 8 9 If you make a mistake, press CLEAR and 0 re-enter the correct number. VCR Plus+ PlusCode 12345--- Basic Operations 2 1 2 3 Press the number buttons to turn off the VCR. The indicator appears in the display window and the VCR stands by for recording. continued Recording TV programs using a cable box, leave it on the TV screen. SP / EP...
Operating Instructions
Page 54
... recording time, the tape speed is changed to the timer recording standby mode after setting the timer To use the VCR after using the VCR Plus+ system (SLV-N60/AX20 only) ONCE, DAILY, or WEEKLY was selected incorrectly. The AC power cord is locked, press x STOP. Note that : - You stop timer recording while the VCR is disconnected or power supply stops. 54 Recording TV programs using the VCR. To use the VCR before timer recording begins, just press ?/1. The PlusCode number is recording: • Reset...
... recording time, the tape speed is changed to the timer recording standby mode after setting the timer To use the VCR after using the VCR Plus+ system (SLV-N60/AX20 only) ONCE, DAILY, or WEEKLY was selected incorrectly. The AC power cord is locked, press x STOP. Note that : - You stop timer recording while the VCR is disconnected or power supply stops. 54 Recording TV programs using the VCR. To use the VCR before timer recording begins, just press ?/1. The PlusCode number is recording: • Reset...
Operating Instructions
Page 68
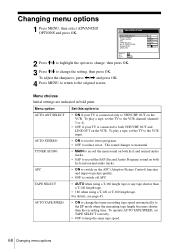
To adjust the sharpness, press ADVANCED OPTIONS AUTO ANT SELECT AUTO STEREO TUNER AUDIO APC TAPE SELECT AUTO TAPE SPEED SHARPNESS RETURN SELECT : SET : OK QUIT : MENU 2 Press M/m to highlight the option to change, then press OK. 3 Press M/m to change the setting, then press OK. Changing menu options 1 Press MENU, then select ADVANCED OPTIONS and press OK.
To adjust the sharpness, press ADVANCED OPTIONS AUTO ANT SELECT AUTO STEREO TUNER AUDIO APC TAPE SELECT AUTO TAPE SPEED SHARPNESS RETURN SELECT : SET : OK QUIT : MENU 2 Press M/m to highlight the option to change, then press OK. 3 Press M/m to change the setting, then press OK. Changing menu options 1 Press MENU, then select ADVANCED OPTIONS and press OK.
Operating Instructions
Page 74
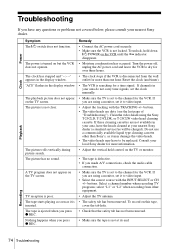
... or problems not covered below, please consult your nearest Sony dealer. buttons. • The video heads are using a monitor, set to the channel for the VCR. Recording 74 Troubleshooting Power Clock Playback Symptom Remedy The ?/1 switch does not function. • Connect the AC power cord securely. • Make sure the VCR is not at your nearest Sony dealer (a standard service fee will be replaced. If these cleaning cassettes are using the Sony T-25CLD, T-25CLDR, or T-25CLW video head cleaning cassette. cover...
... or problems not covered below, please consult your nearest Sony dealer. buttons. • The video heads are using a monitor, set to the channel for the VCR. Recording 74 Troubleshooting Power Clock Playback Symptom Remedy The ?/1 switch does not function. • Connect the AC power cord securely. • Make sure the VCR is not at your nearest Sony dealer (a standard service fee will be replaced. If these cleaning cassettes are using the Sony T-25CLD, T-25CLDR, or T-25CLW video head cleaning cassette. cover...
Operating Instructions
Page 75
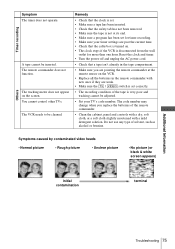
... Troubleshooting 75 The VCR needs to be inserted. The remote commander does not function. Do not use any type of the tape is very poor and tracking cannot be adjusted. • Set your TV's code number. A tape cannot be cleaned. The code number may change when you are weak. • Make sure the [TV] / [VIDEO] switch is set correctly. • The recording condition of solvent, such as alcohol or benzine. Timer recording...
... Troubleshooting 75 The VCR needs to be inserted. The remote commander does not function. Do not use any type of the tape is very poor and tracking cannot be adjusted. • Set your TV's code number. A tape cannot be cleaned. The code number may change when you are weak. • Make sure the [TV] / [VIDEO] switch is set correctly. • The recording condition of solvent, such as alcohol or benzine. Timer recording...
Operating Instructions
Page 76
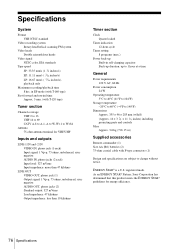
... VIDEO OUT, phono jack (1) Output signal: 1 Vp-p, 75 ohms, unbalanced, sync negative AUDIO OUT, phono jacks (2) Standard output: 327 mVrms Load impedance: 47 kilohms Output impedance: less than 10 kilohms Timer section Clock Quartz locked Timer indication 12-hour cycle Timer setting 8 programs (max.) Power back-up Built-in self-charging capacitor Back-up duration: up to 1 hour at a time General Power requirements 120 V AC, 60 Hz Power consumption 24 W Operating...
... VIDEO OUT, phono jack (1) Output signal: 1 Vp-p, 75 ohms, unbalanced, sync negative AUDIO OUT, phono jacks (2) Standard output: 327 mVrms Load impedance: 47 kilohms Output impedance: less than 10 kilohms Timer section Clock Quartz locked Timer indication 12-hour cycle Timer setting 8 programs (max.) Power back-up Built-in self-charging capacitor Back-up duration: up to 1 hour at a time General Power requirements 120 V AC, 60 Hz Power consumption 24 W Operating...

Operating Instructions
Page 82
... audio track 64 P Picture adjustment. Index A Adjusting picture 35, 67 tracking 67 Advanced option 68 AFT (Auto Fine Tuning) 35 Antenna hookup 10 APC (Adaptive Picture Control) 67 Audio track 64 Audio/video (A/V) hookup 8 Auto Clock Set 23 Auto Tape Speed 68 C Cable hookup 7 Channel line-up 37 recording 52 82 Index see Adjusting Tuner presetting 30 V VCR Plus+ channel set up chart 37 Child Lock 50 Cleaning the video heads 74 Clock setting 23 Connecting Cable TV 13 external antenna connector 73 UHF/VHF band mixer 73 Counter 43 D Demonstration Mode 51 Dial Timer...
... audio track 64 P Picture adjustment. Index A Adjusting picture 35, 67 tracking 67 Advanced option 68 AFT (Auto Fine Tuning) 35 Antenna hookup 10 APC (Adaptive Picture Control) 67 Audio track 64 Audio/video (A/V) hookup 8 Auto Clock Set 23 Auto Tape Speed 68 C Cable hookup 7 Channel line-up 37 recording 52 82 Index see Adjusting Tuner presetting 30 V VCR Plus+ channel set up chart 37 Child Lock 50 Cleaning the video heads 74 Clock setting 23 Connecting Cable TV 13 external antenna connector 73 UHF/VHF band mixer 73 Counter 43 D Demonstration Mode 51 Dial Timer...

