

α Handbook
Page 2
... parts 13 Front 13 Back 14 Top 15 Sides/Bottom 16 Lens 18 Charging the battery pack 19 Inserting the battery pack/memory card (sold separately 21 Memory cards that you can use 23 Attaching a lens 24 Turning on the camera and setting the clock 27 Before shooting 29 Adjusting the viewfinder's visual acuity (diopter adjustment 29 Holding the camera properly 29 Shooting and viewing images Shooting still images 30 Recording movies 32 Playing back images 33 Deleting images (Delete...
... parts 13 Front 13 Back 14 Top 15 Sides/Bottom 16 Lens 18 Charging the battery pack 19 Inserting the battery pack/memory card (sold separately 21 Memory cards that you can use 23 Attaching a lens 24 Turning on the camera and setting the clock 27 Before shooting 29 Adjusting the viewfinder's visual acuity (diopter adjustment 29 Holding the camera properly 29 Shooting and viewing images Shooting still images 30 Recording movies 32 Playing back images 33 Deleting images (Delete...

α Handbook
Page 57
... using the MENU button Audio Recording (105) Wind Noise Reduct. (105) Sets whether to record audio when shooting a movie. (On/Off) Reduces wind noise during flash use auto focus when you look through the viewfinder. (On/Off) Sets the method for switching between the viewfinder and LCD screen. (Auto/Manual) Reduces the red-eye phenomenon during movie recording. (On/Off) Custom menu Eye-Start AF FINDER/LCD Setting (164) Red Eye Reduction Release w/o Lens (160) S. Info./ Histogram) 57 Sets auto review. (10 Sec/5 Sec/2 Sec/Off) DISP Button(Monitor) Sets the LCD screen display modes...
... using the MENU button Audio Recording (105) Wind Noise Reduct. (105) Sets whether to record audio when shooting a movie. (On/Off) Reduces wind noise during flash use auto focus when you look through the viewfinder. (On/Off) Sets the method for switching between the viewfinder and LCD screen. (Auto/Manual) Reduces the red-eye phenomenon during movie recording. (On/Off) Custom menu Eye-Start AF FINDER/LCD Setting (164) Red Eye Reduction Release w/o Lens (160) S. Info./ Histogram) 57 Sets auto review. (10 Sec/5 Sec/2 Sec/Off) DISP Button(Monitor) Sets the LCD screen display modes...
α Handbook
Page 58
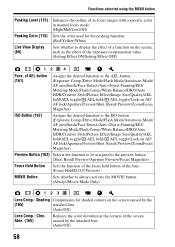
... AEL button (161) Assigns the desired function to the AEL button. (Exposure Comp./Drive Mode/Flash Mode/Autofocus Mode/ AF area/Smile/Face Detect./Auto Object Framing/ISO/ Metering Mode/Flash Comp./White Balance/DRO/Auto HDR/Creative Style/Picture Effect/Image Size/Quality/AEL hold/AEL toggle/ AEL hold button of the lens. (Focus Hold/D.O.F.Preview) MOVIE Button Sets whether to always activate the MOVIE button. (Always/Movie Mode Only) Lens Comp.: Shading Compensates for the peaking function. (Red/Yellow/White) Sets whether to display the effect of a function on the screen...
... AEL button (161) Assigns the desired function to the AEL button. (Exposure Comp./Drive Mode/Flash Mode/Autofocus Mode/ AF area/Smile/Face Detect./Auto Object Framing/ISO/ Metering Mode/Flash Comp./White Balance/DRO/Auto HDR/Creative Style/Picture Effect/Image Size/Quality/AEL hold/AEL toggle/ AEL hold button of the lens. (Focus Hold/D.O.F.Preview) MOVIE Button Sets whether to always activate the MOVIE button. (Always/Movie Mode Only) Lens Comp.: Shading Compensates for the peaking function. (Red/Yellow/White) Sets whether to display the effect of a function on the screen...
α Handbook
Page 66
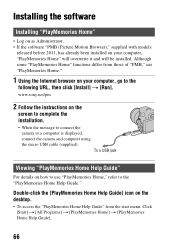
...). To a USB jack Viewing "PlayMemories Home Help Guide" For details on how to use "PlayMemories Home." 1 Using the Internet browser on the screen to complete the installation. • When the message to connect the camera to the "PlayMemories Home Help Guide." Although some "PlayMemories Home" functions differ from the start menu: Click [Start] t [All Programs] t [PlayMemories Home] t [PlayMemories Home Help Guide]. 66 www.sony.net/pm 2 Follow the instructions on...
...). To a USB jack Viewing "PlayMemories Home Help Guide" For details on how to use "PlayMemories Home." 1 Using the Internet browser on the screen to complete the installation. • When the message to connect the camera to the "PlayMemories Home Help Guide." Although some "PlayMemories Home" functions differ from the start menu: Click [Start] t [All Programs] t [PlayMemories Home] t [PlayMemories Home Help Guide]. 66 www.sony.net/pm 2 Follow the instructions on...

α Handbook
Page 67
... Windows: Click [Start] t [All Programs] t [Image Data Converter] t [Help] t [Image Data Converter Ver.4]. For Windows: http://www.sony.co.jp/imsoft/Win/ For Mac: http://www.sony.co.jp/imsoft/Mac/ 2 Follow the instructions on how to use "Image Data Converter," refer to complete the installation. Installing the software • For Windows 8, select the [PlayMemories Home] icon on the Start screen, then launch "PlayMemories Home" and select [PlayMemories Home Help Guide] from the [Help] menu...
... Windows: Click [Start] t [All Programs] t [Image Data Converter] t [Help] t [Image Data Converter Ver.4]. For Windows: http://www.sony.co.jp/imsoft/Win/ For Mac: http://www.sony.co.jp/imsoft/Mac/ 2 Follow the instructions on how to use "Image Data Converter," refer to complete the installation. Installing the software • For Windows 8, select the [PlayMemories Home] icon on the Start screen, then launch "PlayMemories Home" and select [PlayMemories Home Help Guide] from the [Help] menu...

α Handbook
Page 68
... the instructions on the screen to complete the installation. • For details on your computer, go to the following URL. Installing the software Installing "Remote Camera Control" To use "Remote Camera Control," refer to a computer. The following functions are available. • You can set up the camera or shoot an image from the computer. • You can record an image directly to the computer. • You can perform Interval Timer Shooting. 1 Using the Internet browser...
... the instructions on the screen to complete the installation. • For details on your computer, go to the following URL. Installing the software Installing "Remote Camera Control" To use "Remote Camera Control," refer to a computer. The following functions are available. • You can set up the camera or shoot an image from the computer. • You can record an image directly to the computer. • You can perform Interval Timer Shooting. 1 Using the Internet browser...

α Handbook
Page 143
... drive mode Single Shooting This mode is set to [Off], the camera continues to adjust the exposure even after the first shot in [Scene Selection], you press and hold the shutter button, recording continues. Shooting) t Select the desired speed 2 Adjust the focus and shoot the subject. • When you cannot use [Single Shooting]. Shooting] or [Tele-zoom Cont. on the control button t (Cont. Shooting technique • To shoot continuously faster, set the exposure mode to [Tele-zoom Cont...
... drive mode Single Shooting This mode is set to [Off], the camera continues to adjust the exposure even after the first shot in [Scene Selection], you press and hold the shutter button, recording continues. Shooting) t Select the desired speed 2 Adjust the focus and shoot the subject. • When you cannot use [Single Shooting]. Shooting] or [Tele-zoom Cont. on the control button t (Cont. Shooting technique • To shoot continuously faster, set the exposure mode to [Tele-zoom Cont...

α Handbook
Page 157
... digital processing on the screen. This is suitable when you need 2 image files, a JPEG for viewing, and a RAW for professional purposes. • The image size is set when the exposure mode is fixed to [L]. Select this format to process images on one memory card, but the image quality will allow more files to [Sweep Panorama]. Quality MENU button t 1 t [Quality] t Select the desired setting (RAW) (RAW & JPEG) (Fine) (Standard) File format: RAW (Records using the RAW compression format.) + JPEG A RAW image and a JPEG image...
... digital processing on the screen. This is suitable when you need 2 image files, a JPEG for viewing, and a RAW for professional purposes. • The image size is set when the exposure mode is fixed to [L]. Select this format to process images on one memory card, but the image quality will allow more files to [Sweep Panorama]. Quality MENU button t 1 t [Quality] t Select the desired setting (RAW) (RAW & JPEG) (Fine) (Standard) File format: RAW (Records using the RAW compression format.) + JPEG A RAW image and a JPEG image...

α Handbook
Page 158
With this camera. Setting the aspect ratio and image quality About RAW images Download and install "Image Data Converter" on this software, a RAW image can be opened and converted to open a RAW image recorded on your computer to a common format, such as JPEG or TIFF, and its white balance, color saturation, contrast, etc., can be readjusted. • The RAW format image cannot be printed using a DPOF (print) designated printer. • You cannot set [Auto HDR] or [Picture Effect] for RAW format images. 158
With this camera. Setting the aspect ratio and image quality About RAW images Download and install "Image Data Converter" on this software, a RAW image can be opened and converted to open a RAW image recorded on your computer to a common format, such as JPEG or TIFF, and its white balance, color saturation, contrast, etc., can be readjusted. • The RAW format image cannot be printed using a DPOF (print) designated printer. • You cannot set [Auto HDR] or [Picture Effect] for RAW format images. 158

α Handbook
Page 161
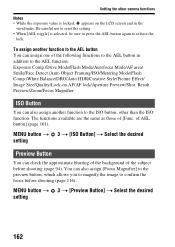
MENU button t 2 t [Auto Review] t Select the desired setting Notes • In auto review, the image will not be selected from the following 2 functions (page 123): - of AEL button The function of the AEL button can set to on the screen immediately after shooting. Holding the locked exposure value by pressing the AEL button until the button is pressed again ([AEL toggle]). MENU button t 3 t [Func. MENU button t 2 t [Grid Line] t Select the desired setting Auto Review You can change the displayed time. Func. Holding the locked exposure value by...
MENU button t 2 t [Auto Review] t Select the desired setting Notes • In auto review, the image will not be selected from the following 2 functions (page 123): - of AEL button The function of the AEL button can set to on the screen immediately after shooting. Holding the locked exposure value by pressing the AEL button until the button is pressed again ([AEL toggle]). MENU button t 3 t [Func. MENU button t 2 t [Grid Line] t Select the desired setting Auto Review You can change the displayed time. Func. Holding the locked exposure value by...
α Handbook
Page 162
... button, other camera functions Notes • While the exposure value is selected, be sure to press the AEL button again to the AEL function: Exposure Comp./Drive Mode/Flash Mode/Autofocus Mode/AF area/ Smile/Face Detect./Auto Object Framing/ISO/Metering Mode/Flash Comp./White Balance/DRO/Auto HDR/Creative Style/Picture Effect/ Image Size/Quality/Lock-on the LCD screen and in addition to release the lock. Setting the other than the ISO function. You can assign one of AEL button...
... button, other camera functions Notes • While the exposure value is selected, be sure to press the AEL button again to the AEL function: Exposure Comp./Drive Mode/Flash Mode/Autofocus Mode/AF area/ Smile/Face Detect./Auto Object Framing/ISO/Metering Mode/Flash Comp./White Balance/DRO/Auto HDR/Creative Style/Picture Effect/ Image Size/Quality/Lock-on the LCD screen and in addition to release the lock. Setting the other than the ISO function. You can assign one of AEL button...
α Handbook
Page 173
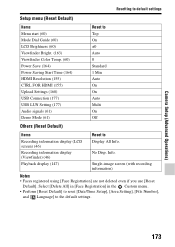
... [Delete All] in [Face Registration] in the Custom menu. • Perform [Reset Default] to reset [Date/Time Setup], [Area Setting], [File Number], and [ Language] to Recording information display (LCD screen) (46) Display All Info. Camera Setup (Advanced Operations) Resetting to default settings Setup menu (Reset Default) Items Menu start (60) Mode Dial Guide (60) LCD Brightness (60) Viewfinder Bright. (163) Viewfinder Color Temp. (60) Power Save (164) Power Saving Start Time (164) HDMI Resolution (155) CTRL FOR HDMI (155) Upload Settings (168) USB Connection (177) USB LUN Setting (177...
... [Delete All] in [Face Registration] in the Custom menu. • Perform [Reset Default] to reset [Date/Time Setup], [Area Setting], [File Number], and [ Language] to Recording information display (LCD screen) (46) Display All Info. Camera Setup (Advanced Operations) Resetting to default settings Setup menu (Reset Default) Items Menu start (60) Mode Dial Guide (60) LCD Brightness (60) Viewfinder Bright. (163) Viewfinder Color Temp. (60) Power Save (164) Power Saving Start Time (164) HDMI Resolution (155) CTRL FOR HDMI (155) Upload Settings (168) USB Connection (177) USB LUN Setting (177...
α Handbook
Page 198
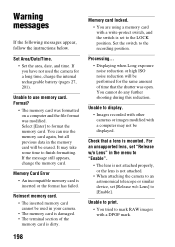
...; Displaying when Long exposure noise reduction or high ISO noise reduction will be displayed. Select [Enter] to finish formatting. Set Area/Date/Time. • Set the area, date, and time. Format? • The memory card was formatted on a computer and the file format was open. Reinsert memory card. • The inserted memory card cannot be performed for a long time, charge the internal rechargeable battery (pages 27, 201). Set the switch to the LOCK position. If the message still appears, change the memory card. Memory Card Error • An incompatible memory card...
...; Displaying when Long exposure noise reduction or high ISO noise reduction will be displayed. Select [Enter] to finish formatting. Set Area/Date/Time. • Set the area, date, and time. Format? • The memory card was formatted on a computer and the file format was open. Reinsert memory card. • The inserted memory card cannot be performed for a long time, charge the internal rechargeable battery (pages 27, 201). Set the switch to the LOCK position. If the message still appears, change the memory card. Memory Card Error • An incompatible memory card...

α Handbook
Page 213
... N New Folder 167 Night Portrait 38, 87 Night Scene 38, 87 No Disp. Info 46 Noise reduction 129, 159 Index P P (Program Auto 91 Panorama: Direction 89 Panorama: Size 47 Partial Color 133 PC Remote 177 Peaking 115 Peaking Color 115 Peaking Level 115 Picture Effect 133 Playback Display 150 Playing back panoramic images 151 PlayMemories Home 64, 66 Pop Color 133 Portrait 38, 86 Posterization 133 Power Save 164 Power Saving Start Time...
... N New Folder 167 Night Portrait 38, 87 Night Scene 38, 87 No Disp. Info 46 Noise reduction 129, 159 Index P P (Program Auto 91 Panorama: Direction 89 Panorama: Size 47 Partial Color 133 PC Remote 177 Peaking 115 Peaking Color 115 Peaking Level 115 Picture Effect 133 Playback Display 150 Playing back panoramic images 151 PlayMemories Home 64, 66 Pop Color 133 Portrait 38, 86 Posterization 133 Power Save 164 Power Saving Start Time...

Instruction Manual
Page 36
...-zoom Cont. The camera records images continuously at a maximum of about 8 images per second. (Movie) (32) Allows you to shoot movies with the exposure (both the shutter speed and the aperture value) adjusted manually. (Program Auto) Allows you to shoot with the exposure (both the shutter speed and the aperture value) manually using the control dial. (Manual Exposure) Allows you to shoot with a texture unique to shoot after adjusting the exposure (both the shutter speed and the aperture value) adjusted automatically. The camera saves 1 appropriate image by...
...-zoom Cont. The camera records images continuously at a maximum of about 8 images per second. (Movie) (32) Allows you to shoot movies with the exposure (both the shutter speed and the aperture value) adjusted manually. (Program Auto) Allows you to shoot with the exposure (both the shutter speed and the aperture value) manually using the control dial. (Manual Exposure) Allows you to shoot with a texture unique to shoot after adjusting the exposure (both the shutter speed and the aperture value) adjusted automatically. The camera saves 1 appropriate image by...

Instruction Manual
Page 68
... instructions on the screen to complete the installation. • For details on your computer, go to the "Help." Installing the software Installing "Remote Camera Control" To use "Remote Camera Control," refer to the following functions are available. • You can set up the camera or shoot an image from the computer. • You can record an image directly to the computer. • You can perform Interval Timer Shooting. 1 Using the Internet browser on how to use "Remote Camera Control," connect...
... instructions on the screen to complete the installation. • For details on your computer, go to the "Help." Installing the software Installing "Remote Camera Control" To use "Remote Camera Control," refer to the following functions are available. • You can set up the camera or shoot an image from the computer. • You can record an image directly to the computer. • You can perform Interval Timer Shooting. 1 Using the Internet browser on how to use "Remote Camera Control," connect...

Instruction Manual
Page 78
... following conditions: - Movie recording: Repeating operations such as recording, zoom, shooting standby, and the power turns on and off once every 10 times. • The movie recordable time is charged for an hour after the CHARGE lamp goes out. - Viewfinder mode Approx. 160 min. - Movie quality: AVCHD FH - Using Sony "Memory Stick PRO Duo" media (sold separately). • The number of use. At an ambient temperature of images Shooting (Still images) LCD screen mode Approx. 350 min. Shooting once every 30...
... following conditions: - Movie recording: Repeating operations such as recording, zoom, shooting standby, and the power turns on and off once every 10 times. • The movie recordable time is charged for an hour after the CHARGE lamp goes out. - Viewfinder mode Approx. 160 min. - Movie quality: AVCHD FH - Using Sony "Memory Stick PRO Duo" media (sold separately). • The number of use. At an ambient temperature of images Shooting (Still images) LCD screen mode Approx. 350 min. Shooting once every 30...
Instruction Manual
Page 91
... 58 Live View Display 58 Lock-on AF 53 Index Long Exposure NR 56 M Mac 67 Macro 38 Manual Exposure 36 Memory card 21 MENU 55 Menu 55 Menu start 60 Metering Mode 53 Microphone jack 16 Mode Dial Guide 60 MOVIE 32 Movie 32 MOVIE Button 58 Multi interface shoe 15 N New Folder 60 Night Portrait 38 Night Scene 38 No Disp. of recordable images 77, 78 P Panorama: Direction 55 Panorama: Size 47 Peaking Color 58 Peaking Level 58 Picture Effect 54 Playback Display 59...
... 58 Live View Display 58 Lock-on AF 53 Index Long Exposure NR 56 M Mac 67 Macro 38 Manual Exposure 36 Memory card 21 MENU 55 Menu 55 Menu start 60 Metering Mode 53 Microphone jack 16 Mode Dial Guide 60 MOVIE 32 Movie 32 MOVIE Button 58 Multi interface shoe 15 N New Folder 60 Night Portrait 38 Night Scene 38 No Disp. of recordable images 77, 78 P Panorama: Direction 55 Panorama: Size 47 Peaking Color 58 Peaking Level 58 Picture Effect 54 Playback Display 59...

Marketing Specifications (SLT-A58K)
Page 4
.... AF Illuminator Exposure System Metering Metering Modes Metering Sensitivity Exposure Compensation Exposure Settings Scene Mode(s) Picture Effect(s) D-Range Optimizer Auto Exposure Lock Color Temperature Creative Style Exposure Bracketing ISO Noise Reduction White Balance Mode Drive System Burst Buffer Continuous Shooting Speed Drive Mode Self-timer Shutter Speeds Shutter Type Flash Flash Compensation Flash Coverage Recycling Time Flash Bracketing Flash Metering System Flash Modes Flash Type Guide Number Convenience Features Self Timer Red-Eye Reduction Media/Battery Indicator Built-in LED...
.... AF Illuminator Exposure System Metering Metering Modes Metering Sensitivity Exposure Compensation Exposure Settings Scene Mode(s) Picture Effect(s) D-Range Optimizer Auto Exposure Lock Color Temperature Creative Style Exposure Bracketing ISO Noise Reduction White Balance Mode Drive System Burst Buffer Continuous Shooting Speed Drive Mode Self-timer Shutter Speeds Shutter Type Flash Flash Compensation Flash Coverage Recycling Time Flash Bracketing Flash Metering System Flash Modes Flash Type Guide Number Convenience Features Self Timer Red-Eye Reduction Media/Battery Indicator Built-in LED...
Marketing Specifications (SLT-A58K)
Page 5
... USB Terminal, Hi-speed USB (USB2.0): Mass-storage, MTP/ Multi (REMOTE)/ Micro USB Type B Approx. 5-1/8 × 3-7/8 × 3-1/8 in View Finder Operation) Software Supplied Software Operating System Compatibility Service and Warranty Information Limited Warranty Term Accessories Single (with or without shooting information), RGB histogram and highlight/shadow warning, 4/9-frame index view, Enlarged display mode (L: 13.6x, M: 9.9x, S: 6.8x), Auto Review (10/5/2 sec, Off), Image orientation (On/Off), Slideshow, Panorama scrolling, Folder selection (still), Forward/Rewind (movie), Delete...
... USB Terminal, Hi-speed USB (USB2.0): Mass-storage, MTP/ Multi (REMOTE)/ Micro USB Type B Approx. 5-1/8 × 3-7/8 × 3-1/8 in View Finder Operation) Software Supplied Software Operating System Compatibility Service and Warranty Information Limited Warranty Term Accessories Single (with or without shooting information), RGB histogram and highlight/shadow warning, 4/9-frame index view, Enlarged display mode (L: 13.6x, M: 9.9x, S: 6.8x), Auto Review (10/5/2 sec, Off), Image orientation (On/Off), Slideshow, Panorama scrolling, Folder selection (still), Forward/Rewind (movie), Delete...


