
α Handbook
Page 12
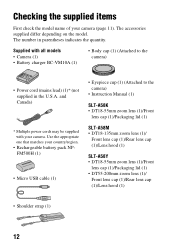
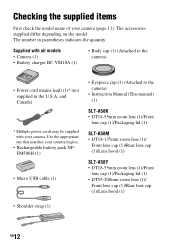
... power cords may be supplied with all models • Camera (1) • Battery charger BC-VM10A (1) • Body cap (1) (Attached to the camera) • Instruction Manual (1) SLT-A58K • DT18-55mm zoom lens (1)/Front lens cap (1)/Packaging lid (1) SLT-A58M • DT18-135mm zoom lens (1)/ Front lens cap (1)/Rear lens cap (1)/Lens hood... (1) SLT-A58Y • DT18-55mm zoom lens (1)/Front lens cap (1)/Packaging lid (1) • DT55-200mm zoom lens (1)/ Front lens cap (1)/Rear lens cap (1)/Lens hood (1)...
... power cords may be supplied with all models • Camera (1) • Battery charger BC-VM10A (1) • Body cap (1) (Attached to the camera) • Instruction Manual (1) SLT-A58K • DT18-55mm zoom lens (1)/Front lens cap (1)/Packaging lid (1) SLT-A58M • DT18-135mm zoom lens (1)/ Front lens cap (1)/Rear lens cap (1)/Lens hood... (1) SLT-A58Y • DT18-55mm zoom lens (1)/Front lens cap (1)/Packaging lid (1) • DT55-200mm zoom lens (1)/ Front lens cap (1)/Rear lens cap (1)/Lens hood (1)...

α Handbook
Page 24
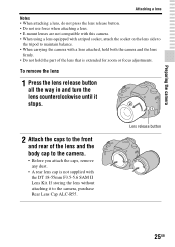
Attaching a lens 1 Remove the body cap from the camera and the packaging lid from the rear of the lens. • Quickly change the lens somewhere away from dusty locations so as to put the lens on straight. Orange index marks 24 Front lens cap Body cap Packaging lid 2 Mount the lens by aligning the orange index marks (mounting indexes) on the lens and camera. 3 Turn the lens clockwise until it clicks into the locked position. • Be sure to keep dust or debris from getting inside the camera. • When shooting, remove the front lens cap from the front of the lens.
Attaching a lens 1 Remove the body cap from the camera and the packaging lid from the rear of the lens. • Quickly change the lens somewhere away from dusty locations so as to put the lens on straight. Orange index marks 24 Front lens cap Body cap Packaging lid 2 Mount the lens by aligning the orange index marks (mounting indexes) on the lens and camera. 3 Turn the lens clockwise until it clicks into the locked position. • Be sure to keep dust or debris from getting inside the camera. • When shooting, remove the front lens cap from the front of the lens.

α Handbook
Page 25
If storing the lens without attaching it stops. 2 Attach the caps to the front and rear of the lens and the body cap to the camera. • Before you attach the caps, remove any dust. • A rear lens cap is not supplied with a lens attached, hold both ...
If storing the lens without attaching it stops. 2 Attach the caps to the front and rear of the lens and the body cap to the camera. • Before you attach the caps, remove any dust. • A rear lens cap is not supplied with a lens attached, hold both ...

α Handbook
Page 29
Holding the camera properly Stabilize your body. Point 3 Lightly tuck your elbows against your upper body and take a position that keeps the camera from moving. Notes • The dioptric adjustment attachment (sold separately) cannot be used with the other. In LCD ... the viewfinder's visual acuity (diopter adjustment) Adjust the diopter-adjustment dial to your eyesight until the display appears clearly in a kneeling position, steady your upper body by placing your elbow on your feet shoulder-width apart.
Holding the camera properly Stabilize your body. Point 3 Lightly tuck your elbows against your upper body and take a position that keeps the camera from moving. Notes • The dioptric adjustment attachment (sold separately) cannot be used with the other. In LCD ... the viewfinder's visual acuity (diopter adjustment) Adjust the diopter-adjustment dial to your eyesight until the display appears clearly in a kneeling position, steady your upper body by placing your elbow on your feet shoulder-width apart.

α Handbook
Page 107
...; A subject that may require special focusing When using the autofocus, it is confirmed. Subjects that is very bright or glittering, such as the sun, the body of an automobile, or the surface of water. • Ambient light is locked. Focus is hard to focus on the following a moving subject. Focal point...
...; A subject that may require special focusing When using the autofocus, it is confirmed. Subjects that is very bright or glittering, such as the sun, the body of an automobile, or the surface of water. • Ambient light is locked. Focus is hard to focus on the following a moving subject. Focal point...

α Handbook
Page 186
... (the part that acts as dark spots on the photo image, depending on the image sensor, clean it may scatter water droplets inside the camera body. If there is dust on the shooting environment. Cleaning the image sensor automatically using the camera's cleaning mode 1 Press the MENU button, then select 3 using...
... (the part that acts as dark spots on the photo image, depending on the image sensor, clean it may scatter water droplets inside the camera body. If there is dust on the shooting environment. Cleaning the image sensor automatically using the camera's cleaning mode 1 Press the MENU button, then select 3 using...

α Handbook
Page 200
...forcefully with tissue paper or other materials may cause a malfunction of mold on the camera. When attaching the body cap, remove all the dust from a cold to attach the front lens cap or body cap when not using a blower, etc. • When wiping off if scratched. We do not ...wipe gently with a soft cloth, such as in a car parked in the sun, the camera body may become deformed and this may cause a malfunction. • Under direct sunlight or near a heater The camera body may become discolored or deformed, and this malfunction cannot be repaired. • Humid places These may...
...forcefully with tissue paper or other materials may cause a malfunction of mold on the camera. When attaching the body cap, remove all the dust from a cold to attach the front lens cap or body cap when not using a blower, etc. • When wiping off if scratched. We do not ...wipe gently with a soft cloth, such as in a car parked in the sun, the camera body may become deformed and this may cause a malfunction. • Under direct sunlight or near a heater The camera body may become discolored or deformed, and this malfunction cannot be repaired. • Humid places These may...

α Handbook
Page 208
... do not use the camera for an extended period of time, charge the battery pack and fully use it up , and insert it in your body to warm it up at least once a year to store the battery pack Store the battery pack in low-temperature environments. Buy a new battery pack...
... do not use the camera for an extended period of time, charge the battery pack and fully use it up , and insert it in your body to warm it up at least once a year to store the battery pack Store the battery pack in low-temperature environments. Buy a new battery pack...
Instruction Manual
Page 12
...• Camera (1) • Battery charger BC-VM10A (1) • Body cap (1) (Attached to the camera) • Instruction Manual (This manual) (1) SLT-A58K • DT18-55mm zoom lens (1)/Front lens cap (1)/Packaging lid (1) SLT-A58M • DT18-135mm zoom lens (1)/ Front lens cap (1)/Rear lens... cap (1)/Lens hood (1) SLT-A58Y • DT18-55mm zoom lens (1)/Front lens cap (1)/Packaging...
...• Camera (1) • Battery charger BC-VM10A (1) • Body cap (1) (Attached to the camera) • Instruction Manual (This manual) (1) SLT-A58K • DT18-55mm zoom lens (1)/Front lens cap (1)/Packaging lid (1) SLT-A58M • DT18-135mm zoom lens (1)/ Front lens cap (1)/Rear lens... cap (1)/Lens hood (1) SLT-A58Y • DT18-55mm zoom lens (1)/Front lens cap (1)/Packaging...

Instruction Manual
Page 24
Attaching a lens 1 Remove the body cap from the camera and the packaging lid from the rear of the lens. • Quickly change the lens somewhere away from dusty locations so as to put the lens on the lens and camera. 3 Turn the lens clockwise until it clicks into the locked position. • Be sure to keep dust or debris from getting inside the camera. • When shooting, remove the front lens cap from the front of the lens. Orange index marks GB24 Front lens cap Body cap Packaging lid 2 Mount the lens by aligning the orange index marks (mounting indexes) on straight.
Attaching a lens 1 Remove the body cap from the camera and the packaging lid from the rear of the lens. • Quickly change the lens somewhere away from dusty locations so as to put the lens on the lens and camera. 3 Turn the lens clockwise until it clicks into the locked position. • Be sure to keep dust or debris from getting inside the camera. • When shooting, remove the front lens cap from the front of the lens. Orange index marks GB24 Front lens cap Body cap Packaging lid 2 Mount the lens by aligning the orange index marks (mounting indexes) on straight.
Instruction Manual
Page 25
... Lens Cap ALC-R55. If storing the lens without attaching it stops. 2 Attach the caps to the front and rear of the lens and the body cap to the camera. • Before you attach the caps, remove any dust. • A rear lens cap is not supplied with a lens attached, hold both...
... Lens Cap ALC-R55. If storing the lens without attaching it stops. 2 Attach the caps to the front and rear of the lens and the body cap to the camera. • Before you attach the caps, remove any dust. • A rear lens cap is not supplied with a lens attached, hold both...

Instruction Manual
Page 29
... visual acuity (diopter adjustment) Adjust the diopter-adjustment dial to your eyesight until the display appears clearly in a kneeling position, steady your upper body by placing your elbow on your knee. 29GB In LCD screen mode In viewfinder mode In viewfinder mode (vertical position) Point 1 Hold the ...Notes • The dioptric adjustment attachment (sold separately) cannot be used with the other. Point 3 Lightly tuck your elbows against your upper body and take a position that keeps the camera from moving. Point 2 Take a secure stance with your feet shoulder-width apart.
... visual acuity (diopter adjustment) Adjust the diopter-adjustment dial to your eyesight until the display appears clearly in a kneeling position, steady your upper body by placing your elbow on your knee. 29GB In LCD screen mode In viewfinder mode In viewfinder mode (vertical position) Point 1 Hold the ...Notes • The dioptric adjustment attachment (sold separately) cannot be used with the other. Point 3 Lightly tuck your elbows against your upper body and take a position that keeps the camera from moving. Point 2 Take a secure stance with your feet shoulder-width apart.

Instruction Manual
Page 84
... format) AVCHD format Ver. 2.0 compatible Video: MPEG-4 AVC/H.264 Audio: Dolby Digital 2ch, equipped with battery and "Memory Stick PRO Duo" media) 492 g (1 lb 1.4 oz) (body only) 0°C to 40°C (32°F to 104°F) GB84
... format) AVCHD format Ver. 2.0 compatible Video: MPEG-4 AVC/H.264 Audio: Dolby Digital 2ch, equipped with battery and "Memory Stick PRO Duo" media) 492 g (1 lb 1.4 oz) (body only) 0°C to 40°C (32°F to 104°F) GB84
Marketing Specifications (SLT-A58K)
Page 2
...additional steps in shutter speed, allowing for still subjects.) Hand-held opportunities in the SLT-A58. Captures in portrait or landscape orientation. Choose from a third for still and moving... Camera Lens Compatibility Lens Mount Camera Type Imaging Sensor Imaging Sensor Processor Anti Dust Sony A-mount, operation with the LCD exposed for shooting or protected for camera shake....SLT camera Exmor™ APS HD CMOS sensor (23.5 X 15.6mm) BIONZ™ image processor Charge protection coating on Low-Pass Filter and electromagnetic vibration mechanism Auto HDR built into the camera body...
...additional steps in shutter speed, allowing for still subjects.) Hand-held opportunities in the SLT-A58. Captures in portrait or landscape orientation. Choose from a third for still and moving... Camera Lens Compatibility Lens Mount Camera Type Imaging Sensor Imaging Sensor Processor Anti Dust Sony A-mount, operation with the LCD exposed for shooting or protected for camera shake....SLT camera Exmor™ APS HD CMOS sensor (23.5 X 15.6mm) BIONZ™ image processor Charge protection coating on Low-Pass Filter and electromagnetic vibration mechanism Auto HDR built into the camera body...

Marketing Specifications (SLT-A58K)
Page 6
... 29 minute segments 5. Battery capacity decreases over time and use. Supplied Accessories Kit Lens (SAL18552) Battery Charger Rechargeable Battery (NP-FM500H) Eyepiece Cup Shoulder Strap Body Cap Micro USB Cable CD-ROM 1. In meters, IS0 100 3.
... 29 minute segments 5. Battery capacity decreases over time and use. Supplied Accessories Kit Lens (SAL18552) Battery Charger Rechargeable Battery (NP-FM500H) Eyepiece Cup Shoulder Strap Body Cap Micro USB Cable CD-ROM 1. In meters, IS0 100 3.
