
α Handbook
Page 12
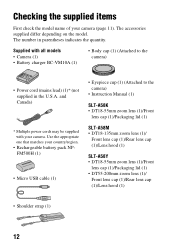
... power cords may be supplied with all models • Camera (1) • Battery charger BC-VM10A (1) • Body cap (1) (Attached to the camera) • Instruction Manual (1) SLT-A58K • DT18-55mm zoom lens (1)/Front lens cap (1)/Packaging lid (1) SLT-A58M • DT18-135mm zoom lens (1)/ Front lens cap (1)/Rear lens cap (1)/Lens hood... (1) SLT-A58Y • DT18-55mm zoom lens (1)/Front lens cap (1)/Packaging lid (1) • DT55-200mm zoom lens (1)/ Front lens cap (1)/Rear lens cap (1)/Lens hood (1)...
... power cords may be supplied with all models • Camera (1) • Battery charger BC-VM10A (1) • Body cap (1) (Attached to the camera) • Instruction Manual (1) SLT-A58K • DT18-55mm zoom lens (1)/Front lens cap (1)/Packaging lid (1) SLT-A58M • DT18-135mm zoom lens (1)/ Front lens cap (1)/Rear lens cap (1)/Lens hood... (1) SLT-A58Y • DT18-55mm zoom lens (1)/Front lens cap (1)/Packaging lid (1) • DT55-200mm zoom lens (1)/ Front lens cap (1)/Rear lens cap (1)/Lens hood (1)...

α Handbook
Page 24
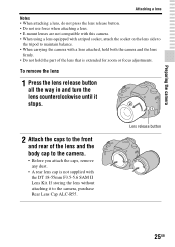
Front lens cap Body cap Packaging lid 2 Mount the lens by aligning the orange index marks (mounting indexes) on the lens and camera. 3 Turn the lens clockwise until it clicks into the locked position. • Be sure to keep dust or debris from getting inside the camera. • When shooting, remove the front lens cap from the front of the lens. • Quickly change the lens somewhere away from dusty locations so as to put the lens on straight. Orange index marks 24 Attaching a lens 1 Remove the body cap from the camera and the packaging lid from the rear of the lens.
Front lens cap Body cap Packaging lid 2 Mount the lens by aligning the orange index marks (mounting indexes) on the lens and camera. 3 Turn the lens clockwise until it clicks into the locked position. • Be sure to keep dust or debris from getting inside the camera. • When shooting, remove the front lens cap from the front of the lens. • Quickly change the lens somewhere away from dusty locations so as to put the lens on straight. Orange index marks 24 Attaching a lens 1 Remove the body cap from the camera and the packaging lid from the rear of the lens.

α Handbook
Page 25
....5-5.6 SAM II Lens Kit. If storing the lens without attaching it stops. 2 Attach the caps to the front and rear of the lens and the body cap to maintain balance. • When carrying the camera with a lens attached, hold both the camera and the lens firmly. • Do not hold the...
....5-5.6 SAM II Lens Kit. If storing the lens without attaching it stops. 2 Attach the caps to the front and rear of the lens and the body cap to maintain balance. • When carrying the camera with a lens attached, hold both the camera and the lens firmly. • Do not hold the...

α Handbook
Page 29
...'s visual acuity (diopter adjustment) Adjust the diopter-adjustment dial to your knee. 29 When shooting in a kneeling position, steady your upper body by placing your elbow on your eyesight until the display appears clearly in the viewfinder. Point 3 Lightly tuck your elbows against your upper... body and take a position that keeps the camera from moving. Notes • The dioptric adjustment attachment (sold separately) cannot be used with this...
...'s visual acuity (diopter adjustment) Adjust the diopter-adjustment dial to your knee. 29 When shooting in a kneeling position, steady your upper body by placing your elbow on your eyesight until the display appears clearly in the viewfinder. Point 3 Lightly tuck your elbows against your upper... body and take a position that keeps the camera from moving. Notes • The dioptric adjustment attachment (sold separately) cannot be used with this...

α Handbook
Page 107
...; A subject that is composed of repeating patterns, such as the facade of a building. • A subject that is low in contrast, such as the sun, the body of an automobile, or the surface of water. • Ambient light is confirmed. Adjusting the focus AF area Focus indicator Notes • While the camera...
...; A subject that is composed of repeating patterns, such as the facade of a building. • A subject that is low in contrast, such as the sun, the body of an automobile, or the surface of water. • Ambient light is confirmed. Adjusting the focus AF area Focus indicator Notes • While the camera...

α Handbook
Page 186
... 3 using v, and press the center of the control button. 3 Select [Enter] using b/B on the image sensor, clean it may scatter water droplets inside the camera body. The image sensor vibrates for a short time, and eliminates dust from the sensor. 4 Turn off the camera. 186 Cleaning the image sensor If dust or...
... 3 using v, and press the center of the control button. 3 Select [Enter] using b/B on the image sensor, clean it may scatter water droplets inside the camera body. The image sensor vibrates for a short time, and eliminates dust from the sensor. 4 Turn off the camera. 186 Cleaning the image sensor If dust or...

α Handbook
Page 200
... dusty places Be careful not to let sand or dust get into the camera. On storing Be sure to attach the front lens cap or body cap when not using a blower, etc. • When wiping off immediately. • Wiping forcefully with a soft cloth, such as in a car parked in the sun... the camera. Precautions Do not use in some cases this malfunction cannot be repaired. • Humid places These may dissolve the coating. When attaching the body cap, remove all the dust from a cold to malfunction, and in temperatures between 0°C and 40°C (32°F and 104°F). If any grease...
... dusty places Be careful not to let sand or dust get into the camera. On storing Be sure to attach the front lens cap or body cap when not using a blower, etc. • When wiping off immediately. • Wiping forcefully with a soft cloth, such as in a car parked in the sun... the camera. Precautions Do not use in some cases this malfunction cannot be repaired. • Humid places These may dissolve the coating. When attaching the body cap, remove all the dust from a cold to malfunction, and in temperatures between 0°C and 40°C (32°F and 104°F). If any grease...

α Handbook
Page 208
... can be used . Buy a new battery pack. • The battery life varies according to warm it up, and insert it in a pocket close to your body to how it from the camera. Battery capacity decreases little by little as you use the flash frequently, use it up at least once a year...
... can be used . Buy a new battery pack. • The battery life varies according to warm it up, and insert it in a pocket close to your body to how it from the camera. Battery capacity decreases little by little as you use the flash frequently, use it up at least once a year...
Instruction Manual
Page 12
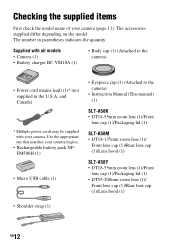
...• Camera (1) • Battery charger BC-VM10A (1) • Body cap (1) (Attached to the camera) • Instruction Manual (This manual) (1) SLT-A58K • DT18-55mm zoom lens (1)/Front lens cap (1)/Packaging lid (1) SLT-A58M • DT18-135mm zoom lens (1)/ Front lens cap (1)/Rear lens... cap (1)/Lens hood (1) SLT-A58Y • DT18-55mm zoom lens (1)/Front lens cap (1)/Packaging...
...• Camera (1) • Battery charger BC-VM10A (1) • Body cap (1) (Attached to the camera) • Instruction Manual (This manual) (1) SLT-A58K • DT18-55mm zoom lens (1)/Front lens cap (1)/Packaging lid (1) SLT-A58M • DT18-135mm zoom lens (1)/ Front lens cap (1)/Rear lens... cap (1)/Lens hood (1) SLT-A58Y • DT18-55mm zoom lens (1)/Front lens cap (1)/Packaging...

Instruction Manual
Page 24
Orange index marks GB24 Attaching a lens 1 Remove the body cap from the camera and the packaging lid from the rear of the lens. • Quickly change the lens somewhere away from dusty locations so as to put the lens on straight. Front lens cap Body cap Packaging lid 2 Mount the lens by aligning the orange index marks (mounting indexes) on the lens and camera. 3 Turn the lens clockwise until it clicks into the locked position. • Be sure to keep dust or debris from getting inside the camera. • When shooting, remove the front lens cap from the front of the lens.
Orange index marks GB24 Attaching a lens 1 Remove the body cap from the camera and the packaging lid from the rear of the lens. • Quickly change the lens somewhere away from dusty locations so as to put the lens on straight. Front lens cap Body cap Packaging lid 2 Mount the lens by aligning the orange index marks (mounting indexes) on the lens and camera. 3 Turn the lens clockwise until it clicks into the locked position. • Be sure to keep dust or debris from getting inside the camera. • When shooting, remove the front lens cap from the front of the lens.
Instruction Manual
Page 25
... zoom or focus adjustments. If storing the lens without attaching it stops. 2 Attach the caps to the front and rear of the lens and the body cap to the camera, purchase Rear Lens Cap ALC-R55.
... zoom or focus adjustments. If storing the lens without attaching it stops. 2 Attach the caps to the front and rear of the lens and the body cap to the camera, purchase Rear Lens Cap ALC-R55.

Instruction Manual
Page 29
...Lightly tuck your elbows against your eyesight until the display appears clearly in a kneeling position, steady your upper body by placing your elbow on your upper body and take a position that keeps the camera from moving. Preparing the camera Before shooting Adjusting the viewfinder's ...visual acuity (diopter adjustment) Adjust the diopter-adjustment dial to your body. When shooting in the viewfinder. In LCD screen mode In viewfinder mode In viewfinder mode (vertical position) Point 1 Hold the...
...Lightly tuck your elbows against your eyesight until the display appears clearly in a kneeling position, steady your upper body by placing your elbow on your upper body and take a position that keeps the camera from moving. Preparing the camera Before shooting Adjusting the viewfinder's ...visual acuity (diopter adjustment) Adjust the diopter-adjustment dial to your body. When shooting in the viewfinder. In LCD screen mode In viewfinder mode In viewfinder mode (vertical position) Point 1 Hold the...

Instruction Manual
Page 84
... format) AVCHD format Ver. 2.0 compatible Video: MPEG-4 AVC/H.264 Audio: Dolby Digital 2ch, equipped with battery and "Memory Stick PRO Duo" media) 492 g (1 lb 1.4 oz) (body only) 0°C to 40°C (32°F to 104°F) GB84
... format) AVCHD format Ver. 2.0 compatible Video: MPEG-4 AVC/H.264 Audio: Dolby Digital 2ch, equipped with battery and "Memory Stick PRO Duo" media) 492 g (1 lb 1.4 oz) (body only) 0°C to 40°C (32°F to 104°F) GB84
Marketing Specifications (SLT-A58K)
Page 2
...of ISO sensitivity. Combining Face Detection and By Pixel Super Resolution technologies with a reduction in the SLT-A58. Sensitivity selectable up or down to two additional steps of traditional cameras-without a flash. Combining ... portraits of great sophistication. Advanced 15-point AF system with Minolta/Konica Minolta Maxxum lenses3 Sony A-mount Interchangeable Lens Digital SLT camera Exmor™ APS HD CMOS sensor (23.5 X 15.6mm) BIONZ™ ...extraordinary detail. Auto HDR built into the camera body itself. Captures in portrait or landscape orientation.
...of ISO sensitivity. Combining Face Detection and By Pixel Super Resolution technologies with a reduction in the SLT-A58. Sensitivity selectable up or down to two additional steps of traditional cameras-without a flash. Combining ... portraits of great sophistication. Advanced 15-point AF system with Minolta/Konica Minolta Maxxum lenses3 Sony A-mount Interchangeable Lens Digital SLT camera Exmor™ APS HD CMOS sensor (23.5 X 15.6mm) BIONZ™ ...extraordinary detail. Auto HDR built into the camera body itself. Captures in portrait or landscape orientation.

Marketing Specifications (SLT-A58K)
Page 6
... DVD players because it may fail to 29 minutes segments. 2. Supplied Accessories Kit Lens (SAL18552) Battery Charger Rechargeable Battery (NP-FM500H) Eyepiece Cup Shoulder Strap Body Cap Micro USB Cable CD-ROM 1. Minolta Maxxum or Dynax lenses manufactured after 1985 4. In meters, IS0 100 3. Records in up to eject disc or...
... DVD players because it may fail to 29 minutes segments. 2. Supplied Accessories Kit Lens (SAL18552) Battery Charger Rechargeable Battery (NP-FM500H) Eyepiece Cup Shoulder Strap Body Cap Micro USB Cable CD-ROM 1. Minolta Maxxum or Dynax lenses manufactured after 1985 4. In meters, IS0 100 3. Records in up to eject disc or...
