
Limited Warranty (US Only)
Page 1
...gives you specific legal rights and you . SONY® DSLR Cameras and Lenses for DSLR Camera LIMITED INARRANT'f (us Only, Sony Electronics Inc. ("Sony") warrantsthis product against defects in material or workmanship for the time periods and as fuses or batteries). Please refer to the End User License... Agreements included with the Product for your unit. Any parts or product replaced under this Limited Warranty, Sony will, at its original specifications. It is required. A...
...gives you specific legal rights and you . SONY® DSLR Cameras and Lenses for DSLR Camera LIMITED INARRANT'f (us Only, Sony Electronics Inc. ("Sony") warrantsthis product against defects in material or workmanship for the time periods and as fuses or batteries). Please refer to the End User License... Agreements included with the Product for your unit. Any parts or product replaced under this Limited Warranty, Sony will, at its original specifications. It is required. A...

α Handbook
Page 2
... the camera Checking the supplied items 12 Identifying parts 13 Front 13 Back 14 Top 15 Sides/Bottom 16 Lens 18 Charging the battery pack 19 Inserting the battery pack/memory card (sold separately 21 Memory cards that you can use 23 Attaching a lens 24 Turning on the camera and setting the...
... the camera Checking the supplied items 12 Identifying parts 13 Front 13 Back 14 Top 15 Sides/Bottom 16 Lens 18 Charging the battery pack 19 Inserting the battery pack/memory card (sold separately 21 Memory cards that you can use 23 Attaching a lens 24 Turning on the camera and setting the...

α Handbook
Page 8
Creating a movie disc 181 Creating a high definition quality (HD) disc (AVCHD recording disc) on a computer 181 Creating a standard definition quality (STD) disc .... 182 Discs you can use with "PlayMemories Home" ...... 183 Print Specifying DPOF 184 Date Imprint 184 Cleaning Cleaning the camera and lens 185 Cleaning the image sensor 186 Troubleshooting/Others Troubleshooting 189 Warning messages 198 Precautions 200 Using your camera abroad - Power sources 203 AVCHD format 204 Memory cards 205 Battery pack/Battery charger 207 License 209 Index 210 8
Creating a movie disc 181 Creating a high definition quality (HD) disc (AVCHD recording disc) on a computer 181 Creating a standard definition quality (STD) disc .... 182 Discs you can use with "PlayMemories Home" ...... 183 Print Specifying DPOF 184 Date Imprint 184 Cleaning Cleaning the camera and lens 185 Cleaning the image sensor 186 Troubleshooting/Others Troubleshooting 189 Warning messages 198 Precautions 200 Using your camera abroad - Power sources 203 AVCHD format 204 Memory cards 205 Battery pack/Battery charger 207 License 209 Index 210 8
α Handbook
Page 11
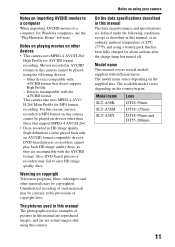
... in this camera. Also, DVD-based players or recorders may be contrary to the provisions of 25ºC (77°F), and using a battery pack that support MPEG-4 AVC/H.264. • Discs recorded in HD image quality (high definition) can be played using this manual The photographs... used in this manual: at an ordinary ambient temperature of copyright laws. Model name SLT-A58K SLT-A58M SLT-A58Y Lens DT18-55mm DT18-135mm DT18-55mm and DT55-200mm 11 Warning on copyright Television programs, films, videotapes, and other than...
... in this camera. Also, DVD-based players or recorders may be contrary to the provisions of 25ºC (77°F), and using a battery pack that support MPEG-4 AVC/H.264. • Discs recorded in HD image quality (high definition) can be played using this manual The photographs... used in this manual: at an ordinary ambient temperature of copyright laws. Model name SLT-A58K SLT-A58M SLT-A58Y Lens DT18-55mm DT18-135mm DT18-55mm and DT55-200mm 11 Warning on copyright Television programs, films, videotapes, and other than...
α Handbook
Page 12
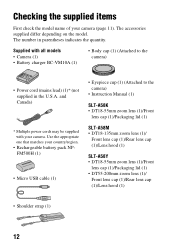
... Canada) * Multiple power cords may be supplied with all models • Camera (1) • Battery charger BC-VM10A (1) • Body cap (1) (Attached to the camera) • Instruction Manual (1) SLT-A58K • DT18-55mm zoom lens (1)/Front lens cap (1)/Packaging lid (1) SLT-A58M • DT18-135mm zoom lens (1)/ Front lens cap (1)/Rear lens cap (1)/Lens...
... Canada) * Multiple power cords may be supplied with all models • Camera (1) • Battery charger BC-VM10A (1) • Body cap (1) (Attached to the camera) • Instruction Manual (1) SLT-A58K • DT18-55mm zoom lens (1)/Front lens cap (1)/Packaging lid (1) SLT-A58M • DT18-135mm zoom lens (1)/ Front lens cap (1)/Rear lens cap (1)/Lens...

α Handbook
Page 17
J Access lamp (22) K Memory card insertion slot (21) L Memory card cover (21) 17 Preparing the camera Identifying parts G Battery insertion slot (21) H Battery cover (21) I Tripod receptacle • Use a tripod with a screw length of less than 5.5 mm (7/32 inch). You will be unable to firmly secure the camera to tripods with a screw length of 5.5 mm (7/32 inch) or longer, and attempting to do so may damage the camera.
J Access lamp (22) K Memory card insertion slot (21) L Memory card cover (21) 17 Preparing the camera Identifying parts G Battery insertion slot (21) H Battery cover (21) I Tripod receptacle • Use a tripod with a screw length of less than 5.5 mm (7/32 inch). You will be unable to firmly secure the camera to tripods with a screw length of 5.5 mm (7/32 inch) or longer, and attempting to do so may damage the camera.

α Handbook
Page 19
... been fully charged. Push the battery pack in until it . The charged battery pack is discharged little by little, even when you shoot. 1 Insert the battery pack into the battery charger. To avoid missing an opportunity to charge the NPFM500H "InfoLITHIUM" battery pack (supplied). Preparing the camera Charging the battery pack When using the camera for...
... been fully charged. Push the battery pack in until it . The charged battery pack is discharged little by little, even when you shoot. 1 Insert the battery pack into the battery charger. To avoid missing an opportunity to charge the NPFM500H "InfoLITHIUM" battery pack (supplied). Preparing the camera Charging the battery pack When using the camera for...

α Handbook
Page 20
.... For countries/regions other than the U.S.A. and Canada to the nearest wall outlet (wall socket). 20 Charging the battery pack 2 Connect the battery charger For the U.S.A. You may not be able to efficiently charge the battery pack outside of 25°C (77°F). • The CHARGE lamp turns off : Charge completed Charging time...
.... For countries/regions other than the U.S.A. and Canada to the nearest wall outlet (wall socket). 20 Charging the battery pack 2 Connect the battery charger For the U.S.A. You may not be able to efficiently charge the battery pack outside of 25°C (77°F). • The CHARGE lamp turns off : Charge completed Charging time...

α Handbook
Page 21
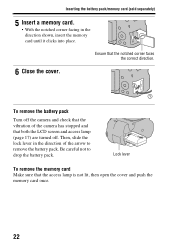
Preparing the camera Inserting the battery pack/memory card (sold separately) 1 Open the battery cover by sliding the lever. 2 Insert the battery pack completely, using the tip of the battery to press the lock lever. 3 Close the cover. Lock lever 4 Slide and open the memory card cover. 21
Preparing the camera Inserting the battery pack/memory card (sold separately) 1 Open the battery cover by sliding the lever. 2 Insert the battery pack completely, using the tip of the battery to press the lock lever. 3 Close the cover. Lock lever 4 Slide and open the memory card cover. 21
α Handbook
Page 22
... that both the LCD screen and access lamp (page 17) are turned off. To remove the battery pack Turn off the camera and check that the vibration of the arrow to drop the battery pack. Then, slide the lock lever in the direction shown, insert the memory card until it ...clicks into place. Ensure that the notched corner faces the correct direction. 6 Close the cover. Be careful not to remove the battery pack. Inserting the battery pack/memory card (sold separately) 5 Insert a memory card. • With the notched corner facing in the direction of the camera has stopped...
... that both the LCD screen and access lamp (page 17) are turned off. To remove the battery pack Turn off the camera and check that the vibration of the arrow to drop the battery pack. Then, slide the lock lever in the direction shown, insert the memory card until it ...clicks into place. Ensure that the notched corner faces the correct direction. 6 Close the cover. Be careful not to remove the battery pack. Inserting the battery pack/memory card (sold separately) 5 Insert a memory card. • With the notched corner facing in the direction of the camera has stopped...
α Handbook
Page 23
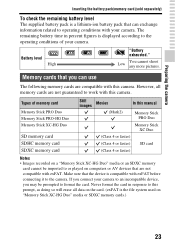
...that you can exchange information related to or played on "Memory Stick XC-HG Duo" media or SDXC memory cards.) 23 Battery level High "Battery exhausted." Types of your camera to an incompatible device, you connect your camera. However, all memory cards are not guaranteed to... devices that are not compatible with this camera. Preparing the camera Inserting the battery pack/memory card (sold separately) To check the remaining battery level The supplied battery pack is a lithium-ion battery pack that can use The following memory cards are compatible with exFAT. Make...
...that you can exchange information related to or played on "Memory Stick XC-HG Duo" media or SDXC memory cards.) 23 Battery level High "Battery exhausted." Types of your camera to an incompatible device, you connect your camera. However, all memory cards are not guaranteed to... devices that are not compatible with this camera. Preparing the camera Inserting the battery pack/memory card (sold separately) To check the remaining battery level The supplied battery pack is a lithium-ion battery pack that can use The following memory cards are compatible with exFAT. Make...

α Handbook
Page 28
MENU button t 1 t [Area Setting] Maintaining the date and time setting This camera has an internal rechargeable battery to maintain the date and time and other items, then press the center of the control button. 6 Check that [Enter] is installed (page 201). 28 ... setup screen appears automatically only when you use the menu. To set the local area when you turn the camera on or off or the battery is selected, then press the center of the control button. To cancel the date/time setting operation Press the MENU button.
MENU button t 1 t [Area Setting] Maintaining the date and time setting This camera has an internal rechargeable battery to maintain the date and time and other items, then press the center of the control button. 6 Check that [Enter] is installed (page 201). 28 ... setup screen appears automatically only when you use the menu. To set the local area when you turn the camera on or off or the battery is selected, then press the center of the control button. To cancel the date/time setting operation Press the MENU button.

α Handbook
Page 71
Others List of screen icons Graphic Display (LCD screen) A Display P A S M Indication Exposure mode (36) Display All Info. (LCD screen) Scene Recognition icons (37, 85) Memory card (21, 205)/ Upload (168) For playback (Basic information display) 100 Remaining number of recordable images Aspect ratio of still images (157) 20M 10M Image size of still images 5.0M 17M (47) 8.4M 4.2M Image quality of still images (157) Frame rate of movies (104) Image size of movies (104) 100% Remaining battery (23) 71 Others
Others List of screen icons Graphic Display (LCD screen) A Display P A S M Indication Exposure mode (36) Display All Info. (LCD screen) Scene Recognition icons (37, 85) Memory card (21, 205)/ Upload (168) For playback (Basic information display) 100 Remaining number of recordable images Aspect ratio of still images (157) 20M 10M Image size of still images 5.0M 17M (47) 8.4M 4.2M Image quality of still images (157) Frame rate of movies (104) Image size of movies (104) 100% Remaining battery (23) 71 Others

α Handbook
Page 72
file number (179) Protect (152) DPOF set (184) Remaining battery warning (23) Indication Spot metering area (123) AF area (110) Smart Zoom (140) Clear Image Zoom (140) Digital Zoom (140) Zoom magnification Shutter speed indicator (...
file number (179) Protect (152) DPOF set (184) Remaining battery warning (23) Indication Spot metering area (123) AF area (110) Smart Zoom (140) Clear Image Zoom (140) Digital Zoom (140) Zoom magnification Shutter speed indicator (...

α Handbook
Page 81
... still images 5.0M 17M (47) 8.4M 4.2M Image quality of still images (157) Frame rate of movies (104) Image size of movies (104) 100% Remaining battery (23) Flash charge in progress (41) Setting Effect OFF (80) No audio recording of movies (105) SteadyShot/Camera shake warning (83) SteadyShot error (197) Shooting...
... still images 5.0M 17M (47) 8.4M 4.2M Image quality of still images (157) Frame rate of movies (104) Image size of movies (104) 100% Remaining battery (23) Flash charge in progress (41) Setting Effect OFF (80) No audio recording of movies (105) SteadyShot/Camera shake warning (83) SteadyShot error (197) Shooting...

α Handbook
Page 147
Info. List of still images (157) DPOF Protect (152) DPOF set (184) Remaining battery warning (23) Auto Object Framing (119) Remaining battery (23) 147 file number (179) Aspect ratio of still images (157) 20M 10M Image size of still images 5.0M 17M (47) 8.4M 4.2M Display Indication ...
Info. List of still images (157) DPOF Protect (152) DPOF set (184) Remaining battery warning (23) Auto Object Framing (119) Remaining battery (23) 147 file number (179) Aspect ratio of still images (157) 20M 10M Image size of still images 5.0M 17M (47) 8.4M 4.2M Display Indication ...

α Handbook
Page 164
... on power save mode. If you do not operate the camera for example, pressing the shutter button halfway down, the camera returns to prevent the battery from being consumed. Setting the other camera functions Power Save You can disable automatic switching of the LCD screen is reduced. MENU button t 1 t [Power Save...
... on power save mode. If you do not operate the camera for example, pressing the shutter button halfway down, the camera returns to prevent the battery from being consumed. Setting the other camera functions Power Save You can disable automatic switching of the LCD screen is reduced. MENU button t 1 t [Power Save...
α Handbook
Page 166
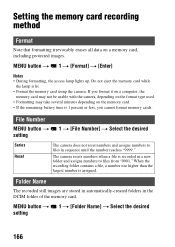
... lamp lights up. Setting the memory card recording method Format Note that formatting irrevocably erases all data on the memory card. • If the remaining battery time is 1 percent or less, you format it on a computer, the memory card may not be usable with the camera, depending on the format type...
... lamp lights up. Setting the memory card recording method Format Note that formatting irrevocably erases all data on the memory card. • If the remaining battery time is 1 percent or less, you format it on a computer, the memory card may not be usable with the camera, depending on the format type...

α Handbook
Page 168
If this camera. MENU button t 1 t [Recover Image DB] t [Enter] Notes • Use a sufficiently charged battery. No images are to be played back on this happens, the camera repairs the file. Upload standby. MENU button t 2 t [Upload Settings] t [On] Communication status Standby.... directly. • Eye-Fi cards can damage data. Setting the memory card recording method Recover Image DB When inconsistencies are caused in the camera. Low battery power during repairs can be used only in which you purchased the card. 168 This item appears when an Eye-Fi card is uploading images...
If this camera. MENU button t 1 t [Recover Image DB] t [Enter] Notes • Use a sufficiently charged battery. No images are to be played back on this happens, the camera repairs the file. Upload standby. MENU button t 2 t [Upload Settings] t [On] Communication status Standby.... directly. • Eye-Fi cards can damage data. Setting the memory card recording method Recover Image DB When inconsistencies are caused in the camera. Low battery power during repairs can be used only in which you purchased the card. 168 This item appears when an Eye-Fi card is uploading images...

α Handbook
Page 174
Confirm the version when a firmware update is (3 remaining battery icons) or more. MENU button t 3 t [Version] Notes • An update can be performed only when the battery level is released. Confirming the camera version Displays the camera version. If you use a battery with the lens version up feature, the lens version is also displayed. We recommend that you mount a lens compatible with sufficient charge or the AC-PW10AM AC Adaptor (sold separately). 174
Confirm the version when a firmware update is (3 remaining battery icons) or more. MENU button t 3 t [Version] Notes • An update can be performed only when the battery level is released. Confirming the camera version Displays the camera version. If you use a battery with the lens version up feature, the lens version is also displayed. We recommend that you mount a lens compatible with sufficient charge or the AC-PW10AM AC Adaptor (sold separately). 174


