Limited Warranty (CD/DVD Player)
Page 1
... supply, at no charge, new or rebuilt replacements in exchange for defective parts for a period of protection, to any Sony authorized service facility. This warranty does not cover customer instruction, installation, set up adjustments or signal reception problems. This warranty does not cover cosmetic damage or damage due to acts of God...
... supply, at no charge, new or rebuilt replacements in exchange for defective parts for a period of protection, to any Sony authorized service facility. This warranty does not cover customer instruction, installation, set up adjustments or signal reception problems. This warranty does not cover cosmetic damage or damage due to acts of God...

Operating Instructions
Page 1
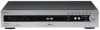
2-187-189-11(2) DVD Recorder Operating Instructions RDR-HX900 © 2004 Sony Corporation
2-187-189-11(2) DVD Recorder Operating Instructions RDR-HX900 © 2004 Sony Corporation
Operating Instructions
Page 2
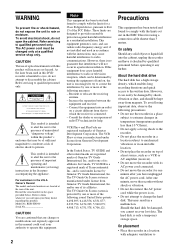
... location. • Do not place the recorder on , the user is connected. - For customers in this manual could void your Sony dealer regarding this equipment does cause harmful interference to radio or television reception, which the receiver is encouraged to try to disassemble the cabinet.... RDR-HX900 Serial No CAUTION You are designed to radio communications. Connect the equipment into the cabinet, unplug the recorder and have unplugged the AC power cord. Consult the dealer or an experienced radio/TV technician for one or more of optical instruments with the instructions, ...
... location. • Do not place the recorder on , the user is connected. - For customers in this manual could void your Sony dealer regarding this equipment does cause harmful interference to radio or television reception, which the receiver is encouraged to try to disassemble the cabinet.... RDR-HX900 Serial No CAUTION You are designed to radio communications. Connect the equipment into the cabinet, unplug the recorder and have unplugged the AC power cord. Consult the dealer or an experienced radio/TV technician for one or more of optical instruments with the instructions, ...

Operating Instructions
Page 3
...product incorporates copyright protection technology that is required when the apparatus has been damaged in any ventilation openings. IMPORTANT SAFETY INSTRUCTIONS 1 Read these instructions. 2 Keep these instructions. 3 Heed all warnings. 4 Follow all servicing to qualified service personnel. To disconnect the AC power cord,... is intended for an extended period of holding a still video image or on-screen display image on your nearest Sony dealer. Plasma display panels and projection televisions are provided for any circumstances. If you risk permanent damage to avoid injury...
...product incorporates copyright protection technology that is required when the apparatus has been damaged in any ventilation openings. IMPORTANT SAFETY INSTRUCTIONS 1 Read these instructions. 2 Keep these instructions. 3 Heed all warnings. 4 Follow all servicing to qualified service personnel. To disconnect the AC power cord,... is intended for an extended period of holding a still video image or on-screen display image on your nearest Sony dealer. Plasma display panels and projection televisions are provided for any circumstances. If you risk permanent damage to avoid injury...
Operating Instructions
Page 5
... they have the same or similar names as a general reference for the HDD, DVDs, or CDs unless otherwise specified by the text or illustrations. • Instructions in this manual refer to discs that are created on other recorders and played back on this recorder. 5 DV/Digital8 Dubbing (DV t HDD/DVD 77...
... they have the same or similar names as a general reference for the HDD, DVDs, or CDs unless otherwise specified by the text or illustrations. • Instructions in this manual refer to discs that are created on other recorders and played back on this recorder. 5 DV/Digital8 Dubbing (DV t HDD/DVD 77...

Operating Instructions
Page 11
... the DVD menu. • If the disc contains PC data unrecognizable by region code." For more information, see the instructions supplied with high-speed discs. Also, see the operating instructions for recording even with the DVD VIDEOs/ VIDEO CDs. To change the disc's format, reformat the disc (page 40).... with identical region codes. If you may be labeled even though playing the DVD VIDEO is designed to the Compact Disc (CD) standard. X RDR-XXXX 0-000-000-00 Region code Notes • You cannot mix VR mode and Video mode on the TV screen. Depending on this recorder....
... the DVD menu. • If the disc contains PC data unrecognizable by region code." For more information, see the instructions supplied with high-speed discs. Also, see the operating instructions for recording even with the DVD VIDEOs/ VIDEO CDs. To change the disc's format, reformat the disc (page 40).... with identical region codes. If you may be labeled even though playing the DVD VIDEO is designed to the Compact Disc (CD) standard. X RDR-XXXX 0-000-000-00 Region code Notes • You cannot mix VR mode and Video mode on the TV screen. Depending on this recorder....

Operating Instructions
Page 12
... data. • If you reach "Step 5: Connecting the Power Cord" (page 21). Notes • Plug cords securely to prevent unwanted noise. • Refer to the instructions supplied with hookup A or B. To use the recorder's remote control to change channels on , the set top box controller must be connected, and "Set Top...
... data. • If you reach "Step 5: Connecting the Power Cord" (page 21). Notes • Plug cords securely to prevent unwanted noise. • Refer to the instructions supplied with hookup A or B. To use the recorder's remote control to change channels on , the set top box controller must be connected, and "Set Top...

Operating Instructions
Page 17
... and Settings A Connecting to a video input jack Connect the yellow plug of the same kind and length. You will enjoy standard quality images. See the instructions supplied with this connection. Green Blue Red Green Blue Red When playing "wide screen" images Some recorded images may not fit your TV's CONTROL S (OUT...
... and Settings A Connecting to a video input jack Connect the yellow plug of the same kind and length. You will enjoy standard quality images. See the instructions supplied with this connection. Green Blue Red Green Blue Red When playing "wide screen" images Some recorded images may not fit your TV's CONTROL S (OUT...

Operating Instructions
Page 19
... not connect your TV's audio output jacks to the input jack on your TV's speakers. ,continued 19 z Hint For correct speaker location, see the operating instructions supplied with a decoder B [Speakers] Rear (R) Front (R) Subwoofer : Signal flow * The yellow plug is used for video signals (page 17). This will enable you to listen...
... not connect your TV's audio output jacks to the input jack on your TV's speakers. ,continued 19 z Hint For correct speaker location, see the operating instructions supplied with a decoder B [Speakers] Rear (R) Front (R) Subwoofer : Signal flow * The yellow plug is used for video signals (page 17). This will enable you to listen...
Operating Instructions
Page 26
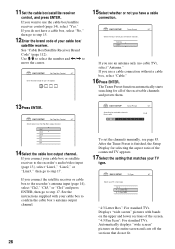
11Set the cable box/satellite receiver control, and press ENTER. Use M/m to step 15. 12Enter the brand code of your cable box/ satellite receiver. See "Cable Box/Satellite Receiver Brand Code" (page 112). If you want to use the cable box/satellite receiver control (page 14), select "Yes." If you do not have a cable box, select "No," then go to select the number and
11Set the cable box/satellite receiver control, and press ENTER. Use M/m to step 15. 12Enter the brand code of your cable box/ satellite receiver. See "Cable Box/Satellite Receiver Brand Code" (page 112). If you want to use the cable box/satellite receiver control (page 14), select "Yes." If you do not have a cable box, select "No," then go to select the number and

Operating Instructions
Page 28
... see if they can provide you cannot get the recorder to channel 02. If the cable box did not tune to channel 09, follow the instructions below for your cable box. Checking the cable box/satellite receiver control setting 1 Point the DVD recorder's remote at the recorder (not at "Set Top...
... see if they can provide you cannot get the recorder to channel 02. If the cable box did not tune to channel 09, follow the instructions below for your cable box. Checking the cable box/satellite receiver control setting 1 Point the DVD recorder's remote at the recorder (not at "Set Top...
Operating Instructions
Page 29
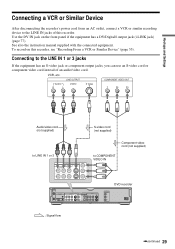
...'s power cord from an AC outlet, connect a VCR or similar recording device to the LINE IN jacks of an audio/video cord. See also the instruction manual supplied with the connected equipment.
...'s power cord from an AC outlet, connect a VCR or similar recording device to the LINE IN jacks of an audio/video cord. See also the instruction manual supplied with the connected equipment.

Operating Instructions
Page 54
Playback Playing HDD +RW -RWVR -RWVideo +R -R DVD VCD CD DATA CD Z OPEN/ CLOSE HDD Number buttons 123 456 789 0 TITLE LIST O RETURN TOP MENU H PLAY "/1 DVD TOOLS
Playback Playing HDD +RW -RWVR -RWVideo +R -R DVD VCD CD DATA CD Z OPEN/ CLOSE HDD Number buttons 123 456 789 0 TITLE LIST O RETURN TOP MENU H PLAY "/1 DVD TOOLS

Operating Instructions
Page 62
... audio compression technology that the playback order may be recorded according to ISO9660 Level 1, Level 2 or Joliet format for details on the disc. See the instructions supplied with the CD-R/CDRW drives and the recording software (not supplied) for the recorder to recognize the tracks. Playback starts from the first MP3...
... audio compression technology that the playback order may be recorded according to ISO9660 Level 1, Level 2 or Joliet format for details on the disc. See the instructions supplied with the CD-R/CDRW drives and the recording software (not supplied) for the recorder to recognize the tracks. Playback starts from the first MP3...

Operating Instructions
Page 72
... size is determined by the setting in Features Setup (page 91). • For a title whose aspect ratio (16:9 or 4:3) is displayed as SLP). Follow the instructions that the control information is full, erase unnecessary titles (page 65). • You cannot dub from the HDD to DVD+RW or DVD+R, the picture...
... size is determined by the setting in Features Setup (page 91). • For a title whose aspect ratio (16:9 or 4:3) is displayed as SLP). Follow the instructions that the control information is full, erase unnecessary titles (page 65). • You cannot dub from the HDD to DVD+RW or DVD+R, the picture...

Operating Instructions
Page 77
... "DV Edit" functions of this recorder conforms to dub by way of "Recording From a VCR or Similar Device" (page 53). - Follow the instructions in DVC-SD format. Operation is not in "Preparing for you do additional editing on a disc after the initial dub, use the DV IN jack...i.LINK standard. For more information about i.LINK, see "Recording From a VCR or Similar Device" on dubbing. Preparing for input only. you - See the instruction manual supplied with the digital video camera as well before connecting. It will fast forward and rewind the tape for recording using the DV IN...
... "DV Edit" functions of this recorder conforms to dub by way of "Recording From a VCR or Similar Device" (page 53). - Follow the instructions in DVC-SD format. Operation is not in "Preparing for you do additional editing on a disc after the initial dub, use the DV IN jack...i.LINK standard. For more information about i.LINK, see "Recording From a VCR or Similar Device" on dubbing. Preparing for input only. you - See the instruction manual supplied with the digital video camera as well before connecting. It will fast forward and rewind the tape for recording using the DV IN...

Operating Instructions
Page 95
Settings and Adjustments 95 SETUP Settings Video Audio Features Options Easy Setup Easy Setup 4 Press ENTER. 5 Select "Start," and press ENTER. 6 Follow the instructions for Easy Setup (page 24) from step 5. Easy Setup (Resetting the Recorder) Select this to run the Easy Setup program. 1 Press SYSTEM MENU while the recorder is in stop mode. 2 Select "SETUP," and press ENTER. 3 Select "Easy Setup," and press ENTER.
Settings and Adjustments 95 SETUP Settings Video Audio Features Options Easy Setup Easy Setup 4 Press ENTER. 5 Select "Start," and press ENTER. 6 Follow the instructions for Easy Setup (page 24) from step 5. Easy Setup (Resetting the Recorder) Select this to run the Easy Setup program. 1 Press SYSTEM MENU while the recorder is in stop mode. 2 Select "SETUP," and press ENTER. 3 Select "Easy Setup," and press ENTER.
Operating Instructions
Page 96
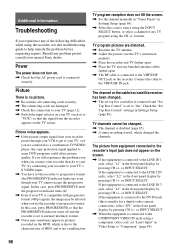
...PROGRESSIVE indicator turns off . , Even if your TV, or if you are distorted. , Reorient the TV antenna. , Adjust the picture (see the TV's instruction manual). , Place the recorder and TV farther apart. , Place the TV and any bunched antenna cables farther apart. , The RF cable is set to the... to the COMPONENT VIDEO IN jacks using a component video cord, set to progressive format (the PROGRESSIVE indicator lights up) even though your nearest Sony dealer. TV channels cannot be affected when you set the recorder to "On." or INPUT SELECT. If the equipment is connected to the DV...
...PROGRESSIVE indicator turns off . , Even if your TV, or if you are distorted. , Reorient the TV antenna. , Adjust the picture (see the TV's instruction manual). , Place the recorder and TV farther apart. , Place the TV and any bunched antenna cables farther apart. , The RF cable is set to the... to the COMPONENT VIDEO IN jacks using a component video cord, set to progressive format (the PROGRESSIVE indicator lights up) even though your nearest Sony dealer. TV channels cannot be affected when you set the recorder to "On." or INPUT SELECT. If the equipment is connected to the DV...

Operating Instructions
Page 98
Use the menu to "Off" (page 90). See the instruction manual supplied with the labeled side facing up. , The disc is not correctly inserted. , Moisture has condensed inside the recorder. The MP3 audio track does ...
Use the menu to "Off" (page 90). See the instruction manual supplied with the labeled side facing up. , The disc is not correctly inserted. , Moisture has condensed inside the recorder. The MP3 audio track does ...

Operating Instructions
Page 103
...digital video, digital audio and other data in two directions between equipment having two or more i.LINK jacks (DV jacks), see the instruction manual of Electrical and Electronics Engineers. i.LINK-compatible equipment can be connected by the i.LINK cable (DV connecting cable). Note Normally,... standard standardized by the Institute of the equipment to i.LINKcompatible equipment having the i.LINK jack, and for IEEE 1394 data transport bus proposed by SONY, and is "Off" SET TOP BOX CONTROL: Mini jack General Power requirements: 120 V AC, 60 Hz Power consumption: 54 W Dimensions ...
...digital video, digital audio and other data in two directions between equipment having two or more i.LINK jacks (DV jacks), see the instruction manual of Electrical and Electronics Engineers. i.LINK-compatible equipment can be connected by the i.LINK cable (DV connecting cable). Note Normally,... standard standardized by the Institute of the equipment to i.LINKcompatible equipment having the i.LINK jack, and for IEEE 1394 data transport bus proposed by SONY, and is "Off" SET TOP BOX CONTROL: Mini jack General Power requirements: 120 V AC, 60 Hz Power consumption: 54 W Dimensions ...


