
Operating Instructions
Page 4
... cart, stand, tripod, bracket, or table specified by the manufacturer, or sold with one wider than the other. Install in this manual refer to DVDs created on this recorder. 13) Unplug this recorder. You can be used , use caution when moving the cart/apparatus combination to avoid injury from being explained. • Instructions in...
... cart, stand, tripod, bracket, or table specified by the manufacturer, or sold with one wider than the other. Install in this manual refer to DVDs created on this recorder. 13) Unplug this recorder. You can be used , use caution when moving the cart/apparatus combination to avoid injury from being explained. • Instructions in...
Operating Instructions
Page 6
...Recording 41 Before Recording 41 Recording mode 41 Recording a stereo/SAP program 42 Unrecordable pictures 42 Timer Recording (Standard/VCR Plus 42 Setting the timer manually (Standard 42 Recording TV programs using the VCR Plus+ system 44 Using the Quick Timer function 45 Adjusting the recording...Recording From Connected Equipment 50 Recording from connected equipment with a timer (Synchro Rec). . . . . 50 Recording...recording (Chasing Playback 57 Playing a previous recording... files that the recorder can play . ...(Divide Title 65 Creating chapters manually 66 Creating and Editing a ...
...Recording 41 Before Recording 41 Recording mode 41 Recording a stereo/SAP program 42 Unrecordable pictures 42 Timer Recording (Standard/VCR Plus 42 Setting the timer manually (Standard 42 Recording TV programs using the VCR Plus+ system 44 Using the Quick Timer function 45 Adjusting the recording...Recording From Connected Equipment 50 Recording from connected equipment with a timer (Synchro Rec). . . . . 50 Recording...recording (Chasing Playback 57 Playing a previous recording... files that the recorder can play . ...(Divide Title 65 Creating chapters manually 66 Creating and Editing a ...
Operating Instructions
Page 8
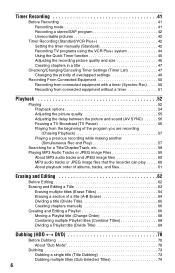
... Guide to Disc Types Recordable and playable discs Type Disc Logo Icon used in Formatting this manual (new discs) Compatibility with other DVD players (finalizing) Hard disk drive (internal) HDD Formatting unnecessary Dub HDD contents to a DVD to play on other DVD players DVD+RW DVDRW VR mode Video mode DVD+R DVD+R DL VR mode DVD-R Video mode +RW...
... Guide to Disc Types Recordable and playable discs Type Disc Logo Icon used in Formatting this manual (new discs) Compatibility with other DVD players (finalizing) Hard disk drive (internal) HDD Formatting unnecessary Dub HDD contents to a DVD to play on other DVD players DVD+RW DVDRW VR mode Video mode DVD+R DVD+R DL VR mode DVD-R Video mode +RW...
Operating Instructions
Page 10
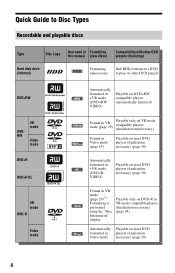
...DVD+RW/ DVD-RW/DVD-R - DATA DVD DATA CD - Discs that cannot be purchased or rented This recorder also recognizes DVDRAMs and DVD-R Dual Layer (Video mode) discs as PAL 10 Playable discs Type DVD VIDEO VIDEO CD Disc Logo Icon used in this manual Characteristics DVD Discs such as movies that were recorded... on Super Audio CDs • DVD VIDEOs with a different region code (page 11). • DVDs that can be played • ...
...DVD+RW/ DVD-RW/DVD-R - DATA DVD DATA CD - Discs that cannot be purchased or rented This recorder also recognizes DVDRAMs and DVD-R Dual Layer (Video mode) discs as PAL 10 Playable discs Type DVD VIDEO VIDEO CD Disc Logo Icon used in this manual Characteristics DVD Discs such as movies that were recorded... on Super Audio CDs • DVD VIDEOs with a different region code (page 11). • DVDs that can be played • ...
Operating Instructions
Page 26
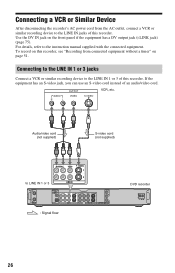
... the AC outlet, connect a VCR or similar recording device to LINE IN 1 or 3 : Signal flow DVD recorder 26 Connecting a VCR or Similar Device After disconnecting the recorder's AC power cord from connected equipment without a timer" on the front panel if the equipment has a DV output jack ... jack) (page 75). For details, refer to the LINE IN 1 or 3 of this recorder. Connecting to the LINE IN 1 or 3 jacks Connect a VCR or similar recording device to the instruction manual supplied with the connected equipment. Audio/video cord (not supplied) S-video cord (not supplied) ...
... the AC outlet, connect a VCR or similar recording device to LINE IN 1 or 3 : Signal flow DVD recorder 26 Connecting a VCR or Similar Device After disconnecting the recorder's AC power cord from connected equipment without a timer" on the front panel if the equipment has a DV output jack ... jack) (page 75). For details, refer to the LINE IN 1 or 3 of this recorder. Connecting to the LINE IN 1 or 3 jacks Connect a VCR or similar recording device to the instruction manual supplied with the connected equipment. Audio/video cord (not supplied) S-video cord (not supplied) ...

Operating Instructions
Page 29
... manually re-format the disc to close the disc tray. Wait until "LOAD" disappears from the front panel display. Recording starts. Eight Basic Operations - z REC x REC STOP REC MODE TV/VIDEO 1 Press HDD or DVD. to select the channel or input source you want to record. 3 Press REC MODE repeatedly to Know Your DVD Recorder 1 Press DVD...
... manually re-format the disc to close the disc tray. Wait until "LOAD" disappears from the front panel display. Recording starts. Eight Basic Operations - z REC x REC STOP REC MODE TV/VIDEO 1 Press HDD or DVD. to select the channel or input source you want to record. 3 Press REC MODE repeatedly to Know Your DVD Recorder 1 Press DVD...
Operating Instructions
Page 40
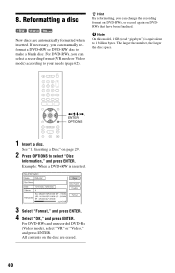
z Hint By reformatting, you can manually reformat a DVD+RW or DVD-RW disc to make a blank disc. If necessary, you can select a recording format (VR mode or Video mode) according to 1 billion bytes. The larger the number, the larger the disc space. Reformatting a disc +RW -RWVR -RWVideo New discs are automatically formatted when inserted. For DVD-RWs, you can change the recording format on DVD-RWs, or record again on DVDRWs that have been finalized. 8. b Note On this model, 1 GB (read "gigabyte") is equivalent to your needs (page 62).
z Hint By reformatting, you can manually reformat a DVD+RW or DVD-RW disc to make a blank disc. If necessary, you can select a recording format (VR mode or Video mode) according to 1 billion bytes. The larger the number, the larger the disc space. Reformatting a disc +RW -RWVR -RWVideo New discs are automatically formatted when inserted. For DVD-RWs, you can change the recording format on DVD-RWs, or record again on DVDRWs that have been finalized. 8. b Note On this model, 1 GB (read "gigabyte") is equivalent to your needs (page 62).
Operating Instructions
Page 43
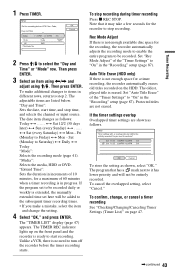
Timer Recording 1 Press TIMER. 2 Press M/m to select the "Day and Time" or "Mode" row. Then press ENTER. 3 Select an item using
Timer Recording 1 Press TIMER. 2 Press M/m to select the "Day and Time" or "Mode" row. Then press ENTER. 3 Select an item using

Operating Instructions
Page 47
...the setting in the dubbed title. However, if the 16:9 signal cannot be recorded as 16:9, it is recorded as 4:3. • When playing a 16:9 size picture recorded as 4:3, the image is recorded. The Timer List appears. b Note When dubbing (page 70), the chapter ...-RVideo You can automatically divide a recording (a title) into chapters by inserting chapter marks at approximately 6 minute intervals during recording. When recording to the HDD, a DVD-R (VR mode) or a DVD-RW (VR mode), you can insert and erase chapter marks manually (page 66). Timer Recording b Notes • If one program...
...the setting in the dubbed title. However, if the 16:9 signal cannot be recorded as 16:9, it is recorded as 4:3. • When playing a 16:9 size picture recorded as 4:3, the image is recorded. The Timer List appears. b Note When dubbing (page 70), the chapter ...-RVideo You can automatically divide a recording (a title) into chapters by inserting chapter marks at approximately 6 minute intervals during recording. When recording to the HDD, a DVD-R (VR mode) or a DVD-RW (VR mode), you can insert and erase chapter marks manually (page 66). Timer Recording b Notes • If one program...
Operating Instructions
Page 66
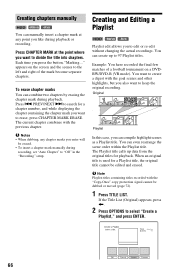
... You can manually insert a chapter mark at the point where you want to divide the title into chapters. b Note Playlist titles containing titles recorded with the previous chapter. appears on the screen and the scenes to the left and right of a football tournament on a DVDRW/DVD-R (VR mode...also want to edit or re-edit without changing the actual recordings. PREV/NEXT > to search for a Playlist title, the original title cannot be erased. • To insert a chapter mark manually during playback or recording. Press CHAPTER MARK at any chapter marks you can compile ...
... You can manually insert a chapter mark at the point where you want to divide the title into chapters. b Note Playlist titles containing titles recorded with the previous chapter. appears on the screen and the scenes to the left and right of a football tournament on a DVDRW/DVD-R (VR mode...also want to edit or re-edit without changing the actual recordings. PREV/NEXT > to search for a Playlist title, the original title cannot be erased. • To insert a chapter mark manually during playback or recording. Press CHAPTER MARK at any chapter marks you can compile ...
Operating Instructions
Page 73
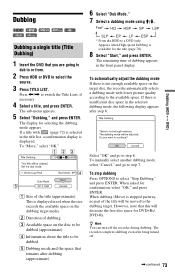
Press Dubbing HDD +RW -RWVR -RWVideo +R -RVR -RVideo Dubbing a single title (Title Dubbing) 1 Insert the DVD that you are going to dub to or from. 2 Press HDD or DVD to select the source. 3 Press TITLE LIST.
Press Dubbing HDD +RW -RWVR -RWVideo +R -RVR -RVideo Dubbing a single title (Title Dubbing) 1 Insert the DVD that you are going to dub to or from. 2 Press HDD or DVD to select the source. 3 Press TITLE LIST.
Operating Instructions
Page 74
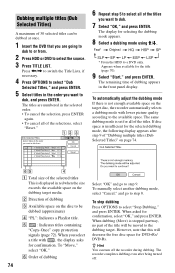
Dubbing multiple titles (Dub Selected Titles) A maximum of 30 selected titles can be dubbed at once. 1 Insert the DVD that you are going to dub to or from. 2 Press HDD or DVD to select the source. 3 Press TITLE LIST. Press
Dubbing multiple titles (Dub Selected Titles) A maximum of 30 selected titles can be dubbed at once. 1 Insert the DVD that you are going to dub to or from. 2 Press HDD or DVD to select the source. 3 Press TITLE LIST. Press
Operating Instructions
Page 75
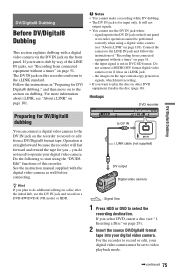
...not output signals. • You cannot use the DV IN jack and record on a DVD-RW/DVD-R (VR mode) or HDD. Do not connect a MICRO MV format digital video camera even if it has an i.LINK jack. - See the instruction manual supplied with a digital video camera via the DV IN jack on page 101.... If you want to the section on the recorder to select the recording destination. ...
...not output signals. • You cannot use the DV IN jack and record on a DVD-RW/DVD-R (VR mode) or HDD. Do not connect a MICRO MV format digital video camera even if it has an i.LINK jack. - See the instruction manual supplied with a digital video camera via the DV IN jack on page 101.... If you want to the section on the recorder to select the recording destination. ...

Operating Instructions
Page 89
...be limited on this case, enter your password, you select a language in the disc is complete. z Hint If you select "Others" in "DVD Menu," "Subtitle," or "Audio," select and enter a language code from "Language Code List" on the disc, you select "Original," the language given...and press ENTER. Auto Automatically finalizes the disc following options for the disc, set "Level" to finalize the disc manually. 89 The Parental Control setting is selected. In this recorder. • Depending on page 105 using the number buttons, then select "OK" and press ENTER. Video Automatically ...
...be limited on this case, enter your password, you select a language in the disc is complete. z Hint If you select "Others" in "DVD Menu," "Subtitle," or "Audio," select and enter a language code from "Language Code List" on the disc, you select "Original," the language given...and press ENTER. Auto Automatically finalizes the disc following options for the disc, set "Level" to finalize the disc manually. 89 The Parental Control setting is selected. In this recorder. • Depending on page 105 using the number buttons, then select "OK" and press ENTER. Video Automatically ...
Operating Instructions
Page 92
... are connected to a combination TV/VIDEO player, the copyprotection signal applied to some DVD programs could affect picture quality. Connect the cable to the DV IN jack. , Try the following difficulties while using the recorder, use this case, hold down x STOP, and press CHANNEL - (minus) ... are distorted. , Reorient the TV antenna. , Adjust the picture (see the TV's instruction manual). , Place the recorder and TV farther apart. , Place the TV and any problem persist, consult your nearest Sony dealer. buttons. Power The power does not turn on. , Check that the signal from your...
... are connected to a combination TV/VIDEO player, the copyprotection signal applied to some DVD programs could affect picture quality. Connect the cable to the DV IN jack. , Try the following difficulties while using the recorder, use this case, hold down x STOP, and press CHANNEL - (minus) ... are distorted. , Reorient the TV antenna. , Adjust the picture (see the TV's instruction manual). , Place the recorder and TV farther apart. , Place the TV and any problem persist, consult your nearest Sony dealer. buttons. Power The power does not turn on. , Check that the signal from your...
Operating Instructions
Page 94
... Stop, Search, or Slow-motion Play cannot be performed. , Depending on the DVD, you may not be changed . , Multilingual tracks are not recorded on the DVD VIDEO being played. , The DVD VIDEO prohibits the changing of the language for the sound track. , Try changing the... has condensed inside the recorder. The angles cannot be able to change the angles when " " does not appear in a format that the recorder can play (page 59). The recorder starts playing automatically. , The DVD VIDEO features an auto playback function. See the instruction manual supplied with the labeled ...
... Stop, Search, or Slow-motion Play cannot be performed. , Depending on the DVD, you may not be changed . , Multilingual tracks are not recorded on the DVD VIDEO being played. , The DVD VIDEO prohibits the changing of the language for the sound track. , Try changing the... has condensed inside the recorder. The angles cannot be able to change the angles when " " does not appear in a format that the recorder can play (page 59). The recorder starts playing automatically. , The DVD VIDEO features an auto playback function. See the instruction manual supplied with the labeled ...
Operating Instructions
Page 107
...27 LINE IN 1/3 26 "Line Input" 84 "Line1 Input" 84 "Line3 Input" 84 M Main sound 54 "Make a Playlist" 68 "Manual Channel Setup" 80 Manual Clock Set 82 MENU 52 Menu DVD's Menu 52 Top menu 52 "Mix" 76 "MNR" 55 "Modify" 48 "Move" 67, 79 MP3 audio tracks 59 N Number buttons... Mode Adjust" 43, 87 "Rec NR" 46 "Rec Settings" 46 REC STOP 30, 77 "Rec Video Equalizer" 46 Recordable discs 8 "Recording" 87 Recording 41 picture adjustment 46 recording format 8 recording mode 30, 41 recording time 30, 41 while watching another program 30 ,continued 107 Picture Size" 46 "HDD Rec. TV CH" 24 H Handling...
...27 LINE IN 1/3 26 "Line Input" 84 "Line1 Input" 84 "Line3 Input" 84 M Main sound 54 "Make a Playlist" 68 "Manual Channel Setup" 80 Manual Clock Set 82 MENU 52 Menu DVD's Menu 52 Top menu 52 "Mix" 76 "MNR" 55 "Modify" 48 "Move" 67, 79 MP3 audio tracks 59 N Number buttons... Mode Adjust" 43, 87 "Rec NR" 46 "Rec Settings" 46 REC STOP 30, 77 "Rec Video Equalizer" 46 Recordable discs 8 "Recording" 87 Recording 41 picture adjustment 46 recording format 8 recording mode 30, 41 recording time 30, 41 while watching another program 30 ,continued 107 Picture Size" 46 "HDD Rec. TV CH" 24 H Handling...


