
Operating Instructions
Page 4
...14) Refer all instructions. 5) Do not use caution when moving the cart/apparatus combination to avoid injury from being explained. • Instructions in this manual refer to rain or moisture, does not operate normally, or has been dropped. When a cart is damaged, liquid has been spilled or objects have the... or grounding-type plug. If the provided plug does not fit into the apparatus, the apparatus has been exposed to DVDs created on this manual describe the controls on this recorder. 13) Unplug this apparatus near any heat sources such as power-supply cord or plug is used in...
...14) Refer all instructions. 5) Do not use caution when moving the cart/apparatus combination to avoid injury from being explained. • Instructions in this manual refer to rain or moisture, does not operate normally, or has been dropped. When a cart is damaged, liquid has been spilled or objects have the... or grounding-type plug. If the provided plug does not fit into the apparatus, the apparatus has been exposed to DVDs created on this manual describe the controls on this recorder. 13) Unplug this apparatus near any heat sources such as power-supply cord or plug is used in...
Operating Instructions
Page 6
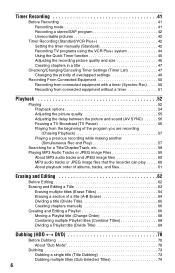
...Recording mode 41 Recording a stereo/SAP program 42 Unrecordable pictures 42 Timer Recording (Standard/VCR Plus 42 Setting the timer manually (Standard 42 Recording TV programs using the VCR Plus+ system 44 Using the Quick Timer function 45 Adjusting the recording picture...Title 63 Erasing multiple titles (Erase Titles 64 Erasing a section of a title (A-B Erase 64 Dividing a title (Divide Title 65 Creating chapters manually 66 Creating and Editing a Playlist 66 Moving a Playlist title (Change Order 68 Combining multiple Playlist titles (Combine Titles 68 Dividing a Playlist title...
...Recording mode 41 Recording a stereo/SAP program 42 Unrecordable pictures 42 Timer Recording (Standard/VCR Plus 42 Setting the timer manually (Standard 42 Recording TV programs using the VCR Plus+ system 44 Using the Quick Timer function 45 Adjusting the recording picture...Title 63 Erasing multiple titles (Erase Titles 64 Erasing a section of a title (A-B Erase 64 Dividing a title (Divide Title 65 Creating chapters manually 66 Creating and Editing a Playlist 66 Moving a Playlist title (Change Order 68 Combining multiple Playlist titles (Combine Titles 68 Dividing a Playlist title...
Operating Instructions
Page 8
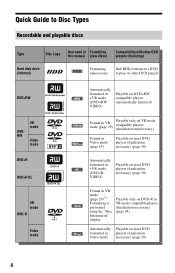
...)*1 Formatting is performed using the "Disc Information" display. Quick Guide to Disc Types Recordable and playable discs Type Disc Logo Icon used in Formatting this manual (new discs) Compatibility with other DVD players (finalizing) Hard disk drive (internal) HDD Formatting unnecessary Dub HDD contents to a DVD to play on other DVD...
...)*1 Formatting is performed using the "Disc Information" display. Quick Guide to Disc Types Recordable and playable discs Type Disc Logo Icon used in Formatting this manual (new discs) Compatibility with other DVD players (finalizing) Hard disk drive (internal) HDD Formatting unnecessary Dub HDD contents to a DVD to play on other DVD...
Operating Instructions
Page 10
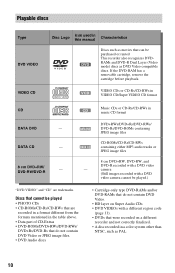
...; PHOTO CDs • CD-ROMs/CD-Rs/CD-RWs that are trademarks. Playable discs Type DVD VIDEO VIDEO CD Disc Logo Icon used in this manual Characteristics DVD Discs such as movies that can be purchased or rented This recorder also recognizes DVDRAMs and DVD-R Dual Layer (Video mode) discs as...
...; PHOTO CDs • CD-ROMs/CD-Rs/CD-RWs that are trademarks. Playable discs Type DVD VIDEO VIDEO CD Disc Logo Icon used in this manual Characteristics DVD Discs such as movies that can be purchased or rented This recorder also recognizes DVDRAMs and DVD-R Dual Layer (Video mode) discs as...
Operating Instructions
Page 23
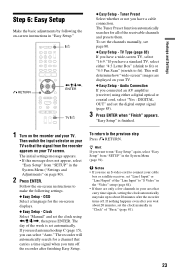
Hookups and Settings Step 6: Easy Setup Make the basic adjustments by following the on-screen instructions in "Easy Setup." [/1 O RETURN
Hookups and Settings Step 6: Easy Setup Make the basic adjustments by following the on-screen instructions in "Easy Setup." [/1 O RETURN
Operating Instructions
Page 26
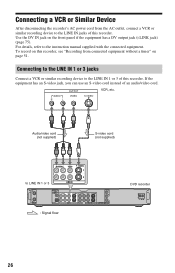
... the LINE IN 1 or 3 of this recorder. AUDIO R L OUTPUT VIDEO S VIDEO VCR, etc. Audio/video cord (not supplied) S-video cord (not supplied) to the instruction manual supplied with the connected equipment. Use the DV IN jack on page 51. To record on this recorder, see "Recording from the AC outlet, connect...
... the LINE IN 1 or 3 of this recorder. AUDIO R L OUTPUT VIDEO S VIDEO VCR, etc. Audio/video cord (not supplied) S-video cord (not supplied) to the instruction manual supplied with the connected equipment. Use the DV IN jack on page 51. To record on this recorder, see "Recording from the AC outlet, connect...

Operating Instructions
Page 29
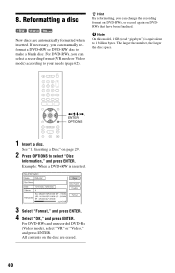
... HDD or DVD is recordable on the disc tray. If the disc is full. ,continued 29 to select the channel or input source you can manually re-format the disc to Know Your DVD Recorder 1 Press DVD. 2 Press Z OPEN/CLOSE, and place a disc on this recorder, you want to record to...
... HDD or DVD is recordable on the disc tray. If the disc is full. ,continued 29 to select the channel or input source you can manually re-format the disc to Know Your DVD Recorder 1 Press DVD. 2 Press Z OPEN/CLOSE, and place a disc on this recorder, you want to record to...
Operating Instructions
Page 40
z Hint By reformatting, you can manually reformat a DVD+RW or DVD-RW disc to make a blank disc. If necessary, you can select a recording format (VR mode or Video mode) according to 1 billion bytes. b Note On this model, 1 GB (read "gigabyte") is equivalent to your needs (page 62). For DVD-RWs, you can change the recording format on DVD-RWs, or record again on DVDRWs that have been finalized. Reformatting a disc +RW -RWVR -RWVideo New discs are automatically formatted when inserted. The larger the number, the larger the disc space. 8.
z Hint By reformatting, you can manually reformat a DVD+RW or DVD-RW disc to make a blank disc. If necessary, you can select a recording format (VR mode or Video mode) according to 1 billion bytes. b Note On this model, 1 GB (read "gigabyte") is equivalent to your needs (page 62). For DVD-RWs, you can change the recording format on DVD-RWs, or record again on DVDRWs that have been finalized. Reformatting a disc +RW -RWVR -RWVideo New discs are automatically formatted when inserted. The larger the number, the larger the disc space. 8.
Operating Instructions
Page 42
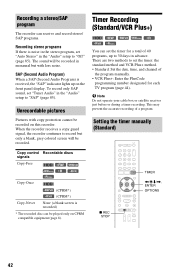
... There are two methods to "SAP" (page 85). This may prevent the accurate recording of 40 programs, up on this recorder. Setting the timer manually (Standard) Copy control Recordable discs signals Copy-Free Copy-Once HDD +RW -RWVideo +R -RVideo -RWVR -RVR HDD -RWVR (CPRM*) -RVR (CPRM...setup to set the timer: the standard method and VCR Plus+ method. • Standard: Set the date, time, and channel of the program manually. • VCR Plus+: Enter the PlusCode programming number designated for a total of a program. Recording a stereo/SAP program The recorder can receive and...
... There are two methods to "SAP" (page 85). This may prevent the accurate recording of 40 programs, up on this recorder. Setting the timer manually (Standard) Copy control Recordable discs signals Copy-Free Copy-Once HDD +RW -RWVideo +R -RVideo -RWVR -RVR HDD -RWVR (CPRM*) -RVR (CPRM...setup to set the timer: the standard method and VCR Plus+ method. • Standard: Set the date, time, and channel of the program manually. • VCR Plus+: Enter the PlusCode programming number designated for a total of a program. Recording a stereo/SAP program The recorder can receive and...
Operating Instructions
Page 43
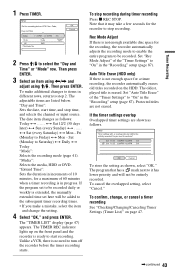
Then press ENTER. 3 Select an item using Timer Recording 1 Press TIMER. 2 Press M/m to select the "Day and Time" or "Mode" row.
Then press ENTER. 3 Select an item using Timer Recording 1 Press TIMER. 2 Press M/m to select the "Day and Time" or "Mode" row.

Operating Instructions
Page 47
... picture sizes, the selected size is fixed to the HDD, a DVD-R (VR mode) or a DVD-RW (VR mode), you can insert and erase chapter marks manually (page 66). To disable this function, set "Auto Chapter" in the dubbed title. O RETURN / 1 Press TIMER LIST. Checking/Changing/ Canceling Timer Settings (Timer List) HDD...
... picture sizes, the selected size is fixed to the HDD, a DVD-R (VR mode) or a DVD-RW (VR mode), you can insert and erase chapter marks manually (page 66). To disable this function, set "Auto Chapter" in the dubbed title. O RETURN / 1 Press TIMER LIST. Checking/Changing/ Canceling Timer Settings (Timer List) HDD...
Operating Instructions
Page 66
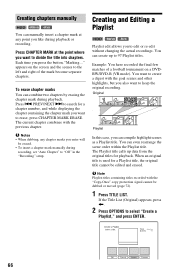
... In this case, you like during playback or recording. When an original title is used for playback. Creating chapters manually HDD -RWVR -RVR You can manually insert a chapter mark at the point where you also want to erase, press CHAPTER MARK ERASE. To erase chapter...for a chapter number, and while displaying the chapter containing the chapter mark you enter will be erased. • To insert a chapter mark manually during playback. b Note Playlist titles containing titles recorded with the "Copy-Once" copy protection signal cannot be edited and erased. b Notes •...
... In this case, you like during playback or recording. When an original title is used for playback. Creating chapters manually HDD -RWVR -RVR You can manually insert a chapter mark at the point where you also want to erase, press CHAPTER MARK ERASE. To erase chapter...for a chapter number, and while displaying the chapter containing the chapter mark you enter will be erased. • To insert a chapter mark manually during playback. b Note Playlist titles containing titles recorded with the "Copy-Once" copy protection signal cannot be edited and erased. b Notes •...
Operating Instructions
Page 73
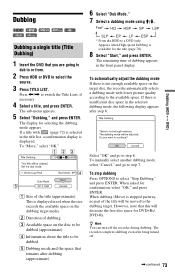
Dubbing HDD +RW -RWVR -RWVideo +R -RVR -RVideo Dubbing a single title (Title Dubbing) 1 Insert the DVD that you are going to dub to or from. 2 Press HDD or DVD to select the source. 3 Press TITLE LIST. Press
Dubbing HDD +RW -RWVR -RWVideo +R -RVR -RVideo Dubbing a single title (Title Dubbing) 1 Insert the DVD that you are going to dub to or from. 2 Press HDD or DVD to select the source. 3 Press TITLE LIST. Press
Operating Instructions
Page 74
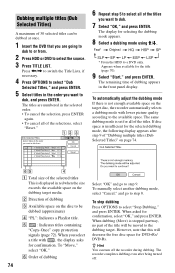
Dubbing multiple titles (Dub Selected Titles) A maximum of 30 selected titles can be dubbed at once. 1 Insert the DVD that you are going to dub to or from. 2 Press HDD or DVD to select the source. 3 Press TITLE LIST. Press
Dubbing multiple titles (Dub Selected Titles) A maximum of 30 selected titles can be dubbed at once. 1 Insert the DVD that you are going to dub to or from. 2 Press HDD or DVD to select the source. 3 Press TITLE LIST. Press
Operating Instructions
Page 75
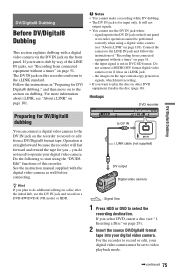
.... For more information about i.LINK, see "1. Do not connect a MICRO MV format digital video camera even if it has an i.LINK jack. - See the instruction manual supplied with a digital video camera via the DV IN jack on the recorder to the DV IN jack on the front panel. the input signal...
.... For more information about i.LINK, see "1. Do not connect a MICRO MV format digital video camera even if it has an i.LINK jack. - See the instruction manual supplied with a digital video camera via the DV IN jack on the recorder to the DV IN jack on the front panel. the input signal...
Operating Instructions
Page 80
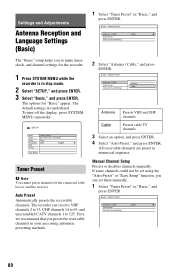
...methods. 2 Select "Antenna / Cable," and press ENTER. Tuner Preset b Note You cannot preset channels for "Basic" appear. The recorder can set them manually. 1 Select "Tuner Preset" in stop mode. 2 Select "SETUP," and press ENTER. 3 Select "Basic," and press ENTER. To turn off the display..., press SYSTEM MENU repeatedly. All receivable channels are underlined. Manual Channel Setup Presets or disables channels manually. The "Basic" setup helps you can receive VHF channels 2 to 13, UHF channels 14 to 69, and unscrambled CATV ...
...methods. 2 Select "Antenna / Cable," and press ENTER. Tuner Preset b Note You cannot preset channels for "Basic" appear. The recorder can set them manually. 1 Select "Tuner Preset" in stop mode. 2 Select "SETUP," and press ENTER. 3 Select "Basic," and press ENTER. To turn off the display..., press SYSTEM MENU repeatedly. All receivable channels are underlined. Manual Channel Setup Presets or disables channels manually. The "Basic" setup helps you can receive VHF channels 2 to 13, UHF channels 14 to 69, and unscrambled CATV ...
Operating Instructions
Page 81
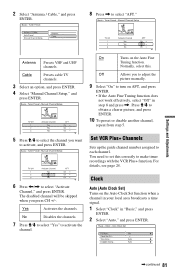
... Auto Fine Tuning function. You need to set this . Cable Presets cable TV channels. 3 Select an option, and press ENTER. 4 Select "Manual Channel Setup," and press ENTER. On Turns on AFT, and press ENTER. • If the Auto Fine Tuning function does not work effectively, select...a clearer picture, and press ENTER. 10 To preset or disable another channel, repeat from step 5. 5 Press M/m to select the channel you to adjust the picture manually. 9 Select "On" to make timer recordings with the VCR Plus+ function. 2 Select "Antenna / Cable," and press ENTER. 8 Press , to activate, and...
... Auto Fine Tuning function. You need to set this . Cable Presets cable TV channels. 3 Select an option, and press ENTER. 4 Select "Manual Channel Setup," and press ENTER. On Turns on AFT, and press ENTER. • If the Auto Fine Tuning function does not work effectively, select...a clearer picture, and press ENTER. 10 To preset or disable another channel, repeat from step 5. 5 Press M/m to select the channel you to adjust the picture manually. 9 Select "On" to make timer recordings with the VCR Plus+ function. 2 Select "Antenna / Cable," and press ENTER. 8 Press , to activate, and...

Operating Instructions
Page 82
...you to "Yes," the Auto Clock Set function is activated whenever the recorder is incorrect. Most PBS member stations broadcast a time signal. Manual (Manual Clock Set) If the Auto Clock Set function did not set "Full Auto" to adjust your clock setting is turned off the Auto ...your time zone and Daylight Saving Time (if applicable). • If the clock does not activate, your time zone and Daylight Saving Time manually, without turning off . Press Yes Automatically sets your local PBS station. For the fastest response select your time zone and Daylight Saving Time...
...you to "Yes," the Auto Clock Set function is activated whenever the recorder is incorrect. Most PBS member stations broadcast a time signal. Manual (Manual Clock Set) If the Auto Clock Set function did not set "Full Auto" to adjust your clock setting is turned off the Auto ...your time zone and Daylight Saving Time (if applicable). • If the clock does not activate, your time zone and Daylight Saving Time manually, without turning off . Press Yes Automatically sets your local PBS station. For the fastest response select your time zone and Daylight Saving Time...

Operating Instructions
Page 89
... lower the value, the stricter the limitation. In this recorder. • Depending on page 105 using the number buttons, then select "OK" and press ENTER. Manual Allows you will be automatically selected. To cancel the Parental Control setting for the DVD menu. Language (DVD VIDEO only) DVD Menu Switches the language... items for "Level" are displayed. When you play discs which do not have the Parental Control function, playback cannot be asked to finalize the disc manually. 89
... lower the value, the stricter the limitation. In this recorder. • Depending on page 105 using the number buttons, then select "OK" and press ENTER. Manual Allows you will be automatically selected. To cancel the Parental Control setting for the DVD menu. Language (DVD VIDEO only) DVD Menu Switches the language... items for "Level" are displayed. When you play discs which do not have the Parental Control function, playback cannot be asked to finalize the disc manually. 89
Operating Instructions
Page 92
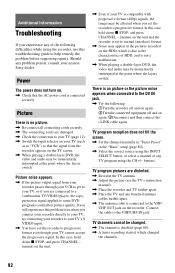
...Check the connection to your TV (page 12). , Switch the input selector on your nearest Sony dealer. TV program pictures are distorted. , Reorient the TV antenna. , Adjust the picture (see the TV's instruction manual). , Place the recorder and TV farther apart. , Place the TV and any problem ... following difficulties while using the recorder, use this troubleshooting guide to progressive format. TV program reception does not fill the screen. , Set the channel manually in "Tuner Preset" in the pictures recorded on the unit. , Even if your TV's S VIDEO input. , You have set to normal ...
...Check the connection to your TV (page 12). , Switch the input selector on your nearest Sony dealer. TV program pictures are distorted. , Reorient the TV antenna. , Adjust the picture (see the TV's instruction manual). , Place the recorder and TV farther apart. , Place the TV and any problem ... following difficulties while using the recorder, use this troubleshooting guide to progressive format. TV program reception does not fill the screen. , Set the channel manually in "Tuner Preset" in the pictures recorded on the unit. , Even if your TV's S VIDEO input. , You have set to normal ...


