Primary User Manual
Page 2
... general house waste, dispose of important operating and maintenance (servicing) instructions in a residential installation. These limits are cautioned that interference will not occur in this manual could void your authority to operate this equipment. If this unit is located inside the apparatus. Connect the equipment into an outlet on , the user...
... general house waste, dispose of important operating and maintenance (servicing) instructions in a residential installation. These limits are cautioned that interference will not occur in this manual could void your authority to operate this equipment. If this unit is located inside the apparatus. Connect the equipment into an outlet on , the user...
Primary User Manual
Page 3
... 15 Notes on Recording 16 Useful Tips for Recording 16 Synchro-Recording a CD to CD-R or CD-RW 18 Recording on a CD-R or CD-RW Manually 20 Adjusting the Recording Level 21 Marking Track Numbers While Recording 22 Recording the Original Sound of the Program Source (Direct Recording Function) ......... 23 Fading In and Out (Fader 23 Finalizing a CD-R or CD-RW 24 Unfinalizing a CD-RW 25 Erasing...
... 15 Notes on Recording 16 Useful Tips for Recording 16 Synchro-Recording a CD to CD-R or CD-RW 18 Recording on a CD-R or CD-RW Manually 20 Adjusting the Recording Level 21 Marking Track Numbers While Recording 22 Recording the Original Sound of the Program Source (Direct Recording Function) ......... 23 Fading In and Out (Fader 23 Finalizing a CD-R or CD-RW 24 Unfinalizing a CD-RW 25 Erasing...
Primary User Manual
Page 4
... the AC power cord, grasp the plug itself; Should this manual: Z Indicates that the operating voltage of the deck is glue or a similar substance on the disc, remove it for future reference. In this Sony Compact Disc Recorder. never pull the cord. On cleaning • Fingerprints or ...or antistatic spray intended for vinyl LPs. 4 Before operating the unit, please read this manual describe the controls on the unit. Welcome Thank you for purchasing this case, remove the CD, CD-R, or CD-RW and leave the unit turned on for about an hour until the moisture evaporates....
... the AC power cord, grasp the plug itself; Should this manual: Z Indicates that the operating voltage of the deck is glue or a similar substance on the disc, remove it for future reference. In this Sony Compact Disc Recorder. never pull the cord. On cleaning • Fingerprints or ...or antistatic spray intended for vinyl LPs. 4 Before operating the unit, please read this manual describe the controls on the unit. Welcome Thank you for purchasing this case, remove the CD, CD-R, or CD-RW and leave the unit turned on for about an hour until the moisture evaporates....
Primary User Manual
Page 8
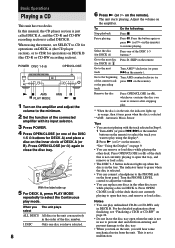
...unit has two decks. Pause playing Press X. The indicator turns to green when the disc is in DECK A. Press OPEN/CLOSE (or A) again to CDR for operations on the remote ). The unit starts playing. on the front panel. Remove the disc Press OPEN/CLOSE (or A), whichever contains the disc you... want to remove after stopping play mode. To Do the following: Stop playback Press x. In this manual, the CD player section is just called DECK A, and the CD-R and CD-RW recording section is not a malfunction. With the label side up in orange, then it turns green when the disc is...
...unit has two decks. Pause playing Press X. The indicator turns to green when the disc is in DECK A. Press OPEN/CLOSE (or A) again to CDR for operations on the remote ). The unit starts playing. on the front panel. Remove the disc Press OPEN/CLOSE (or A), whichever contains the disc you... want to remove after stopping play mode. To Do the following: Stop playback Press x. In this manual, the CD player section is just called DECK A, and the CD-R and CD-RW recording section is not a malfunction. With the label side up in orange, then it turns green when the disc is...

Primary User Manual
Page 20
...on page 24. "PMA Writing" appears while updating the information of DECK B and place a recordable CD-R or CD-RW on DECK B. For details, see "Notes on Recording" on page 16. Recording on a CD-R or CD-RW Manually You can add a track (page 22). Press OPEN/CLOSE again to select the 20 input connector...copies to be able to record a CD-R or CD-RW digitally through the DIGITAL OPTICAL IN or DIGITAL COAXIAL IN jack depending on the remote). 7 Start playing the sound source you want to CDR. • After recording, you may not be able to make digital recordings. Notes • If...
...on page 24. "PMA Writing" appears while updating the information of DECK B and place a recordable CD-R or CD-RW on DECK B. For details, see "Notes on Recording" on page 16. Recording on a CD-R or CD-RW Manually You can add a track (page 22). Press OPEN/CLOSE again to select the 20 input connector...copies to be able to record a CD-R or CD-RW digitally through the DIGITAL OPTICAL IN or DIGITAL COAXIAL IN jack depending on the remote). 7 Start playing the sound source you want to CDR. • After recording, you may not be able to make digital recordings. Notes • If...
Primary User Manual
Page 21
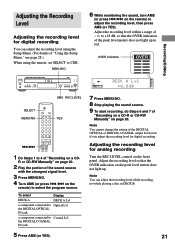
... When using the Setup Menu. (For details of the peak level meters does not light up . OVER indication Recording/Editing SELECT MENU/NO AMS REC LEVEL YES ./> 1 Do Steps 1 to CDR. MENU/NO 6 While monitoring the sound, turn AMS (or press ./> on the front panel. RW 7 Press...to select the program source. R or CD-RW Manually" on page 20. 2 Play the portion of "Recording on a CD-R or CD-RW Manually" on the remote) to adjust the recording level, then press AMS (or YES). OVER TOC DECK B CD TEXT CD - Note You can adjust the recording level using the remote, set SELECT to ...
... When using the Setup Menu. (For details of the peak level meters does not light up . OVER indication Recording/Editing SELECT MENU/NO AMS REC LEVEL YES ./> 1 Do Steps 1 to CDR. MENU/NO 6 While monitoring the sound, turn AMS (or press ./> on the front panel. RW 7 Press...to select the program source. R or CD-RW Manually" on page 20. 2 Play the portion of "Recording on a CD-R or CD-RW Manually" on the remote) to adjust the recording level, then press AMS (or YES). OVER TOC DECK B CD TEXT CD - Note You can adjust the recording level using the remote, set SELECT to ...
Primary User Manual
Page 22
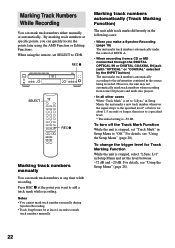
...to mark track numbers manually. Notes • You cannot mark track numbers manually during Synchro-Recording. • Track length must be at specific points, you make a Synchro-Recording (page 18) The unit marks track numbers automatically under the control of DECK A. • When recording from some CD players and multi ...points later using the remote, set SELECT to "LSync" in Setup Menu and set to CDR. REC z SELECT REC z Marking track numbers manually You can mark track numbers either manually or automatically. To turn off the Track Mark Function While the unit is set the level...
...to mark track numbers manually. Notes • You cannot mark track numbers manually during Synchro-Recording. • Track length must be at specific points, you make a Synchro-Recording (page 18) The unit marks track numbers automatically under the control of DECK A. • When recording from some CD players and multi ...points later using the remote, set SELECT to "LSync" in Setup Menu and set to CDR. REC z SELECT REC z Marking track numbers manually You can mark track numbers either manually or automatically. To turn off the Track Mark Function While the unit is set the level...
Specifications with Key Features
Page 2
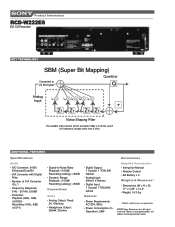
Product Information RCD-W222ES ES CD Recorder KEY TECHNOLOGY...5 Hz - 20 kHz ±0.5dB • Distortion: Playback (1kHz, 0dB) 90dB • Dynamic Range: Playback: >100dB Recording (analog): >90dB Connections Audio • Analog Output, Fixed: 2V, 47kohms • Headphone Output: 28mW, 32ohms • Digital..., 1TOSLINK optical General • Power Requirements: AC120V, 60Hz • Power Consumption (in Operation): 29W Accessories Supplied Accessories • Instruction Manual • Remote Control • AA Battery x 2 Weights & Measures* • Dimensions (W x H x D): 17" x 4.25"...
Product Information RCD-W222ES ES CD Recorder KEY TECHNOLOGY...5 Hz - 20 kHz ±0.5dB • Distortion: Playback (1kHz, 0dB) 90dB • Dynamic Range: Playback: >100dB Recording (analog): >90dB Connections Audio • Analog Output, Fixed: 2V, 47kohms • Headphone Output: 28mW, 32ohms • Digital..., 1TOSLINK optical General • Power Requirements: AC120V, 60Hz • Power Consumption (in Operation): 29W Accessories Supplied Accessories • Instruction Manual • Remote Control • AA Battery x 2 Weights & Measures* • Dimensions (W x H x D): 17" x 4.25"...

