CLIE Handbook
Page 3
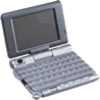
...of the accessories described in this manual (Handbook) may not be consistent with using this manual are explained in detail. ‰ When you want to make full use the supplied applications in detail. Differences between PEG-UX50 and PEG-UX40 are specified in solving common problems ...that you want to install additional applications CLIÉ Application Manual (HTML format: Read via a computer window) Explains how to the following manuals are included with the basic ...
...of the accessories described in this manual (Handbook) may not be consistent with using this manual are explained in detail. ‰ When you want to make full use the supplied applications in detail. Differences between PEG-UX50 and PEG-UX40 are specified in solving common problems ...that you want to install additional applications CLIÉ Application Manual (HTML format: Read via a computer window) Explains how to the following manuals are included with the basic ...
CLIE Handbook
Page 6
... Creating Graffiti® 2 ShortCuts . . . . 77 Adjusting the Digitizer 78 Setting the Network preferences for a wireless LAN (for PEG-UX50 only 79 Setting a wireless LAN access point manually 79 Searching and setting a wireless LAN access point manually . . . . 81 Connecting your CLIÉ handheld to a wireless LAN access point automatically 82 Checking the wireless LAN...
... Creating Graffiti® 2 ShortCuts . . . . 77 Adjusting the Digitizer 78 Setting the Network preferences for a wireless LAN (for PEG-UX50 only 79 Setting a wireless LAN access point manually 79 Searching and setting a wireless LAN access point manually . . . . 81 Connecting your CLIÉ handheld to a wireless LAN access point automatically 82 Checking the wireless LAN...

CLIE Handbook
Page 13
CLIÉ™ handheld basic operations 13 Basic operations Pressing the Jog Dial™ navigator Press the Jog Dial™ navigator to select an item or to the "CLIÉ Application Manual" installed on your computer. Note The operations you can perform using the Jog Dial™ navigator vary depending on the operations of each application, refer to start a selected application. b For details on the application. Tip Rotating while pressing the Jog Dial™ navigator In some applications, operations are executed by pressing and rotating the Jog Dial™ navigator.
CLIÉ™ handheld basic operations 13 Basic operations Pressing the Jog Dial™ navigator Press the Jog Dial™ navigator to select an item or to the "CLIÉ Application Manual" installed on your computer. Note The operations you can perform using the Jog Dial™ navigator vary depending on the operations of each application, refer to start a selected application. b For details on the application. Tip Rotating while pressing the Jog Dial™ navigator In some applications, operations are executed by pressing and rotating the Jog Dial™ navigator.
CLIE Handbook
Page 14
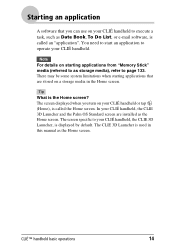
... called an "application". You need to start an application to execute a task, such as the Home screen. Note For details on a storage media in this manual as Date Book, To Do List, or e-mail software, is called the Home screen. In your CLIÉ handheld to operate your CLIÉ handheld...
... called an "application". You need to start an application to execute a task, such as the Home screen. Note For details on a storage media in this manual as Date Book, To Do List, or e-mail software, is called the Home screen. In your CLIÉ handheld to operate your CLIÉ handheld...

CLIE Handbook
Page 16
b For details, refer to the "CLIÉ Application Manual" installed on is displayed when you worked on your CLIÉ handheld as follows. .... You can switch from one of two methods to display the CLIE 3D Launcher as you need to save data manually. All the changes in the application that you are automatically saved, and the last screen you restart the application. Note... tapping (Home). Starting an application Quitting an application You do not need to save data manually on an application. Return to the CLIE 3D Launcher by pressing the Application button.
b For details, refer to the "CLIÉ Application Manual" installed on is displayed when you worked on your CLIÉ handheld as follows. .... You can switch from one of two methods to display the CLIE 3D Launcher as you need to save data manually. All the changes in the application that you are automatically saved, and the last screen you restart the application. Note... tapping (Home). Starting an application Quitting an application You do not need to save data manually on an application. Return to the CLIE 3D Launcher by pressing the Application button.
CLIE Handbook
Page 42
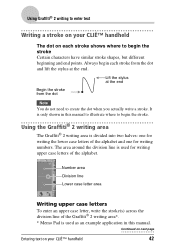
... your CLIÉ™ handheld The dot on your CLIÉ™ handheld 42 The area around the division line is only shown in this manual to illustrate where to begin the stroke Certain characters have similar stroke shapes, but different beginning and end points. Number area Division line Lower case... To enter an upper case letter, write the stroke(s) across the division line of the alphabet. It is used as an example application in this manual. Begin the stroke from the dot and lift the stylus at the end Note You do not need to create the dot when you actually...
... your CLIÉ™ handheld The dot on your CLIÉ™ handheld 42 The area around the division line is only shown in this manual to illustrate where to begin the stroke Certain characters have similar stroke shapes, but different beginning and end points. Number area Division line Lower case... To enter an upper case letter, write the stroke(s) across the division line of the alphabet. It is used as an example application in this manual. Begin the stroke from the dot and lift the stylus at the end Note You do not need to create the dot when you actually...
CLIE Handbook
Page 66
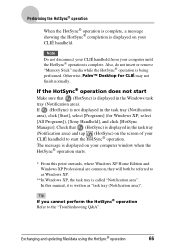
Otherwise, Palm™ Desktop for Windows XP, select [All Programs]), [Sony Handheld], and click [HotSync Manager]. Exchanging and updating files/data using the HotSync® operation 66 If the HotSync® operation does not start the ... is displayed in the Windows task tray (Notification area). The message is displayed on your computer window when the HotSync® operation starts. * From this manual, it is called "Notification area". In this point onwards, where Windows XP Home Edition and Windows XP Professional are common, they will both be referred...
Otherwise, Palm™ Desktop for Windows XP, select [All Programs]), [Sony Handheld], and click [HotSync Manager]. Exchanging and updating files/data using the HotSync® operation 66 If the HotSync® operation does not start the ... is displayed in the Windows task tray (Notification area). The message is displayed on your computer window when the HotSync® operation starts. * From this manual, it is called "Notification area". In this point onwards, where Windows XP Home Edition and Windows XP Professional are common, they will both be referred...
CLIE Handbook
Page 79
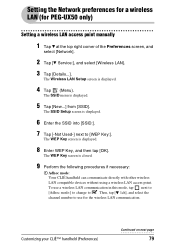
The WEP Key screen is displayed. 4 Tap (Menu). To use for PEG-UX50 only) Setting a wireless LAN access point manually 1 Tap V at the top right corner of the Preferences screen, and select [Network]. 2 Tap [V Service:], and select [Wireless LAN]. 3 Tap [Details...]. Then, tap [V 1ch], and ...
The WEP Key screen is displayed. 4 Tap (Menu). To use for PEG-UX50 only) Setting a wireless LAN access point manually 1 Tap V at the top right corner of the Preferences screen, and select [Network]. 2 Tap [V Service:], and select [Wireless LAN]. 3 Tap [Details...]. Then, tap [V 1ch], and ...

CLIE Handbook
Page 80
... [OK]. Enable Power Save function in normal use. If the communication reception of your CLIÉ handheld is treated as one for PEG-UX50 only) 2 Power Save: The Power Save function is displayed and you can manually set up an IP Address, Netmask(Subnet mask), Router(Gateway), Primary DNS, and Secondary DNS.
... [OK]. Enable Power Save function in normal use. If the communication reception of your CLIÉ handheld is treated as one for PEG-UX50 only) 2 Power Save: The Power Save function is displayed and you can manually set up an IP Address, Netmask(Subnet mask), Router(Gateway), Primary DNS, and Secondary DNS.
CLIE Handbook
Page 81
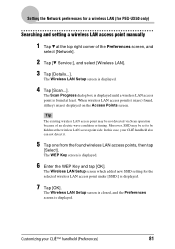
... from the found at the wireless LAN access point side. The Wireless LAN Setup screen which added new SSID setting for PEG-UX50 only) Searching and setting a wireless LAN access point manually 1 Tap V at the top right corner of an electric wave condition or timing. Customizing your CLIÉ handheld also can...
... from the found at the wireless LAN access point side. The Wireless LAN Setup screen which added new SSID setting for PEG-UX50 only) Searching and setting a wireless LAN access point manually 1 Tap V at the top right corner of an electric wave condition or timing. Customizing your CLIÉ handheld also can...
CLIE Handbook
Page 85
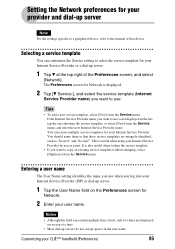
... by access point. Setting the Network preferences for your provider and dial-up server Note For the settings specific to a peripheral device, refer to the manual of that those service templates are displayed on the Preferences screen for Network. 2 Enter your user name. Selecting a service template You can create multiple service...
... by access point. Setting the Network preferences for your provider and dial-up server Note For the settings specific to a peripheral device, refer to the manual of that those service templates are displayed on the Preferences screen for Network. 2 Enter your user name. Selecting a service template You can create multiple service...
CLIE Handbook
Page 115
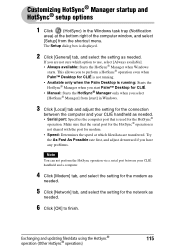
.... • Speed: Determines the speed at the bottom right of the computer window, and select [Setup] from [start Palm™ Desktop for CLIÉ. • Manual: Starts the HotSync® Manager only when you select [HotSync® Manager] from the shortcut menu. The Setup dialog box is displayed. 2 Click [General] tab...
.... • Speed: Determines the speed at the bottom right of the computer window, and select [Setup] from [start Palm™ Desktop for CLIÉ. • Manual: Starts the HotSync® Manager only when you select [HotSync® Manager] from the shortcut menu. The Setup dialog box is displayed. 2 Click [General] tab...

CLIE Handbook
Page 119
... of the Preferences screen, and select [Connection]. 2 Tap [New...]. 3 Enter the connection name in the name field. Preparing your computer. For details, refer to the manual of your computer. 1 Tap V at the top right of your CLIÉ handheld Note Prior to [Device].
... of the Preferences screen, and select [Connection]. 2 Tap [New...]. 3 Enter the connection name in the name field. Preparing your computer. For details, refer to the manual of your computer. 1 Tap V at the top right of your CLIÉ handheld Note Prior to [Device].
CLIE Handbook
Page 123
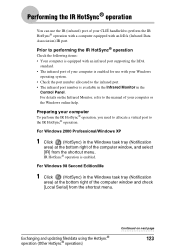
... the Control Panel. Exchanging and updating files/data using the HotSync® operation (Other HotSync® operations) Continued on the Infrared Monitor, refer to the manual of your CLIÉ handheld to the infrared port. • The infrared port number is available in the Infrared Monitor in the Windows task tray...
... the Control Panel. Exchanging and updating files/data using the HotSync® operation (Other HotSync® operations) Continued on the Infrared Monitor, refer to the manual of your CLIÉ handheld to the infrared port. • The infrared port number is available in the Infrared Monitor in the Windows task tray...
CLIE Handbook
Page 130
... an Internal Media to be used with your CLIÉ handheld. **You can use your CLIÉ handheld You can use both types of this manual. You can be played back on a device not certificated. MagicGate certifies the compatible device and "MagicGate Memory Stick" media as copyright protection-compatible devices and...
... an Internal Media to be used with your CLIÉ handheld. **You can use your CLIÉ handheld You can use both types of this manual. You can be played back on a device not certificated. MagicGate certifies the compatible device and "MagicGate Memory Stick" media as copyright protection-compatible devices and...
CLIE Handbook
Page 138
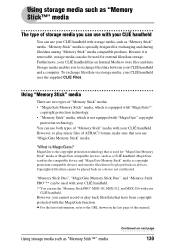
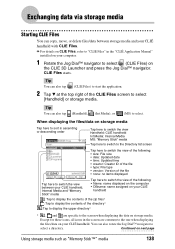
.../data on next page Using storage media such as "Memory Stick™" media 138 Except for these icons, all icons in the "CLIÉ Application Manual" installed on storage media. When displaying the files/data on storage media Tap here to sort in ascending or descending order Tap here to switch...
.../data on next page Using storage media such as "Memory Stick™" media 138 Except for these icons, all icons in the "CLIÉ Application Manual" installed on storage media. When displaying the files/data on storage media Tap here to sort in ascending or descending order Tap here to switch...

CLIE Handbook
Page 164
... for the Bluetooth® compatible device (mobile phone), following the instructions in "Connecting" on page 160. For detailed operations, refer to the "CLIÉ Application Manual" on the CLIE 3D Launcher of the mobile phone and activate Bluetooth® communications. b For detailed operations, refer to the...
... for the Bluetooth® compatible device (mobile phone), following the instructions in "Connecting" on page 160. For detailed operations, refer to the "CLIÉ Application Manual" on the CLIE 3D Launcher of the mobile phone and activate Bluetooth® communications. b For detailed operations, refer to the...
CLIE Handbook
Page 172
... the HotSync® operation, the new data may be lost at the data restoration. • If you may not be backed up, refer to the manual of your CLIÉ handheld data by the HotSync® operation, perform a HotSync promptly after performing a hard reset. Certain applications or driver files added later...
... the HotSync® operation, the new data may be lost at the data restoration. • If you may not be backed up, refer to the manual of your CLIÉ handheld data by the HotSync® operation, perform a HotSync promptly after performing a hard reset. Certain applications or driver files added later...

CLIE Handbook
Page 183
... the Internal Media of the "Read This First (Operating Instructions)". Note As add-on applications installed on your CLIÉ handheld support website. In this manual. Enhancing features with add-on applications 183 For the latest information on the applications that run on Palm OS (Add-on applications).
... the Internal Media of the "Read This First (Operating Instructions)". Note As add-on applications installed on your CLIÉ handheld support website. In this manual. Enhancing features with add-on applications 183 For the latest information on the applications that run on Palm OS (Add-on applications).
CLIE Handbook
Page 186
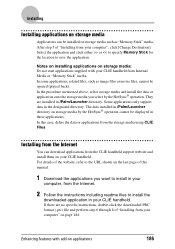
After step 5 of "Installing from your computer", click [Change Destination]. Select the application and click either >> or Installing Installing applications on storage media Applications can be installed on storage media such as "Memory Stick" media.
After step 5 of "Installing from your computer", click [Change Destination]. Select the application and click either >> or Installing Installing applications on storage media Applications can be installed on storage media such as "Memory Stick" media.

