
Quick Start Guide
Page 2
... registered trademarks of the computer, and may be completed by third parties. Product activation procedures and privacy policies will be transported or used outside the United States. Sony, VAIO, the VAIO logo, VAIO Smart, Giga Pocket, MovieShaker, DVgate, Handycam, Memory Stick, the Memory Stick logo, Net MD... and additions to this product meets the ENERGY STAR® guidelines for Canadian customers: Your new VAIO computer includes certain software versions or upgrades, and Internet services or offers that this manual or the information contained herein at any machine-readable...
... registered trademarks of the computer, and may be completed by third parties. Product activation procedures and privacy policies will be transported or used outside the United States. Sony, VAIO, the VAIO logo, VAIO Smart, Giga Pocket, MovieShaker, DVgate, Handycam, Memory Stick, the Memory Stick logo, Net MD... and additions to this product meets the ENERGY STAR® guidelines for Canadian customers: Your new VAIO computer includes certain software versions or upgrades, and Internet services or offers that this manual or the information contained herein at any machine-readable...
System Reference Manual
Page 2
... user license agreement. Sony, VAIO, the VAIO logo, VAIO Smart, Giga Pocket, MovieShaker, DVgate, Handycam, Memory Stick, the Memory Stick logo, Net MD, Network Walkman, OpenMG, MICROMV, SonicStage, ImageStation, ATRAC3, and i.LINK are trademarks or registered trademarks of Sony. All other trademarks ... customers: Your new VAIO computer includes certain software versions or upgrades, and Internet services or offers that are trademarks or registered trademarks of the computer, and may be reproduced, translated, or reduced to U.S. IN NO EVENT SHALL SONY ELECTRONICS INC. Microsoft,...
... user license agreement. Sony, VAIO, the VAIO logo, VAIO Smart, Giga Pocket, MovieShaker, DVgate, Handycam, Memory Stick, the Memory Stick logo, Net MD, Network Walkman, OpenMG, MICROMV, SonicStage, ImageStation, ATRAC3, and i.LINK are trademarks or registered trademarks of Sony. All other trademarks ... customers: Your new VAIO computer includes certain software versions or upgrades, and Internet services or offers that are trademarks or registered trademarks of the computer, and may be reproduced, translated, or reduced to U.S. IN NO EVENT SHALL SONY ELECTRONICS INC. Microsoft,...
System Reference Manual
Page 12
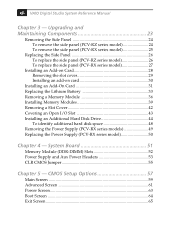
xii VAIO Digital Studio System Reference Manual Chapter 3 - System Board 51 Memory Module (DDR-DIMM) Slots 52 Power Supply and Aux Power Headers 53 CLR CMOS Jumper 55 Chapter 5 - CMOS Setup Options 57 Main Screen 59 Advanced Screen 61 Power Screen 63 Boot Screen 64 Exit Screen 65 Upgrading and ...Maintaining Components 23 Removing the Side Panel 24 To remove the side panel (PCV-RZ series model 24 To remove the side panel (PCV-RX series model 25 Replacing the Side Panel 26 To replace the...
xii VAIO Digital Studio System Reference Manual Chapter 3 - System Board 51 Memory Module (DDR-DIMM) Slots 52 Power Supply and Aux Power Headers 53 CLR CMOS Jumper 55 Chapter 5 - CMOS Setup Options 57 Main Screen 59 Advanced Screen 61 Power Screen 63 Boot Screen 64 Exit Screen 65 Upgrading and ...Maintaining Components 23 Removing the Side Panel 24 To remove the side panel (PCV-RZ series model 24 To remove the side panel (PCV-RX series model 25 Replacing the Side Panel 26 To replace the...

System Reference Manual
Page 47
... handle damaged or leaking batteries. Do not disassemble it is safer to power the CMOS memory. ! When you remove the lithium battery, all the BIOS options to exit the BIOS Setup Utility. 6 Turn off the computer and unplug the power cord. 7 Remove the side panel (see "Removing the Side ...lithium battery may be lost. When the values are different from their default settings (see "Accessing the BIOS Setup Utility" on page 57). Upgrading and Maintaining Components 33 Replacing the Lithium Battery ! You may need to replace the battery at this list when you can hold the charge for...
... handle damaged or leaking batteries. Do not disassemble it is safer to power the CMOS memory. ! When you remove the lithium battery, all the BIOS options to exit the BIOS Setup Utility. 6 Turn off the computer and unplug the power cord. 7 Remove the side panel (see "Removing the Side ...lithium battery may be lost. When the values are different from their default settings (see "Accessing the BIOS Setup Utility" on page 57). Upgrading and Maintaining Components 33 Replacing the Lithium Battery ! You may need to replace the battery at this list when you can hold the charge for...
System Reference Manual
Page 51
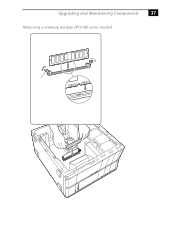
Upgrading and Maintaining Components 37 Removing a memory module (PCV-RZ series model)
Upgrading and Maintaining Components 37 Removing a memory module (PCV-RZ series model)
System Reference Manual
Page 53
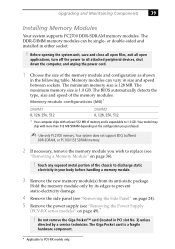
...remove the Giga Pocket™ card (located in either socket. ! The Giga Pocket card is expandable to PCV-RX models only. Memory modules can be single- The minimum memory size is 1.0 GB. Before opening the system unit, save and close all open files, exit all open...attached peripheral devices, shut down the computer, and unplug the power cord. 1 Choose the size of memory and is a fragile hardware component. * Applicable to 1.0 GB. Touch any exposed metal portion of the memory modules. Upgrading and Maintaining Components 39 Installing Memory Modules Your system supports PC2700 DDR-...
...remove the Giga Pocket™ card (located in either socket. ! The Giga Pocket card is expandable to PCV-RX models only. Memory modules can be single- The minimum memory size is 1.0 GB. Before opening the system unit, save and close all open files, exit all open...attached peripheral devices, shut down the computer, and unplug the power cord. 1 Choose the size of memory and is a fragile hardware component. * Applicable to 1.0 GB. Touch any exposed metal portion of the memory modules. Upgrading and Maintaining Components 39 Installing Memory Modules Your system supports PC2700 DDR-...
System Reference Manual
Page 55
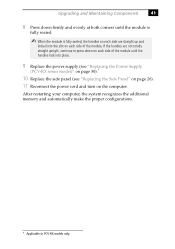
Upgrading and Maintaining Components 41 8 Press down on each side of the module until the module is fully seated. ✍ When the module is fully seated, the handles on the computer. After restarting your computer, the system recognizes the additional memory and automatically make the proper configurations. * Applicable to...Power Supply (PCV-RX series model)" on page 50).* 10 Replace the side panel (see "Replacing the Side Panel" on page 26). 11 Reconnect the power cord and turn on each side of the module. If the handles are not totally straight upright, continue to PCV-RX models ...
Upgrading and Maintaining Components 41 8 Press down on each side of the module until the module is fully seated. ✍ When the module is fully seated, the handles on the computer. After restarting your computer, the system recognizes the additional memory and automatically make the proper configurations. * Applicable to...Power Supply (PCV-RX series model)" on page 50).* 10 Replace the side panel (see "Replacing the Side Panel" on page 26). 11 Reconnect the power cord and turn on each side of the module. If the handles are not totally straight upright, continue to PCV-RX models ...
System Reference Manual
Page 63
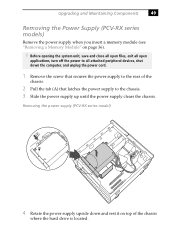
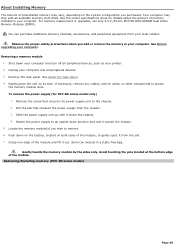
...all attached peripheral devices, shut down and rest it on page 36). ! Upgrading and Maintaining Components 49 Removing the Power Supply (PCV-RX series models) Remove the power supply when you insert a memory module (see "Removing a Memory Module" on top of the chassis. 2 Pull the tab (A) that ...secures the power supply to the rear of the chassis where the hard drive is located. Removing the power supply (PCV-RX series model) A 4 Rotate the power supply upside down the computer, ...
...all attached peripheral devices, shut down and rest it on page 36). ! Upgrading and Maintaining Components 49 Removing the Power Supply (PCV-RX series models) Remove the power supply when you insert a memory module (see "Removing a Memory Module" on top of the chassis. 2 Pull the tab (A) that ...secures the power supply to the rear of the chassis where the hard drive is located. Removing the power supply (PCV-RX series model) A 4 Rotate the power supply upside down the computer, ...
Online Help Center (VAIO User Guide)
Page 42
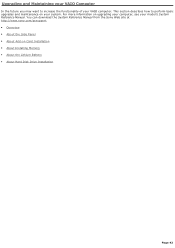
... from the Sony Web site at http://www.sony.com/pcsupport. Overview About the Side Panel About Add-on Card Installation About Installing Memory About the Lithium Battery About Hard Disk Drive Installation Page 42 For more information on upgrading your computer, see your VAIO computer. Upgrading and Maintaining your VAIO Computer In the...
... from the Sony Web site at http://www.sony.com/pcsupport. Overview About the Side Panel About Add-on Card Installation About Installing Memory About the Lithium Battery About Hard Disk Drive Installation Page 42 For more information on upgrading your computer, see your VAIO computer. Upgrading and Maintaining your VAIO Computer In the...
Online Help Center (VAIO User Guide)
Page 48
... the screw that releases the power supply from your computer. Locate the memory module(s) you wish to the chassis. 2. Grasp one edge of the module and lift it clears the chassis. 4. Rem ov ing/Installing m em ory (PCV- Your computer may vary, depending on its side. Observe the ...module in your local retailer. Avoid touching the pins located at the bottom edge of the module. See Before upgrading your computer and all available memory slots filled. Unplug your computer. Remove the side panel. If necessary, remove any cables, add-on both sides of the module, to ...
... the screw that releases the power supply from your computer. Locate the memory module(s) you wish to the chassis. 2. Grasp one edge of the module and lift it clears the chassis. 4. Rem ov ing/Installing m em ory (PCV- Your computer may vary, depending on its side. Observe the ...module in your local retailer. Avoid touching the pins located at the bottom edge of the module. See Before upgrading your computer and all available memory slots filled. Unplug your computer. Remove the side panel. If necessary, remove any cables, add-on both sides of the module, to ...
Marketing Specifications
Page 1
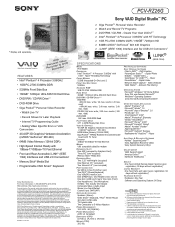
... access required; * Display sold separately. Reproduction in whole or in U.S.A. 1/03 PCV-RZ26G Sony VAIO Digital Studio™ PC ¾ Giga PocketTM Personal Video Recorder ¾ Watch and...installed on the Sony Desktop Computer are trademarks of varying software packages and add-on display. ©2002 Sony Electronics Inc. ...174; GeForce4™ MX 440) • 64MB Video Memory (128-bit DDR) • High-Speed Internet Ready with... speed; While Sony representatives or Sony authorized dealers may be able to assist you may require additional upgrade. 3 Certain Features are...
... access required; * Display sold separately. Reproduction in whole or in U.S.A. 1/03 PCV-RZ26G Sony VAIO Digital Studio™ PC ¾ Giga PocketTM Personal Video Recorder ¾ Watch and...installed on the Sony Desktop Computer are trademarks of varying software packages and add-on display. ©2002 Sony Electronics Inc. ...174; GeForce4™ MX 440) • 64MB Video Memory (128-bit DDR) • High-Speed Internet Ready with... speed; While Sony representatives or Sony authorized dealers may be able to assist you may require additional upgrade. 3 Certain Features are...


