Camera Operations Guide
Page 1
Camera Operations Guide [US] 3-089-181-12(1) Camera Operations Guide Read this first Digital Video Camera Recorder DCR-PC108/PC109 © 2004 Sony Corporation
Camera Operations Guide [US] 3-089-181-12(1) Camera Operations Guide Read this first Digital Video Camera Recorder DCR-PC108/PC109 © 2004 Sony Corporation
Camera Operations Guide
Page 4
...the LCD screen and the viewfinder used on this manual are based on the model DCR-PC109. Notes on using the camcorder • Hold the camcorder, putting your wrist through the belt and your camcorder to malfunction. These points are operational for long periods of time may be sure to ...8226; You can also be used on this may cause a malfunction of your camcorder to other device such as a VCR or a computer with a USB or i.LINK cable, be damaged, or this manual are captured using a digital still camera, and thus may be some tiny black points and/ or bright points (white,...
...the LCD screen and the viewfinder used on this manual are based on the model DCR-PC109. Notes on using the camcorder • Hold the camcorder, putting your wrist through the belt and your camcorder to malfunction. These points are operational for long periods of time may be sure to ...8226; You can also be used on this may cause a malfunction of your camcorder to other device such as a VCR or a computer with a USB or i.LINK cable, be damaged, or this manual are captured using a digital still camera, and thus may be some tiny black points and/ or bright points (white,...
Camera Operations Guide
Page 7
END SEARCH 48 Searching manually - Easy Handycam 55 Making full use of Easy Handycam operation 56 Various playback functions 57 Magnifying pictures - ...Searching for a scene using various effects 43 Fading in various modes 51 Viewing recordings with ease - Digital effect 52 Viewing recordings on a tape 50 Playing back in and out of a scene - ...Tape playback zoom/Memory playback zoom 57 Displaying the screen indicators 58 Displaying the date/time and camera settings data - Rec review 49 Playback Viewing movies recorded on a "Memory Stick Duo 53 Playing back...
END SEARCH 48 Searching manually - Easy Handycam 55 Making full use of Easy Handycam operation 56 Various playback functions 57 Magnifying pictures - ...Searching for a scene using various effects 43 Fading in various modes 51 Viewing recordings with ease - Digital effect 52 Viewing recordings on a tape 50 Playing back in and out of a scene - ...Tape playback zoom/Memory playback zoom 57 Displaying the screen indicators 58 Displaying the date/time and camera settings data - Rec review 49 Playback Viewing movies recorded on a "Memory Stick Duo 53 Playing back...
Camera Operations Guide
Page 8
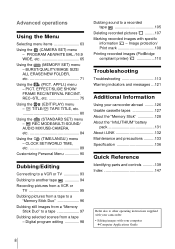
....) menu - EFFECT/SLIDE SHOW/ FRAME REC/INTERVAL REC/INT. Digital program editing 98 Dubbing sound to a recorded tape 105 Deleting recorded pictures .........107 Marking recorded images with your camcorder: • Editing images with specific information - REC MODE/MULTI-SOUND/ AUDIO MIX/USB-CAMERA, etc 84 Using the (TIME/LANGU.) menu - Advanced operations Using...
....) menu - EFFECT/SLIDE SHOW/ FRAME REC/INTERVAL REC/INT. Digital program editing 98 Dubbing sound to a recorded tape 105 Deleting recorded pictures .........107 Marking recorded images with your camcorder: • Editing images with specific information - REC MODE/MULTI-SOUND/ AUDIO MIX/USB-CAMERA, etc 84 Using the (TIME/LANGU.) menu - Advanced operations Using...

Camera Operations Guide
Page 11
... down to OFF (CHG). To change to OPEN. c Touch (play) to CLOSE. a Slide the POWER switch repeatedly until the PLAY/EDIT lamp lights up the CAMERA-TAPE lamp. To turn off the power, slide the POWER switch up in the default setting. Set the LENS COVER switch to start the playback...
... down to OFF (CHG). To change to OPEN. c Touch (play) to CLOSE. a Slide the POWER switch repeatedly until the PLAY/EDIT lamp lights up the CAMERA-TAPE lamp. To turn off the power, slide the POWER switch up in the default setting. Set the LENS COVER switch to start the playback...

Camera Operations Guide
Page 13
... is adjusted. Quick Start Guide 3 Start recording while checking the subject on the LCD screen. e Press PHOTO fully. a Slide the POWER switch repeatedly until the CAMERA-MEM lamp lights up . b Touch . b Open the LCD panel. d Press PHOTO lightly. Set the LENS COVER switch to OPEN. c While pressing the green button, slide...
... is adjusted. Quick Start Guide 3 Start recording while checking the subject on the LCD screen. e Press PHOTO fully. a Slide the POWER switch repeatedly until the CAMERA-MEM lamp lights up . b Touch . b Open the LCD panel. d Press PHOTO lightly. Set the LENS COVER switch to OPEN. c While pressing the green button, slide...
Camera Operations Guide
Page 15
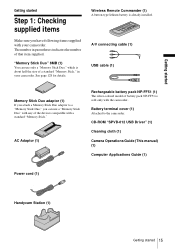
...installed. A/V connecting cable (1) USB cable (1) Memory Stick Duo adaptor (1) If you attach a Memory Stick Duo adaptor to the camcorder. AC Adaptor (1) Rechargeable battery pack NP-FF51 (1) The silver-colored model of that item supplied. Battery terminal cover (1) Attached to.... The number in your camcorder. Wireless Remote Commander (1) A button-type lithium battery is sold only with your camcorder. CD-ROM "SPVD-012 USB Driver" (1) Cleaning cloth (1) Camera Operations Guide (This manual) (1) Computer Applications Guide (1) Power cord (1) Handycam Station (1) Getting started Step...
...installed. A/V connecting cable (1) USB cable (1) Memory Stick Duo adaptor (1) If you attach a Memory Stick Duo adaptor to the camcorder. AC Adaptor (1) Rechargeable battery pack NP-FF51 (1) The silver-colored model of that item supplied. Battery terminal cover (1) Attached to.... The number in your camcorder. Wireless Remote Commander (1) A button-type lithium battery is sold only with your camcorder. CD-ROM "SPVD-012 USB Driver" (1) Cleaning cloth (1) Camera Operations Guide (This manual) (1) Computer Applications Guide (1) Power cord (1) Handycam Station (1) Getting started Step...

Camera Operations Guide
Page 20
The power turns on. LENS COVER switch • CAMERA-TAPE mode: To record on a tape. • CAMERA-MEM mode: To record on a "Memory Stick Duo." • PLAY/EDIT mode: To play . Set the LENS COVER switch to OFF (CHG). When using this camcorder for the desired power mode lights up to CLOSE. To turn...
The power turns on. LENS COVER switch • CAMERA-TAPE mode: To record on a tape. • CAMERA-MEM mode: To record on a "Memory Stick Duo." • PLAY/EDIT mode: To play . Set the LENS COVER switch to OFF (CHG). When using this camcorder for the desired power mode lights up to CLOSE. To turn...

Camera Operations Guide
Page 22
...Duo," you do not set . • [EXPOSURE]: Adjust with the screen facing out. Proceed to select a desired effect (only in the CAMERA- To hide the buttons on your camcorder (p. 20). 2 Open the LCD panel. b Note • If you can adjust the exposure (p. 38) and fader (p. 43) while ... or CAMERA-MEM (p. 20). 2 Extend the viewfinder, and close the LCD panel with / and touch . • [FADER]: Touch it repeatedly to step 7 when you are using this camcorder for the first time. EXPO- POWER switch 1 Turn on the LCD screen, touch . TAPE mode). • : The LCD screen ...
...Duo," you do not set . • [EXPOSURE]: Adjust with the screen facing out. Proceed to select a desired effect (only in the CAMERA- To hide the buttons on your camcorder (p. 20). 2 Open the LCD panel. b Note • If you can adjust the exposure (p. 38) and fader (p. 43) while ... or CAMERA-MEM (p. 20). 2 Extend the viewfinder, and close the LCD panel with / and touch . • [FADER]: Touch it repeatedly to step 7 when you are using this camcorder for the first time. EXPO- POWER switch 1 Turn on the LCD screen, touch . TAPE mode). • : The LCD screen ...

Camera Operations Guide
Page 23
... cassette into the compartment. DATE 2004Y JAN M 1D 12: 00 AM OK You can use mini DV cassettes only. This may cause a malfunction of your camcorder. 1 Slide the OPEN/ZEJECT lever in the same way as write- For midnight, set it to the year 2079. 8 Set [M] (month), [D] (day), hour and minute... in the direction of the arrow and open the lid. Getting started 23 CAMERA SET PROGRAM AE SPOT METER EXPOSURE OK 5 Select (TIME/LANGU.) with / , then touch . 60min -:--:-- DISPLAY MENU ROTATE A.
... cassette into the compartment. DATE 2004Y JAN M 1D 12: 00 AM OK You can use mini DV cassettes only. This may cause a malfunction of your camcorder. 1 Slide the OPEN/ZEJECT lever in the same way as write- For midnight, set it to the year 2079. 8 Set [M] (month), [D] (day), hour and minute... in the direction of the arrow and open the lid. Getting started 23 CAMERA SET PROGRAM AE SPOT METER EXPOSURE OK 5 Select (TIME/LANGU.) with / , then touch . 60min -:--:-- DISPLAY MENU ROTATE A.
Camera Operations Guide
Page 27
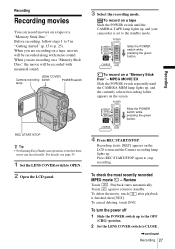
...POWER switch while pressing the green button. Recording REC START/STOP z Tip • Performing Easy Handycam operation, even first time users can record movies on a "Memory Stick Duo," the movie will... - Touch again to return to p. 25). To record on the LCD screen and the Camera recording lamp lights up , and the currently selected recording folder appears on a "Memory Stick ...with monaural sound. To turn the power off 1 Slide the POWER switch up , and your camcorder is finished, then [YES]. Recording Recording movies You can record easily. Before recording, follow steps 1 ...
...POWER switch while pressing the green button. Recording REC START/STOP z Tip • Performing Easy Handycam operation, even first time users can record movies on a "Memory Stick Duo," the movie will... - Touch again to return to p. 25). To record on the LCD screen and the Camera recording lamp lights up , and the currently selected recording folder appears on a "Memory Stick ...with monaural sound. To turn the power off 1 Slide the POWER switch up , and your camcorder is finished, then [YES]. Recording Recording movies You can record easily. Before recording, follow steps 1 ...

Camera Operations Guide
Page 28
...; Before changing the battery pack, slide the POWER switch up to OFF (CHG). • In the default setting, when you do not operate the camcorder for Cassette Memory cassettes B Remaining battery The indicated time may not be correct depending on the environment of use other menu items, add them to... display the correct remaining battery time. In order to select CAMERA-TAPE or CAMERA-MEM, and then press REC START/ STOP. • While recording movies on a "Memory Stick Duo," the only menu items available will not...
...; Before changing the battery pack, slide the POWER switch up to OFF (CHG). • In the default setting, when you do not operate the camcorder for Cassette Memory cassettes B Remaining battery The indicated time may not be correct depending on the environment of use other menu items, add them to... display the correct remaining battery time. In order to select CAMERA-TAPE or CAMERA-MEM, and then press REC START/ STOP. • While recording movies on a "Memory Stick Duo," the only menu items available will not...

Camera Operations Guide
Page 29
... time To record for best results. ,continued Recording 29 Recording Occasional use of time you can record movies on a "Memory Stick Duo" formatted on your camcorder. To record for approximate length of the zoom is possible to record on a "Memory Stick Duo" of different capacities. • The recording time, date, and...:10:40 00:21:20 00:42:40 01:25:20 02:50:40 05:41:20 When the CAMERA-TAPE mode is useful when you record from that point activate the digital zoom ([DIGITAL ZOOM], p. 68). Do not record pictures in the menu setting (p. 58). In the LP mode, you can record...
... time To record for best results. ,continued Recording 29 Recording Occasional use of time you can record movies on a "Memory Stick Duo" formatted on your camcorder. To record for approximate length of the zoom is possible to record on a "Memory Stick Duo" of different capacities. • The recording time, date, and...:10:40 00:21:20 00:42:40 01:25:20 02:50:40 05:41:20 When the CAMERA-TAPE mode is useful when you record from that point activate the digital zoom ([DIGITAL ZOOM], p. 68). Do not record pictures in the menu setting (p. 58). In the LP mode, you can record...
Camera Operations Guide
Page 31
... is not displayed on the screen, touch / . If you can start recording after a delay of about 10 seconds (The count down indication begins from the (CAMERA SET) menu. 60min STBY SELF-TIMER: OFF 0:00:00 OFF ON 3 Touch [ON], then . appears. 60min STBY 0:00:00 P-MENU Recording 31 To cancel the...
... is not displayed on the screen, touch / . If you can start recording after a delay of about 10 seconds (The count down indication begins from the (CAMERA SET) menu. 60min STBY SELF-TIMER: OFF 0:00:00 OFF ON 3 Touch [ON], then . appears. 60min STBY 0:00:00 P-MENU Recording 31 To cancel the...

Camera Operations Guide
Page 32
... be recorded.* 60min 101 1152 FINE 30 LENS COVER switch POWER switch z Tip • Performing Easy Handycam operation, even first time users can record 3 to CLOSE. Touch to return to OPEN . 2 Open... the LCD panel. 3 Slide the POWER switch repeatedly until the CAMERA-MEM lamp lights up to the OFF (CHG) position. 2 Set the LENS COVER switch to 13 ...the LENS COVER switch to standby. To turn the power off 1 Slide the POWER switch up . Burst For DCR-PC109: Select the (MEMORY SET) menu, [STILL SET], then [ BURST] (p. 71). When bars of about 0.5 ...
... be recorded.* 60min 101 1152 FINE 30 LENS COVER switch POWER switch z Tip • Performing Easy Handycam operation, even first time users can record 3 to CLOSE. Touch to return to OPEN . 2 Open... the LCD panel. 3 Slide the POWER switch repeatedly until the CAMERA-MEM lamp lights up to the OFF (CHG) position. 2 Set the LENS COVER switch to 13 ...the LENS COVER switch to standby. To turn the power off 1 Slide the POWER switch up . Burst For DCR-PC109: Select the (MEMORY SET) menu, [STILL SET], then [ BURST] (p. 71). When bars of about 0.5 ...

Camera Operations Guide
Page 33
... [640 × 480]. Indicators displayed during playback by selecting [DATA CODE] on the screen (p. 58). • The recording angle is wider than that of the CAMERA-TAPE mode. The image size is available for DCRPC109 only. For DCR-PC108: Select the (MEMORY SET) menu, [STILL SET], then [ QUALITY] (p. 72). The number... 61 120 245 445 640 × 480 50 96 190 390 780 1400 900 2850 * The image size of pictures you press PHOTO on your camcorder. Selecting image quality or size For DCR-PC109: Select the (MEMORY SET) menu, [STILL SET], then [ QUALITY] or [ IMAGE SIZE] (p. 72).
... [640 × 480]. Indicators displayed during playback by selecting [DATA CODE] on the screen (p. 58). • The recording angle is wider than that of the CAMERA-TAPE mode. The image size is available for DCRPC109 only. For DCR-PC108: Select the (MEMORY SET) menu, [STILL SET], then [ QUALITY] (p. 72). The number... 61 120 245 445 640 × 480 50 96 190 390 780 1400 900 2850 * The image size of pictures you press PHOTO on your camcorder. Selecting image quality or size For DCR-PC109: Select the (MEMORY SET) menu, [STILL SET], then [ QUALITY] or [ IMAGE SIZE] (p. 72).

Camera Operations Guide
Page 34
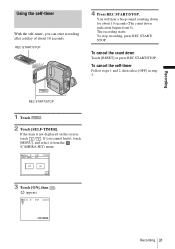
... "Memory Stick Duo." 1 Touch . 2 Touch [SELF-TIMER]. PHOTO PHOTO 3 Touch [ON], then . When bars of about 10 seconds (The count down indication begins from the (CAMERA SET) menu. 60min 1152 FINE 30 SELF-TIMER: OFF OFF ON To cancel the count down Touch [RESET]. To cancel the self-timer Follow steps...
... "Memory Stick Duo." 1 Touch . 2 Touch [SELF-TIMER]. PHOTO PHOTO 3 Touch [ON], then . When bars of about 10 seconds (The count down indication begins from the (CAMERA SET) menu. 60min 1152 FINE 30 SELF-TIMER: OFF OFF ON To cancel the count down Touch [RESET]. To cancel the self-timer Follow steps...
Camera Operations Guide
Page 35
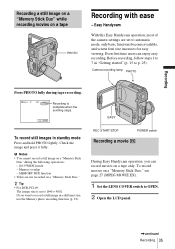
...continued Recording 35 MEMORY MIX function • Titles are set to [640 × 480]. If you can enjoy easy recording. Easy Handycam With this Easy Handycam operation, most of the camera settings are not recorded on a "Memory Stick Duo," see page 27 (MPEG MOVIE EX). 1 Set the LENS COVER switch to... p. 25). Check the image and press it fully. z Tip • For DCR-PC109: The image size is complete when the scrolling ...
...continued Recording 35 MEMORY MIX function • Titles are set to [640 × 480]. If you can enjoy easy recording. Easy Handycam With this Easy Handycam operation, most of the camera settings are not recorded on a "Memory Stick Duo," see page 27 (MPEG MOVIE EX). 1 Set the LENS COVER switch to... p. 25). Check the image and press it fully. z Tip • For DCR-PC109: The image size is complete when the scrolling ...

Camera Operations Guide
Page 36
...[REC] appears on the "Memory Stick Duo." To turn the power off during: - To cancel Easy Handycam operation Press EASY again. 36 Recording LCD BACKLIGHT (p. 21) - 3 Slide the POWER switch until the CAMERA-MEM lamp lights up to the OFF (CHG) position. 2 Set the LENS COVER switch to stop recording... To turn the power off 1 Slide the POWER switch up . USB Streaming • During Easy Handycam operation, the following buttons are adjusted. A shutter sound is recorded on the LCD screen and the Camera recording lamp lights up in blue. 1 Set the LENS COVER switch to OPEN. 2 Open the ...
...[REC] appears on the "Memory Stick Duo." To turn the power off during: - To cancel Easy Handycam operation Press EASY again. 36 Recording LCD BACKLIGHT (p. 21) - 3 Slide the POWER switch until the CAMERA-MEM lamp lights up to the OFF (CHG) position. 2 Set the LENS COVER switch to stop recording... To turn the power off 1 Slide the POWER switch up . USB Streaming • During Easy Handycam operation, the following buttons are adjusted. A shutter sound is recorded on the LCD screen and the Camera recording lamp lights up in blue. 1 Set the LENS COVER switch to OPEN. 2 Open the ...

Camera Operations Guide
Page 37
BACK LIGHT (p. 38) • During Easy Handycam operation, the settings of the functions that are displayed on the screen return to their defaults. Example: In the CAMERA-MEM mode 60min 30 SELFTIMER BEEP CLOCK SET LANGUAGE 2 Touch the desired item. 3 Select the desired setting. Recording 37 LCD BACKLIGHT (p. 21) - The available menu ...
BACK LIGHT (p. 38) • During Easy Handycam operation, the settings of the functions that are displayed on the screen return to their defaults. Example: In the CAMERA-MEM mode 60min 30 SELFTIMER BEEP CLOCK SET LANGUAGE 2 Touch the desired item. 3 Select the desired setting. Recording 37 LCD BACKLIGHT (p. 21) - The available menu ...


