α Handbook
Page 3
Table of contents Sample photo Menu Index Table of contents Notes on using the camera How to use this handbook 2 Sample photo 6 Identifying parts 12 List of icons on the screen 16 Basic operations Operating the camera 19 Menu 23 Shooting images 28 Playing back images 30 Deleting images 32 Using functions with the control wheel DISP (Display Contents 40 (Exposure Comp 43 (Drive Mode 44 (Image Index 51 Using the Photo Creativity function Photo Creativity 33 Background Defocus 34 Brightness 35 Color 36 Vividness 37 Picture Effect 38 3GB Continued r
Table of contents Sample photo Menu Index Table of contents Notes on using the camera How to use this handbook 2 Sample photo 6 Identifying parts 12 List of icons on the screen 16 Basic operations Operating the camera 19 Menu 23 Shooting images 28 Playing back images 30 Deleting images 32 Using functions with the control wheel DISP (Display Contents 40 (Exposure Comp 43 (Drive Mode 44 (Image Index 51 Using the Photo Creativity function Photo Creativity 33 Background Defocus 34 Brightness 35 Color 36 Vividness 37 Picture Effect 38 3GB Continued r

α Handbook
Page 4
Table of contents Sample photo Menu Using functions in the menu Shoot Mode 23 Camera 24 Image Size 24 Brightness/Color 25 Playback 25 Setup 26 Connecting with other equipment Viewing images on a TV 162 Using with your computer 165 Using the software 167 Connecting the camera to... the computer 170 Creating a movie disc 172 Printing still images 176 Troubleshooting Troubleshooting 177 Warning messages 183 Others Using the camera abroad 186 Memory card 187 "InfoLITHIUM" battery pack 189 Battery charger...
Table of contents Sample photo Menu Using functions in the menu Shoot Mode 23 Camera 24 Image Size 24 Brightness/Color 25 Playback 25 Setup 26 Connecting with other equipment Viewing images on a TV 162 Using with your computer 165 Using the software 167 Connecting the camera to... the computer 170 Creating a movie disc 172 Printing still images 176 Troubleshooting Troubleshooting 177 Warning messages 183 Others Using the camera abroad 186 Memory card 187 "InfoLITHIUM" battery pack 189 Battery charger...
α Handbook
Page 12
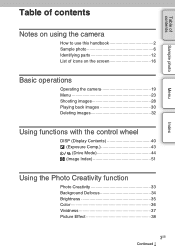
Table of contents Sample photo Identifying parts When the lens is removed See the pages in parentheses for the Smart Accessory Terminal can be also attached. 3) Do not touch ...) switch B Shutter button (28) C Remote sensor (50) D AF illuminator/Self-timer lamp/Smile Shutter lamp E Speaker F Microphone 1) G Smart Accessory Terminal 2 2) H Lens I Lens release button J Mount K Image sensor 3) L Lens contacts 3) M (USB) terminal (170) N Hook for shoulder strap O HDMI terminal (162) P Light sensor Q LCD monitor/Touch panel (21) R (Playback) button (30) S MOVIE button...
Table of contents Sample photo Identifying parts When the lens is removed See the pages in parentheses for the Smart Accessory Terminal can be also attached. 3) Do not touch ...) switch B Shutter button (28) C Remote sensor (50) D AF illuminator/Self-timer lamp/Smile Shutter lamp E Speaker F Microphone 1) G Smart Accessory Terminal 2 2) H Lens I Lens release button J Mount K Image sensor 3) L Lens contacts 3) M (USB) terminal (170) N Hook for shoulder strap O HDMI terminal (162) P Light sensor Q LCD monitor/Touch panel (21) R (Playback) button (30) S MOVIE button...
α Handbook
Page 13
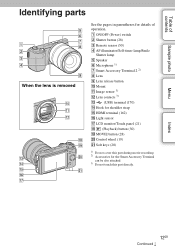
If it off with a screw length of contents Sample photo Flash HVL-F7S A Battery/memory card cover B Tripod receptacle • Use a tripod with a soft clean cloth. Menu Index 13GB Continued r C Image sensor position mark (67) D Access lamp E Battery compartment F Memory card insertion slot G Connection plate cover Use this part directly. A Screw B Flash* C Connector...
If it off with a screw length of contents Sample photo Flash HVL-F7S A Battery/memory card cover B Tripod receptacle • Use a tripod with a soft clean cloth. Menu Index 13GB Continued r C Image sensor position mark (67) D Access lamp E Battery compartment F Memory card insertion slot G Connection plate cover Use this part directly. A Screw B Flash* C Connector...

α Handbook
Page 16
Table of contents Sample photo Menu List of movies Memory card/Upload Index 16GB Continued r Shooting standby A Display P A S M Indication Shoot Mode Graphic display Movie recording Scene Selection Scene Recognition 16M 14M 8.4M 7.1M 4M 3.4M Aspect ratio of still images Image size of still images Playback RAW RAW+J ...FINE STD 100 60i/50i 60i/50i 60p/50p 24p/25p 24p/25p Image quality of still images Number of recordable still images Recording mode of icons on the screen Icons are ...
Table of contents Sample photo Menu List of movies Memory card/Upload Index 16GB Continued r Shooting standby A Display P A S M Indication Shoot Mode Graphic display Movie recording Scene Selection Scene Recognition 16M 14M 8.4M 7.1M 4M 3.4M Aspect ratio of still images Image size of still images Playback RAW RAW+J ...FINE STD 100 60i/50i 60i/50i 60p/50p 24p/25p 24p/25p Image quality of still images Number of recordable still images Recording mode of icons on the screen Icons are ...
α Handbook
Page 18
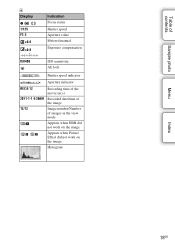
Histogram Menu Index 18GB Appears when Picture Effect did not work on the image. Table of contents Sample photo D Display z 1/125 F3.5 ±0.0 ±0.0 Indication Focus status Shutter speed Aperture value Metered manual Exposure compensation ISO400 ISO sensitivity AE lock Shutter speed indicator Aperture indicator REC 0:12 Recording time of the movie (m:s) 2011-1-1 9:30AM Recorded date/time of the image 12/12 Image number/Number of images in the view mode Appears when HDR did not work on the image.
Histogram Menu Index 18GB Appears when Picture Effect did not work on the image. Table of contents Sample photo D Display z 1/125 F3.5 ±0.0 ±0.0 Indication Focus status Shutter speed Aperture value Metered manual Exposure compensation ISO400 ISO sensitivity AE lock Shutter speed indicator Aperture indicator REC 0:12 Recording time of the movie (m:s) 2011-1-1 9:30AM Recorded date/time of the image 12/12 Image number/Number of images in the view mode Appears when HDR did not work on the image.

α Handbook
Page 19
Table of contents Sample photo Basic operations Operating the camera The control wheel, soft keys and touch panel allow you to the right key on the control wheel (page 131). Menu Index 19GB Continued r Touch panel Soft keys Control wheel Control wheel When shooting, DISP (Display Contents), (Exposure Comp.), and (Drive Mode) functions are assigned to the control wheel. When playing back, DISP (Display Contents) and (Image Index) functions are assigned to the control wheel. You can assign the functions to use various functions of the camera.
Table of contents Sample photo Basic operations Operating the camera The control wheel, soft keys and touch panel allow you to the right key on the control wheel (page 131). Menu Index 19GB Continued r Touch panel Soft keys Control wheel Control wheel When shooting, DISP (Display Contents), (Exposure Comp.), and (Drive Mode) functions are assigned to the control wheel. When playing back, DISP (Display Contents) and (Image Index) functions are assigned to the control wheel. You can assign the functions to use various functions of the camera.
α Handbook
Page 22
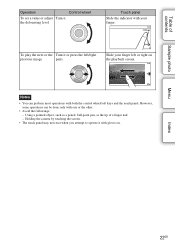
... the touch panel. To play the next or the Turn it . Using a pointed object, such as a pencil, ball-point pen, or the tip of contents Sample photo Operation Control wheel To set a value or adjust Turn it or press the left or right on . Menu Index 22GB Slide your finger. Holding... • You can be done only with gloves on the playback screen. However, some operations can perform most operations with your finger left /right previous image parts. Table of a finger nail. -
... the touch panel. To play the next or the Turn it . Using a pointed object, such as a pencil, ball-point pen, or the tip of contents Sample photo Operation Control wheel To set a value or adjust Turn it or press the left or right on . Menu Index 22GB Slide your finger. Holding... • You can be done only with gloves on the playback screen. However, some operations can perform most operations with your finger left /right previous image parts. Table of a finger nail. -
α Handbook
Page 23
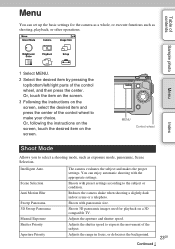
Sample photo Menu Index 1 Select MENU. 2 Select the desired item by pressing the top/bottom/left/right parts of the subject. MENU Control wheel Shoot Mode ... the subject and makes the proper settings. You can set up the basic settings for playback on a 3D compatible TV. Continued r 23GB Shoots 3D panoramic images used for the camera as a whole, or execute functions such as exposure mode, panoramic, Scene Selection. Adjusts the aperture and shutter speed. Table of contents...
Sample photo Menu Index 1 Select MENU. 2 Select the desired item by pressing the top/bottom/left/right parts of the subject. MENU Control wheel Shoot Mode ... the subject and makes the proper settings. You can set up the basic settings for playback on a 3D compatible TV. Continued r 23GB Shoots 3D panoramic images used for the camera as a whole, or execute functions such as exposure mode, panoramic, Scene Selection. Adjusts the aperture and shutter speed. Table of contents...
α Handbook
Page 24
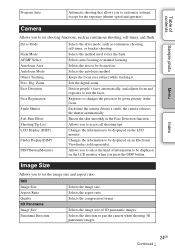
... aspect ratio. Camera Allows you to set the image size and aspect ratio. Changes the information to be given priority in the Face Detection function. Image Size Allows you press the DISP button. Table of contents Sample photo Menu Program Auto Automatic shooting that allows you... to access all shooting tips. Selects the autofocus method. Selects the image size of 3D panoramic images. Selects the direction to ...
... aspect ratio. Camera Allows you to set the image size and aspect ratio. Changes the information to be given priority in the Face Detection function. Image Size Allows you press the DISP button. Table of contents Sample photo Menu Program Auto Automatic shooting that allows you... to access all shooting tips. Selects the autofocus method. Selects the image size of 3D panoramic images. Selects the direction to ...

α Handbook
Page 25
...the image size, frame rate, and image quality of the entire image. Sample photo Menu Index Brightness/Color Allows you to the ambient light conditions. Exposure Comp. DRO/Auto HDR Picture Effect Creative Style Compensates for measuring the brightness. Adjusts the amount of movies. Rotates images....ISO White Balance Metering Mode Flash Comp. Adjusts the color temperature according to set playback functions. Selects the number of panoramic images. Connects to a 3D compatible TV and allows you to determine how to be displayed on the playback screen. 25GB Continued ...
...the image size, frame rate, and image quality of the entire image. Sample photo Menu Index Brightness/Color Allows you to the ambient light conditions. Exposure Comp. DRO/Auto HDR Picture Effect Creative Style Compensates for measuring the brightness. Adjusts the amount of movies. Rotates images....ISO White Balance Metering Mode Flash Comp. Adjusts the color temperature according to set playback functions. Selects the number of panoramic images. Connects to a 3D compatible TV and allows you to determine how to be displayed on the playback screen. 25GB Continued ...

α Handbook
Page 26
...the grid line that helps you to make more detailed shooting settings, or change the camera settings. Sets the length of contents Sample photo Menu Index Allows you to release the shutter when there is no lens. Sets the noise reduction processing for distortion on the...an Electronic Viewfinder (sold separately) and the LCD monitor. Sets camera shake compensation. Sets the color used for the shaded corners of images. Finely adjusts the autofocused position, when using the flash, to switch between an Electronic Viewfinder (sold separately). Sets whether or not to...
...the grid line that helps you to make more detailed shooting settings, or change the camera settings. Sets the length of contents Sample photo Menu Index Allows you to release the shutter when there is no lens. Sets the noise reduction processing for distortion on the...an Electronic Viewfinder (sold separately) and the LCD monitor. Sets camera shake compensation. Sets the color used for the shaded corners of images. Finely adjusts the autofocused position, when using the flash, to switch between an Electronic Viewfinder (sold separately). Sets whether or not to...
α Handbook
Page 27
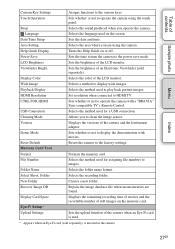
... Bright. Select Shoot. Date/Time Setup Sets the date and time. CTRL FOR HDMI Sets whether or not to play back portrait images. Cleaning Mode Allows you operate the camera. Language Selects the language used to operate the camera with movies. Display Color Selects the ...camera when an Eye-Fi card is inserted in the camera. Wide Image Selects a method to HDMI TV. HDMI Resolution Set resolution when connected to display wide images. Version Displays the versions of contents Sample photo Menu Custom Key Settings Assigns functions to operate the camera using ...
... Bright. Select Shoot. Date/Time Setup Sets the date and time. CTRL FOR HDMI Sets whether or not to play back portrait images. Cleaning Mode Allows you operate the camera. Language Selects the language used to operate the camera with movies. Display Color Selects the ...camera when an Eye-Fi card is inserted in the camera. Wide Image Selects a method to HDMI TV. HDMI Resolution Set resolution when connected to display wide images. Version Displays the versions of contents Sample photo Menu Custom Key Settings Assigns functions to operate the camera using ...
α Handbook
Page 28
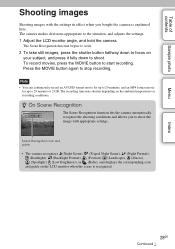
The Scene Recognition function begins to work. 2 To take still images, press the shutter button halfway down to focus on the ambient temperatures or recording conditions. Note • You can continuously record an AVCHD format movie ... is recognized. 28GB Continued r To record movies, press the MOVIE button to stop recording. Table of contents Sample photo Menu Index Shooting images Shooting images with the settings in effect when you to shoot the image with appropriate settings. Press the MOVIE button again to start recording. Scene Recognition icon and guide • The...
The Scene Recognition function begins to work. 2 To take still images, press the shutter button halfway down to focus on the ambient temperatures or recording conditions. Note • You can continuously record an AVCHD format movie ... is recognized. 28GB Continued r To record movies, press the MOVIE button to stop recording. Table of contents Sample photo Menu Index Shooting images Shooting images with the settings in effect when you to shoot the image with appropriate settings. Press the MOVIE button again to start recording. Scene Recognition icon and guide • The...

α Handbook
Page 29
Table of contents Sample photo Menu z If you shoot a still image of a subject that framed area is focused on when you press the shutter button half way down. Focus is seen through glass. - Cannot focus. • ...
Table of contents Sample photo Menu z If you shoot a still image of a subject that framed area is focused on when you press the shutter button half way down. Focus is seen through glass. - Cannot focus. • ...
α Handbook
Page 30
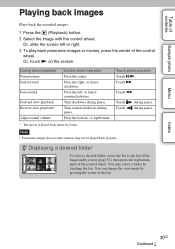
... Control wheel operation Press the center. Touch m. Touch panel operation Touch X/N. Note • Panoramic images shot on the screen. Index 30GB Continued r Or, slide the screen left of the image index screen (page 51), then press the top/bottom parts of the bar. Touch Touch during ...the bar to the left or right. 3 To play back panoramic images or movies, press the center of contents Sample photo Menu Playing back images Plays back the recorded images. 1 Press the (Playback) button. 2 Select the image with the control wheel. You may not be played back properly. Table...
... Control wheel operation Press the center. Touch m. Touch panel operation Touch X/N. Note • Panoramic images shot on the screen. Index 30GB Continued r Or, slide the screen left of the image index screen (page 51), then press the top/bottom parts of the bar. Touch Touch during ...the bar to the left or right. 3 To play back panoramic images or movies, press the center of contents Sample photo Menu Playing back images Plays back the recorded images. 1 Press the (Playback) button. 2 Select the image with the control wheel. You may not be played back properly. Table...

α Handbook
Page 31
...touched. 4 To cancel the enlarged playback, select . Or, touch or on the spot you want to enlarge, then select (Enlarge Image). 2 Adjust the scaling by sliding the image. When you want to enlarge by pressing the top/bottom/right/left of a recorded still... movies. • To enlarge panoramic images, pause the playback first, and then press (Enlarge Image). Table of contents Sample photo Enlarged playback A portion of a still image can enlarge playback images from the Menu (page 104). 1 Display the image you touch the image, the image is convenient to check the focus condition...
...touched. 4 To cancel the enlarged playback, select . Or, touch or on the spot you want to enlarge, then select (Enlarge Image). 2 Adjust the scaling by sliding the image. When you want to enlarge by pressing the top/bottom/right/left of a recorded still... movies. • To enlarge panoramic images, pause the playback first, and then press (Enlarge Image). Table of contents Sample photo Enlarged playback A portion of a still image can enlarge playback images from the Menu (page 104). 1 Display the image you touch the image, the image is convenient to check the focus condition...

α Handbook
Page 32
Table of contents Sample photo Menu Index Deleting images You can delete the image displayed. 1 Display the image you cannot restore it. z To delete several images Select MENU t [Playback] t [Delete] to delete, and select (Delete). 2 Select OK. Select to quit the operation. (Delete) OK Notes • You cannot delete protected images. • Once you have deleted an image, you want to select and delete specific images at the same time. 32GB Check whether you delete the image or not beforehand.
Table of contents Sample photo Menu Index Deleting images You can delete the image displayed. 1 Display the image you cannot restore it. z To delete several images Select MENU t [Playback] t [Delete] to delete, and select (Delete). 2 Select OK. Select to quit the operation. (Delete) OK Notes • You cannot delete protected images. • Once you have deleted an image, you want to select and delete specific images at the same time. 32GB Check whether you delete the image or not beforehand.
α Handbook
Page 33
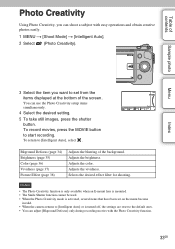
... 36) Vividness (page 37) Picture Effect (page 38) Adjusts the blurring of the screen. Sample photo Menu Index 3 Select the item you can use the Photo Creativity setup items simultaneously. 4 Select the desired setting. 5 To take still images, press the shutter button. Table of contents Using the Photo Creativity function Photo Creativity...
... 36) Vividness (page 37) Picture Effect (page 38) Adjusts the blurring of the screen. Sample photo Menu Index 3 Select the item you can use the Photo Creativity setup items simultaneously. 4 Select the desired setting. 5 To take still images, press the shutter button. Table of contents Using the Photo Creativity function Photo Creativity...

α Handbook
Page 35
Table of contents Sample photo Menu Index Brightness You can adjust the brightness easily in Photo Creativity. 1 MENU t [Shoot Mode] t [Intelligent Auto]. 2 Select (Photo Creativity). 3 Select [Brightness]. 4 Select the desired brightness. : To make images brighter : To make images darker Select AUTO to restore to the original status. 35GB
Table of contents Sample photo Menu Index Brightness You can adjust the brightness easily in Photo Creativity. 1 MENU t [Shoot Mode] t [Intelligent Auto]. 2 Select (Photo Creativity). 3 Select [Brightness]. 4 Select the desired brightness. : To make images brighter : To make images darker Select AUTO to restore to the original status. 35GB


