
α Handbook
Page 3
... search 5 Identifying parts 11 List of icons on the screen 15 Basic operations Using the control wheel and soft keys 17 Menu search 19 Shooting images 23 Playing back images 26 Deleting images 28 Using functions with the control wheel DISP (Display Contents 29 (Flash Mode 31 (Exposure Comp 32 (Drive Mode 33...
... search 5 Identifying parts 11 List of icons on the screen 15 Basic operations Using the control wheel and soft keys 17 Menu search 19 Shooting images 23 Playing back images 26 Deleting images 28 Using functions with the control wheel DISP (Display Contents 29 (Flash Mode 31 (Exposure Comp 32 (Drive Mode 33...
α Handbook
Page 4
Table of contents Sample photo Menu search search Connecting with other equipment Viewing images on a TV 123 Using with your computer 125 Using the software 127 Connecting the camera to the computer 130 Creating a movie disc (NEX-5/5C 132 Printing still images 136 Troubleshooting Troubleshooting 137 Warning messages 143 Others Using the camera abroad 146 Memory card 147 "InfoLITHIUM" battery pack 149 Battery charger 151 Mount Adaptor 152 AVCHD format (NEX-5/5C 153 Cleaning 154 Index Index 155 Index 4GB
Table of contents Sample photo Menu search search Connecting with other equipment Viewing images on a TV 123 Using with your computer 125 Using the software 127 Connecting the camera to the computer 130 Creating a movie disc (NEX-5/5C 132 Printing still images 136 Troubleshooting Troubleshooting 137 Warning messages 143 Others Using the camera abroad 146 Memory card 147 "InfoLITHIUM" battery pack 149 Battery charger 151 Mount Adaptor 152 AVCHD format (NEX-5/5C 153 Cleaning 154 Index Index 155 Index 4GB
α Handbook
Page 11
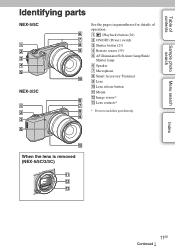
Table of contents Sample photo Menu search search Identifying parts NEX-5/5C NEX-3/3C See the pages in parentheses for details of operation. A (Playback) button (26) B ON/OFF (Power) switch C Shutter button (23) D Remote sensor (39) E AF illuminator/Self-timer lamp/Smile Shutter lamp F Speaker G Microphone H Smart Accessory Terminal I Lens J Lens release button K Mount L Image sensor* M Lens contacts* * Do not touch this part directly. When the lens is removed (NEX-5/5C/3/3C) Index 11GB Continued r
Table of contents Sample photo Menu search search Identifying parts NEX-5/5C NEX-3/3C See the pages in parentheses for details of operation. A (Playback) button (26) B ON/OFF (Power) switch C Shutter button (23) D Remote sensor (39) E AF illuminator/Self-timer lamp/Smile Shutter lamp F Speaker G Microphone H Smart Accessory Terminal I Lens J Lens release button K Mount L Image sensor* M Lens contacts* * Do not touch this part directly. When the lens is removed (NEX-5/5C/3/3C) Index 11GB Continued r

α Handbook
Page 12
Table of contents NEX-5/5C NEX-3/3C A (USB) terminal (130) B Hook for shoulder strap C HDMI terminal (123) D Light sensor E LCD monitor F MOVIE button (23) G Control wheel (17) H Soft keys (18) I Image sensor position mark (53) Sample photo Menu search search Index 12GB Continued r
Table of contents NEX-5/5C NEX-3/3C A (USB) terminal (130) B Hook for shoulder strap C HDMI terminal (123) D Light sensor E LCD monitor F MOVIE button (23) G Control wheel (17) H Soft keys (18) I Image sensor position mark (53) Sample photo Menu search search Index 12GB Continued r
α Handbook
Page 13
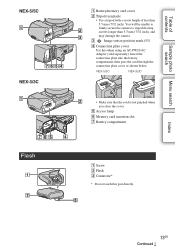
Insert the connection plate into the battery compartment, then pass the cord through the connection plate cover as shown below. NEX-5/5C NEX-3/3C Flash A Battery/memory card cover B Tripod receptacle • Use a tripod with a screw length of contents E Access lamp F Memory card insertion ...Flash C Connector* * Do not touch this when using an AC-PW20 AC Adaptor (sold separately). NEX-5/5C NEX-3/3C • Make sure that the cord is not pinched when you close the cover. C Image sensor position mark (53) D Connection plate cover Use this part directly. 13GB Continued r Index ...
Insert the connection plate into the battery compartment, then pass the cord through the connection plate cover as shown below. NEX-5/5C NEX-3/3C Flash A Battery/memory card cover B Tripod receptacle • Use a tripod with a screw length of contents E Access lamp F Memory card insertion ...Flash C Connector* * Do not touch this when using an AC-PW20 AC Adaptor (sold separately). NEX-5/5C NEX-3/3C • Make sure that the cord is not pinched when you close the cover. C Image sensor position mark (53) D Connection plate cover Use this part directly. 13GB Continued r Index ...

α Handbook
Page 15
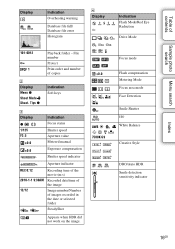
Shooting standby A Display P A S M Indication Shoot Mode Scene Selection Image size/Aspect ratio of still images Graphic display Movie recording RAW RAW+J FINE STD 100 Image quality of still images Number of recordable still images Image size of movies Index Playback Memory card/Upload 123min 100% Recordable time of icons on the screen Icons are displayed on the...
Shooting standby A Display P A S M Indication Shoot Mode Scene Selection Image size/Aspect ratio of still images Graphic display Movie recording RAW RAW+J FINE STD 100 Image quality of still images Number of recordable still images Image size of movies Index Playback Memory card/Upload 123min 100% Recordable time of icons on the screen Icons are displayed on the...
α Handbook
Page 16
... 0:12 2010-1-1 9:30AM 12/12 Recording time of the movie (m:s) Recorded date/time of the image Image number/Number of images recorded in the date or selected folder SteadyShot Appears when HDR did not work on the image. ±0.0 AWB 7500K G9 Indication Flash Mode/Red Eye Reduction Drive Mode Focus mode Flash compensation...
... 0:12 2010-1-1 9:30AM 12/12 Recording time of the movie (m:s) Recorded date/time of the image Image number/Number of images recorded in the date or selected folder SteadyShot Appears when HDR did not work on the image. ±0.0 AWB 7500K G9 Indication Flash Mode/Red Eye Reduction Drive Mode Focus mode Flash compensation...
α Handbook
Page 17
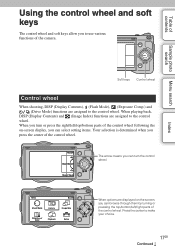
... pressing the top/bottom/left/right parts of the control wheel. Press the center to the control wheel. When playing back, DISP (Display Contents) and (Image Index) functions are displayed on -screen display, you can turn the control wheel. The arrow means you can select setting items. Your selection is determined...
... pressing the top/bottom/left/right parts of the control wheel. Press the center to the control wheel. When playing back, DISP (Display Contents) and (Image Index) functions are displayed on -screen display, you can turn the control wheel. The arrow means you can select setting items. Your selection is determined...
α Handbook
Page 20
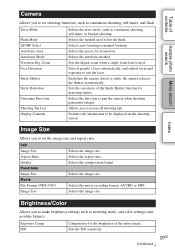
... to make brightness settings such as metering mode, and color settings such as white balance. Selects the aspect ratio. File Format (NEX-5/5C) Image Size Selects the movie recording format, AVCHD or MP4. Brightness/Color Allows you to access all shooting tips. Table of contents Sample...Allows you to set shooting functions, such as continuous shooting, self-timer, or bracket shooting. Index Image Size Allows you to set the image size and aspect ratio. Selects the image size. Sets the ISO sensitivity. 20GB Continued r Switches the information to pan the camera when ...
... to make brightness settings such as metering mode, and color settings such as white balance. Selects the aspect ratio. File Format (NEX-5/5C) Image Size Selects the movie recording format, AVCHD or MP4. Brightness/Color Allows you to access all shooting tips. Table of contents Sample...Allows you to set shooting functions, such as continuous shooting, self-timer, or bracket shooting. Index Image Size Allows you to set the image size and aspect ratio. Selects the image size. Sets the ISO sensitivity. 20GB Continued r Switches the information to pan the camera when ...
α Handbook
Page 21
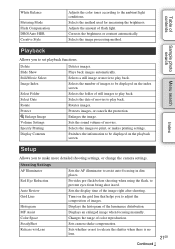
... to play back. Sample photo Menu search search Playback Allows you to adjust the composition of images. Protects images, or cancels the protection. Displays an enlarged image when focusing manually. Sets camera shake compensation. Selects the method used for measuring the brightness. ...Corrects the brightness or contrast automatically. Selects the folder of still images to play back. Shooting Settings AF Illuminator Red Eye Reduction Auto Review Grid Line Histogram MF Assist Color Space SteadyShot ...
... to play back. Sample photo Menu search search Playback Allows you to adjust the composition of images. Protects images, or cancels the protection. Displays an enlarged image when focusing manually. Sets camera shake compensation. Selects the method used for measuring the brightness. ...Corrects the brightness or contrast automatically. Selects the folder of still images to play back. Shooting Settings AF Illuminator Red Eye Reduction Auto Review Grid Line Histogram MF Assist Color Space SteadyShot ...

α Handbook
Page 22
...LCD Brightness Sets the brightness of the LCD monitor. CTRL FOR HDMI Sets whether or not to clean the image sensor. Folder Name Selects the folder name format. NEX-5C/3C do not have this function. High ISO NR Sets the noise reduction processing for high ISO ...sensitivity shootings. Wide Image Selects a method to the factory-settings. Area Setting Selects the area where you operate the camera....
...LCD Brightness Sets the brightness of the LCD monitor. CTRL FOR HDMI Sets whether or not to clean the image sensor. Folder Name Selects the folder name format. NEX-5C/3C do not have this function. High ISO NR Sets the noise reduction processing for high ISO ...sensitivity shootings. Wide Image Selects a method to the factory-settings. Area Setting Selects the area where you operate the camera....

α Handbook
Page 23
...can check the frame for movies by displaying an empty frame on the LCD monitor when the scene is narrower than that of still images. Press the MOVIE button again to start recording. z On Scene Recognition The Scene Recognition function lets the camera automatically recognize the shooting... is explained here. To record movies, press the MOVIE button to stop recording. The camera makes decisions appropriate to work. 2 To take still images, press the shutter button. Note • The angle of view of movies is recognized. 23GB Continued r Scene Recognition icon and guide •...
...can check the frame for movies by displaying an empty frame on the LCD monitor when the scene is narrower than that of still images. Press the MOVIE button again to start recording. z On Scene Recognition The Scene Recognition function lets the camera automatically recognize the shooting... is explained here. To record movies, press the MOVIE button to stop recording. The camera makes decisions appropriate to work. 2 To take still images, press the shutter button. Note • The angle of view of movies is recognized. 23GB Continued r Scene Recognition icon and guide •...

α Handbook
Page 24
... a moving quickly. - The contrast between the subject and the background is backlit. The subject is poor. - Background Defocus Control (Intelligent Auto) allows you shoot a still image of the control wheel. 2 Defocus the background by turning the control wheel. : Turn up to focus : Turn down to defocus Press [Back] to restore to...
... a moving quickly. - The contrast between the subject and the background is backlit. The subject is poor. - Background Defocus Control (Intelligent Auto) allows you shoot a still image of the control wheel. 2 Defocus the background by turning the control wheel. : Turn up to focus : Turn down to defocus Press [Back] to restore to...
α Handbook
Page 26
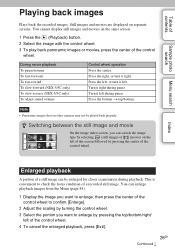
...reverse (NEX-5/5C only) To adjust sound volume Control wheel operation Press the center. Turn it left during pause. You can enlarge playback images from the Menu (page 84). 1 Display the image you want to enlarge by pressing the center of a still image can switch the image type by selecting (still image) ... wheel. 3 Select the portion you can be played back properly. Press the right, or turn it left . You cannot display still images and movies on the left of the screen followed by pressing the top/bottom/right/ left of contents Sample photo Menu search search Playing...
...reverse (NEX-5/5C only) To adjust sound volume Control wheel operation Press the center. Turn it left during pause. You can enlarge playback images from the Menu (page 84). 1 Display the image you want to enlarge by pressing the center of a still image can switch the image type by selecting (still image) ... wheel. 3 Select the portion you can be played back properly. Press the right, or turn it left . You cannot display still images and movies on the left of the screen followed by pressing the top/bottom/right/ left of contents Sample photo Menu search search Playing...

α Handbook
Page 27
Image size L M Scaling range Approx. ×1.1 - ×13 Approx. ×1.1 - ×10 S Approx. ×1.1 - ×6.7 Sample photo Menu search search Index 27GB Table of contents Notes • You cannot use the enlarged playback function with movies. • To enlarge panoramic images, pause the playback first, and then press [Option]. z Scaling range The scaling range is as follows.
Image size L M Scaling range Approx. ×1.1 - ×13 Approx. ×1.1 - ×10 S Approx. ×1.1 - ×6.7 Sample photo Menu search search Index 27GB Table of contents Notes • You cannot use the enlarged playback function with movies. • To enlarge panoramic images, pause the playback first, and then press [Option]. z Scaling range The scaling range is as follows.

α Handbook
Page 28
Index 28GB Table of contents Sample photo Menu search search Deleting images You can delete the image displayed. 1 Display the image you want to delete, and press [Delete]. 2 Press the center of the control wheel to quit the operation. [Cancel] [OK] [Delete] Note • You cannot delete protected images. Press [Cancel] to confirm [OK]. z To delete several images Select [Menu] t [Playback] t [Delete] to select and delete specific images at the same time.
Index 28GB Table of contents Sample photo Menu search search Deleting images You can delete the image displayed. 1 Display the image you want to delete, and press [Delete]. 2 Press the center of the control wheel to quit the operation. [Cancel] [OK] [Delete] Note • You cannot delete protected images. Press [Cancel] to confirm [OK]. z To delete several images Select [Menu] t [Playback] t [Delete] to select and delete specific images at the same time.

α Handbook
Page 30
... make the entire histogram shift to the right side, and darker image to recording information. G (green) B (blue) Index 30GB Info. Movie - Table of a particular brightness exist in addition to the left side. No Disp. Histogram Displays the... recording information. The histogram displays the luminance distribution that portion flashes on the histogram display during following playback modes. - Flash R (red) Luminance • If the image has a high-key or low-key portion, that shows how many pixels of contents Sample photo Menu search search During playback Display Info.
... make the entire histogram shift to the right side, and darker image to recording information. G (green) B (blue) Index 30GB Info. Movie - Table of a particular brightness exist in addition to the left side. No Disp. Histogram Displays the... recording information. The histogram displays the luminance distribution that portion flashes on the histogram display during following playback modes. - Flash R (red) Luminance • If the image has a high-key or low-key portion, that shows how many pixels of contents Sample photo Menu search search During playback Display Info.

α Handbook
Page 31
... shooting a backlit subject, select [Fill-flash]. Fires every time you trigger the shutter. Rear sync shooting allows you to shoot a natural image of the trail of contents Sample photo Menu search search Flash Mode In a dark location, using the flash allows you to shoot a bright... both the subject and the background by slowing the shutter speed. z Tips on the shooting mode. • You cannot use the flash to shoot a clear image of the backlit subject. 1 Attach the flash. 2 (Flash Mode) on the control wheel t desired mode. Or, [Menu] t [Camera] t [Flash Mode] t desired...
... shooting a backlit subject, select [Fill-flash]. Fires every time you trigger the shutter. Rear sync shooting allows you to shoot a natural image of the trail of contents Sample photo Menu search search Flash Mode In a dark location, using the flash allows you to shoot a bright... both the subject and the background by slowing the shutter speed. z Tips on the shooting mode. • You cannot use the flash to shoot a clear image of the backlit subject. 1 Attach the flash. 2 (Flash Mode) on the control wheel t desired mode. Or, [Menu] t [Camera] t [Flash Mode] t desired...
α Handbook
Page 32
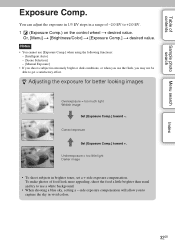
... blue sky, setting a --side exposure compensation will allow you may not be able to get a satisfactory effect. Underexposure = too little light Darker image • To shoot subjects in a range of -2.0 EV to +2.0 EV. 1 (Exposure Comp.) on the control wheel t desired value. z Adjusting... the exposure for better looking images Overexposure = too much light Whitish image m Set [Exposure Comp.] toward +. To make photos of contents Sample photo Menu search search Exposure Comp. You can adjust the ...
... blue sky, setting a --side exposure compensation will allow you may not be able to get a satisfactory effect. Underexposure = too little light Darker image • To shoot subjects in a range of -2.0 EV to +2.0 EV. 1 (Exposure Comp.) on the control wheel t desired value. z Adjusting... the exposure for better looking images Overexposure = too much light Whitish image m Set [Exposure Comp.] toward +. To make photos of contents Sample photo Menu search search Exposure Comp. You can adjust the ...
α Handbook
Page 33
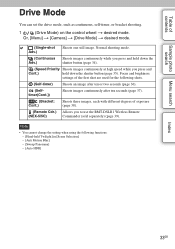
... 34). (Speed Priority Shoots images continuously at high speed while you to use the RMT-DSLR1 Wireless Remote (NEX-5/5C) Commander (sold separately) (page 39). Note • You cannot change the setting when using the following shots. (Self-timer) Shoots an image after ten or two seconds... (page 36). (Selftimer(Cont.)) Shoots images continuously after ten seconds (page 37...
... 34). (Speed Priority Shoots images continuously at high speed while you to use the RMT-DSLR1 Wireless Remote (NEX-5/5C) Commander (sold separately) (page 39). Note • You cannot change the setting when using the following shots. (Self-timer) Shoots an image after ten or two seconds... (page 36). (Selftimer(Cont.)) Shoots images continuously after ten seconds (page 37...


