Operating Instructions (primary manual)
Page 1
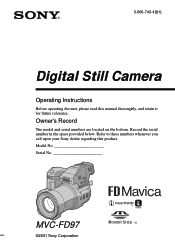
Model No Serial No MVC-FD97 ©2001 Sony Corporation Refer to these numbers whenever you call upon your Sony dealer regarding this manual thoroughly, and retain it for future reference. Record the serial number in the space provided below. 3-066-743-12(1) Digital Still Camera Operating Instructions Before operating the unit, please read this product. Owner's Record The model and serial numbers are located on the bottom.
Model No Serial No MVC-FD97 ©2001 Sony Corporation Refer to these numbers whenever you call upon your Sony dealer regarding this manual thoroughly, and retain it for future reference. Record the serial number in the space provided below. 3-066-743-12(1) Digital Still Camera Operating Instructions Before operating the unit, please read this product. Owner's Record The model and serial numbers are located on the bottom.

Operating Instructions (primary manual)
Page 3
...UNITED KINGDOM A moulded plug complying with the limits sets out on the EMC Directive for a digital device pursuant to Subpart B of Part 15 of FCC Rules. Should the fuse in household or...Light-industry district (This equipment complies with the EMC standard regulations EN55022 Class B.) Attention for your nearest Sony Service Center or Factory Service Center. DISPOSE OF PROPERLY. For the Customers in Germany Directive:EMC Directive... this equipment for the Customers in order to comply with this camera. 3 LITHIUM ION BATTERY. The supplied interface cable must be sure to attach the fuse...
...UNITED KINGDOM A moulded plug complying with the limits sets out on the EMC Directive for a digital device pursuant to Subpart B of Part 15 of FCC Rules. Should the fuse in household or...Light-industry district (This equipment complies with the EMC standard regulations EN55022 Class B.) Attention for your nearest Sony Service Center or Factory Service Center. DISPOSE OF PROPERLY. For the Customers in Germany Directive:EMC Directive... this equipment for the Customers in order to comply with this camera. 3 LITHIUM ION BATTERY. The supplied interface cable must be sure to attach the fuse...
Operating Instructions (primary manual)
Page 4
..., films, video tapes, and other equipment on how to the provision of such materials may be contrary to remove it for Camera File system universal standard established by the JEITA (Japan Electrics and Information Technology Industries Association). Unauthorized recording of the copyright laws. LCD ...events, you read this manual thoroughly, and retain it before using your camera still images recorded on other equipment (DCR-TRV890E/TRV900/ TRV900E, DSC-D700, DSC-D770) that constantly appear on the camera are normal in the manufacturing process and do not affect the recording in ...
..., films, video tapes, and other equipment on how to the provision of such materials may be contrary to remove it for Camera File system universal standard established by the JEITA (Japan Electrics and Information Technology Industries Association). Unauthorized recording of the copyright laws. LCD ...events, you read this manual thoroughly, and retain it before using your camera still images recorded on other equipment (DCR-TRV890E/TRV900/ TRV900E, DSC-D700, DSC-D770) that constantly appear on the camera are normal in the manufacturing process and do not affect the recording in ...
Operating Instructions (primary manual)
Page 5
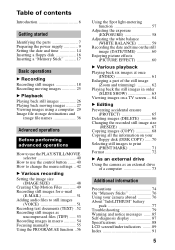
...images using a computer 29 Image file storage destinations and image file names 36 Advanced operations Before performing advanced operations How to use the PLAY/STILL/MOVIE selector 40 How to use the control button ....... 40 How to change the menu settings .. 42 B Various recording Setting the image... images (COPY 68 Copying all the information on your floppy disk (DISK COPY) ...... 70 Selecting still images to print (PRINT MARK 71 Format 72 B As an external drive Using the camera as an external drive of a computer 73 Additional information Precautions 74 On "Memory Sticks 76 Using your...
...images using a computer 29 Image file storage destinations and image file names 36 Advanced operations Before performing advanced operations How to use the PLAY/STILL/MOVIE selector 40 How to use the control button ....... 40 How to change the menu settings .. 42 B Various recording Setting the image... images (COPY 68 Copying all the information on your floppy disk (DISK COPY) ...... 70 Selecting still images to print (PRINT MARK 71 Format 72 B As an external drive Using the camera as an external drive of a computer 73 Additional information Precautions 74 On "Memory Sticks 76 Using your...

Operating Instructions (primary manual)
Page 6
...delete it right away. Introduction Deletes undesired images right away, checking the image after shooting The digital still camera is able to still images (VOICE): page 51 Recording text documents (TEXT): page 52 Recording still images as uncompressed files (TIFF): page 53 6 Viewing images using a computer: page 29 Records... a moving picture with audio The digital still camera can record a moving images: page 25 Selects the recording mode from various types of recordings according to your computer using a...
...delete it right away. Introduction Deletes undesired images right away, checking the image after shooting The digital still camera is able to still images (VOICE): page 51 Recording text documents (TEXT): page 52 Recording still images as uncompressed files (TIFF): page 53 6 Viewing images using a computer: page 29 Records... a moving picture with audio The digital still camera can record a moving images: page 25 Selects the recording mode from various types of recordings according to your computer using a...

Operating Instructions (primary manual)
Page 8
wa ws K Hooks for strap L ACC (Accessory) jack M PLAY/STILL/MOVIE selector (40) N Access lamp (18, 19) O DISK EJECT lever (16) P Speaker Q Floppy disk slot (16) R Battery cover/PUSH button (bottom surface) (9) S "Memory Stick" cover/ "... less than 6.5 mm (7/32 inch). J DISPLAY button (22) 8 Attaching the shoulder strap qs qd qf qg qh qj qk ql w; You cannot firmly secure the camera to tripods having longer screws, and may damage the camera. qa 1 2 3 4 5 6 7 8 9 0 A LCD screen B Finder (19) C LCD ON/OFF switch (20) D VOL +/-
wa ws K Hooks for strap L ACC (Accessory) jack M PLAY/STILL/MOVIE selector (40) N Access lamp (18, 19) O DISK EJECT lever (16) P Speaker Q Floppy disk slot (16) R Battery cover/PUSH button (bottom surface) (9) S "Memory Stick" cover/ "... less than 6.5 mm (7/32 inch). J DISPLAY button (22) 8 Attaching the shoulder strap qs qd qf qg qh qj qk ql w; You cannot firmly secure the camera to tripods having longer screws, and may damage the camera. qa 1 2 3 4 5 6 7 8 9 0 A LCD screen B Finder (19) C LCD ON/OFF switch (20) D VOL +/-

Operating Instructions (primary manual)
Page 9
Getting started Preparing the power supply Installing the battery pack Your camera operates only with the v mark facing toward the battery compartment as battery consumption with compatible video equipment. Battery eject lever * What is a lithium ... cover. See page 77 for more information about "InfoLITHIUM" battery pack. 1 2 1 2 3 1 2 1 Open the battery cover. Slide the battery cover in the direction of Sony Corporation. 9 Be careful not to drop the battery pack when removing it. To remove the battery pack Open the battery cover. "InfoLITHIUM" is a trademark of...
Getting started Preparing the power supply Installing the battery pack Your camera operates only with the v mark facing toward the battery compartment as battery consumption with compatible video equipment. Battery eject lever * What is a lithium ... cover. See page 77 for more information about "InfoLITHIUM" battery pack. 1 2 1 2 3 1 2 1 Open the battery cover. Slide the battery cover in the direction of Sony Corporation. 9 Be careful not to drop the battery pack when removing it. To remove the battery pack Open the battery cover. "InfoLITHIUM" is a trademark of...

Operating Instructions (primary manual)
Page 10
... the LCD screen lights up . 3 Connect the power cord (mains lead) to the AC power adaptor and then to 86°F) is turned on the camera shows the remaining time for which you cannot charge the battery pack. Battery remaining indicator The LCD screen or finder on , you can... still record or play back images. This indication may not be entirely accurate depending on your camera with the v mark facing up when charging begins. Charging at a room temperature of 10°C to 30...
... the LCD screen lights up . 3 Connect the power cord (mains lead) to the AC power adaptor and then to 86°F) is turned on the camera shows the remaining time for which you cannot charge the battery pack. Battery remaining indicator The LCD screen or finder on , you can... still record or play back images. This indication may not be entirely accurate depending on your camera with the v mark facing up when charging begins. Charging at a room temperature of 10°C to 30...

Operating Instructions (primary manual)
Page 11
... (page 84). When using a pocket heater, take care not to keep it warm, then insert the battery pack into the camera just before recording. Note on the camera again. Auto power-off automatically to charge a completely discharged battery pack at a temperature of images Continuous recording* Approx. 65 Approx...down the battery pack. Battery life and number of images that can be recorded/played back STILL mode recording/playback when using the LCD screen, the operating time becomes short. To use the camera again, slide the POWER switch to the right to turn on the POWER ON/OFF ...
... (page 84). When using a pocket heater, take care not to keep it warm, then insert the battery pack into the camera just before recording. Note on the camera again. Auto power-off automatically to charge a completely discharged battery pack at a temperature of images Continuous recording* Approx. 65 Approx...down the battery pack. Battery life and number of images that can be recorded/played back STILL mode recording/playback when using the LCD screen, the operating time becomes short. To use the camera again, slide the POWER switch to the right to turn on the POWER ON/OFF ...
Operating Instructions (primary manual)
Page 13
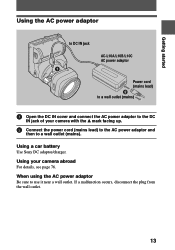
... the AC power adaptor Be sure to use it near a wall outlet. If a malfunction occurs, disconnect the plug from the wall outlet. 13 Using your camera with the v mark facing up. 2 Connect the power cord (mains lead) to the AC power adaptor and then to a wall outlet (mains). Getting started Using... cord (mains lead) 2 to a wall outlet (mains) 1 Open the DC IN cover and connect the AC power adaptor to the DC IN jack of your camera abroad For details, see page 76. Using a car battery Use...
... the AC power adaptor Be sure to use it near a wall outlet. If a malfunction occurs, disconnect the plug from the wall outlet. 13 Using your camera with the v mark facing up. 2 Connect the power cord (mains lead) to the AC power adaptor and then to a wall outlet (mains). Getting started Using... cord (mains lead) 2 to a wall outlet (mains) 1 Open the DC IN cover and connect the AC power adaptor to the DC IN jack of your camera abroad For details, see page 76. Using a car battery Use...

Operating Instructions (primary manual)
Page 14
... center z. The POWER ON/OFF (CHG) (green) lamp lights up. 2 Press v on the finder. Setting the date and time When you first use your camera, set , the CLOCK SET screen appears whenever you turn on the power. Control button POWER ON/OFF (CHG) lamp 1 Slide the POWER switch to the... right to turn on the control button, then press the center z. 14 VIDEO OUT /LANGUAGE CLOCK SET BEEP LCD BRIGHT 2001 1 1 1 2:0 0:0 0AM EFFECT FILE CAMERA SETUP SELECT OK CLOCK SET Y/M/D M/D/Y D/M/Y 2001 / 1 / 1 12 : 00 AM ENTER SELECT CANCEL OK The menu bar appears on the LCD screen or on the ...
... center z. The POWER ON/OFF (CHG) (green) lamp lights up. 2 Press v on the finder. Setting the date and time When you first use your camera, set , the CLOCK SET screen appears whenever you turn on the power. Control button POWER ON/OFF (CHG) lamp 1 Slide the POWER switch to the... right to turn on the control button, then press the center z. 14 VIDEO OUT /LANGUAGE CLOCK SET BEEP LCD BRIGHT 2001 1 1 1 2:0 0:0 0AM EFFECT FILE CAMERA SETUP SELECT OK CLOCK SET Y/M/D M/D/Y D/M/Y 2001 / 1 / 1 12 : 00 AM ENTER SELECT CANCEL OK The menu bar appears on the LCD screen or on the ...

Operating Instructions (primary manual)
Page 18
... on the floppy disk. 3 Press and hold the shutter button halfway down. When the camera finishes the automatic adjustments, the AE lock indicator z stops flashing, then lights up 18 To record still images, slide the POWER switch to the right to turn on the power and insert a... floppy disk or a "Memory Stick." 3, 4 12 Access lamp 1 Set the PLAY/STILL/MOVIE selector to STILL. 2 Select the recording media using the MS/FD selector. The beeps sound and the image is flashing, the camera automatically adjusts the exposure and focus of the captured image. Basic operations Recording...
... on the floppy disk. 3 Press and hold the shutter button halfway down. When the camera finishes the automatic adjustments, the AE lock indicator z stops flashing, then lights up 18 To record still images, slide the POWER switch to the right to turn on the power and insert a... floppy disk or a "Memory Stick." 3, 4 12 Access lamp 1 Set the PLAY/STILL/MOVIE selector to STILL. 2 Select the recording media using the MS/FD selector. The beeps sound and the image is flashing, the camera automatically adjusts the exposure and focus of the captured image. Basic operations Recording...

Operating Instructions (primary manual)
Page 19
B Recording 4 Press the shutter button fully down at once, the camera starts recording after the AE is locked. RECORDING For the number of the LCD screen may become unusable. • When you press the shutter button ... image appears clearly within the finder, then record the image. Also, do not shake or strike the camera. When this will be carried out while the lamp (page 8) is flashing. (During this time, the camera is not near the finder. 19 However, the recording cannot be recorded on a floppy disk or a "Memory...
B Recording 4 Press the shutter button fully down at once, the camera starts recording after the AE is locked. RECORDING For the number of the LCD screen may become unusable. • When you press the shutter button ... image appears clearly within the finder, then record the image. Also, do not shake or strike the camera. When this will be carried out while the lamp (page 8) is flashing. (During this time, the camera is not near the finder. 19 However, the recording cannot be recorded on a floppy disk or a "Memory...

Operating Instructions (primary manual)
Page 21
...215;. • Digital zooming deteriorates the picture quality. Digital zoom function This camera has a digital zoom function. Using digital zoom • The maximum zoom magnification is not necessary, set [DIGITAL ZOOM] to the subject until the focus is sharp (page 54). Digital zoom enlarges the image by digital processing, and ...54. Minimum focal distance to function when the zoom exceeds 10×. W T The T-side of the bar shows the digital zooming zone. Note Digital zoom does not work for wideangle (subject appears farther away) If you cannot get a sharp focus on a close subject ...
...215;. • Digital zooming deteriorates the picture quality. Digital zoom function This camera has a digital zoom function. Using digital zoom • The maximum zoom magnification is not necessary, set [DIGITAL ZOOM] to the subject until the focus is sharp (page 54). Digital zoom enlarges the image by digital processing, and ...54. Minimum focal distance to function when the zoom exceeds 10×. W T The T-side of the bar shows the digital zooming zone. Note Digital zoom does not work for wideangle (subject appears farther away) If you cannot get a sharp focus on a close subject ...

Operating Instructions (primary manual)
Page 22
...off the indicators on the LCD screen or on the finder. (SteadyShot) indicator Notes • The SteadyShot function will not correct excessive camera-shake. • If you use a wide conversion lens (not supplied), this lens may influence the SteadyShot function. Activating the SteadyShot ...function When the SteadyShot function is working, the camera compensates for a detailed description of the indicators used in advanced operations. • The indicators on the LCD screen or on the...
...off the indicators on the LCD screen or on the finder. (SteadyShot) indicator Notes • The SteadyShot function will not correct excessive camera-shake. • If you use a wide conversion lens (not supplied), this lens may influence the SteadyShot function. Activating the SteadyShot ...function When the SteadyShot function is working, the camera compensates for a detailed description of the indicators used in advanced operations. • The indicators on the LCD screen or on the...

Operating Instructions (primary manual)
Page 26
... image. FD: When playing back images in the "Memory Stick." Notes • You might not be able to correctly play back images recorded with this camera for a detailed description of the indicators. 26 See page 90 for recording. MS: When playing back images in the floppy disk. 3 Press v on...displayed You can be able to select "b/B" on the LCD screen or on the finder. The last recorded image (still or moving) appears on the LCD screen or on the finder. 4 Select the desired still image with this camera on other equipment. • You may not be used with the control button.
... image. FD: When playing back images in the "Memory Stick." Notes • You might not be able to correctly play back images recorded with this camera for a detailed description of the indicators. 26 See page 90 for recording. MS: When playing back images in the floppy disk. 3 Press v on...displayed You can be able to select "b/B" on the LCD screen or on the finder. The last recorded image (still or moving) appears on the LCD screen or on the finder. 4 Select the desired still image with this camera on other equipment. • You may not be used with the control button.
Operating Instructions (primary manual)
Page 29
...applications that support these file formats are installed on a computer connected using the USB cable This section describes the method for your computer. -Still images (other than TEXT mode, uncompressed mode and Clip Motion): JPEG format -Moving images/audio: MPEG format -Uncompressed mode... viewing images on a computer, or attach it is stored in a floppy disk or "Memory Stick." Copying a file to the hard disk of your camera using application software on a computer using the supplied USB cable. What is the USB connection? : You can view or modify data recorded with your computer...
...applications that support these file formats are installed on a computer connected using the USB cable This section describes the method for your computer. -Still images (other than TEXT mode, uncompressed mode and Clip Motion): JPEG format -Moving images/audio: MPEG format -Uncompressed mode... viewing images on a computer, or attach it is stored in a floppy disk or "Memory Stick." Copying a file to the hard disk of your camera using application software on a computer using the supplied USB cable. What is the USB connection? : You can view or modify data recorded with your computer...
Operating Instructions (primary manual)
Page 31
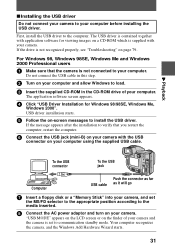
...98SE, Windows Me and Windows 2000 Professional users 1 Make sure that you restart the computer, restart the computer. 6 Connect the USB jack (mini-B) on your camera with the USB connector on page 79. If the message appears after the installation to install the USB driver. If the drive is not recognized... To the USB jack Computer Push the connector as far USB cable as it will go 7 Insert a floppy disk or a "Memory Stick" into your camera, and set to the media inserted. 8 Connect the AC power adaptor and turn on a CD-ROM which is contained together with your computer before installing...
...98SE, Windows Me and Windows 2000 Professional users 1 Make sure that you restart the computer, restart the computer. 6 Connect the USB jack (mini-B) on your camera with the USB connector on page 79. If the message appears after the installation to install the USB driver. If the drive is not recognized... To the USB jack Computer Push the connector as far USB cable as it will go 7 Insert a floppy disk or a "Memory Stick" into your camera, and set to the media inserted. 8 Connect the AC power adaptor and turn on a CD-ROM which is contained together with your computer before installing...

Operating Instructions (primary manual)
Page 33
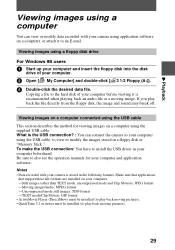
... 79. ∗ Drive identifier depends on the power of your computer. 33 "USB MODE" appears on the LCD screen or on the finder of the camera. 5 Open "My Computer" on your computer and allow Windows to load. 2 Connect one end of the supplied USB cable to the USB connector on... Windows and double-click the newly recognized drive, "Removable Disk"(Example (D:)∗). B) on the camera and the other end to the USB jack (mini- B Playback xViewing images For Windows 98, Windows 98SE, Windows Me and Windows 2000 Professional users 1 ...
... 79. ∗ Drive identifier depends on the power of your computer. 33 "USB MODE" appears on the LCD screen or on the finder of the camera. 5 Open "My Computer" on your computer and allow Windows to load. 2 Connect one end of the supplied USB cable to the USB connector on... Windows and double-click the newly recognized drive, "Removable Disk"(Example (D:)∗). B) on the camera and the other end to the USB jack (mini- B Playback xViewing images For Windows 98, Windows 98SE, Windows Me and Windows 2000 Professional users 1 ...

Operating Instructions (primary manual)
Page 34
... or "Memory Stick," the image and sound may break off. When viewing an image in a floppy disk Desired file type Double-click in this order Still image Moving image* Audio* Clip Motion image "Dcim" folder t "100msdcf" folder t Image file "Mssony" folder t "Moml0001" folder t Image file* "Mssony" folder t..., the following procedures are recommended when disconnecting the USB cable from your computer, ejecting the floppy disk or "Memory Stick" from the camera, or changing the position of the MS/FD selector, while it is recommended. For the detailed folder and file name, see "Image...
... or "Memory Stick," the image and sound may break off. When viewing an image in a floppy disk Desired file type Double-click in this order Still image Moving image* Audio* Clip Motion image "Dcim" folder t "100msdcf" folder t Image file "Mssony" folder t "Moml0001" folder t Image file* "Mssony" folder t..., the following procedures are recommended when disconnecting the USB cable from your computer, ejecting the floppy disk or "Memory Stick" from the camera, or changing the position of the MS/FD selector, while it is recommended. For the detailed folder and file name, see "Image...


