
Operating Instructions (primary manual)
Page 3
... your nearest Sony Service Center or Factory Service Center. Should the fuse in the plug supplied need to be used under the following circumstances: • Residential area • Business district • Light-industry district (This equipment complies with the EMC standard regulations EN55022 Class B.) Attention for the Customers in order to comply with this equipment for using connection cables shorter...
... your nearest Sony Service Center or Factory Service Center. Should the fuse in the plug supplied need to be used under the following circumstances: • Residential area • Business district • Light-industry district (This equipment complies with the EMC standard regulations EN55022 Class B.) Attention for the Customers in order to comply with this equipment for using connection cables shorter...
Operating Instructions (primary manual)
Page 4
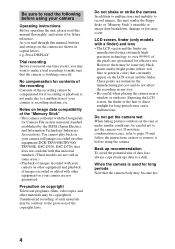
... do not affect the recording in color) that constantly appear on the LCD screen and the finder. However, there may become hot. 4 When the camera is working correctly. Be sure to read the following before using your camera Operating instructions Before operating the unit, please read through this manual, buttons and settings on the camera are shown in capital letters. Press DISPLAY. If moisture condensation occurs...
... do not affect the recording in color) that constantly appear on the LCD screen and the finder. However, there may become hot. 4 When the camera is working correctly. Be sure to read the following before using your camera Operating instructions Before operating the unit, please read through this manual, buttons and settings on the camera are shown in capital letters. Press DISPLAY. If moisture condensation occurs...
Operating Instructions (primary manual)
Page 5
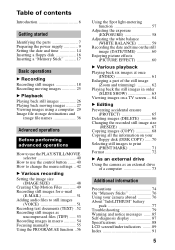
...Using the Spot light-metering function 57 Adjusting the exposure (EXPOSURE 58 Adjusting the white balance (WHITE BALANCE 59 Recording the date and time on the still image (DATE/TIME 60 Enjoying picture effects (PICTURE EFFECT 60 B Various playback Playing back six images at once (INDEX 61 Enlarging a part of the still image (Zoom and trimming 62 Playing back the still images in order (SLIDE SHOW 63 Viewing images on a TV screen .... 64 B Editing Preventing accidental erasure (PROTECT 65 Deleting images (DELETE 66 Changing the recorded still image size (RESIZE 67 Copying images (COPY...
...Using the Spot light-metering function 57 Adjusting the exposure (EXPOSURE 58 Adjusting the white balance (WHITE BALANCE 59 Recording the date and time on the still image (DATE/TIME 60 Enjoying picture effects (PICTURE EFFECT 60 B Various playback Playing back six images at once (INDEX 61 Enlarging a part of the still image (Zoom and trimming 62 Playing back the still images in order (SLIDE SHOW 63 Viewing images on a TV screen .... 64 B Editing Preventing accidental erasure (PROTECT 65 Deleting images (DELETE 66 Changing the recorded still image size (RESIZE 67 Copying images (COPY...

Operating Instructions (primary manual)
Page 6
... 18 Playing back still images: page 26 Deleting images (DELETE): page 66 Captures images with your computer You can record a moving picture with audio The digital still camera can easily copy images onto your computer using application software. Viewing images using a computer: page 29 Records a moving images: page 25 Selects the recording mode from various types of recordings according to your computer using a floppy disk or a "Memory Stick," and view and modify images on your situation Creating Clip Motion Files...
... 18 Playing back still images: page 26 Deleting images (DELETE): page 66 Captures images with your computer You can record a moving picture with audio The digital still camera can easily copy images onto your computer using application software. Viewing images using a computer: page 29 Records a moving images: page 25 Selects the recording mode from various types of recordings according to your computer using a floppy disk or a "Memory Stick," and view and modify images on your situation Creating Clip Motion Files...

Operating Instructions (primary manual)
Page 18
... lock indicator z is ready for recording. AE lock indicator (green) flashes t lights up , and the camera is flashing, the camera automatically adjusts the exposure and focus of the captured image. MS: When recording on the floppy disk. 3 Press and hold the shutter button halfway down. FD: When recording on the "Memory Stick." The beeps sound and the image is frozen. To record still images, slide the POWER switch to the right to turn on the power and insert a floppy disk or a "Memory...
... lock indicator z is ready for recording. AE lock indicator (green) flashes t lights up , and the camera is flashing, the camera automatically adjusts the exposure and focus of the captured image. MS: When recording on the floppy disk. 3 Press and hold the shutter button halfway down. FD: When recording on the "Memory Stick." The beeps sound and the image is frozen. To record still images, slide the POWER switch to the right to turn on the power and insert a floppy disk or a "Memory...

Operating Instructions (primary manual)
Page 19
RECORDING For the number of images you can start the next recording. However, the recording cannot be recorded on the floppy disk or the "Memory Stick." However, this time, the camera is charging the flash.) Recording images with the finder Turn the finder adjustment dial until the image appears clearly within the finder, then record the image. The shutter clicks. When "RECORDING" disappears from the LCD screen or finder, you press the shutter button fully down . When...
RECORDING For the number of images you can start the next recording. However, the recording cannot be recorded on the floppy disk or the "Memory Stick." However, this time, the camera is charging the flash.) Recording images with the finder Turn the finder adjustment dial until the image appears clearly within the finder, then record the image. The shutter clicks. When "RECORDING" disappears from the LCD screen or finder, you press the shutter button fully down . When...

Operating Instructions (primary manual)
Page 25
...: When recording on the "Memory Stick." LCD screen or finder indicators during recording Press DISPLAY to turn on the power and insert a floppy disk or a "Memory Stick." 3 12 1 Set the PLAY/STILL/MOVIE selector to MOVIE. 2 Select the recording media using the self-timer See pages 20 to 23. These indicators are recorded in MPEG format. To record moving images Moving images with [REC TIME SET] in the menu settings is set to 60 seconds. However, when [IMAGE SIZE] in the menu settings (page 45...
...: When recording on the "Memory Stick." LCD screen or finder indicators during recording Press DISPLAY to turn on the power and insert a floppy disk or a "Memory Stick." 3 12 1 Set the PLAY/STILL/MOVIE selector to MOVIE. 2 Select the recording media using the self-timer See pages 20 to 23. These indicators are recorded in MPEG format. To record moving images Moving images with [REC TIME SET] in the menu settings is set to 60 seconds. However, when [IMAGE SIZE] in the menu settings (page 45...

Operating Instructions (primary manual)
Page 26
... 6/8 INDEX DELETE FILE TOOL SETUP SELECT FILE BACK/NEXT When the menu bar is not displayed You can be able to select "b/B" on the LCD screen or on the finder, then press b/B. FD: When playing back images in the "Memory Stick." LCD screen or finder indicators during still image playback Press DISPLAY to PLAY. MS: When playing back images in the floppy disk. 3 Press v on the control button to display the menu bar on the LCD screen or...
... 6/8 INDEX DELETE FILE TOOL SETUP SELECT FILE BACK/NEXT When the menu bar is not displayed You can be able to select "b/B" on the LCD screen or on the finder, then press b/B. FD: When playing back images in the "Memory Stick." LCD screen or finder indicators during still image playback Press DISPLAY to PLAY. MS: When playing back images in the floppy disk. 3 Press v on the control button to display the menu bar on the LCD screen or...
Operating Instructions (primary manual)
Page 29
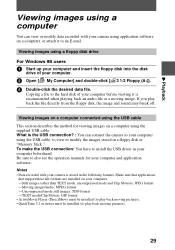
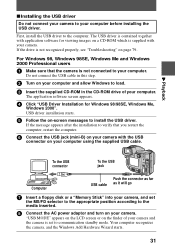
... to install the USB driver in your computer and application software. Copying a file to the hard disk of your camera using application software on your computer before viewing it to an E-mail. B Playback Viewing images using a computer You can view or modify data recorded with your camera is the USB connection? : You can connect the camera to your computer using the USB cable, to view or modify the images stored in a floppy disk or "Memory Stick." Viewing images using a floppy disk drive For Windows 98 users 1 Start...
... to install the USB driver in your computer and application software. Copying a file to the hard disk of your camera using application software on your computer before viewing it to an E-mail. B Playback Viewing images using a computer You can view or modify data recorded with your camera is the USB connection? : You can connect the camera to your computer using the USB cable, to view or modify the images stored in a floppy disk or "Memory Stick." Viewing images using a floppy disk drive For Windows 98 users 1 Start...
Operating Instructions (primary manual)
Page 31
... users 1 Make sure that you restart the computer, restart the computer. 6 Connect the USB jack (mini-B) on your camera with your camera. USB driver installation starts. 5 Follow the on your computer using the supplied USB cable. If the message appears after the installation to verify that the camera is supplied with the USB connector on -screen messages to communication standby mode. "USB MODE" appears on the LCD screen or on your camera. The application software screen appears. 4 Click "USB Driver Installation for viewing images...
... users 1 Make sure that you restart the computer, restart the computer. 6 Connect the USB jack (mini-B) on your camera with your camera. USB driver installation starts. 5 Follow the on your computer using the supplied USB cable. If the message appears after the installation to verify that the camera is supplied with the USB connector on -screen messages to communication standby mode. "USB MODE" appears on the LCD screen or on your camera. The application software screen appears. 4 Click "USB Driver Installation for viewing images...

Operating Instructions (primary manual)
Page 37
... image file recorded in - VOICE mode (page 51) MVC-sssf.411 • INDEX display file This file can only be played back on this camera. 37 MVC-sssf.MPG • Moving image file MVC-sssf.GIF • Still image file recorded in - E-MAIL mode (page 51) - B Playback Location File Meaning 3 1/2 Floppy MVC-sssf.JPG [A:] • Still image file recorded normally • Still image file recorded in TEXT mode and its corresponding index image file -An image file recorded with Clip Motion and its corresponding image file -An image file recorded in...
... image file recorded in - VOICE mode (page 51) MVC-sssf.411 • INDEX display file This file can only be played back on this camera. 37 MVC-sssf.MPG • Moving image file MVC-sssf.GIF • Still image file recorded in - E-MAIL mode (page 51) - B Playback Location File Meaning 3 1/2 Floppy MVC-sssf.JPG [A:] • Still image file recorded normally • Still image file recorded in TEXT mode and its corresponding index image file -An image file recorded with Clip Motion and its corresponding image file -An image file recorded in...

Operating Instructions (primary manual)
Page 39
... saved on repeated occasions. This camera records still images using the MPEG format for moving images recording and the VOICE mode (page 51). 39 However, if the image is able to compress files without compression, so the image does not deteriorate. Most of operating systems and applications correspond to 256 colors. B Playback Folder Imcif100 Moml0001 Momlv100 File DSC0ssss.JPG DSC0ssss.TIF MOV0ssss.MPG DSC0ssss.MPG Meaning • Small-size image file recorded...
... saved on repeated occasions. This camera records still images using the MPEG format for moving images recording and the VOICE mode (page 51). 39 However, if the image is able to compress files without compression, so the image does not deteriorate. Most of operating systems and applications correspond to 256 colors. B Playback Folder Imcif100 Moml0001 Momlv100 File DSC0ssss.JPG DSC0ssss.TIF MOV0ssss.MPG DSC0ssss.MPG Meaning • Small-size image file recorded...

Operating Instructions (primary manual)
Page 42
... camera are changed according to display the menu bar. The color of the advanced operations for its item are displayed. STILL/MOVIE PLAY (single mode) PLAY (INDEX mode) EFFECT FILE CAMERA SETUP SELECT OK MENU BAR OFF INDEX DELETE FILE TOOL SETUP SELECT OK MENU BAR OFF MVC-001F 2001 7 4 10:30PM DELETE FILE TOOL SETUP SELECT SINGLE DISPLAY 2 Select the desired item with v/V/b/B on the control button, then press the center z. VIDEO OUT /LANGUAGE CLOCK SET BEEP LCD BRIGHT NTSC INDEX DELETE FILE...
... camera are changed according to display the menu bar. The color of the advanced operations for its item are displayed. STILL/MOVIE PLAY (single mode) PLAY (INDEX mode) EFFECT FILE CAMERA SETUP SELECT OK MENU BAR OFF INDEX DELETE FILE TOOL SETUP SELECT OK MENU BAR OFF MVC-001F 2001 7 4 10:30PM DELETE FILE TOOL SETUP SELECT SINGLE DISPLAY 2 Select the desired item with v/V/b/B on the control button, then press the center z. VIDEO OUT /LANGUAGE CLOCK SET BEEP LCD BRIGHT NTSC INDEX DELETE FILE...
Operating Instructions (primary manual)
Page 59
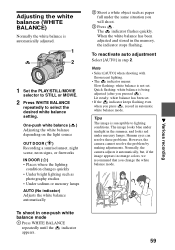
... recording The indicator flashes quickly. The image looks blue under sunlight in one-push white balance mode 1 Press WHITE BALANCE repeatedly until the indicator appears. 2 Shoot a white object such as paper full under mercury lamps. Normally, the camera adjusts it automatically, but, if the image appears in the memory, the indicator stops flashing. Tips The image is automatically adjusted. 1 2 1 Set the PLAY/STILL/MOVIE selector to STILL or MOVIE. 2 Press WHITE BALANCE repeatedly to lighting conditions. Human eyes can resolve these problems...
... recording The indicator flashes quickly. The image looks blue under sunlight in one-push white balance mode 1 Press WHITE BALANCE repeatedly until the indicator appears. 2 Shoot a white object such as paper full under mercury lamps. Normally, the camera adjusts it automatically, but, if the image appears in the memory, the indicator stops flashing. Tips The image is automatically adjusted. 1 2 1 Set the PLAY/STILL/MOVIE selector to STILL or MOVIE. 2 Press WHITE BALANCE repeatedly to lighting conditions. Human eyes can resolve these problems...
Operating Instructions (primary manual)
Page 79
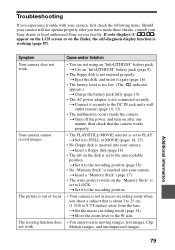
... shoot a subject that the camera works properly. Your camera cannot record images. • The PLAY/STILL/MOVIE selector is inserted into your camera. tSet the macro recording mode (page 54). Motion images, and uncompressed images. 79 tTurn off the power, and turn on the disk is not connected securely. The picture is out of focus. • Your camera is not in macro recording mode when you have made these checks, consult your camera. tUse an "InfoLITHIUM" battery...
... shoot a subject that the camera works properly. Your camera cannot record images. • The PLAY/STILL/MOVIE selector is inserted into your camera. tSet the macro recording mode (page 54). Motion images, and uncompressed images. 79 tTurn off the power, and turn on the disk is not connected securely. The picture is out of focus. • Your camera is not in macro recording mode when you have made these checks, consult your camera. tUse an "InfoLITHIUM" battery...

Operating Instructions (primary manual)
Page 81
... do not operate the camera for about 20 minutes when using a floppy disk. You cannot use the PROGRAM AE function. tTo continue the slide show function stops after about three minutes while the power is in manual focus mode. tSet it with a fully charged battery pack. • The VIDEO OUT setting of the computer and then play back an image on , the camera turns off suddenly. tCopy the file to the...
... do not operate the camera for about 20 minutes when using a floppy disk. You cannot use the PROGRAM AE function. tTo continue the slide show function stops after about three minutes while the power is in manual focus mode. tSet it with a fully charged battery pack. • The VIDEO OUT setting of the computer and then play back an image on , the camera turns off suddenly. tCopy the file to the...
Operating Instructions (primary manual)
Page 82
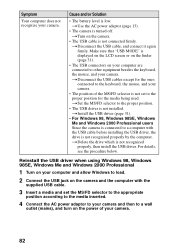
... Solution • The battery level is turned off. tDisconnect the USB cables except for the media being used. tUse the AC power adaptor (page 13). • The camera is low. tInstall the USB driver (page 31). • For Windows 98, Windows 98SE, Windows Me and Windows 2000 Professional users Since the camera is connected to a computer with the supplied USB cable. 3 Insert a media and set to a wall outlet (mains), and turn...
... Solution • The battery level is turned off. tDisconnect the USB cables except for the media being used. tUse the AC power adaptor (page 13). • The camera is low. tInstall the USB driver (page 31). • For Windows 98, Windows 98SE, Windows Me and Windows 2000 Professional users Since the camera is connected to a computer with the supplied USB cable. 3 Insert a media and set to a wall outlet (mains), and turn...
Operating Instructions (primary manual)
Page 85
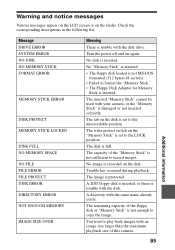
... disk is protected. The write-protect switch on the "Memory Stick" is set to play back images with the disk. A 2DD floppy disk is inserted, or there is trouble with an image size larger than the maximum playback size of this camera. Turn the power off and on the disk. No "Memory Stick" is inserted. • The floppy disk loaded is not MS-DOS formatted (512 bytes×18 sectors). • Failed to record images. Trouble...
... disk is protected. The write-protect switch on the "Memory Stick" is set to play back images with the disk. A 2DD floppy disk is inserted, or there is trouble with an image size larger than the maximum playback size of this camera. Turn the power off and on the disk. No "Memory Stick" is inserted. • The floppy disk loaded is not MS-DOS formatted (512 bytes×18 sectors). • Failed to record images. Trouble...

Operating Instructions (primary manual)
Page 89
.../Flash mode indicator E PROGRAM AE indicator/Zoom indicator F White balance indicator G SteadyShot indicator H Picture effect indicator I DATE indicator J EV level indicator K Iris/Shutter speed indicator L AE lock indicator/Focus lock indicator M Recording mode/Clip Motion indicator N Image size indicator O Number of recorded images P Remaining disk capacity/ Remaining memory capacity indicator : Floppy disk : "Memory Stick" Q Recording time indicator R Self-diagnosis function indicator/Recording time indicator S Self-timer indicator T Spot light-metering indicator U Menu bar and guide menu...
.../Flash mode indicator E PROGRAM AE indicator/Zoom indicator F White balance indicator G SteadyShot indicator H Picture effect indicator I DATE indicator J EV level indicator K Iris/Shutter speed indicator L AE lock indicator/Focus lock indicator M Recording mode/Clip Motion indicator N Image size indicator O Number of recorded images P Remaining disk capacity/ Remaining memory capacity indicator : Floppy disk : "Memory Stick" Q Recording time indicator R Self-diagnosis function indicator/Recording time indicator S Self-timer indicator T Spot light-metering indicator U Menu bar and guide menu...

Operating Instructions (primary manual)
Page 91
... charge 10 G , , , GIF 29 39 49 52 I Image Copying 68 Deleting 66 File name 36 Print mark 71 Protect 65 Size 48 INDEX screen 61 Indicators on the LCD screen or on the finder 89 , "InfoLITHIUM" battery pack 9 77 J , , JPEG 18 29 39 M Macro recording 54 Manual focusing 55 "Memory Stick" Copying 68 Format 72 Inserting 17 Number of recordable i4m8,ag5e0s, 51, 52, 53 Menu 42 MOBILE mode 49 Moisture condensation.....74 Moving image Playback...
... charge 10 G , , , GIF 29 39 49 52 I Image Copying 68 Deleting 66 File name 36 Print mark 71 Protect 65 Size 48 INDEX screen 61 Indicators on the LCD screen or on the finder 89 , "InfoLITHIUM" battery pack 9 77 J , , JPEG 18 29 39 M Macro recording 54 Manual focusing 55 "Memory Stick" Copying 68 Format 72 Inserting 17 Number of recordable i4m8,ag5e0s, 51, 52, 53 Menu 42 MOBILE mode 49 Moisture condensation.....74 Moving image Playback...


