Operating Instructions
Page 3
...is connected. - You are designed to temperatures above 140°F (60°C), such as in a car parked in the sun or under direct sunlight. Note: This equipment has been tested and found to comply with the instructions,...EXPOSURE. This equipment generates, uses, and can radiate radio frequency energy and, if not installed and used in accordance with the limits for help. For the Sony Service Center nearest you call 416-499-SONY (Canada only) Caution: Do not handle damaged or leaking lithium ion batteries. 3-EN CAUTION Never expose the battery pack to provide reasonable protection...
...is connected. - You are designed to temperatures above 140°F (60°C), such as in a car parked in the sun or under direct sunlight. Note: This equipment has been tested and found to comply with the instructions,...EXPOSURE. This equipment generates, uses, and can radiate radio frequency energy and, if not installed and used in accordance with the limits for help. For the Sony Service Center nearest you call 416-499-SONY (Canada only) Caution: Do not handle damaged or leaking lithium ion batteries. 3-EN CAUTION Never expose the battery pack to provide reasonable protection...
Operating Instructions
Page 5
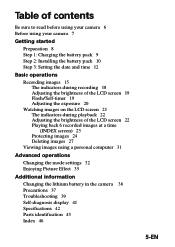
... using your camera 6 Before using your camera 7 Getting started 8 Preparation 8 Step 1: Charging the battery pack 9 Step 2: Installing the battery pack 10 Step 3: Setting the date and time 12 Basic operations 15 Recording images 15 The indicators during recording 18 Adjusting the brightness of the LCD screen 19 Flash/Self-timer 19 Adjusting the exposure 20 Watching images on the LCD screen 21 The indicators during playback 22 Adjusting the brightness of the LCD screen 22 Playing back 6 recorded images at a time (INDEX screen) 23 Protecting images 24 Deleting images 27 Viewing images using...
... using your camera 6 Before using your camera 7 Getting started 8 Preparation 8 Step 1: Charging the battery pack 9 Step 2: Installing the battery pack 10 Step 3: Setting the date and time 12 Basic operations 15 Recording images 15 The indicators during recording 18 Adjusting the brightness of the LCD screen 19 Flash/Self-timer 19 Adjusting the exposure 20 Watching images on the LCD screen 21 The indicators during playback 22 Adjusting the brightness of the LCD screen 22 Playing back 6 recorded images at a time (INDEX screen) 23 Protecting images 24 Deleting images 27 Viewing images using...
Operating Instructions
Page 6
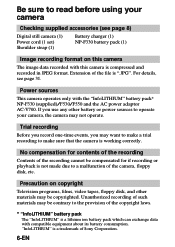
... 8) Digital still camera (1) Power cord (1 set) Shoulder strap (1) Battery charger (1) NP-F330 battery pack (1) Image recording format on this camera is not made due to the provision of the camera, floppy disk, etc. Unauthorized recording of such materials may be contrary to a malfunction of the copyright laws. * "InfoLITHIUM" battery pack The "InfoLITHIUM" is a lithium ion battery pack which can exchange data with compatible equipment about its battery consumption. Power sources This camera operates only...
... 8) Digital still camera (1) Power cord (1 set) Shoulder strap (1) Battery charger (1) NP-F330 battery pack (1) Image recording format on this camera is not made due to the provision of the camera, floppy disk, etc. Unauthorized recording of such materials may be contrary to a malfunction of the copyright laws. * "InfoLITHIUM" battery pack The "InfoLITHIUM" is a lithium ion battery pack which can exchange data with compatible equipment about its battery consumption. Power sources This camera operates only...
Operating Instructions
Page 7
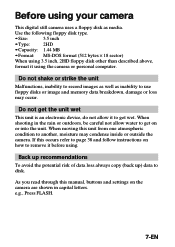
When moving this manual, buttons and settings on the camera are shown in the rain or outdoors, be careful not allow it using the camera or personal computer. As you read through this unit from one atmospheric condition to another, moisture may occur. Before using your camera This digital still camera uses a floppy disk as inability to use floppy disks or image and memory data breakdown, damage or loss...
When moving this manual, buttons and settings on the camera are shown in the rain or outdoors, be careful not allow it using the camera or personal computer. As you read through this unit from one atmospheric condition to another, moisture may occur. Before using your camera This digital still camera uses a floppy disk as inability to use floppy disks or image and memory data breakdown, damage or loss...
Operating Instructions
Page 8
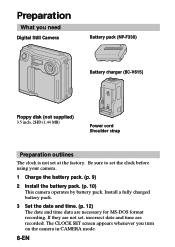
... need Digital Still Camera Battery pack (NP-F330) Battery charger (BC-V615) Floppy disk (not supplied) 3.5 inch, 2HD (1.44 MB) Power cord Shoulder strap Preparation outlines The clock is not set the clock before using your camera. 1 Charge the battery pack. (p. 9) 2 Install the battery pack. (p. 10) This camera operates by battery pack. Be sure to set at the factory. Preparation What you turn on the camera in CAMERA mode. 8-EN If they are not set, incorrect date and time...
... need Digital Still Camera Battery pack (NP-F330) Battery charger (BC-V615) Floppy disk (not supplied) 3.5 inch, 2HD (1.44 MB) Power cord Shoulder strap Preparation outlines The clock is not set the clock before using your camera. 1 Charge the battery pack. (p. 9) 2 Install the battery pack. (p. 10) This camera operates by battery pack. Be sure to set at the factory. Preparation What you turn on the camera in CAMERA mode. 8-EN If they are not set, incorrect date and time...
Operating Instructions
Page 11
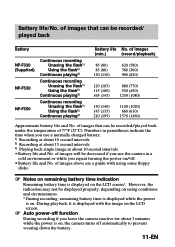
... the power is on , the camera turns off automatically to prevent wearing down the battery. 11-EN However, the indication may not be recorded/played back under the temperature of images that can be displayed properly, depending on using some floppy disks. ¡ Notes on remaining battery time indication Remaining battery time is displayed on the LCD screen*. of images will be recorded/ played back Battery NP-F330 (Supplied) NP-F530 NP-F550 Continuous recording...
... the power is on , the camera turns off automatically to prevent wearing down the battery. 11-EN However, the indication may not be recorded/played back under the temperature of images that can be displayed properly, depending on using some floppy disks. ¡ Notes on remaining battery time indication Remaining battery time is displayed on the LCD screen*. of images will be recorded/ played back Battery NP-F330 (Supplied) NP-F530 NP-F550 Continuous recording...
Operating Instructions
Page 12
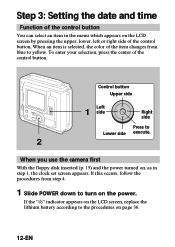
... the control button. If the "I" indicator appears on the LCD screen, replace the lithium battery according to turn on the power. Step 3: Setting the date and time Function of the control button You can select an item in step 1, the clock set screen appears. If this occurs, follow the procedures from blue to Lower side execute. 2 When you use the camera first With the floppy disk inserted (p. 15) and the power turned...
... the control button. If the "I" indicator appears on the LCD screen, replace the lithium battery according to turn on the power. Step 3: Setting the date and time Function of the control button You can select an item in step 1, the clock set screen appears. If this occurs, follow the procedures from blue to Lower side execute. 2 When you use the camera first With the floppy disk inserted (p. 15) and the power turned...
Operating Instructions
Page 15
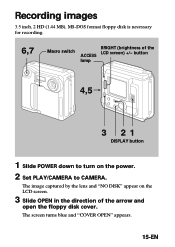
The screen turns blue and "COVER OPEN" appears. 15-EN The image captured by the lens and "NO DISK" appear on the power. 2 Set PLAY/CAMERA to CAMERA. button lamp 4,5 3 21 DISPLAY button 1 Slide POWER down to turn on the LCD screen. 3 Slide OPEN in the direction of the ACCESS LCD screen) +/- Recording images 3.5 inch, 2 HD (1.44 MB), MS-DOS format floppy disk is necessary for recording. 6,7 Macro switch BRIGHT (brightness of the arrow and open the floppy disk cover.
The screen turns blue and "COVER OPEN" appears. 15-EN The image captured by the lens and "NO DISK" appear on the power. 2 Set PLAY/CAMERA to CAMERA. button lamp 4,5 3 21 DISPLAY button 1 Slide POWER down to turn on the LCD screen. 3 Slide OPEN in the direction of the ACCESS LCD screen) +/- Recording images 3.5 inch, 2 HD (1.44 MB), MS-DOS format floppy disk is necessary for recording. 6,7 Macro switch BRIGHT (brightness of the arrow and open the floppy disk cover.

Operating Instructions
Page 19
... blinking FLASH CHARGE lamp lights up, you press the shutter button, the subject is recorded. • The subject must be 1 5/8 feet to 10 feet (50 cm to 3 m) away from the flash. • If flash is used in FRAME mode, the image is recorded in FIELD mode. About 10 seconds after you can shoot images using the flash. The FRAME indicator flashes on the LCD screen (p. 33). 19-EN Adjusting the brightness of the LCD screen Use...
... blinking FLASH CHARGE lamp lights up, you press the shutter button, the subject is recorded. • The subject must be 1 5/8 feet to 10 feet (50 cm to 3 m) away from the flash. • If flash is used in FRAME mode, the image is recorded in FIELD mode. About 10 seconds after you can shoot images using the flash. The FRAME indicator flashes on the LCD screen (p. 33). 19-EN Adjusting the brightness of the LCD screen Use...
Operating Instructions
Page 20
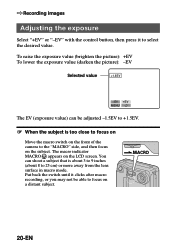
...; Recording images Adjusting the exposure Select "+EV" or "-EV" with the control button, then press it clicks after macro recording, or you may not be adjusted -1.5EV to +1.5EV. ¡ When the subject is about 3 to 9 inches (about 8 to 25 cm) or more away from the lens surface in macro mode. You can be able to focus on the LCD screen. Put back the switch until...
...; Recording images Adjusting the exposure Select "+EV" or "-EV" with the control button, then press it clicks after macro recording, or you may not be adjusted -1.5EV to +1.5EV. ¡ When the subject is about 3 to 9 inches (about 8 to 25 cm) or more away from the lens surface in macro mode. You can be able to focus on the LCD screen. Put back the switch until...
Operating Instructions
Page 21
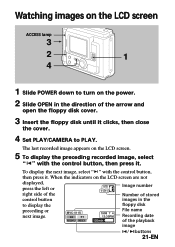
... the indicators on the power. 2 Slide OPEN in the floppy disk File name Recording date of the playback image / buttons 21-EN MVC-011S MENU INDEX STD 11/11 1998 7 4 12:30PM 120min Image number Number of stored images in the direction of the arrow and open the floppy disk cover. 3 Insert the floppy disk until it clicks, then close the cover. 4 Set PLAY/CAMERA to display the preceding or next image. Watching images on the LCD screen...
... the indicators on the power. 2 Slide OPEN in the floppy disk File name Recording date of the playback image / buttons 21-EN MVC-011S MENU INDEX STD 11/11 1998 7 4 12:30PM 120min Image number Number of stored images in the direction of the arrow and open the floppy disk cover. 3 Insert the floppy disk until it clicks, then close the cover. 4 Set PLAY/CAMERA to display the preceding or next image. Watching images on the LCD screen...
Operating Instructions
Page 24
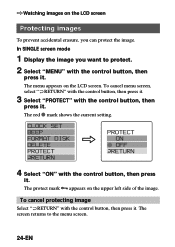
... the control button, then press it . To cancel menu screen, select " RETURN" with the control button, then press it. 3 Select "PROTECT" with the control button, then press it . CLOCK SET BEEP FORMAT DISK DELETE PROTECT RETURN ÷ PROTECT r ON r OFF RETURN 4 Select "ON" with the control button, then press it . The screen returns to protect. 2 Select "MENU" with the control button, then press it . In SINGLE screen mode 1 Display the image you can protect the image. The menu appears...
... the control button, then press it . To cancel menu screen, select " RETURN" with the control button, then press it. 3 Select "PROTECT" with the control button, then press it . CLOCK SET BEEP FORMAT DISK DELETE PROTECT RETURN ÷ PROTECT r ON r OFF RETURN 4 Select "ON" with the control button, then press it . The screen returns to protect. 2 Select "MENU" with the control button, then press it . In SINGLE screen mode 1 Display the image you can protect the image. The menu appears...
Operating Instructions
Page 31
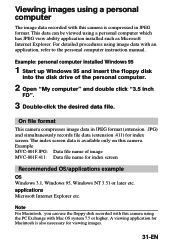
... with Mac OS system 7.5 or higher. This data can use the floppy disk recorded with this camera. A viewing application for Macintosh is available only on this camera using a personal computer which has JPEG view ability application installed such as Microsoft Internet Explorer. Example: personal computer installed Windows 95 1 Start up Windows 95 and insert the floppy disk into the disk drive of image MVC-001F.411: Data file name for index screen.
... with Mac OS system 7.5 or higher. This data can use the floppy disk recorded with this camera. A viewing application for Macintosh is available only on this camera using a personal computer which has JPEG view ability application installed such as Microsoft Internet Explorer. Example: personal computer installed Windows 95 1 Start up Windows 95 and insert the floppy disk into the disk drive of image MVC-001F.411: Data file name for index screen.
Operating Instructions
Page 32
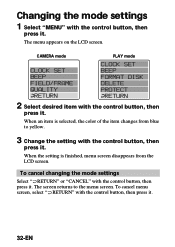
... menu screen, select " RETURN" with the control button, then press it. When the setting is selected, the color of the item changes from the LCD screen. To cancel changing the mode settings Select " RETURN" or "CANCEL" with the control button, then press it. 32-EN Changing the mode settings 1 Select "MENU" with the control button, then press it. The menu appears on the LCD screen. CAMERA mode CLOCK SET BEEP FIELD/FRAME QUALITY RETURN PLAY mode CLOCK SET BEEP FORMAT DISK DELETE PROTECT...
... menu screen, select " RETURN" with the control button, then press it. When the setting is selected, the color of the item changes from the LCD screen. To cancel changing the mode settings Select " RETURN" or "CANCEL" with the control button, then press it. 32-EN Changing the mode settings 1 Select "MENU" with the control button, then press it. The menu appears on the LCD screen. CAMERA mode CLOCK SET BEEP FIELD/FRAME QUALITY RETURN PLAY mode CLOCK SET BEEP FORMAT DISK DELETE PROTECT...
Operating Instructions
Page 33
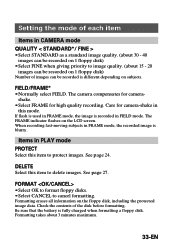
... Care for camera- FORMAT • Select OK to format floppy disks. • Select CANCEL to protect images. Items in PLAY mode PROTECT Select this item to delete images. See page 24. Formatting takes about 15 - 20 images can be recorded on 1 floppy disk) Number of the disk before formatting. Formatting erases all information on the LCD screen. See page 27. The FRAME indicator flashes on the floppy disk, including the protected image data. Be sure that the battery is blurry...
... Care for camera- FORMAT • Select OK to format floppy disks. • Select CANCEL to protect images. Items in PLAY mode PROTECT Select this item to delete images. See page 24. Formatting takes about 15 - 20 images can be recorded on 1 floppy disk) Number of the disk before formatting. Formatting erases all information on the LCD screen. See page 27. The FRAME indicator flashes on the floppy disk, including the protected image data. Be sure that the battery is blurry...
Operating Instructions
Page 36
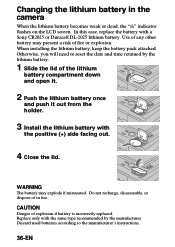
... used batteries according to reset the date and time retained by the lithium battery. 1 Slide the lid of in the camera When the lithium battery becomes weak or dead, the "I" indicator flashes on the LCD screen. Otherwise, you will need to the manufacturer's instructions. 36-EN When installing the lithium battery, keep the battery pack attached. CAUTION Danger of fire or explosion. In this case, replace the battery with a Sony...
... used batteries according to reset the date and time retained by the lithium battery. 1 Slide the lid of in the camera When the lithium battery becomes weak or dead, the "I" indicator flashes on the LCD screen. Otherwise, you will need to the manufacturer's instructions. 36-EN When installing the lithium battery, keep the battery pack attached. CAUTION Danger of fire or explosion. In this case, replace the battery with a Sony...
Operating Instructions
Page 39
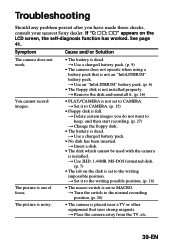
... record images. The picture is not an "InfoLITHIUM" battery pack. n Use a charged battery pack. (p. 9) • The camera does not operate when using a battery pack that uses strong magnets. n Delete certain images you have made those checks, consult your nearest Sony dealer. n Use an "InfoLITHIUM" battery pack. (p. 6) • The floppy disk is dead. n Set it to the writing possible position. (p. 16) • The macro switch is set to keep, and then start recording. (p. 27) n Change the floppy disk...
... record images. The picture is not an "InfoLITHIUM" battery pack. n Use a charged battery pack. (p. 9) • The camera does not operate when using a battery pack that uses strong magnets. n Delete certain images you have made those checks, consult your nearest Sony dealer. n Use an "InfoLITHIUM" battery pack. (p. 6) • The floppy disk is dead. n Set it to the writing possible position. (p. 16) • The macro switch is set to keep, and then start recording. (p. 27) n Change the floppy disk...

Operating Instructions
Page 40
.... • PLAY/CAMERA is not set . n Adjust brightness of the battery pack is protected. You cannot play back the images. You cannot delete an image. • The ambient temperature is too low. • Charging of the image. (p. 20) • The LCD screen is not malfunctioning. n Use a charged battery pack. • The image is not enough. Vertical streaks appear when shooting a very bright subject. • The date and time are recorded. n Adjust brightness. (p. 19...
.... • PLAY/CAMERA is not set . n Adjust brightness of the battery pack is protected. You cannot play back the images. You cannot delete an image. • The ambient temperature is too low. • Charging of the image. (p. 20) • The LCD screen is not malfunctioning. n Use a charged battery pack. • The image is not enough. Vertical streaks appear when shooting a very bright subject. • The date and time are recorded. n Adjust brightness. (p. 19...
Operating Instructions
Page 41
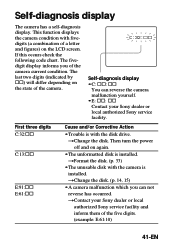
.../or Corrective Action •Trouble is installed. Then turn the power off and on the state of the camera current condition. nFormat the disk. (p. 33) •The unusable disk with the camera is with fivedigits (a combination of the five digits. (example: E:61:10) 41-EN nContact your Sony dealer or local authorized Sony service facility. C:32:ππ Self-diagnosis display •C: ππ...
.../or Corrective Action •Trouble is installed. Then turn the power off and on the state of the camera current condition. nFormat the disk. (p. 33) •The unusable disk with the camera is with fivedigits (a combination of the five digits. (example: E:61:10) 41-EN nContact your Sony dealer or local authorized Sony service facility. C:32:ππ Self-diagnosis display •C: ππ...
Operating Instructions
Page 46
... 34 Charging 9 Cleaning 37 Control button 12 Delete 27 F Floppy disk 7 Format Disk 33 Full charge 9 I Image quality 33 INDEX screen 23 Indicators on the LCD screen 18, 22 InfoLITHIUM battery pack ..... 6 J, L JPEG 6, 31 Lithium battery 36 M Menu 33 Moisture condensation .......... 38 N, P Normal charge 9 Picture effect 35 Playing back 21 Protect 24 R Recording 15 Recording in macro 20 Remaining battery indicator .. 11 S, T Self-diagnosis display 41 Self timer 19 Setting the date and time ....... 12 Troubleshooting 39 U, V Using flash 19 Viewing images using a personal...
... 34 Charging 9 Cleaning 37 Control button 12 Delete 27 F Floppy disk 7 Format Disk 33 Full charge 9 I Image quality 33 INDEX screen 23 Indicators on the LCD screen 18, 22 InfoLITHIUM battery pack ..... 6 J, L JPEG 6, 31 Lithium battery 36 M Menu 33 Moisture condensation .......... 38 N, P Normal charge 9 Picture effect 35 Playing back 21 Protect 24 R Recording 15 Recording in macro 20 Remaining battery indicator .. 11 S, T Self-diagnosis display 41 Self timer 19 Setting the date and time ....... 12 Troubleshooting 39 U, V Using flash 19 Viewing images using a personal...

