
Operating Instructions
Page 3
...be prohibited. Increase the separation between the equipment and receiver. - Consult the dealer or an experienced radio/TV technician for a Class B digital device, pursuant to comply with the instructions, may be determined by turning the equipment off and on a circuit different from that any ... 15 of the following measures: - This equipment generates, uses, and can return you call 416-499-SONY (Canada only) Caution: Do not handle damaged or leaking lithium ion batteries. 3-EN Reorient or relocate the receiving antenna. - For the Customers in accordance with the limits for help...
...be prohibited. Increase the separation between the equipment and receiver. - Consult the dealer or an experienced radio/TV technician for a Class B digital device, pursuant to comply with the instructions, may be determined by turning the equipment off and on a circuit different from that any ... 15 of the following measures: - This equipment generates, uses, and can return you call 416-499-SONY (Canada only) Caution: Do not handle damaged or leaking lithium ion batteries. 3-EN Reorient or relocate the receiving antenna. - For the Customers in accordance with the limits for help...

Operating Instructions
Page 5
Table of contents Be sure to read before using your camera 6 Before using your camera 7 Getting started Preparation 9 Step 1: Charging the battery pack 10 Step 2: Installing the battery pack 11 Step 3: Setting the date and time 13 Basic operations Recording images 16 The indicators ... a personal computer 32 Advanced operations Changing the mode settings 33 Using various functions for recording (MVC-FD7 only) 36 Additional information Changing the lithium battery in the camera 38 Precautions 39 Troubleshooting 41 Self-diagnosis display 43 Specifications 44 Parts identification 45 Index 47 5-...
Table of contents Be sure to read before using your camera 6 Before using your camera 7 Getting started Preparation 9 Step 1: Charging the battery pack 10 Step 2: Installing the battery pack 11 Step 3: Setting the date and time 13 Basic operations Recording images 16 The indicators ... a personal computer 32 Advanced operations Changing the mode settings 33 Using various functions for recording (MVC-FD7 only) 36 Additional information Changing the lithium battery in the camera 38 Precautions 39 Troubleshooting 41 Self-diagnosis display 43 Specifications 44 Parts identification 45 Index 47 5-...

Operating Instructions
Page 6
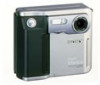
...recording cannot be compensated for if recording or playback is a trademark of Sony Corporation. 6-EN "InfoLITHIUM" is not made due to a malfunction of the copyright laws. * "InfoLITHIUM" battery pack The "InfoLITHIUM" is working correctly. If you may want to make...to make sure that the camera is a lithium ion battery pack which can exchange data with compatible equipment about its battery consumption. For details, see page 9) Digital still camera (1) Power cord (1 set) Shoulder strap (1) Battery charger (1) NP-F530 battery pack (1) Lens cap (1) (MVC-FD7 only) Image recording ...
...recording cannot be compensated for if recording or playback is a trademark of Sony Corporation. 6-EN "InfoLITHIUM" is not made due to a malfunction of the copyright laws. * "InfoLITHIUM" battery pack The "InfoLITHIUM" is working correctly. If you may want to make...to make sure that the camera is a lithium ion battery pack which can exchange data with compatible equipment about its battery consumption. For details, see page 9) Digital still camera (1) Power cord (1 set) Shoulder strap (1) Battery charger (1) NP-F530 battery pack (1) Lens cap (1) (MVC-FD7 only) Image recording ...

Operating Instructions
Page 9
The CLOCK SET screen appears whenever you need Digital Still Camera Battery pack (NP-F530) Battery charger (BC-V615) (MVC-FD7) Floppy disk (not supplied) 3.5 inch, 2HD (1.44 MB) Power cord Shoulder strap Lens cap (MVC-FD7 only) Preparation outlines The clock is not set at the factory. If they are not set the clock before using your...
The CLOCK SET screen appears whenever you need Digital Still Camera Battery pack (NP-F530) Battery charger (BC-V615) (MVC-FD7) Floppy disk (not supplied) 3.5 inch, 2HD (1.44 MB) Power cord Shoulder strap Lens cap (MVC-FD7 only) Preparation outlines The clock is not set at the factory. If they are not set the clock before using your...

Operating Instructions
Page 10
... the $ mark. Slide it down until the CHARGE lamp goes out. 10-EN For details, refer to charge an empty battery pack using the battery charger BC-V615. (Lower temperatures require a longer charging time.) * Charging for about one hour after the CHARGE lamp goes ... The CHARGE lamp (orange) lights up the battery pack. Normal charge** 165 min. Charging time Full charge* 225 min. Step 1: Charging the battery pack To charge the battery pack, use the battery charger. to wall outlet 1 Battery pack 2 CHARGE lamp (orange) Battery charger 1 Connect the power cord to a wall...
... the $ mark. Slide it down until the CHARGE lamp goes out. 10-EN For details, refer to charge an empty battery pack using the battery charger BC-V615. (Lower temperatures require a longer charging time.) * Charging for about one hour after the CHARGE lamp goes ... The CHARGE lamp (orange) lights up the battery pack. Normal charge** 165 min. Charging time Full charge* 225 min. Step 1: Charging the battery pack To charge the battery pack, use the battery charger. to wall outlet 1 Battery pack 2 CHARGE lamp (orange) Battery charger 1 Connect the power cord to a wall...
Operating Instructions
Page 11
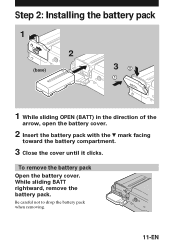
To remove the battery pack Open the battery cover. While sliding BATT rightward, remove the battery pack. Be careful not to drop the battery pack when removing. 11-EN Step 2: Installing the battery pack 1 2 (base) 32 1 1 While sliding OPEN (BATT) in the direction of the arrow, open the battery cover. 2 Insert the battery pack with the $ mark facing toward the battery compartment. 3 Close the cover until it clicks.
To remove the battery pack Open the battery cover. While sliding BATT rightward, remove the battery pack. Be careful not to drop the battery pack when removing. 11-EN Step 2: Installing the battery pack 1 2 (base) 32 1 1 While sliding OPEN (BATT) in the direction of the arrow, open the battery cover. 2 Insert the battery pack with the $ mark facing toward the battery compartment. 3 Close the cover until it clicks.
Operating Instructions
Page 12
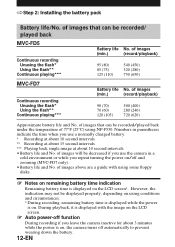
...at about 3 minutes while the power is displayed on , the camera turns off and zooming (MVC-FD7 only). • Battery life and No. of images above are a guide with the image on . ÷ Step 2: Installing the battery pack Battery life/No. of 77°F (25°C) using some floppy... LCD screen*. During playback, it is displayed with using NP-F530. of images that can be recorded/ played back MVC-FD5 Continuous recording Unusing the flash* Using the flash** Continuous playing*** Battery life No. of images (min.) (record/playback) 90 (70) 70 (60) 120 (105) 500 (400)...
...at about 3 minutes while the power is displayed on , the camera turns off and zooming (MVC-FD7 only). • Battery life and No. of images above are a guide with the image on . ÷ Step 2: Installing the battery pack Battery life/No. of 77°F (25°C) using some floppy... LCD screen*. During playback, it is displayed with using NP-F530. of images that can be recorded/ played back MVC-FD5 Continuous recording Unusing the flash* Using the flash** Continuous playing*** Battery life No. of images (min.) (record/playback) 90 (70) 70 (60) 120 (105) 500 (400)...

Operating Instructions
Page 13
If this occurs, follow the procedures from blue to Lower side execute. 2 When you use the camera first With the floppy disk inserted (p.16) and the power turned on the LCD screen by pressing the upper, lower, left or right side of ... set screen appears. When an item is selected, the color of the control button. If the "I" indicator appears on the LCD screen, replace the lithium battery according to turn on page 38. 13-EN
If this occurs, follow the procedures from blue to Lower side execute. 2 When you use the camera first With the floppy disk inserted (p.16) and the power turned on the LCD screen by pressing the upper, lower, left or right side of ... set screen appears. When an item is selected, the color of the control button. If the "I" indicator appears on the LCD screen, replace the lithium battery according to turn on page 38. 13-EN

Operating Instructions
Page 17
..., the remaining disk capacity indicator rotates and "RECORDING" appears on the LCD screen. AE (auto exposure), AWB (auto white balance) and AF (auto focus: MVC-FD7 only) are frozen. 8 Press the shutter button fully down . Note When the ACCESS lamp is recorded on the LCD screen. W T Image quality indicator... only) 7 Press the shutter button halfway down . As well do not open the floppy disk cover, turn the power off or remove the battery pack. The image appears on the LCD screen. The AE lock indicator r (green) appears on the disk. Before inserting, check that the write ...
..., the remaining disk capacity indicator rotates and "RECORDING" appears on the LCD screen. AE (auto exposure), AWB (auto white balance) and AF (auto focus: MVC-FD7 only) are frozen. 8 Press the shutter button fully down . Note When the ACCESS lamp is recorded on the LCD screen. W T Image quality indicator... only) 7 Press the shutter button halfway down . As well do not open the floppy disk cover, turn the power off or remove the battery pack. The image appears on the LCD screen. The AE lock indicator r (green) appears on the disk. Before inserting, check that the write ...
Operating Instructions
Page 19
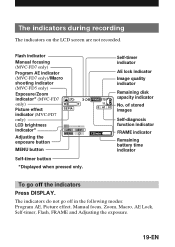
...The indicators on the LCD screen are not recorded. of stored images 120min Self-diagnosis function indicator FRAME indicator Remaining battery time indicator To go off the indicators Press DISPLAY. The indicators do not go off in the following modes: ...E : 61 : 01 Remaining disk capacity indicator No. Flash indicator Manual focusing (MVC-FD7 only) Program AE indicator (MVC-FD7 only)/Macro shooting indicator (MVC-FD5 only) Exposure/Zoom indicator* (MVC-FD7 only) Picture effect indicator (MVC-FD7 only) LCD brightness indicator* Adjusting the exposure button f W T SEPIA ...
...The indicators on the LCD screen are not recorded. of stored images 120min Self-diagnosis function indicator FRAME indicator Remaining battery time indicator To go off the indicators Press DISPLAY. The indicators do not go off in the following modes: ...E : 61 : 01 Remaining disk capacity indicator No. Flash indicator Manual focusing (MVC-FD7 only) Program AE indicator (MVC-FD7 only)/Macro shooting indicator (MVC-FD5 only) Exposure/Zoom indicator* (MVC-FD7 only) Picture effect indicator (MVC-FD7 only) LCD brightness indicator* Adjusting the exposure button f W T SEPIA ...

Operating Instructions
Page 23
As well do not open the floppy disk cover, turn the power off or remove the battery pack. button. 23-EN The indicators during playback MVC-011S MENU INDEX STD 11/11 1997 7 4 12:30PM 120min Image number Image quality indicator Remaining disk capacity indicator Number of... stored images in the floppy disk File name Recording date of the playback image Remaining battery time indicator / buttons (Single screen...
As well do not open the floppy disk cover, turn the power off or remove the battery pack. button. 23-EN The indicators during playback MVC-011S MENU INDEX STD 11/11 1997 7 4 12:30PM 120min Image number Image quality indicator Remaining disk capacity indicator Number of... stored images in the floppy disk File name Recording date of the playback image Remaining battery time indicator / buttons (Single screen...

Operating Instructions
Page 34
... contents of images can be recorded on 1 floppy disk) Number of the disk before formatting. The camera compensates for camera- ÷ Changing the mode settings Setting the mode of each item Items in CAMERA mode QUALITY < STANDARD*/ FINE > •Select STANDARD as a standard image quality. (about 30 ...images. See page 25. Formatting takes about 15 - 20 images can be recorded is different depending on subjects. Be sure that the battery is fully charged when formatting a floppy disk. When recording fast-moving subjects in FIELD mode. DELETE Select this item to cancel formatting....
... contents of images can be recorded on 1 floppy disk) Number of the disk before formatting. The camera compensates for camera- ÷ Changing the mode settings Setting the mode of each item Items in CAMERA mode QUALITY < STANDARD*/ FINE > •Select STANDARD as a standard image quality. (about 30 ...images. See page 25. Formatting takes about 15 - 20 images can be recorded is different depending on subjects. Be sure that the battery is fully charged when formatting a floppy disk. When recording fast-moving subjects in FIELD mode. DELETE Select this item to cancel formatting....

Operating Instructions
Page 38
... the manufacturer's instructions. 38-EN WARNING The battery may present a risk of explosion if battery is incorrectly replaced. Replace only with the same type recommended by the lithium battery. 1 Slide the lid of in the camera When the lithium battery becomes weak or dead, the "I" indicator flashes...replace the battery with the positive (+) side facing out. 4 Close the lid. Do not recharge, disassemble, or dispose of the lithium battery compartment down and open it. 2 Push the lithium battery once and push it out from the holder. 3 Install the lithium battery with a Sony CR2025 or...
... the manufacturer's instructions. 38-EN WARNING The battery may present a risk of explosion if battery is incorrectly replaced. Replace only with the same type recommended by the lithium battery. 1 Slide the lid of in the camera When the lithium battery becomes weak or dead, the "I" indicator flashes...replace the battery with the positive (+) side facing out. 4 Close the lid. Do not recharge, disassemble, or dispose of the lithium battery compartment down and open it. 2 Push the lithium battery once and push it out from the holder. 3 Install the lithium battery with a Sony CR2025 or...
Operating Instructions
Page 40
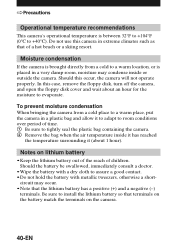
... location, or is between 32°F to +104°F (0°C to +40°C). Should the battery be swallowed, immediately consult a doctor. •Wipe the battery with a dry cloth to evaporate. ÷ Precautions Operational temperature recommendations This camera's operational temperature is placed in a very damp room, moisture may occur. •Note that the lithium...
... location, or is between 32°F to +104°F (0°C to +40°C). Should the battery be swallowed, immediately consult a doctor. •Wipe the battery with a dry cloth to evaporate. ÷ Precautions Operational temperature recommendations This camera's operational temperature is placed in a very damp room, moisture may occur. •Note that the lithium...
Operating Instructions
Page 41
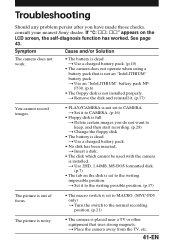
... (p.28) n Change the floppy disk. • The battery is dead. n Use a charged battery pack. (p.10) • The camera does not operate when using a battery pack that uses strong magnets. n Use 2HD, 1.44MB,... an "InfoLITHIUM" battery pack. See page 43. n Use a charged battery pack. • No disk has been inserted. n Set it to the normal recording position. (p.21) • The camera is placed near ... focus. n Use an "InfoLITHIUM" battery pack NP- The picture is noisy. • The macro switch is set to MACRO. (MVC-FD5 only) n Turn the switch to CAMERA. (p.16) • Floppy disk ...
... (p.28) n Change the floppy disk. • The battery is dead. n Use a charged battery pack. (p.10) • The camera does not operate when using a battery pack that uses strong magnets. n Use 2HD, 1.44MB,... an "InfoLITHIUM" battery pack. See page 43. n Use a charged battery pack. • No disk has been inserted. n Set it to the normal recording position. (p.21) • The camera is placed near ... focus. n Use an "InfoLITHIUM" battery pack NP- The picture is noisy. • The macro switch is set to MACRO. (MVC-FD5 only) n Turn the switch to CAMERA. (p.16) • Floppy disk ...
Operating Instructions
Page 42
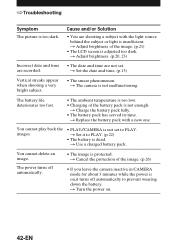
...PLAY. n Set it turns off automatically. • The image is too dark. n Use a charged battery pack. n Cancel the protection of the image. (p.26) • If you leave the camera inactive in CAMERA mode for about 3 minutes while the power is not set . Cause and/or Solution • You... are shooting a subject with a new one. n Replace the battery pack with the light source behind the subject or light is adjusted too dark. n The camera is not enough. The battery life deteriorates too fast. • The ambient temperature is too low. • Charging of...
...PLAY. n Set it turns off automatically. • The image is too dark. n Use a charged battery pack. n Cancel the protection of the image. (p.26) • If you leave the camera inactive in CAMERA mode for about 3 minutes while the power is not set . Cause and/or Solution • You... are shooting a subject with a new one. n Replace the battery pack with the light source behind the subject or light is adjusted too dark. n The camera is not enough. The battery life deteriorates too fast. • The ambient temperature is too low. • Charging of...
Operating Instructions
Page 44
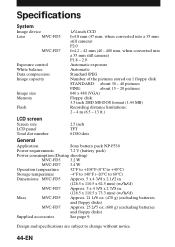
...Lens MVC-FD5 MVC-FD7 Exposure control White balance Data compression Image capacity Image size Memory Flash 1/4-inch CCD f=4.8 mm (47 mm, when converted into a 35 mm still camera) F2.0 f=4.2 - 42 mm (40 - 400 mm, when converted into a 35 mm still camera)... 13 ft.) LCD screen Screen size LCD panel Total dot number 2.5 inch TFT 61380 dots General Application Sony battery pack NP-F530 Power requirements 7.2 V (battery pack) Power consumption (During shooting) MVC-FD5 3.2 W MVC-FD7 3.4 W Operation temperature 32°F to +104°F (0°C to +40°C) Storage ...
...Lens MVC-FD5 MVC-FD7 Exposure control White balance Data compression Image capacity Image size Memory Flash 1/4-inch CCD f=4.8 mm (47 mm, when converted into a 35 mm still camera) F2.0 f=4.2 - 42 mm (40 - 400 mm, when converted into a 35 mm still camera)... 13 ft.) LCD screen Screen size LCD panel Total dot number 2.5 inch TFT 61380 dots General Application Sony battery pack NP-F530 Power requirements 7.2 V (battery pack) Power consumption (During shooting) MVC-FD5 3.2 W MVC-FD7 3.4 W Operation temperature 32°F to +104°F (0°C to +40°C) Storage ...
Operating Instructions
Page 45
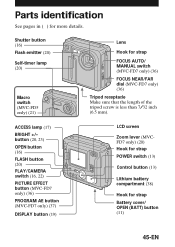
... emitter (20) Self-timer lamp (20) Macro switch (MVC-FD5 only) (21) Lens Hook for more details. button (20, 23) OPEN button (16) FLASH button (20) PLAY/CAMERA switch (16, 22) PICTURE EFFECT button (MVC-FD7 only) (36) PROGRAM AE button (MVC-FD7 only) (37) DISPLAY button (19) LCD screen ...Zoom lever (MVCFD7 only) (20) Hook for strap POWER switch (13) Control button (13) Lithium battery compartment (38) Hook for strap Battery cover/ OPEN (BATT...
... emitter (20) Self-timer lamp (20) Macro switch (MVC-FD5 only) (21) Lens Hook for more details. button (20, 23) OPEN button (16) FLASH button (20) PLAY/CAMERA switch (16, 22) PICTURE EFFECT button (MVC-FD7 only) (36) PROGRAM AE button (MVC-FD7 only) (37) DISPLAY button (19) LCD screen ...Zoom lever (MVCFD7 only) (20) Hook for strap POWER switch (13) Control button (13) Lithium battery compartment (38) Hook for strap Battery cover/ OPEN (BATT...

Operating Instructions
Page 46
... Attach the supplied shoulder strap to the writing impossible position. No image has been recorded on the LCD screen. Trouble has occurred during playback. The battery is with the disk. No disk has been inserted. Message DRIVE ERROR NO DISK DISK ERROR DISK PROTECT DISK FULL NO FILE FILE ERROR FILE...
... Attach the supplied shoulder strap to the writing impossible position. No image has been recorded on the LCD screen. Trouble has occurred during playback. The battery is with the disk. No disk has been inserted. Message DRIVE ERROR NO DISK DISK ERROR DISK PROTECT DISK FULL NO FILE FILE ERROR FILE...

Operating Instructions
Page 47
... Format Disk 34 Full charge 10 I Image quality 34 INDEX screen 24 Indicators on the LCD screen 19, 23 InfoLITHIUM battery pack ..... 6 J, L JPEG 6, 32 Lithium battery 38 M Manual focusing 36 Menu 34 Moisture condensation .......... 40 N, P Normal charge 10 Picture effect 36 Playing back 22 ...PROGRAM AE 37 Protect 25 R Recording 16 Recording in macro 21 Remaining battery indicator . 12 S, T Self-diagnosis display 43 Self timer 20 Setting the date and time ....... 13 Troubleshooting 41 U, V Using flash 20...
... Format Disk 34 Full charge 10 I Image quality 34 INDEX screen 24 Indicators on the LCD screen 19, 23 InfoLITHIUM battery pack ..... 6 J, L JPEG 6, 32 Lithium battery 38 M Manual focusing 36 Menu 34 Moisture condensation .......... 40 N, P Normal charge 10 Picture effect 36 Playing back 22 ...PROGRAM AE 37 Protect 25 R Recording 16 Recording in macro 21 Remaining battery indicator . 12 S, T Self-diagnosis display 43 Self timer 20 Setting the date and time ....... 13 Troubleshooting 41 U, V Using flash 20...


