
Operating Instructions
Page 5
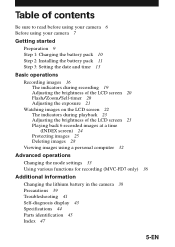
... 2: Installing the battery pack 11 Step 3: Setting the date and time 13 Basic operations Recording images 16 The indicators during recording 19 Adjusting the brightness of the LCD screen 20 Flash/Zoom/Self-timer 20 Adjusting the exposure 21 Watching images on the LCD screen 22 The indicators during playback 23 Adjusting the brightness of the LCD screen 23 Playing back 6 recorded images at a time (INDEX screen) 24 Protecting images 25 Deleting images 28 Viewing images using a personal computer 32 Advanced operations Changing the mode settings 33 Using various functions for recording (MVC-FD7...
... 2: Installing the battery pack 11 Step 3: Setting the date and time 13 Basic operations Recording images 16 The indicators during recording 19 Adjusting the brightness of the LCD screen 20 Flash/Zoom/Self-timer 20 Adjusting the exposure 21 Watching images on the LCD screen 22 The indicators during playback 23 Adjusting the brightness of the LCD screen 23 Playing back 6 recorded images at a time (INDEX screen) 24 Protecting images 25 Deleting images 28 Viewing images using a personal computer 32 Advanced operations Changing the mode settings 33 Using various functions for recording (MVC-FD7...

Operating Instructions
Page 6
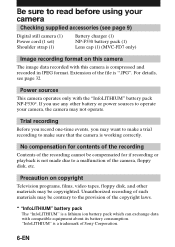
..., video tapes, floppy disk, and other battery or power sources to operate your camera Checking supplied accessories (see page 32. For details, see page 9) Digital still camera (1) Power cord (1 set) Shoulder strap (1) Battery charger (1) NP-F530 battery pack (1) Lens cap (1) (MVC-FD7 only) Image recording format on this camera is ".JPG". Be sure to read before using your camera, the camera may not operate. Extension of Sony Corporation. 6-EN Trial recording Before you record one-time events, you use any...
..., video tapes, floppy disk, and other battery or power sources to operate your camera Checking supplied accessories (see page 32. For details, see page 9) Digital still camera (1) Power cord (1 set) Shoulder strap (1) Battery charger (1) NP-F530 battery pack (1) Lens cap (1) (MVC-FD7 only) Image recording format on this camera is ".JPG". Be sure to read before using your camera, the camera may not operate. Extension of Sony Corporation. 6-EN Trial recording Before you record one-time events, you use any...
Operating Instructions
Page 8
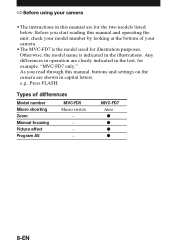
... this manual and operating the unit, check your camera. •The MVC-FD7 is indicated in the text, for example, "MVC-FD7 only." MVC-FD7 Auto r r r r 8-EN Any differences in operation are for illustration purposes. e.g., Press FLASH. Before you read through this manual are clearly indicated in the illustrations. Types of your model number by looking at the bottom of differences Model number Macro shooting Zoom Manual focusing Picture effect Program AE MVC-FD5 Macro switch...
... this manual and operating the unit, check your camera. •The MVC-FD7 is indicated in the text, for example, "MVC-FD7 only." MVC-FD7 Auto r r r r 8-EN Any differences in operation are for illustration purposes. e.g., Press FLASH. Before you read through this manual are clearly indicated in the illustrations. Types of your model number by looking at the bottom of differences Model number Macro shooting Zoom Manual focusing Picture effect Program AE MVC-FD5 Macro switch...

Operating Instructions
Page 9
... time are necessary for MS-DOS format recording. Install a fully charged battery pack. 3 Set the date and time. (p. 13) The date and time data are recorded. The CLOCK SET screen appears whenever you need Digital Still Camera Battery pack (NP-F530) Battery charger (BC-V615) (MVC-FD7) Floppy disk (not supplied) 3.5 inch, 2HD (1.44 MB) Power cord Shoulder strap Lens cap (MVC-FD7 only) Preparation outlines The clock is not set at the factory. Preparation What you turn on the camera in CAMERA mode...
... time are necessary for MS-DOS format recording. Install a fully charged battery pack. 3 Set the date and time. (p. 13) The date and time data are recorded. The CLOCK SET screen appears whenever you need Digital Still Camera Battery pack (NP-F530) Battery charger (BC-V615) (MVC-FD7) Floppy disk (not supplied) 3.5 inch, 2HD (1.44 MB) Power cord Shoulder strap Lens cap (MVC-FD7 only) Preparation outlines The clock is not set at the factory. Preparation What you turn on the camera in CAMERA mode...

Operating Instructions
Page 16
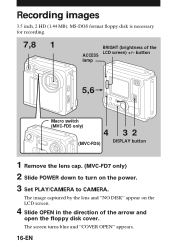
The screen turns blue and "COVER OPEN" appears. 16-EN Recording images 3.5 inch, 2 HD (1.44 MB), MS-DOS format floppy disk is necessary for recording. 7,8 1 BRIGHT (brightness of the arrow and open the floppy disk cover. The image captured by the lens and "NO DISK" appear on the power. 3 Set PLAY/CAMERA to turn on the LCD screen. 4 Slide OPEN in the direction of the ACCESS LCD screen) +/- button lamp 5,6 Macro switch (MVC-FD5 only) 4 32 (MVC-FD5) DISPLAY button 1 Remove the lens cap. (MVC-FD7 only) 2 Slide POWER down to CAMERA.
The screen turns blue and "COVER OPEN" appears. 16-EN Recording images 3.5 inch, 2 HD (1.44 MB), MS-DOS format floppy disk is necessary for recording. 7,8 1 BRIGHT (brightness of the arrow and open the floppy disk cover. The image captured by the lens and "NO DISK" appear on the power. 3 Set PLAY/CAMERA to turn on the LCD screen. 4 Slide OPEN in the direction of the ACCESS LCD screen) +/- button lamp 5,6 Macro switch (MVC-FD5 only) 4 32 (MVC-FD5) DISPLAY button 1 Remove the lens cap. (MVC-FD7 only) 2 Slide POWER down to CAMERA.

Operating Instructions
Page 19
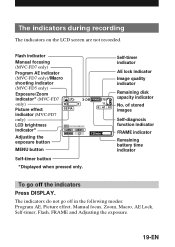
...disk capacity indicator No. The indicators during recording The indicators on the LCD screen are not recorded. of stored images 120min Self-diagnosis function indicator FRAME indicator Remaining battery time indicator To go off the indicators Press DISPLAY. Flash indicator Manual focusing (MVC-FD7 only) Program AE indicator (MVC-FD7 only)/Macro shooting indicator (MVC-FD5 only) Exposure/Zoom indicator* (MVC-FD7 only) Picture effect indicator (MVC-FD7 only) LCD brightness indicator* Adjusting the exposure button f W T SEPIA -EV +EV MENU MENU button Self-timer button *Displayed...
...disk capacity indicator No. The indicators during recording The indicators on the LCD screen are not recorded. of stored images 120min Self-diagnosis function indicator FRAME indicator Remaining battery time indicator To go off the indicators Press DISPLAY. Flash indicator Manual focusing (MVC-FD7 only) Program AE indicator (MVC-FD7 only)/Macro shooting indicator (MVC-FD5 only) Exposure/Zoom indicator* (MVC-FD7 only) Picture effect indicator (MVC-FD7 only) LCD brightness indicator* Adjusting the exposure button f W T SEPIA -EV +EV MENU MENU button Self-timer button *Displayed...

Operating Instructions
Page 28
The menu appears on the LCD screen To cancel protection of the image in INDEX screen mode Follow the procedures of the image disappears. Deleting images You can delete images you want to keep any longer. The "H" indicator at the upper left side of "Protecting selected images". To cancel protecting image Select "CANCEL" with the control button, then press it . 28-EN In SINGLE screen mode 1 Display the image you have finished the cancelling...
The menu appears on the LCD screen To cancel protection of the image in INDEX screen mode Follow the procedures of the image disappears. Deleting images You can delete images you want to keep any longer. The "H" indicator at the upper left side of "Protecting selected images". To cancel protecting image Select "CANCEL" with the control button, then press it . 28-EN In SINGLE screen mode 1 Display the image you have finished the cancelling...

Operating Instructions
Page 33
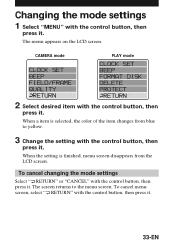
..., menu screen disappears from blue to the menu screen. When the setting is selected, the color of the item changes from the LCD screen. Changing the mode settings 1 Select "MENU" with the control button, then press it . To cancel changing the mode settings Select " RETURN" or "CANCEL" with the control button, then press it . 33-EN CAMERA mode CLOCK SET BEEP FIELD/FRAME QUALITY RETURN PLAY mode CLOCK SET BEEP FORMAT DISK DELETE PROTECT RETURN 2 Select desired item with the control button...
..., menu screen disappears from blue to the menu screen. When the setting is selected, the color of the item changes from the LCD screen. Changing the mode settings 1 Select "MENU" with the control button, then press it . To cancel changing the mode settings Select " RETURN" or "CANCEL" with the control button, then press it . 33-EN CAMERA mode CLOCK SET BEEP FIELD/FRAME QUALITY RETURN PLAY mode CLOCK SET BEEP FORMAT DISK DELETE PROTECT RETURN 2 Select desired item with the control button...

Operating Instructions
Page 41
... macro switch is set to the writing possible position. (p.17) The picture is out of focus. Symptom Cause and/or Solution The camera does not work. • The battery is installed. n Remove the disk and reinstall it to the writing impossible position. n Use a charged battery pack. • No disk has been inserted. F530. (p.6) • The floppy disk is not installed properly. If "C appears on the disk is set to MACRO. (MVC-FD5 only) n Turn the switch to CAMERA. Troubleshooting...
... macro switch is set to the writing possible position. (p.17) The picture is out of focus. Symptom Cause and/or Solution The camera does not work. • The battery is installed. n Remove the disk and reinstall it to the writing impossible position. n Use a charged battery pack. • No disk has been inserted. F530. (p.6) • The floppy disk is not installed properly. If "C appears on the disk is set to MACRO. (MVC-FD5 only) n Turn the switch to CAMERA. Troubleshooting...
Operating Instructions
Page 42
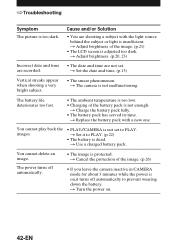
...) • The LCD screen is not set . n Set it turns off automatically. • The image is dead. You cannot delete an image. n Cancel the protection of the image. (p.26) • If you leave the camera inactive in CAMERA mode for about 3 minutes while the power is on . 42-EN n Charge the battery pack fully. • The battery pack has served its time. n Replace the battery pack with the light source behind...
...) • The LCD screen is not set . n Set it turns off automatically. • The image is dead. You cannot delete an image. n Cancel the protection of the image. (p.26) • If you leave the camera inactive in CAMERA mode for about 3 minutes while the power is on . 42-EN n Charge the battery pack fully. • The battery pack has served its time. n Replace the battery pack with the light source behind...

Operating Instructions
Page 47
... 39 Control button 13 Delete 21 F Floppy disk 7 Format Disk 34 Full charge 10 I Image quality 34 INDEX screen 24 Indicators on the LCD screen 19, 23 InfoLITHIUM battery pack ..... 6 J, L JPEG 6, 32 Lithium battery 38 M Manual focusing 36 Menu 34 Moisture condensation .......... 40 N, P Normal charge 10 Picture effect 36 Playing back 22 PROGRAM AE 37 Protect 25 R Recording 16 Recording in macro 21 Remaining battery indicator . 12 S, T Self-diagnosis display 43 Self timer 20 Setting the date and time ....... 13 Troubleshooting 41 U, V Using flash 20 Viewing images using...
... 39 Control button 13 Delete 21 F Floppy disk 7 Format Disk 34 Full charge 10 I Image quality 34 INDEX screen 24 Indicators on the LCD screen 19, 23 InfoLITHIUM battery pack ..... 6 J, L JPEG 6, 32 Lithium battery 38 M Manual focusing 36 Menu 34 Moisture condensation .......... 40 N, P Normal charge 10 Picture effect 36 Playing back 22 PROGRAM AE 37 Protect 25 R Recording 16 Recording in macro 21 Remaining battery indicator . 12 S, T Self-diagnosis display 43 Self timer 20 Setting the date and time ....... 13 Troubleshooting 41 U, V Using flash 20 Viewing images using...
Operating Instructions (English, Español, Français)
Page 5
... 2: Installing the battery pack 11 Step 3: Setting the date and time 13 Basic operations Recording images 16 The indicators during recording 19 Adjusting the brightness of the LCD screen 20 Flash/Zoom/Self-timer 20 Adjusting the exposure 21 Watching images on the LCD screen 22 The indicators during playback 23 Adjusting the brightness of the LCD screen 23 Playing back 6 recorded images at a time (INDEX screen) 24 Protecting images 25 Deleting images 28 Viewing images using a personal computer 32 Advanced operations Changing the mode settings 33 Using various functions for recording (MVC-FD7...
... 2: Installing the battery pack 11 Step 3: Setting the date and time 13 Basic operations Recording images 16 The indicators during recording 19 Adjusting the brightness of the LCD screen 20 Flash/Zoom/Self-timer 20 Adjusting the exposure 21 Watching images on the LCD screen 22 The indicators during playback 23 Adjusting the brightness of the LCD screen 23 Playing back 6 recorded images at a time (INDEX screen) 24 Protecting images 25 Deleting images 28 Viewing images using a personal computer 32 Advanced operations Changing the mode settings 33 Using various functions for recording (MVC-FD7...
Operating Instructions (English, Español, Français)
Page 6
... for contents of the recording Contents of the camera, floppy disk, etc. Power sources This camera operates only with this camera The image data recorded with the "InfoLITHIUM" battery pack NP-F530*. For details, see page 9) Digital still camera (1) Power cord (1 set) Shoulder strap (1) Battery charger (1) NP-F530 battery pack (1) Lens cap (1) (MVC-FD7 only) Image recording format on copyright Television programs, films, video tapes, floppy disk, and other battery or power sources to operate your camera Checking supplied accessories (see...
... for contents of the recording Contents of the camera, floppy disk, etc. Power sources This camera operates only with this camera The image data recorded with the "InfoLITHIUM" battery pack NP-F530*. For details, see page 9) Digital still camera (1) Power cord (1 set) Shoulder strap (1) Battery charger (1) NP-F530 battery pack (1) Lens cap (1) (MVC-FD7 only) Image recording format on copyright Television programs, films, video tapes, floppy disk, and other battery or power sources to operate your camera Checking supplied accessories (see...

Operating Instructions (English, Español, Français)
Page 8
... differences Model number Macro shooting Zoom Manual focusing Picture effect Program AE MVC-FD5 Macro switch - - - - Any differences in operation are for the two models listed below. Types of your camera. •The MVC-FD7 is indicated in the illustrations. Before you read through this manual, buttons and settings on the camera are shown in capital letters. e.g., Press FLASH. Otherwise, the model name is the model used for illustration purposes. ÷ Before using your camera •The instructions...
... differences Model number Macro shooting Zoom Manual focusing Picture effect Program AE MVC-FD5 Macro switch - - - - Any differences in operation are for the two models listed below. Types of your camera. •The MVC-FD7 is indicated in the illustrations. Before you read through this manual, buttons and settings on the camera are shown in capital letters. e.g., Press FLASH. Otherwise, the model name is the model used for illustration purposes. ÷ Before using your camera •The instructions...
Operating Instructions (English, Español, Français)
Page 16
The screen turns blue and "COVER OPEN" appears. 16-EN button lamp 5,6 Macro switch (MVC-FD5 only) 4 32 (MVC-FD5) DISPLAY button 1 Remove the lens cap. (MVC-FD7 only) 2 Slide POWER down to turn on the LCD screen. 4 Slide OPEN in the direction of the ACCESS LCD screen) +/- The image captured by the lens and "NO DISK" appear on the power. 3 Set PLAY/CAMERA to CAMERA. Recording images 3.5 inch, 2 HD (1.44 MB), MS-DOS format floppy disk is necessary for recording. 7,8 1 BRIGHT (brightness of the arrow and open the floppy disk cover.
The screen turns blue and "COVER OPEN" appears. 16-EN button lamp 5,6 Macro switch (MVC-FD5 only) 4 32 (MVC-FD5) DISPLAY button 1 Remove the lens cap. (MVC-FD7 only) 2 Slide POWER down to turn on the LCD screen. 4 Slide OPEN in the direction of the ACCESS LCD screen) +/- The image captured by the lens and "NO DISK" appear on the power. 3 Set PLAY/CAMERA to CAMERA. Recording images 3.5 inch, 2 HD (1.44 MB), MS-DOS format floppy disk is necessary for recording. 7,8 1 BRIGHT (brightness of the arrow and open the floppy disk cover.
Operating Instructions (English, Español, Français)
Page 19
... 120min Self-diagnosis function indicator FRAME indicator Remaining battery time indicator To go off the indicators Press DISPLAY. Self-timer indicator AE lock indicator Image quality indicator FRAME STD 11 E : 61 : 01 Remaining disk capacity indicator No. Flash indicator Manual focusing (MVC-FD7 only) Program AE indicator (MVC-FD7 only)/Macro shooting indicator (MVC-FD5 only) Exposure/Zoom indicator* (MVC-FD7 only) Picture effect indicator (MVC-FD7 only) LCD brightness indicator* Adjusting the exposure button f W T SEPIA -EV +EV MENU MENU button Self-timer button *Displayed...
... 120min Self-diagnosis function indicator FRAME indicator Remaining battery time indicator To go off the indicators Press DISPLAY. Self-timer indicator AE lock indicator Image quality indicator FRAME STD 11 E : 61 : 01 Remaining disk capacity indicator No. Flash indicator Manual focusing (MVC-FD7 only) Program AE indicator (MVC-FD7 only)/Macro shooting indicator (MVC-FD5 only) Exposure/Zoom indicator* (MVC-FD7 only) Picture effect indicator (MVC-FD7 only) LCD brightness indicator* Adjusting the exposure button f W T SEPIA -EV +EV MENU MENU button Self-timer button *Displayed...
Operating Instructions (English, Español, Français)
Page 33
... menu screen, select " RETURN" with the control button, then press it . When the setting is selected, the color of the item changes from the LCD screen. CAMERA mode CLOCK SET BEEP FIELD/FRAME QUALITY RETURN PLAY mode CLOCK SET BEEP FORMAT DISK DELETE PROTECT RETURN 2 Select desired item with the control button, then press it . 33-EN Changing the mode settings 1 Select "MENU" with the control button, then press it . The menu appears on the LCD screen. To cancel changing the mode settings...
... menu screen, select " RETURN" with the control button, then press it . When the setting is selected, the color of the item changes from the LCD screen. CAMERA mode CLOCK SET BEEP FIELD/FRAME QUALITY RETURN PLAY mode CLOCK SET BEEP FORMAT DISK DELETE PROTECT RETURN 2 Select desired item with the control button, then press it . 33-EN Changing the mode settings 1 Select "MENU" with the control button, then press it . The menu appears on the LCD screen. To cancel changing the mode settings...

Operating Instructions (English, Español, Français)
Page 41
... Solution The camera does not work. • The battery is set to the writing impossible position. n Use an "InfoLITHIUM" battery pack NP- n Use a charged battery pack. • No disk has been inserted. If "C appears on the disk is dead. Troubleshooting Should any problem persist after you do not want to keep, and then start recording. (p.28) n Change the floppy disk. • The battery is installed. The picture is noisy. • The macro switch is set...
... Solution The camera does not work. • The battery is set to the writing impossible position. n Use an "InfoLITHIUM" battery pack NP- n Use a charged battery pack. • No disk has been inserted. If "C appears on the disk is dead. Troubleshooting Should any problem persist after you do not want to keep, and then start recording. (p.28) n Change the floppy disk. • The battery is installed. The picture is noisy. • The macro switch is set...

Operating Instructions (English, Español, Français)
Page 42
... protected. n Adjust brightness of the image. (p.26) • If you leave the camera inactive in CAMERA mode for about 3 minutes while the power is dead. n The camera is adjusted too dark. n Charge the battery pack fully. • The battery pack has served its time. n Use a charged battery pack. n Cancel the protection of the image. (p.21) • The LCD screen is not malfunctioning. You cannot delete an image. The power turns off automatically to PLAY. n Turn the power...
... protected. n Adjust brightness of the image. (p.26) • If you leave the camera inactive in CAMERA mode for about 3 minutes while the power is dead. n The camera is adjusted too dark. n Charge the battery pack fully. • The battery pack has served its time. n Use a charged battery pack. n Cancel the protection of the image. (p.21) • The LCD screen is not malfunctioning. You cannot delete an image. The power turns off automatically to PLAY. n Turn the power...
Operating Instructions (English, Español, Français)
Page 47
... 39 Control button 13 Delete 21 F Floppy disk 7 Format Disk 34 Full charge 10 I Image quality 34 INDEX screen 24 Indicators on the LCD screen 19, 23 InfoLITHIUM battery pack ..... 6 J, L JPEG 6, 32 Lithium battery 38 M Manual focusing 36 Menu 34 Moisture condensation .......... 40 N, P Normal charge 10 Picture effect 36 Playing back 22 PROGRAM AE 37 Protect 25 R Recording 16 Recording in macro 21 Remaining battery indicator . 12 S, T Self-diagnosis display 43 Self timer 20 Setting the date and time ....... 13 Troubleshooting 41 U, V Using flash 20 Viewing images using...
... 39 Control button 13 Delete 21 F Floppy disk 7 Format Disk 34 Full charge 10 I Image quality 34 INDEX screen 24 Indicators on the LCD screen 19, 23 InfoLITHIUM battery pack ..... 6 J, L JPEG 6, 32 Lithium battery 38 M Manual focusing 36 Menu 34 Moisture condensation .......... 40 N, P Normal charge 10 Picture effect 36 Playing back 22 PROGRAM AE 37 Protect 25 R Recording 16 Recording in macro 21 Remaining battery indicator . 12 S, T Self-diagnosis display 43 Self timer 20 Setting the date and time ....... 13 Troubleshooting 41 U, V Using flash 20 Viewing images using...

