
Operating Instructions
Page 6
Recording is complete Record Finalize [About 1 min] (page 32) About 13 MB disc space is used View on the camera (page 28) View on a computer (page 35) View through a CD-ROM drive, CD-R drive, CD-RW drive, or the USB cable and view and modify ... equipment [ ] : Required time Initialize (page 18) Disc preparation for viewing through a CD-ROM drive (page 37) Disc preparation for recording is complete. When using application software. Blank disc Format [About 7 min] (page 82) The disc space is fully available. 6 View through a CD-R/CD-RW drive (page 41) View through a CD-ROM...
Recording is complete Record Finalize [About 1 min] (page 32) About 13 MB disc space is used View on the camera (page 28) View on a computer (page 35) View through a CD-ROM drive, CD-R drive, CD-RW drive, or the USB cable and view and modify ... equipment [ ] : Required time Initialize (page 18) Disc preparation for viewing through a CD-ROM drive (page 37) Disc preparation for recording is complete. When using application software. Blank disc Format [About 7 min] (page 82) The disc space is fully available. 6 View through a CD-R/CD-RW drive (page 41) View through a CD-ROM...
Operating Instructions
Page 35
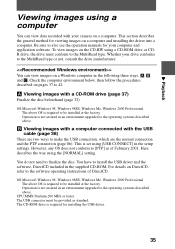
...and the PTP connection (page 86). For details on a Windows computer in the following three ways, A, B, and C. Whether your computer and application software. B Viewing images with a computer connected with the USB cable (page 38) There are two ways to finalize the disc. You have to install ... drive must be installed at the factory. However, any OS does not conform to be installed at the factory. A Viewing images with your camera on the CD-RW using [USB CONNECT] in an environment upgraded to 42. B Playback Viewing images using the [NORMAL] setting. This section...
...and the PTP connection (page 86). For details on a Windows computer in the following three ways, A, B, and C. Whether your computer and application software. B Viewing images with a computer connected with the USB cable (page 38) There are two ways to finalize the disc. You have to install ... drive must be installed at the factory. However, any OS does not conform to be installed at the factory. A Viewing images with your camera on the CD-RW using [USB CONNECT] in an environment upgraded to 42. B Playback Viewing images using the [NORMAL] setting. This section...
Operating Instructions
Page 36
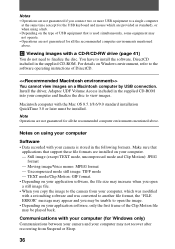
... uncompressed mode and Clip Motion): JPEG format - You have to install the software, DirectCD included in the following formats. Communications with your computer (for Windows only) Communications between your camera and your computer may not recover after recovering from your computer, which was modified... with a retouching software and was converted to another file format, the "FILE ERROR" message ...
... uncompressed mode and Clip Motion): JPEG format - You have to install the software, DirectCD included in the following formats. Communications with your computer (for Windows only) Communications between your camera and your computer may not recover after recovering from your computer, which was modified... with a retouching software and was converted to another file format, the "FILE ERROR" message ...
Operating Instructions
Page 38
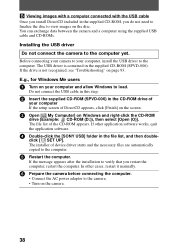
...2 Insert the supplied CD-ROM (SPVD-006) in the supplied CD-ROM (SPVD-006). In other application software works, quit the application software. 4 Double-click the [SONY USB] folder in the file list, and then double- The file list of device driver starts and the ...necessary files are automatically copied to load. click [ SET UP]. The USB driver is not recognized, see "Troubleshooting" on the disc. E.g., for Windows Me users 1 Turn on the camera...
...2 Insert the supplied CD-ROM (SPVD-006) in the supplied CD-ROM (SPVD-006). In other application software works, quit the application software. 4 Double-click the [SONY USB] folder in the file list, and then double- The file list of device driver starts and the ...necessary files are automatically copied to load. click [ SET UP]. The USB driver is not recognized, see "Troubleshooting" on the disc. E.g., for Windows Me users 1 Turn on the camera...
Operating Instructions
Page 39
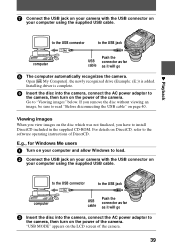
...computer automatically recognizes the camera. Open [ My Computer], the newly recognized drive (Example: (E:)) is complete. 9 Insert the disc into the camera, connect the AC power adaptor to the software operating instructions of the camera. Go to load. 2 Connect the USB jack on your camera with the USB ...connector on the LCD screen of the camera. For details on the power of DirectCD....
...computer automatically recognizes the camera. Open [ My Computer], the newly recognized drive (Example: (E:)) is complete. 9 Insert the disc into the camera, connect the AC power adaptor to the software operating instructions of the camera. Go to load. 2 Connect the USB jack on your camera with the USB ...connector on the LCD screen of the camera. For details on the power of DirectCD....

Operating Instructions
Page 40
...procedure below. 40 If you must be locked. 4 Open [ My Computer] on Windows and double-click the newly recognized drive. (Example: [ CD Mavica (E:)]) The folders inside the disc are displayed, and the disc cover of DirectCD. To view the image using this order Still image "DCIM" folder ... Tiff image (uncompressed) t Image file ∗ Copying a file to the hard disk of DirectCD. The data in "Removing the disc" of the software operating instructions of the camera will be as follows, "DSC0ssss.JPG". To remove the disc, carry out the operation for removing the disc.
...procedure below. 40 If you must be locked. 4 Open [ My Computer] on Windows and double-click the newly recognized drive. (Example: [ CD Mavica (E:)]) The folders inside the disc are displayed, and the disc cover of DirectCD. To view the image using this order Still image "DCIM" folder ... Tiff image (uncompressed) t Image file ∗ Copying a file to the hard disk of DirectCD. The data in "Removing the disc" of the software operating instructions of the camera will be as follows, "DSC0ssss.JPG". To remove the disc, carry out the operation for removing the disc.
Operating Instructions
Page 44
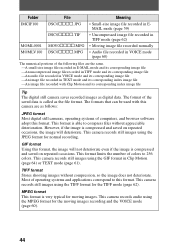
...the GIF format in TEXT mode and its corresponding index image file Tip The digital still camera saves recorded images as follows: JPEG format Most digital still cameras, operating systems of computers, and browser software adopt this format, the image will not deteriorate even if the image is compressed... The formats that can be used with Clip Motion and its corresponding index image file -An image file recorded with this camera are as digital data. Folder IMCIF100 MOML0001 MOMLV100 File DSC0ssss.JPG DSC0ssss.TIF MOV0ssss.MPG DSC0ssss.MPG Meaning • Small-size image file ...
...the GIF format in TEXT mode and its corresponding index image file Tip The digital still camera saves recorded images as follows: JPEG format Most digital still cameras, operating systems of computers, and browser software adopt this format, the image will not deteriorate even if the image is compressed... The formats that can be used with Clip Motion and its corresponding index image file -An image file recorded with this camera are as digital data. Folder IMCIF100 MOML0001 MOMLV100 File DSC0ssss.JPG DSC0ssss.TIF MOV0ssss.MPG DSC0ssss.MPG Meaning • Small-size image file ...
Operating Instructions
Page 96
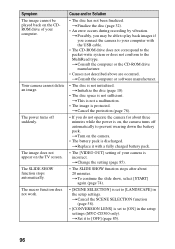
...camera... of your camera is on, the camera turns off ...suddenly. Cause and/or Solution • The disc has not been finalized. tFinalize the disc (page 32). • An error occurs during recording by vibration. tConsult the computer or software... manufacturer. • The disc is protected. tTo continue the slide show, select [START] again (page 74). • [SCENE SELECTION] is set to play back images if you do not operate the camera... for about 20 minutes. tInitialize the disc (page 18). • The disc space is discharged. tTurn on the camera...
...camera... of your camera is on, the camera turns off ...suddenly. Cause and/or Solution • The disc has not been finalized. tFinalize the disc (page 32). • An error occurs during recording by vibration. tConsult the computer or software... manufacturer. • The disc is protected. tTo continue the slide show, select [START] again (page 74). • [SCENE SELECTION] is set to play back images if you do not operate the camera... for about 20 minutes. tInitialize the disc (page 18). • The disc space is discharged. tTurn on the camera...


