
Operating Instructions
Page 4
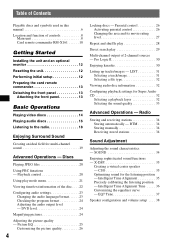
... Alignment 35 Precisely calibrating the listening position - Playback control 20 Using play 29 Multi-channel output of controls 8 Main unit 8 Card remote commander RM-X161 10 Getting Started Installing the unit and an optional monitor 12 Resetting the unit 12 Performing initial setup 12 Preparing the...13 Basic Operations Playing video discs 14 Playing audio discs 16 Listening to the radio 18 Enjoying Surround Sound Creating an ideal field for multi-channel sound 19 Advanced Operations - DVD level 24 Magnifying pictures 24 Adjusting the picture quality - BTM 34 Storing ...
... Alignment 35 Precisely calibrating the listening position - Playback control 20 Using play 29 Multi-channel output of controls 8 Main unit 8 Card remote commander RM-X161 10 Getting Started Installing the unit and an optional monitor 12 Resetting the unit 12 Performing initial setup 12 Preparing the...13 Basic Operations Playing video discs 14 Playing audio discs 16 Listening to the radio 18 Enjoying Surround Sound Creating an ideal field for multi-channel sound 19 Advanced Operations - DVD level 24 Magnifying pictures 24 Adjusting the picture quality - BTM 34 Storing ...
Operating Instructions
Page 8
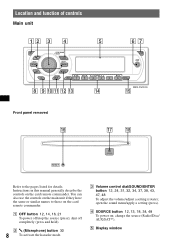
..., 18, 34, 48 To power on the card remote commander. change the source (Radio/Disc/ AUX/SAT*1). C Volume control dial/SOUND/ENTER button 12, 24, 31, 32, 34, 37, 38, 43, 47, 48 To adjust the volume/adjust a setting (rotate); qa qs qd qf MEX-DV2000 qg Front panel removed qh qj qk RESET...
..., 18, 34, 48 To power on the card remote commander. change the source (Radio/Disc/ AUX/SAT*1). C Volume control dial/SOUND/ENTER button 12, 24, 31, 32, 34, 37, 38, 43, 47, 48 To adjust the volume/adjust a setting (rotate); qa qs qd qf MEX-DV2000 qg Front panel removed qh qj qk RESET...
Operating Instructions
Page 9
...forward disc (press and hold ). K SYSTEM SETUP button 24, 33, 34, 37, 38, 43, 47, 48 To open the system setup menu. select the unit*4. Radio: To receive stored stations (press); store stations (press and hold momentarily); P RESET button 12 Q Z (eject) button 15, 16 To eject the disc. G OPEN ...button 13, 14, 15, 16 H LIST button 31, 32 To list up.*2 I Receptor for the card remote commander J SEEK -/+ buttons 15, 17, 18, 20 Disc: To skip a chapter/track/scene (press); find a station manually (press and hold ).*5 (6): u (play/pause) 14, 15...
...forward disc (press and hold ). K SYSTEM SETUP button 24, 33, 34, 37, 38, 43, 47, 48 To open the system setup menu. select the unit*4. Radio: To receive stored stations (press); store stations (press and hold momentarily); P RESET button 12 Q Z (eject) button 15, 16 To eject the disc. G OPEN ...button 13, 14, 15, 16 H LIST button 31, 32 To list up.*2 I Receptor for the card remote commander J SEEK -/+ buttons 15, 17, 18, 20 Disc: To skip a chapter/track/scene (press); find a station manually (press and hold ).*5 (6): u (play/pause) 14, 15...

Operating Instructions
Page 10
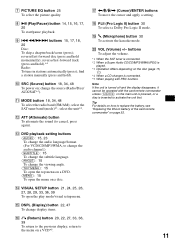
A OFF button 12, 14, 16, 21 To power off completely (press and hold ). 10 C CLEAR button 27, 29 To delete an entered number. Radio: To receive stored stations (press); D SYSTEM SETUP button 24, 33, 34, 37, 38, 43, 47, 48 To open the sound menu. E LIST/CAT*1 button 31, ... the source (press); store stations (press and hold ). B Number buttons 14, 15, 20, 21, 22, 27, 29, 34 Disc: To locate a title/chapter/track. Card remote commander RM-X161 1 2 3 4 5 6 7 8 9 0 qa OFF ATT AUDIO 123 SUBTITLE 456 ANGLE 789 CLEAR TOP MENU MENU 0 SYSTEM SETUP VISUAL SETUP LIST/CAT SOUND ENTER DSPL...
A OFF button 12, 14, 16, 21 To power off completely (press and hold ). 10 C CLEAR button 27, 29 To delete an entered number. Radio: To receive stored stations (press); D SYSTEM SETUP button 24, 33, 34, 37, 38, 43, 47, 48 To open the sound menu. E LIST/CAT*1 button 31, ... the source (press); store stations (press and hold ). B Number buttons 14, 15, 20, 21, 22, 27, 29, 34 Disc: To locate a title/chapter/track. Card remote commander RM-X161 1 2 3 4 5 6 7 8 9 0 qa OFF ATT AUDIO 123 SUBTITLE 456 ANGLE 789 CLEAR TOP MENU MENU 0 SYSTEM SETUP VISUAL SETUP LIST/CAT SOUND ENTER DSPL...
Operating Instructions
Page 11
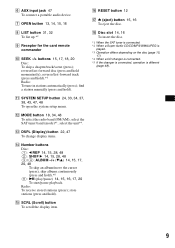
...EQ button 25 To select the picture quality. K MODE button 18, 34, 48 To select the radio band (FM/AM); H u (Play/Pause) button 14, 15, 16, 17, 20 To...To return to cancel, press again). Q reverse/fast-forward track (press and hold ). find a station manually (press and hold ).*3 Radio: To tune in stations automatically (press); N VISUAL SETUP button 21, 24, 25, 26, 27, 28, 29, 33, 36...change the viewing angle. (TOP MENU): 15 To open the top menu on a DVD. (MENU): 15 To open the play mode/visual setup menu. M DVD playback setting buttons (AUDIO): 15, 23 To change the source...
...EQ button 25 To select the picture quality. K MODE button 18, 34, 48 To select the radio band (FM/AM); H u (Play/Pause) button 14, 15, 16, 17, 20 To...To return to cancel, press again). Q reverse/fast-forward track (press and hold ). find a station manually (press and hold ).*3 Radio: To tune in stations automatically (press); N VISUAL SETUP button 21, 24, 25, 26, 27, 28, 29, 33, 36...change the viewing angle. (TOP MENU): 15 To open the top menu on a DVD. (MENU): 15 To open the play mode/visual setup menu. M DVD playback setting buttons (AUDIO): 15, 23 To change the source...

Operating Instructions
Page 13
... the front panel to the right, then gently pull out the left end of this unit to operate the unit. Preparing the card remote commander Before using the card remote commander for a few seconds. The front panel is complete. For details on setting the speaker connection status, see "Optimizing sound for the... car or on the unit, then lightly push the left , or select "FRONT R" if front right. Intelligent Time Alignment" on page 38. With the card remote commander Press M/m instead of rotating the volume control dial, press (ENTER) instead of pressing the volume control dial.
... the front panel to the right, then gently pull out the left end of this unit to operate the unit. Preparing the card remote commander Before using the card remote commander for a few seconds. The front panel is complete. For details on setting the speaker connection status, see "Optimizing sound for the... car or on the unit, then lightly push the left , or select "FRONT R" if front right. Intelligent Time Alignment" on page 38. With the card remote commander Press M/m instead of rotating the volume control dial, press (ENTER) instead of pressing the volume control dial.

Operating Instructions
Page 14
Basic Operations Playing video discs Depending on the main unit. 3 Insert the disc (label side up). Refer to this unit. 2 Press (OPEN) on the disc, some operations may be different or restricted. OFF Z OPEN OFF Number buttons b/B/V/v u u ZXZ 1 Turn on your monitor, then select the input source on your monitor corresponding to the operating instructions supplied with your disc.
Basic Operations Playing video discs Depending on the main unit. 3 Insert the disc (label side up). Refer to this unit. 2 Press (OPEN) on the disc, some operations may be different or restricted. OFF Z OPEN OFF Number buttons b/B/V/v u u ZXZ 1 Turn on your monitor, then select the input source on your monitor corresponding to the operating instructions supplied with your disc.

Operating Instructions
Page 15
These sections are called "titles." Other playback operations .m/M> b/B/V/v u Number buttons To Press pause/resume play a DVD that allow you to confirm Remote: For DVDs that contains several sections, which make up a picture or music feature. and then repeatedly to switch the speed (× ...2 t × 12 t × 120 t × 2...) cancel reverse/fast-forward u show the DVD menu*1 Remote: (TOP MENU) or (MENU) select items in the DVD menu*1 Main unit: (1)(b)/(2)(B)/(3)(V)/(4)(v) to move the cursor, then press (6) (u) to select items such as subtitle/sound language(s),...
These sections are called "titles." Other playback operations .m/M> b/B/V/v u Number buttons To Press pause/resume play a DVD that allow you to confirm Remote: For DVDs that contains several sections, which make up a picture or music feature. and then repeatedly to switch the speed (× ...2 t × 12 t × 120 t × 2...) cancel reverse/fast-forward u show the DVD menu*1 Remote: (TOP MENU) or (MENU) select items in the DVD menu*1 Main unit: (1)(b)/(2)(B)/(3)(V)/(4)(v) to move the cursor, then press (6) (u) to select items such as subtitle/sound language(s),...

Operating Instructions
Page 17
Other playback operations .m/M> ALBUM u ZXZ u To pause/resume play after pause skip a track reverse/fast-forward track skip an album* skip albums continuously* * When an MP3/WMA is played. Press u .m ( (,) and hold .m/M> Main unit: (3) (ALBUM -)/(4) (ALBUM +) Remote: M/m Main unit: and hold (3) (ALBUM -)/(4) (ALBUM +) Remote: and hold M/m 17
Other playback operations .m/M> ALBUM u ZXZ u To pause/resume play after pause skip a track reverse/fast-forward track skip an album* skip albums continuously* * When an MP3/WMA is played. Press u .m ( (,) and hold .m/M> Main unit: (3) (ALBUM -)/(4) (ALBUM +) Remote: M/m Main unit: and hold (3) (ALBUM -)/(4) (ALBUM +) Remote: and hold M/m 17

Operating Instructions
Page 18
... locate the approximate frequency, then press (SEEK) -/+ repeatedly to fine adjust to the radio SOURCE SEEK MODE ZXZ SRC .m/M> MODE 1 Press (SOURCE) repeatedly until "TUNER" appears. 2 Press (MODE) repeatedly until the desired station is received. With the card remote commander Use (SRC) instead of (SOURCE), and .m/M> instead of (SEEK) -/+. 18 Scanning stops...
... locate the approximate frequency, then press (SEEK) -/+ repeatedly to fine adjust to the radio SOURCE SEEK MODE ZXZ SRC .m/M> MODE 1 Press (SOURCE) repeatedly until "TUNER" appears. 2 Press (MODE) repeatedly until the desired station is received. With the card remote commander Use (SRC) instead of (SOURCE), and .m/M> instead of (SEEK) -/+. 18 Scanning stops...

Operating Instructions
Page 20
...) to 33 * Including JPEG operations. Playing JPEG files .m/M> ALBUM u Other playback operations To Press rotate the image skip an image Remote: skip an album Remote: M/m Main unit: (3) (ALBUM -)/ (4) (ALBUM +) skip albums continuously Remote: and hold M/m Main unit: and hold (3) (ALBUM -)/ (4) (ALBUM +) Notes • If a large-sized image is played. 1 Start playing a PBC compatible...
...) to 33 * Including JPEG operations. Playing JPEG files .m/M> ALBUM u Other playback operations To Press rotate the image skip an image Remote: skip an album Remote: M/m Main unit: (3) (ALBUM -)/ (4) (ALBUM +) skip albums continuously Remote: and hold M/m Main unit: and hold (3) (ALBUM -)/ (4) (ALBUM +) Notes • If a large-sized image is played. 1 Start playing a PBC compatible...

Operating Instructions
Page 49
Changing the operative direction The operative direction of the controls is factoryset as .m/M> on the card remote commander or (SEEK) -/+ on how you can reverse the operative direction. 1 While pushing the VOL control, press and hold ). To increase SOUND MODE DSPL DSPL ... OFF The following controls on the rotary commander require a different operation from the unit. • PRESET/DISC control The same as (VOL) +/- on the card remote commander or the volume control dial on the main unit (rotate). • SEEK/AMS control The same as shown below. Rotary commander RM-X4S Attaching...
Changing the operative direction The operative direction of the controls is factoryset as .m/M> on the card remote commander or (SEEK) -/+ on how you can reverse the operative direction. 1 While pushing the VOL control, press and hold ). To increase SOUND MODE DSPL DSPL ... OFF The following controls on the rotary commander require a different operation from the unit. • PRESET/DISC control The same as (VOL) +/- on the card remote commander or the volume control dial on the main unit (rotate). • SEEK/AMS control The same as shown below. Rotary commander RM-X4S Attaching...

Operating Instructions
Page 52
...• Keep the lithium battery out of the reach of children. Maintenance Replacing the lithium battery of the card remote commander Under normal conditions, the battery will last approximately 1 year. (The service life may be an internal malfunction...to assure a good contact. • Be sure to use .) When the battery becomes weak, the range of the card remote commander becomes shorter. In such a case, consult your fingers or with metallic tweezers, otherwise a short-circuit may explode if ... the front panel (page 13) and clean the connectors with your nearest Sony dealer.
...• Keep the lithium battery out of the reach of children. Maintenance Replacing the lithium battery of the card remote commander Under normal conditions, the battery will last approximately 1 year. (The service life may be an internal malfunction...to assure a good contact. • Be sure to use .) When the battery becomes weak, the range of the card remote commander becomes shorter. In such a case, consult your fingers or with metallic tweezers, otherwise a short-circuit may explode if ... the front panel (page 13) and clean the connectors with your nearest Sony dealer.

Operating Instructions
Page 53
... 23.2 watts per channel minimum continuous average power into 4 Ohms) System Laser: Semiconductor laser Signal format system: NTSC DVD/CD Player section Signal-to-noise ratio: 120 dB Frequency response: 10 - 20,000 Hz Wow and flutter: Below measurable limit... Mounting dimensions: Approx. 182 × 53 × 181 mm (7 1/4 × 2 1/8 × 7 1/4 in) (w/h/d) Mass: Approx. 1.4 kg (3 lb 2 oz) Supplied accessories: Card remote commander: RM-X161 Parts for installation and connections (1 set) continue to next page t 53 CEA2006 Standard Power Output: 17 Watts RMS × 4 at 4 Ohms < 1% THD...
... 23.2 watts per channel minimum continuous average power into 4 Ohms) System Laser: Semiconductor laser Signal format system: NTSC DVD/CD Player section Signal-to-noise ratio: 120 dB Frequency response: 10 - 20,000 Hz Wow and flutter: Below measurable limit... Mounting dimensions: Approx. 182 × 53 × 181 mm (7 1/4 × 2 1/8 × 7 1/4 in) (w/h/d) Mass: Approx. 1.4 kg (3 lb 2 oz) Supplied accessories: Card remote commander: RM-X161 Parts for installation and connections (1 set) continue to next page t 53 CEA2006 Standard Power Output: 17 Watts RMS × 4 at 4 Ohms < 1% THD...
Operating Instructions
Page 55
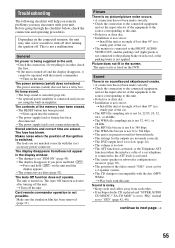
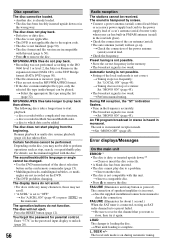
...• The settings for the outputs are not matched correctly with this unit. • Defective or dirty disc. • Installation is turned on the DVD. continue to next page t 55 Depending on the unit. No beep sound. • The beep sound is canceled (page 44). • An optional... power amplifier is not possible. Card remote commander operation is connected and you are erased. Troubleshooting The following checklist will help you remedy problems you may take a few seconds to turn off...
...• The settings for the outputs are not matched correctly with this unit. • Defective or dirty disc. • Installation is turned on the DVD. continue to next page t 55 Depending on the unit. No beep sound. • The beep sound is canceled (page 44). • An optional... power amplifier is not possible. Card remote commander operation is connected and you are erased. Troubleshooting The following checklist will help you remedy problems you may take a few seconds to turn off...
Operating Instructions
Page 56
.... t Wait until any button is pressed.) The connection of the direct selection button on the card remote commander (page 15). • Multilingual tracks, multilingual subtitles, or multi- SEEK +/- t Select the...play back. • Defective or dirty disc. • The disc is not applicable. • The DVD is not applicable due to the region code. • The disc is hampered by noises. •...shuffle play back. • Recording was not performed according to unlock (page 26). 56 Radio reception The stations cannot be received. For details, see the manual supplied with a complicated ...
.... t Wait until any button is pressed.) The connection of the direct selection button on the card remote commander (page 15). • Multilingual tracks, multilingual subtitles, or multi- SEEK +/- t Select the...play back. • Defective or dirty disc. • The disc is not applicable. • The DVD is not applicable due to the region code. • The disc is hampered by noises. •...shuffle play back. • Recording was not performed according to unlock (page 26). 56 Radio reception The stations cannot be received. For details, see the manual supplied with a complicated ...
