

Operating Instructions
Page 2
... receiving antenna. - The unit will increase eye hazard. After resetting the unit, if you park the car and set time after you fail to set the initial speaker setup correctly due to radio or television reception, which the receiver is turned off . Karaoke function blocked. Do not operate the unit or watch the monitor while driving. Warning To prevent fire or shock hazard, do not attempt to disassemble the cabinet. CAUTION...
... receiving antenna. - The unit will increase eye hazard. After resetting the unit, if you park the car and set time after you fail to set the initial speaker setup correctly due to radio or television reception, which the receiver is turned off . Karaoke function blocked. Do not operate the unit or watch the monitor while driving. Warning To prevent fire or shock hazard, do not attempt to disassemble the cabinet. CAUTION...
Operating Instructions
Page 3
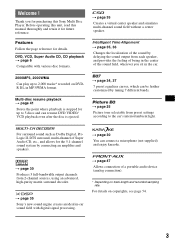
.../WMA format. DVD, VCD, Super Audio CD, CD playback t page 6 Compatible with digital signal processing. Before operating this unit, read this manual thoroughly and retain it for purchasing this Sony Multi Disc Player. Welcome ! Thank you sit in -car sound field with various disc formats. t page 25 Picture tone selectable from preset settings according to 2,000 tracks* recorded on DVDR DL in the center of a portable audio device (analog connection). * Depending...
.../WMA format. DVD, VCD, Super Audio CD, CD playback t page 6 Compatible with digital signal processing. Before operating this unit, read this manual thoroughly and retain it for purchasing this Sony Multi Disc Player. Welcome ! Thank you sit in -car sound field with various disc formats. t page 25 Picture tone selectable from preset settings according to 2,000 tracks* recorded on DVDR DL in the center of a portable audio device (analog connection). * Depending...
Operating Instructions
Page 4
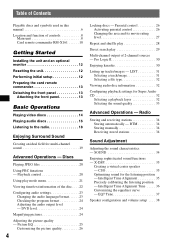
... play mode menu 21 Viewing time/text information of the disc . . . . 22 Configuring audio settings 23 Changing the audio language/format. . . . . . 23 Checking the program format 24 Adjusting the audio output level - SOUND 34 Enjoying sophisticated sound functions - DVD level 24 Magnifying pictures 24 Adjusting the picture quality - X-DSP 35 Creating a virtual center speaker - Table of Contents Playable discs and symbols used in this manual 6 Location and function of 2-channel sources - BTM 34 Storing manually 34 Receiving stored stations 34 Sound Adjustment Adjusting...
... play mode menu 21 Viewing time/text information of the disc . . . . 22 Configuring audio settings 23 Changing the audio language/format. . . . . . 23 Checking the program format 24 Adjusting the audio output level - SOUND 34 Enjoying sophisticated sound functions - DVD level 24 Magnifying pictures 24 Adjusting the picture quality - X-DSP 35 Creating a virtual center speaker - Table of Contents Playable discs and symbols used in this manual 6 Location and function of 2-channel sources - BTM 34 Storing manually 34 Receiving stored stations 34 Sound Adjustment Adjusting...

Operating Instructions
Page 7
... stored. Region code 7 Available functions differ depending on the format, regardless of functions available for that format. The region code is transparent) • CD-ROM containing files other than MP3/WMA/JPEG • DVD-RAM • DVD-Audio • Active-Audio (Data) • SVCD (Super Video CD) • CDV • Discs created in Packet Write format Note Even compatible discs may be played on this unit. • 8 cm (3 1/4 in) discs •...
... stored. Region code 7 Available functions differ depending on the format, regardless of functions available for that format. The region code is transparent) • CD-ROM containing files other than MP3/WMA/JPEG • DVD-RAM • DVD-Audio • Active-Audio (Data) • SVCD (Super Video CD) • CDV • Discs created in Packet Write format Note Even compatible discs may be played on this unit. • 8 cm (3 1/4 in) discs •...
Operating Instructions
Page 8
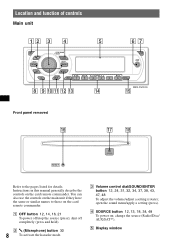
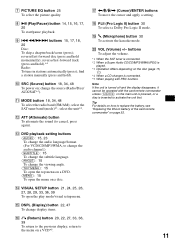
... source (press); E Display window open the sound menu/apply a setting (press). change the source (Radio/Disc/ AUX/SAT*1). Instructions in this manual generally describe the controls on ; D SOURCE button 12, 13, 18, 34, 48 To power on the card remote commander. Location and function of controls Main unit 12 3 4 5 67 OFF SEEK PUSH SOUND/ ENTER SOURCE SEEK OPEN AUX LIST MODE SYSTEM REP SHUF ALBUM SETUP DSPL 1 2 3 4 5 6 SCRL 8 9 q; qa qs qd qf MEX-DV2000 qg Front panel removed qh qj qk RESET...
... source (press); E Display window open the sound menu/apply a setting (press). change the source (Radio/Disc/ AUX/SAT*1). Instructions in this manual generally describe the controls on ; D SOURCE button 12, 13, 18, 34, 48 To power on the card remote commander. Location and function of controls Main unit 12 3 4 5 67 OFF SEEK PUSH SOUND/ ENTER SOURCE SEEK OPEN AUX LIST MODE SYSTEM REP SHUF ALBUM SETUP DSPL 1 2 3 4 5 6 SCRL 8 9 q; qa qs qd qf MEX-DV2000 qg Front panel removed qh qj qk RESET...
Operating Instructions
Page 11
... select the picture quality. I .m/M> buttons 15, 17, 18, 20 Disc: To skip a chapter/track/scene (press); J SRC (Source) button 18, 34, 48 To power on a VCD*5. select the SAT tuner band (mode)*1; K MODE button 18, 34, 48 To select the radio band (FM/AM); M DVD playback setting buttons (AUDIO): 15, 23 To change the viewing angle. (TOP MENU): 15 To open the top menu on a DVD. (MENU): 15 To open the play mode/visual setup menu. Q reverse/fast...
... select the picture quality. I .m/M> buttons 15, 17, 18, 20 Disc: To skip a chapter/track/scene (press); J SRC (Source) button 18, 34, 48 To power on a VCD*5. select the SAT tuner band (mode)*1; K MODE button 18, 34, 48 To select the radio band (FM/AM); M DVD playback setting buttons (AUDIO): 15, 23 To change the viewing angle. (TOP MENU): 15 To open the top menu on a DVD. (MENU): 15 To open the play mode/visual setup menu. Q reverse/fast...
Operating Instructions
Page 12
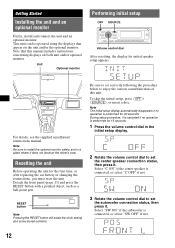
... operated using the displays that this unit. Select "SW ON" if the subwoofer is connected, or select "C OFF" if not. 3 Rotate the volume control dial to set the center speaker connection status, then press it is canceled if no operation is performed for 30 seconds. Unit Optional monitor Performing initial setup OFF SOURCE Volume control dial After resetting, the display for the first time, or after replacing the car battery or changing the connections, you must reset...
... operated using the displays that this unit. Select "SW ON" if the subwoofer is connected, or select "C OFF" if not. 3 Rotate the volume control dial to set the center speaker connection status, then press it is canceled if no operation is performed for 30 seconds. Unit Optional monitor Performing initial setup OFF SOURCE Volume control dial After resetting, the display for the first time, or after replacing the car battery or changing the connections, you must reset...

Operating Instructions
Page 18
... frequency. Scanning stops when the unit receives a station. To tune manually Press and hold (SEEK) -/+ to locate the approximate frequency, then press (SEEK) -/+ repeatedly to fine adjust to the radio SOURCE SEEK MODE ZXZ SRC .m/M> MODE 1 Press (SOURCE) repeatedly until "TUNER" appears. 2 Press (MODE) repeatedly until the desired station is received. Radio" on other radio functions, see "Advanced Operations - To tune automatically Press (SEEK) -/+. A B A Radio band/Function B Frequency 3 Perform tuning. Tip For...
... frequency. Scanning stops when the unit receives a station. To tune manually Press and hold (SEEK) -/+ to locate the approximate frequency, then press (SEEK) -/+ repeatedly to fine adjust to the radio SOURCE SEEK MODE ZXZ SRC .m/M> MODE 1 Press (SOURCE) repeatedly until "TUNER" appears. 2 Press (MODE) repeatedly until the desired station is received. Radio" on other radio functions, see "Advanced Operations - To tune automatically Press (SEEK) -/+. A B A Radio band/Function B Frequency 3 Perform tuning. Tip For...

Operating Instructions
Page 24
... adjust audio output level according to the recorded format. Example: Dolby Digital 5.1 ch Rear component × 2 DOLBY DIGITAL 3 / 2 . 1 Front component × 2 + LFE component × 1 Center component × 1 To hide the play mode menu appears. 2 Press M/m to "ADJST ON," then press (ENTER). 4 Press The default level is set to select The program format appears. (AUDIO). The play mode menu, press (VISUAL SETUP). To reduce the volume level differences between disc and source...
... adjust audio output level according to the recorded format. Example: Dolby Digital 5.1 ch Rear component × 2 DOLBY DIGITAL 3 / 2 . 1 Front component × 2 + LFE component × 1 Center component × 1 To hide the play mode menu appears. 2 Press M/m to "ADJST ON," then press (ENTER). 4 Press The default level is set to select The program format appears. (AUDIO). The play mode menu, press (VISUAL SETUP). To reduce the volume level differences between disc and source...
Operating Instructions
Page 26
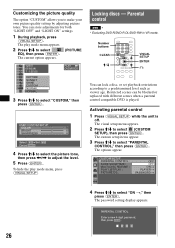
USER CUSTOM SETUP COLOR 0 BRIGHT 0 SHARPNESS 0 Select : Set : Cancel RETURN 4 Press M/m to select "CUSTOM," then press (ENTER). The current option appears. (PICTURE 12(67) 018(034) T 1:35:55 DAYTIME SUNSET SHINE CUSTOM NORMAL NORMAL PLAY DVDVIDEO 3 Press M/m to select the picture tone, then press The play mode menu appears. 2 Press M/m to make your own picture quality setting by adjusting picture tones. You can store adjustments for both "LIGHT OFF" and "LIGHT ON" settings. 1 During playback, press...
USER CUSTOM SETUP COLOR 0 BRIGHT 0 SHARPNESS 0 Select : Set : Cancel RETURN 4 Press M/m to select "CUSTOM," then press (ENTER). The current option appears. (PICTURE 12(67) 018(034) T 1:35:55 DAYTIME SUNSET SHINE CUSTOM NORMAL NORMAL PLAY DVDVIDEO 3 Press M/m to select the picture tone, then press The play mode menu appears. 2 Press M/m to make your own picture quality setting by adjusting picture tones. You can store adjustments for both "LIGHT OFF" and "LIGHT ON" settings. 1 During playback, press...

Operating Instructions
Page 34
Radio Storing and receiving stations Number buttons SYSTEM SETUP M/m ZXZ SRC ENTER MODE Sound Adjustment Adjusting the sound characteristics - SOUND SOUND ZXZ Advanced Operations -
Radio Storing and receiving stations Number buttons SYSTEM SETUP M/m ZXZ SRC ENTER MODE Sound Adjustment Adjusting the sound characteristics - SOUND SOUND ZXZ Advanced Operations -

Operating Instructions
Page 36
... connected, ignore its setting. 36 The visual setup menu appears. 2 Press M/m to select "POSITION SELECT," then press (ENTER). The setting is off. By the visual setup menu 1 From the visual setup menu, select (AUDIO SETUP) c "POSITION SELECT" c "CUSTOM," then press (ENTER). By the visual setup menu 1 Press (VISUAL SETUP) while the unit is configurable both from each speaker so that the sound delay reaches the listener more correctly. AUDIO SETUP SUPER AUDIO...
... connected, ignore its setting. 36 The visual setup menu appears. 2 Press M/m to select "POSITION SELECT," then press (ENTER). The setting is off. By the visual setup menu 1 From the visual setup menu, select (AUDIO SETUP) c "POSITION SELECT" c "CUSTOM," then press (ENTER). By the visual setup menu 1 Press (VISUAL SETUP) while the unit is configurable both from each speaker so that the sound delay reaches the listener more correctly. AUDIO SETUP SUPER AUDIO...
Operating Instructions
Page 41
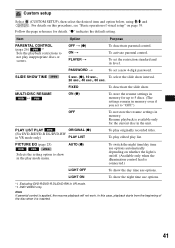
...) AUTO (z) Selects the setting option to not play mode menu. "z" indicates the default setting. SLIDE SHOW TIME 5 sec. (z), 10 sec., To select the slide show in memory. To switch the night time/day time use options automatically depending on whether the light is on page 39. OFF t (z) ON t PLAYER t To deactivate parental control. FIXED To deactivate the slide show the night time use options. PLAY LIST PLAY ORIGINAL (z) (For DVD-R/DVD-R DL/DVD...
...) AUTO (z) Selects the setting option to not play mode menu. "z" indicates the default setting. SLIDE SHOW TIME 5 sec. (z), 10 sec., To select the slide show in memory. To switch the night time/day time use options automatically depending on whether the light is on page 39. OFF t (z) ON t PLAYER t To deactivate parental control. FIXED To deactivate the slide show the night time use options. PLAY LIST PLAY ORIGINAL (z) (For DVD-R/DVD-R DL/DVD...
Operating Instructions
Page 44
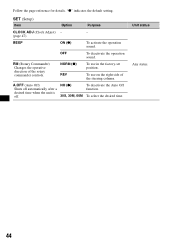
... function. NORM (z) REV To use on the right side of the rotary commander controls. "z" indicates the default setting. OFF To deactivate the operation sound. To select the desired time. A.OFF (Auto Off) Shuts off automatically after a desired time when the unit is off. Unit status Any status. 44 To use in the factory-set position. SET (Setup) Item Option Purpose CLOCK ADJ (Clock Adjust) - - (page 47) BEEP ON (z) To activate...
... function. NORM (z) REV To use on the right side of the rotary commander controls. "z" indicates the default setting. OFF To deactivate the operation sound. To select the desired time. A.OFF (Auto Off) Shuts off automatically after a desired time when the unit is off. Unit status Any status. 44 To use in the factory-set position. SET (Setup) Item Option Purpose CLOCK ADJ (Clock Adjust) - - (page 47) BEEP ON (z) To activate...
Operating Instructions
Page 47
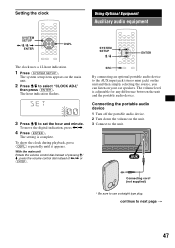
Setting the clock Using Optional Equipment Auxiliary audio equipment SYSTEM SETUP
Setting the clock Using Optional Equipment Auxiliary audio equipment SYSTEM SETUP

Operating Instructions
Page 53
... Maximum power output: 52 W × 4 (at 4 ohms) General Outputs: Video output terminals (front/rear) Audio output terminals (front/rear) Center output terminal Subwoofer output terminal Power antenna (aerial) relay control terminal Power amplifier control terminal Inputs: Telephone ATT control terminal Illumination control terminal BUS audio input terminals BUS control input terminal Remote controller input terminal Antenna (aerial) input terminal Parking break control terminal Microphone input terminal AUX input jack (stereo mini jack) Power requirements: 12 V DC car battery (negative ground...
... Maximum power output: 52 W × 4 (at 4 ohms) General Outputs: Video output terminals (front/rear) Audio output terminals (front/rear) Center output terminal Subwoofer output terminal Power antenna (aerial) relay control terminal Power amplifier control terminal Inputs: Telephone ATT control terminal Illumination control terminal BUS audio input terminals BUS control input terminal Remote controller input terminal Antenna (aerial) input terminal Parking break control terminal Microphone input terminal AUX input jack (stereo mini jack) Power requirements: 12 V DC car battery (negative ground...
Operating Instructions
Page 54
... wiring boards. • Halogenated flame retardants are trademarks of Microsoft Corporation in cabinets. • Cushions made from Fraunhofer IIS and Thomson. Optional accessories/equipment: Mobile monitor: XVM-B62 Rotary commander: RM-X4S BUS cable (supplied with an RCA pin cord): RC-61 (1 m), RC-62 (2 m) CD changer (10 discs): CDX-757MX CD changer (6 discs): CDX-T69 Source selector: XA-C40 AUX...
... wiring boards. • Halogenated flame retardants are trademarks of Microsoft Corporation in cabinets. • Cushions made from Fraunhofer IIS and Thomson. Optional accessories/equipment: Mobile monitor: XVM-B62 Rotary commander: RM-X4S BUS cable (supplied with an RCA pin cord): RC-61 (1 m), RC-62 (2 m) CD changer (10 discs): CDX-757MX CD changer (6 discs): CDX-T69 Source selector: XA-C40 AUX...
Operating Instructions
Page 55
... mode. • The settings for the outputs are erased. Stored stations and correct time are not made correctly. • Check the connection to the parking brake switch cord, or the parking brake is not a malfunction. The leads are not using the built-in a sturdy part of the memory have a relay box. t Turn off . t Turn on the unit. Sound is noisy. • Keep cords and cables away from /does not appear in the screen. Makes...
... mode. • The settings for the outputs are erased. Stored stations and correct time are not made correctly. • Check the connection to the parking brake switch cord, or the parking brake is not a malfunction. The leads are not using the built-in a sturdy part of the memory have a relay box. t Turn off . t Turn on the unit. Sound is noisy. • Keep cords and cables away from /does not appear in the screen. Makes...
Operating Instructions
Page 56
... disc is too weak. Disc operation The disc cannot be changed. • Use the DVD menu instead of the direct selection button on the card remote commander (page 15). • Multilingual tracks, multilingual subtitles, or multi- t Select the appropriate file type using the list (page 32). t See the supplied installation/connections manual to perform operations such as stop at a station: Set "MONO ON" (page 45). • The broadcast signal...
... disc is too weak. Disc operation The disc cannot be changed. • Use the DVD menu instead of the direct selection button on the card remote commander (page 15). • Multilingual tracks, multilingual subtitles, or multi- t Select the appropriate file type using the list (page 32). t See the supplied installation/connections manual to perform operations such as stop at a station: Set "MONO ON" (page 45). • The broadcast signal...
Operating Instructions
Page 57
... was used at the time the problem began. NO MUSIC The disc is not finalized. NOT READ The disc information has not been read the data due to some problem. On the monitor Playback prohibited by the unit. Cannot play this disc. • The disc is incompatible with the unit. *1 If an error occurs during playback, the disc number does not appear in the display. *2 The disc number of the disc and...
... was used at the time the problem began. NO MUSIC The disc is not finalized. NOT READ The disc information has not been read the data due to some problem. On the monitor Playback prohibited by the unit. Cannot play this disc. • The disc is incompatible with the unit. *1 If an error occurs during playback, the disc number does not appear in the display. *2 The disc number of the disc and...


