
Limited Warranty
Page 1
.... In addition, if you . PARTS: In addition, Sony will repair or replace the Product with the Sony Partnership within the Warranty period. When returning Product, to any authorized Sony service facility, Product freight needs to you may not apply to be presented to service the Product. This warranty does not cover customer instruction, installation, set up adjustments or signal reception problems. This warranty does not cover cosmetic damage...
.... In addition, if you . PARTS: In addition, Sony will repair or replace the Product with the Sony Partnership within the Warranty period. When returning Product, to any authorized Sony service facility, Product freight needs to you may not apply to be presented to service the Product. This warranty does not cover customer instruction, installation, set up adjustments or signal reception problems. This warranty does not cover cosmetic damage...
Operating Instructions
Page 2
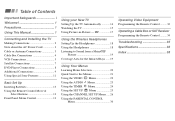
... 1 Using This Manual 1 Connecting and Installing the TV Making Connections 2 Note about the AC Power Cord 3 Cable or Antenna Connections 3 Cable Box Connections 4 VCR Connections 5 Satellite Connections 7 DVD Player Connections 8 Additional Connections 9 Using Special Sony Features 11 Basic Set Up Inserting Batteries 13 Using the Remote Control Move & Select Buttons 13 Front Panel Menu Control 13 Using your New TV Setting Up the TV Automatically 14 Watching the TV 15 Using Picture-in-Picture - PIP 17 Using the Wireless Headphones Setting Up the Headphones 18 Using the...
... 1 Using This Manual 1 Connecting and Installing the TV Making Connections 2 Note about the AC Power Cord 3 Cable or Antenna Connections 3 Cable Box Connections 4 VCR Connections 5 Satellite Connections 7 DVD Player Connections 8 Additional Connections 9 Using Special Sony Features 11 Basic Set Up Inserting Batteries 13 Using the Remote Control Move & Select Buttons 13 Front Panel Menu Control 13 Using your New TV Setting Up the TV Automatically 14 Watching the TV 15 Using Picture-in-Picture - PIP 17 Using the Wireless Headphones Setting Up the Headphones 18 Using the...
Operating Instructions
Page 3
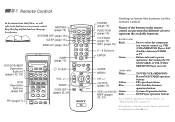
... in different colors to buttons on your remote control. Player/SAT/CABLE operation buttons Joystick (page 13) Yellow PIP operation buttons Blue SAT (Satellite Antenna) operation buttons VTR1/2/3/DVD/ Green System off GUIDE Label color MENU White TV/VTR (VCR)/MDP/DVD CH +/- TV/VIDEO (page 16) ANT (page 16) Button color Black Press to select the component you want to power operations, like turning the TV, SAT/CABLE, or VTR (VCR)/ MDP/DVD Player on or off operation button MDP (pages Pink DVD Player operation buttons 32...
... in different colors to buttons on your remote control. Player/SAT/CABLE operation buttons Joystick (page 13) Yellow PIP operation buttons Blue SAT (Satellite Antenna) operation buttons VTR1/2/3/DVD/ Green System off GUIDE Label color MENU White TV/VTR (VCR)/MDP/DVD CH +/- TV/VIDEO (page 16) ANT (page 16) Button color Black Press to select the component you want to power operations, like turning the TV, SAT/CABLE, or VTR (VCR)/ MDP/DVD Player on or off operation button MDP (pages Pink DVD Player operation buttons 32...
Operating Instructions
Page 4
... installation. Owners Record The model and serial numbers are designed to operate this manual could void your TV, keep the brightness and contrast functions at the rear of television closed captioning in accordance with radio communications. This symbol is no guarantee that any changes or modifications not expressly approved in this equipment. These limits are located at low settings. Note on Caption Vision This television receiver provides display...
... installation. Owners Record The model and serial numbers are designed to operate this manual could void your TV, keep the brightness and contrast functions at the rear of television closed captioning in accordance with radio communications. This symbol is no guarantee that any changes or modifications not expressly approved in this equipment. These limits are located at low settings. Note on Caption Vision This television receiver provides display...
Operating Instructions
Page 5
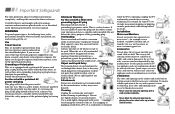
... manual for the specific model of TV. Important Safeguards For your protection, please read these slots and openings must never be observed in the installation, use power-line operated sets near a swimming pool, etc. If you are not sure of the type of electrical power supplied to your home, consult your electrician to insert the plug fully into a grounding-type power outlet. This is operating...
... manual for the specific model of TV. Important Safeguards For your protection, please read these slots and openings must never be observed in the installation, use power-line operated sets near a swimming pool, etc. If you are not sure of the type of electrical power supplied to your home, consult your electrician to insert the plug fully into a grounding-type power outlet. This is operating...
Operating Instructions
Page 6
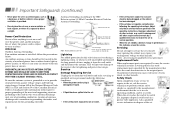
... an antenna discharge unit, size of grounding conductors, location of time, unplug it from the wall outlet and refer servicing to qualified service personnel under the following the operating instructions. Adjust only those controls that have the same characteristics as the original parts. this television receiver during a lightning storm, or when it is installed, follow the precautions below. Refer all servicing to so certify. Antennas Outdoor Antenna Grounding...
... an antenna discharge unit, size of grounding conductors, location of time, unplug it from the wall outlet and refer servicing to qualified service personnel under the following the operating instructions. Adjust only those controls that have the same characteristics as the original parts. this television receiver during a lightning storm, or when it is installed, follow the precautions below. Refer all servicing to so certify. Antennas Outdoor Antenna Grounding...
Operating Instructions
Page 7
... to use your remote control. 4 Using your Menus This section teaches you how to access on-screen menus and adjust your TV's settings. 5 Troubleshooting This section helps you to insert the plug fully into five major sections. The features you will enjoy include: • A flat CRT, for optimal picture quality • Component video (Y, PB, PR) input for the highest quality DVD Player connection • Three A/V inputs, for models KV-32XBR250 and KV-36XBR250. If...
... to use your remote control. 4 Using your Menus This section teaches you how to access on-screen menus and adjust your TV's settings. 5 Troubleshooting This section helps you to insert the plug fully into five major sections. The features you will enjoy include: • A flat CRT, for optimal picture quality • Component video (Y, PB, PR) input for the highest quality DVD Player connection • Three A/V inputs, for models KV-32XBR250 and KV-36XBR250. If...

Operating Instructions
Page 10
... CHANNEL FIX feature, (see page 34). • When using PIP, you can be controlling all channels. Tip z Pressing ANT switches between these inputs. 4 If you will be programmed to operate your TV. If you are connecting a cable box through the AUX input and would like to switch between scrambled channels (through your remote control. Connecting and Installing the TV (continued) Cable Box Connections Some pay cable TV systems use scrambled or encoded signals that require a cable box to view...
... CHANNEL FIX feature, (see page 34). • When using PIP, you can be controlling all channels. Tip z Pressing ANT switches between these inputs. 4 If you will be programmed to operate your TV. If you are connecting a cable box through the AUX input and would like to switch between scrambled channels (through your remote control. Connecting and Installing the TV (continued) Cable Box Connections Some pay cable TV systems use scrambled or encoded signals that require a cable box to view...

Operating Instructions
Page 11
... provide sound, your TV. Tip z If you are connecting a monaural VCR, connect only the single white audio output to the left input on your TV. For optimum picture quality, use S VIDEO instead of TV) VIDEO IN 1 3 4 S VIDEO VIDEO L (MONO) AUDIO R Y PB PR L AUDIO R S-LINK CONTROL S OUT AUDIO-R (red) AUDIO-L (white) VIDEO (yellow) 5 VCR Connections Connecting an antenna/cable TV system with a cable box 1 Connect the coaxial cable from the wall to IN on your cable box . 2 Using a coaxial connector, connect OUT on your cable box to...
... provide sound, your TV. Tip z If you are connecting a monaural VCR, connect only the single white audio output to the left input on your TV. For optimum picture quality, use S VIDEO instead of TV) VIDEO IN 1 3 4 S VIDEO VIDEO L (MONO) AUDIO R Y PB PR L AUDIO R S-LINK CONTROL S OUT AUDIO-R (red) AUDIO-L (white) VIDEO (yellow) 5 VCR Connections Connecting an antenna/cable TV system with a cable box 1 Connect the coaxial cable from the wall to IN on your cable box . 2 Using a coaxial connector, connect OUT on your cable box to...

Operating Instructions
Page 12
...) AUDIO R AUDIO L VIDEO LINE OUT OUT IN 1 VIDEO IN 1 3 4 S VIDEO VIDEO L (MONO) AUDIO R Y OUT PB TV MONITOR AUDIO (VAR/FIX) PR VIDEO L AUDIO R L (MONO) AUDIO R S-LINK CONTROL S OUT IN 2 VCR (for recording to MONITOR AUDIO and VIDEO OUT on your TV. Connecting and Installing the TV (continued) Connecting two VCRs for tape editing MONITOR OUT gives you the ability to use a second VCR to record a program being played by pressing TV/VIDEO. (Rear of this manual. 2 Using A/V connectors, connect AUDIO...
...) AUDIO R AUDIO L VIDEO LINE OUT OUT IN 1 VIDEO IN 1 3 4 S VIDEO VIDEO L (MONO) AUDIO R Y OUT PB TV MONITOR AUDIO (VAR/FIX) PR VIDEO L AUDIO R L (MONO) AUDIO R S-LINK CONTROL S OUT IN 2 VCR (for recording to MONITOR AUDIO and VIDEO OUT on your TV. Connecting and Installing the TV (continued) Connecting two VCRs for tape editing MONITOR OUT gives you the ability to use a second VCR to record a program being played by pressing TV/VIDEO. (Rear of this manual. 2 Using A/V connectors, connect AUDIO...

Operating Instructions
Page 13
... Video connection, use it for optimum picture quality instead of TV) VIDEO IN 1 3 4 Y S VIDEO PB VIDEO L (MONO) AUDIO R PR L AUDIO R S-LINK CONTROL S OUT AUDIO-R (red) AUDIO-L (white) VIDEO (yellow) 7 S Video does not provide sound, so your audio cable must still be connected. 1 Satellite antenna cable Satellite receiver SATELLITE IN AUDIO R AUDIO L VIDEO LINE OUT 3 2 VHF/UHF IN OUT AUX TO CONVERTER VHF/UHF (Rear of TV) VIDEO IN 1 3 4 Y S VIDEO PB VIDEO L (MONO) AUDIO R PR L AUDIO R S-LINK CONTROL S OUT AUDIO-R (red) AUDIO-L (white) VIDEO (yellow) Connecting a satellite...
... Video connection, use it for optimum picture quality instead of TV) VIDEO IN 1 3 4 Y S VIDEO PB VIDEO L (MONO) AUDIO R PR L AUDIO R S-LINK CONTROL S OUT AUDIO-R (red) AUDIO-L (white) VIDEO (yellow) 7 S Video does not provide sound, so your audio cable must still be connected. 1 Satellite antenna cable Satellite receiver SATELLITE IN AUDIO R AUDIO L VIDEO LINE OUT 3 2 VHF/UHF IN OUT AUX TO CONVERTER VHF/UHF (Rear of TV) VIDEO IN 1 3 4 Y S VIDEO PB VIDEO L (MONO) AUDIO R PR L AUDIO R S-LINK CONTROL S OUT AUDIO-R (red) AUDIO-L (white) VIDEO (yellow) Connecting a satellite...

Operating Instructions
Page 14
... colors. 8 1 2 DVD Video connectors LINE OUT S VIDEO OUT COMPONENT VIDEO OUT S-LINK DIGITAL OUT R-AUDIO 1-L VIDEO Y B-Y R-Y OPTICAL COAXIAL 1 (Rear of TV) VIDEO IN 1 3 4 Y S VIDEO PB VIDEO L (MONO) AUDIO R PR L AUDIO R S-LINK CONTROL S OUT AUDIO-R (red) AUDIO-L (white) (Rear of your TV. Note Some DVD player terminals may be labeled Y, CB, and CR, or Y, B-Y, and R-Y. Connecting and Installing the TV (continued) DVD Player Connections Connecting a DVD Player 1 Using audio connectors, connect AUDIO OUT on your DVD player to AUDIO IN on your TV. 2 Using an S VIDEO cable...
... colors. 8 1 2 DVD Video connectors LINE OUT S VIDEO OUT COMPONENT VIDEO OUT S-LINK DIGITAL OUT R-AUDIO 1-L VIDEO Y B-Y R-Y OPTICAL COAXIAL 1 (Rear of TV) VIDEO IN 1 3 4 Y S VIDEO PB VIDEO L (MONO) AUDIO R PR L AUDIO R S-LINK CONTROL S OUT AUDIO-R (red) AUDIO-L (white) (Rear of your TV. Note Some DVD player terminals may be labeled Y, CB, and CR, or Y, B-Y, and R-Y. Connecting and Installing the TV (continued) DVD Player Connections Connecting a DVD Player 1 Using audio connectors, connect AUDIO OUT on your DVD player to AUDIO IN on your TV. 2 Using an S VIDEO cable...
Operating Instructions
Page 20
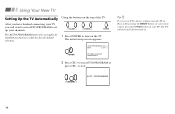
.... to factory settings, turn the TV on. AUTO PROGRAMMING 14 The TV will want to run AUTO PROGRAM or press CH - The AUTO PROGRAM feature does not apply for installations that use a cable box for all channel selection. 1 Press POWER to run AUTO PROGRAM to set up your channels. The initial setup screen appears. AUTO PROGRAM: [ CH + ] EXIT: [ CH - ] First please connect cable/antenna 2 Press CH + to turn on the TV. Then, while pressing the RESET button on your remote control...
.... to factory settings, turn the TV on. AUTO PROGRAMMING 14 The TV will want to run AUTO PROGRAM or press CH - The AUTO PROGRAM feature does not apply for installations that use a cable box for all channel selection. 1 Press POWER to run AUTO PROGRAM to set up your channels. The initial setup screen appears. AUTO PROGRAM: [ CH + ] EXIT: [ CH - ] First please connect cable/antenna 2 Press CH + to turn on the TV. Then, while pressing the RESET button on your remote control...

Operating Instructions
Page 21
... restore sound. SLEEP RESET Turns the TV off in an on programming your remote control. Watching the TV The following chart explains more advanced buttons on and off. REFER TO THE ILLUSTRATION OF THE REMOTE CONTROL ON THE INSIDE FRONT COVER OF THIS MANUAL AS YOU REVIEW THIS CHART Using the White Labeled Buttons for TV Operations POWER Press when you can press ENTER for instructions on -screen menu. 15...
... restore sound. SLEEP RESET Turns the TV off in an on programming your remote control. Watching the TV The following chart explains more advanced buttons on and off. REFER TO THE ILLUSTRATION OF THE REMOTE CONTROL ON THE INSIDE FRONT COVER OF THIS MANUAL AS YOU REVIEW THIS CHART Using the White Labeled Buttons for TV Operations POWER Press when you can press ENTER for instructions on -screen menu. 15...
Operating Instructions
Page 32
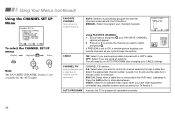
... Using the CHANNEL SET UP Menu CHANNEL SET UP FAVORITE CHANNEL CABLE: ON CHANNEL FIX: OFF AUTO PROGRAM CHANNEL SKIP/ADD CHANNEL CAPTION MENU Move Select Exit MENU To select the CHANNEL SET UP menu: Display Highlight Select MENU Note The FAVORITE CHANNEL feature is set to ON, a window picture displays your favorite channels as you cycle through a cable box. AUX 2-6: Select when a cable box is connected to run AUTO PROGRAM after changing your CABLE settings. FAVORITE CHANNEL MODE : AUTO PREVIEW : ON 1. 6 2. 5 3. 4 4. 3 5. 2 MENU Move Select Exit MENU Using FAVORITE CHANNEL...
... Using the CHANNEL SET UP Menu CHANNEL SET UP FAVORITE CHANNEL CABLE: ON CHANNEL FIX: OFF AUTO PROGRAM CHANNEL SKIP/ADD CHANNEL CAPTION MENU Move Select Exit MENU To select the CHANNEL SET UP menu: Display Highlight Select MENU Note The FAVORITE CHANNEL feature is set to ON, a window picture displays your favorite channels as you cycle through a cable box. AUX 2-6: Select when a cable box is connected to run AUTO PROGRAM after changing your CABLE settings. FAVORITE CHANNEL MODE : AUTO PREVIEW : ON 1. 6 2. 5 3. 4 4. 3 5. 2 MENU Move Select Exit MENU Using FAVORITE CHANNEL...
Operating Instructions
Page 37
... how to change your password. To reactivate your password, see page 36. 31 models only), TV-PG, PG, 8 ans+ (Canadian models only). models only), TV-14, 14+, 13 ans+ (Canadian models only). Move Select Exit MENU CUSTOM: If you forget your PARENTAL CONTROL settings, turn PARENTAL LOCK to OFF. To reset your rating settings. PARENTAL LOCK: ON RATING: CHILD CHANGE PASSWORD MENU YOUNG ADULT: TV-14, PG-13 (U.S. OFF: Turns off RATING CHANGE PASSWORD ON...
... how to change your password. To reactivate your password, see page 36. 31 models only), TV-PG, PG, 8 ans+ (Canadian models only). models only), TV-14, 14+, 13 ans+ (Canadian models only). Move Select Exit MENU CUSTOM: If you forget your PARENTAL CONTROL settings, turn PARENTAL LOCK to OFF. To reset your rating settings. PARENTAL LOCK: ON RATING: CHILD CHANGE PASSWORD MENU YOUNG ADULT: TV-14, PG-13 (U.S. OFF: Turns off RATING CHANGE PASSWORD ON...
Operating Instructions
Page 41
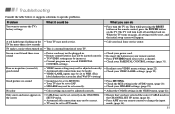
... picture (screen lit), good sound • VIDEO menu settings may not be adjusted correctly. • Readjust your VIDEO menu settings, (page 22). • Antenna/cable connections may be faulty. • Check your VIDEO LABEL settings, (page 25). • VIDEO LABEL inputs may be set to AUX mode. • Ensure that you receive a channel. • Check your power cord. • Re-insert the batteries in the VIDEO menu, (page 22). A red light keeps flashing on the TV. Troubleshooting Consult the table...
... picture (screen lit), good sound • VIDEO menu settings may not be adjusted correctly. • Readjust your VIDEO menu settings, (page 22). • Antenna/cable connections may be faulty. • Check your VIDEO LABEL settings, (page 25). • VIDEO LABEL inputs may be set to AUX mode. • Ensure that you receive a channel. • Check your power cord. • Re-insert the batteries in the VIDEO menu, (page 22). A red light keeps flashing on the TV. Troubleshooting Consult the table...
Operating Instructions
Page 42
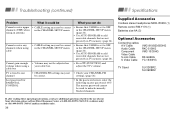
... presently in the CHANNEL SET UP menu, (page 26). • Use AUTO PROGRAM to unlock currently blocked channels. Troubleshooting (continued) Specifications Problem What it could be What you have additional questions related to the use of your Sony television, please call our Direct Response Center at 1-800-222-SONY (7669)(U.S. Supplied Accessories Cordless stereo headphones MDR-IF0230 (1) Remote control RM-Y170 (1) Batteries size AA (3) Optional Accessories Connecting cables A/V Cable Audio Cable Component Video Cable S-Link Cable S Video Cable VMC-810...
... presently in the CHANNEL SET UP menu, (page 26). • Use AUTO PROGRAM to unlock currently blocked channels. Troubleshooting (continued) Specifications Problem What it could be What you have additional questions related to the use of your Sony television, please call our Direct Response Center at 1-800-222-SONY (7669)(U.S. Supplied Accessories Cordless stereo headphones MDR-IF0230 (1) Remote control RM-Y170 (1) Batteries size AA (3) Optional Accessories Connecting cables A/V Cable Audio Cable Component Video Cable S-Link Cable S Video Cable VMC-810...
Operating Instructions
Page 43
... mVrms (fix) Impedance (Output): 2 kilohms 5) Y: 1.0 Vp-p, 75 ohms, sync negative PB: 0.7 Vp-p, 75 ohms PR: 0.7 Vp-p, 75 ohms Television system American TV standard, NTSC Channel coverage VHF: 2-13/UHF: 14 -69/CATV: 1 - 125 Picture tube FD Trinitron® tube Visible screen size 32-inch picture measured diagonally (KV-32XBR250) 36-inch picture measured diagonally (KV-36XBR250) Actual screen size 34-inch picture measured diagonally (KV-32XBR250) 38-inch picture measured diagonally (KV-36XBR250) Antenna 75 ohm external terminal...
... mVrms (fix) Impedance (Output): 2 kilohms 5) Y: 1.0 Vp-p, 75 ohms, sync negative PB: 0.7 Vp-p, 75 ohms PR: 0.7 Vp-p, 75 ohms Television system American TV standard, NTSC Channel coverage VHF: 2-13/UHF: 14 -69/CATV: 1 - 125 Picture tube FD Trinitron® tube Visible screen size 32-inch picture measured diagonally (KV-32XBR250) 36-inch picture measured diagonally (KV-36XBR250) Actual screen size 34-inch picture measured diagonally (KV-32XBR250) 38-inch picture measured diagonally (KV-36XBR250) Antenna 75 ohm external terminal...

Operating Instructions
Page 45
... 23 Safety 1 Select buttons 13 Adjustment bars 13 SET UP menu 25 AUTO PROGRAM 26 CABLE 26 CHANNEL CAPTION 27 CHANNEL FIX 26 CHANNEL SKIP/ADD 27 DEMO 25 FAVORITE CHANNEL 26 LANGUAGE 25 PARENTAL CONTROL 25 TILT CORRECTION 25 VIDEO LABEL 25 Setting up TV 14 SHARPNESS 22 SLEEP button 15 SPEAKER ON 23 OFF 23 Specifications 36, 37 SWAP button 17 SYSTEM OFF button 16 T, U TILT CORRECTION 25 TIMER menu operations CURRENT TIME SET 24 DAYLIGHT SAVING 24...
... 23 Safety 1 Select buttons 13 Adjustment bars 13 SET UP menu 25 AUTO PROGRAM 26 CABLE 26 CHANNEL CAPTION 27 CHANNEL FIX 26 CHANNEL SKIP/ADD 27 DEMO 25 FAVORITE CHANNEL 26 LANGUAGE 25 PARENTAL CONTROL 25 TILT CORRECTION 25 VIDEO LABEL 25 Setting up TV 14 SHARPNESS 22 SLEEP button 15 SPEAKER ON 23 OFF 23 Specifications 36, 37 SWAP button 17 SYSTEM OFF button 16 T, U TILT CORRECTION 25 TIMER menu operations CURRENT TIME SET 24 DAYLIGHT SAVING 24...


