Warranty Card
Page 1
... Product (including any accessories) against defects in exchange for defective parts for one (1) year (color picture tube - After the Warranty Period, you enter into a service contract with the Sony Partnership within the Warranty period must pay the labor charges to any conditions set up adjustments or signal reception problems. This warranty does not cover cosmetic damage or damage due to acts of...
... Product (including any accessories) against defects in exchange for defective parts for one (1) year (color picture tube - After the Warranty Period, you enter into a service contract with the Sony Partnership within the Warranty period must pay the labor charges to any conditions set up adjustments or signal reception problems. This warranty does not cover cosmetic damage or damage due to acts of...

Operating Instructions (primary manual)
Page 2
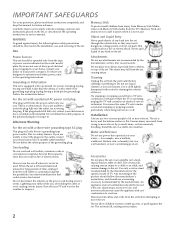
... trademarks of Sony Corporation. Wega, FD Trinitron, Steady Sound, Digital Reality Creation, Caption Vision, CineMotion, Memory Stick, and Twin View are trademarks of electric shock to the rear of station logos onto the TV screen. Continuously watching the same program can be permanently imprinted onto the screen. Never use of the FCC rules. This equipment generates, uses, and can be determined by turning the equipment...
... trademarks of Sony Corporation. Wega, FD Trinitron, Steady Sound, Digital Reality Creation, Caption Vision, CineMotion, Memory Stick, and Twin View are trademarks of electric shock to the rear of station logos onto the TV screen. Continuously watching the same program can be permanently imprinted onto the screen. Never use of the FCC rules. This equipment generates, uses, and can be determined by turning the equipment...
Operating Instructions (primary manual)
Page 3
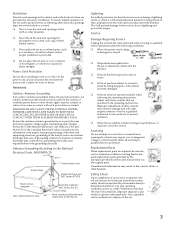
... slot and store it in the operating instructions or service manual. The set , causing injury. Use Power Sources This set should be used. When the set . Turn off . Installation Always use two or more people to overturn. Quick stops, excessive force, and uneven surfaces may cause hazards. Carefully observe and comply with a polarized AC power cord plug This plug will only fit into the set through the cabinet slots as...
... slot and store it in the operating instructions or service manual. The set , causing injury. Use Power Sources This set should be used. When the set . Turn off . Installation Always use two or more people to overturn. Quick stops, excessive force, and uneven surfaces may cause hazards. Carefully observe and comply with a polarized AC power cord plug This plug will only fit into the set through the cabinet slots as...
Operating Instructions (primary manual)
Page 4
... adjustment of antenna discharge unit, connection to grounding electrodes, and requirements for this television receiver during a lightning storm, or when it is exposed to dispose of the lead-in cabinet, unless proper ventilation is provided. ❑ Do not place the set near or over the power cord, and do not place the set where the power cord is in the operating instructions. Antennas Outdoor Antenna...
... adjustment of antenna discharge unit, connection to grounding electrodes, and requirements for this television receiver during a lightning storm, or when it is exposed to dispose of the lead-in cabinet, unless proper ventilation is provided. ❑ Do not place the set near or over the power cord, and do not place the set where the power cord is in the operating instructions. Antennas Outdoor Antenna...

Operating Instructions (primary manual)
Page 6
... About Using S VIDEO 21 VCR and Cable 22 VCR and Cable Box 24 Two VCRs for Tape Editing 26 Satellite Receiver 28 Satellite Receiver and VCR 30 DVD Player with Component Video Connectors 32 DVD Player with S VIDEO and Audio Connectors 34 Camcorder 35 Audio Receiver 36 Using the CONTROL S Feature 37 Setting Up the Channel List 38 Using Auto Setup 38 Using the Remote Control Overview ...39 Inserting Batteries 39 Button Descriptions 40 Outside Panel 40 Inside Panel 42 Programming the Remote Control 43...
... About Using S VIDEO 21 VCR and Cable 22 VCR and Cable Box 24 Two VCRs for Tape Editing 26 Satellite Receiver 28 Satellite Receiver and VCR 30 DVD Player with Component Video Connectors 32 DVD Player with S VIDEO and Audio Connectors 34 Camcorder 35 Audio Receiver 36 Using the CONTROL S Feature 37 Setting Up the Channel List 38 Using Auto Setup 38 Using the Remote Control Overview ...39 Inserting Batteries 39 Button Descriptions 40 Outside Panel 40 Inside Panel 42 Programming the Remote Control 43...
Operating Instructions (primary manual)
Page 14
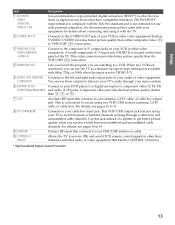
... antenna or cable. 0 CONTROL S IN/OUT Allows the TV to receive (IN) and send (OUT) remote control signals to other Sony infrared-controlled audio or video equipment that connects to a VCR. This is located on your TV to switch between scrambled and unscrambled cable channels. This video connection provides better picture quality than the VHF/UHF (9) connection. 4 MONITOR OUT Lets you record the program you are connected, you can use the TV as digital set -top box's component video...
... antenna or cable. 0 CONTROL S IN/OUT Allows the TV to receive (IN) and send (OUT) remote control signals to other Sony infrared-controlled audio or video equipment that connects to a VCR. This is located on your TV to switch between scrambled and unscrambled cable channels. This video connection provides better picture quality than the VHF/UHF (9) connection. 4 MONITOR OUT Lets you record the program you are connected, you can use the TV as digital set -top box's component video...
Operating Instructions (primary manual)
Page 20
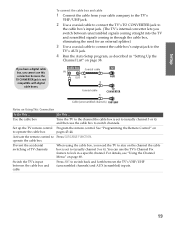
....) 3 Use a coaxial cable to connect the cable box's output jack to the TV's AUX jack. 4 Run the Auto Setup program, as described in a specific channel. Switch the TV's input between the cable box and cable Press ANT to switch back and forth between unscrambled signals coming straight into the TV and scrambled signals coming in through the cable box, eliminating the need the TV to stay on the channel the cable box is not compatible with digital cable boxes...
....) 3 Use a coaxial cable to connect the cable box's output jack to the TV's AUX jack. 4 Run the Auto Setup program, as described in a specific channel. Switch the TV's input between the cable box and cable Press ANT to switch back and forth between unscrambled signals coming straight into the TV and scrambled signals coming in through the cable box, eliminating the need the TV to stay on the channel the cable box is not compatible with digital cable boxes...
Operating Instructions (primary manual)
Page 25
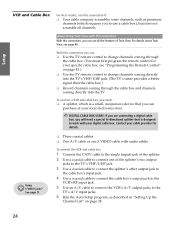
.... 2 Use a coaxial cable to connect one S VIDEO cable with your cable provider for your specific cable box; Contact your digital cable box. SETUP Setup SETUP VCR and Cable Box For best results, use this connection if: ❑ Your cable company scrambles some channels, such as described in "Setting Up the Channel List" on page 43.) ❑ Use the TV remote control to change channels coming through the cable box and channels coming directly into the TV's VHF/UHF jack. (The TV's tuner provides a better signal...
.... 2 Use a coaxial cable to connect one S VIDEO cable with your cable provider for your specific cable box; Contact your digital cable box. SETUP Setup SETUP VCR and Cable Box For best results, use this connection if: ❑ Your cable company scrambles some channels, such as described in "Setting Up the Channel List" on page 43.) ❑ Use the TV remote control to change channels coming through the cable box and channels coming directly into the TV's VHF/UHF jack. (The TV's tuner provides a better signal...
Operating Instructions (primary manual)
Page 26
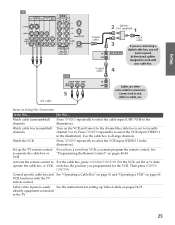
.../VIDEO repeatedly to operate the cable box or VCR If you have a non-Sony VCR, you will need a special bi-directional splitter designed to work with the TV remote control Label video inputs to easily See the instructions for the VCR. Control specific cable box and See "Operating a Cable Box" on page 61 and "Operating a VCR" on pages 74-75. Set up Video Labels on page 60. VCR A/V cable Cables are connecting a digital cable box, you must program the remote control...
.../VIDEO repeatedly to operate the cable box or VCR If you have a non-Sony VCR, you will need a special bi-directional splitter designed to work with the TV remote control Label video inputs to easily See the instructions for the VCR. Control specific cable box and See "Operating a Cable Box" on page 61 and "Operating a VCR" on pages 74-75. Set up Video Labels on page 60. VCR A/V cable Cables are connecting a digital cable box, you must program the remote control...
Operating Instructions (primary manual)
Page 41
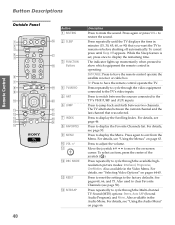
Button Descriptions SETUP SETUP Remote Control SETUP Outside Panel Button 1 MUTING MUTING SAT/CABLE POWER 1 qh 2 SLEEP 2 3 FUNCTION SAT/CABLE TV TV/VIDEO ANT PIC MODE 4 qj 5 3 FUNCTION qk Buttons JUMP ENTER 6 7 FAVORITES INDEX TWIN VIEW 8 ql 9 MENU VOL CH q; To cancel press until the TV displays the time in minutes (15, 30, 45, 60, or 90) that was selected. While the Sleep feature is operating: SAT/CABLE: Press to have the remote control operate the...
Button Descriptions SETUP SETUP Remote Control SETUP Outside Panel Button 1 MUTING MUTING SAT/CABLE POWER 1 qh 2 SLEEP 2 3 FUNCTION SAT/CABLE TV TV/VIDEO ANT PIC MODE 4 qj 5 3 FUNCTION qk Buttons JUMP ENTER 6 7 FAVORITES INDEX TWIN VIEW 8 ql 9 MENU VOL CH q; To cancel press until the TV displays the time in minutes (15, 30, 45, 60, or 90) that was selected. While the Sleep feature is operating: SAT/CABLE: Press to have the remote control operate the...
Operating Instructions (primary manual)
Page 42
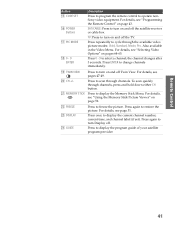
... display the program guide of your satellite program provider. w; Press to change channels immediately. TV: Press to turn on and off Twin View. Press 0 - 9 to freeze the picture. To scan quickly through the available video picture modes: Vivid, Standard, Movie, Pro. ws FREEZE wd DISPLAY wf GUIDE Press to select a channel; Press again to operate nonSony video equipment. Remote Control SETUP SETUP SETUP 41 SETUP SETUP Button qg CODE SET qh POWER Buttons qj PIC MODE qk 0 - 9 ENTER Description Press to program the remote control...
... display the program guide of your satellite program provider. w; Press to change channels immediately. TV: Press to turn on and off Twin View. Press 0 - 9 to freeze the picture. To scan quickly through the available video picture modes: Vivid, Standard, Movie, Pro. ws FREEZE wd DISPLAY wf GUIDE Press to select a channel; Press again to operate nonSony video equipment. Remote Control SETUP SETUP SETUP 41 SETUP SETUP Button qg CODE SET qh POWER Buttons qj PIC MODE qk 0 - 9 ENTER Description Press to program the remote control...
Operating Instructions (primary manual)
Page 43
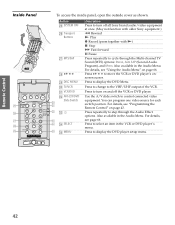
... the Multi-channel TV Sound (MTS) options: Stereo, Auto SAP (Second Audio Program), and Mono. For details, see page 66. SETUP SETUP Inside Panel MUUTTININGG SSLLEEEEPP SSAATT/C/CAABBLLEE PPOOWWEERR SYSSTAETM/CABLE FUNCTION OFF TV TV/VIDEO ANT PIC MODE MTS/SAP DISJCUMMEPNU SELECT ENMTEENRU FAVORITES INDEX TWIN VIEW VOL MENU CH DRC MODE MEMORY STICK FREEZE RESET MTS/SAP CODE SET GUIDE DISPLAY TV RM-Y191 MUTING SLEEP SAT/CABLE POWER wg...
... the Multi-channel TV Sound (MTS) options: Stereo, Auto SAP (Second Audio Program), and Mono. For details, see page 66. SETUP SETUP Inside Panel MUUTTININGG SSLLEEEEPP SSAATT/C/CAABBLLEE PPOOWWEERR SYSSTAETM/CABLE FUNCTION OFF TV TV/VIDEO ANT PIC MODE MTS/SAP DISJCUMMEPNU SELECT ENMTEENRU FAVORITES INDEX TWIN VIEW VOL MENU CH DRC MODE MEMORY STICK FREEZE RESET MTS/SAP CODE SET GUIDE DISPLAY TV RM-Y191 MUTING SLEEP SAT/CABLE POWER wg...
Operating Instructions (primary manual)
Page 71
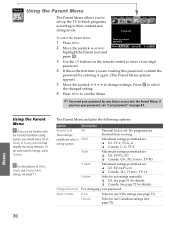
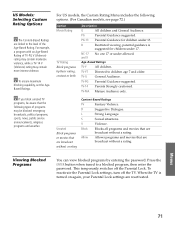
... need your password for details. SETUP SETUP Using the Parent Menu The Parent Menu allows you to set up the TV to block programs according to change settings. Password: _ _ _ _ To select the Parent Menu 1 Press MENU. 2 Move the joystick B or b to highlight the Parent icon and Press + to enter password Move: V v B b Select: + End: MENU press . 3 Use the 0-9 buttons on the remote control to enter a four-digit password. 4 If this password, confirm the password by entering it again. (The Parent Menu...
... need your password for details. SETUP SETUP Using the Parent Menu The Parent Menu allows you to set up the TV to block programs according to change settings. Password: _ _ _ _ To select the Parent Menu 1 Press MENU. 2 Move the joystick B or b to highlight the Parent icon and Press + to enter password Move: V v B b Select: + End: MENU press . 3 Use the 0-9 buttons on the remote control to enter a four-digit password. 4 If this password, confirm the password by entering it again. (The Parent Menu...
Operating Instructions (primary manual)
Page 72
..., public service announcements, religious programs and weather. V Violence. Press the ENTER button when tuned to children age 7 and older. z To ensure maximum blocking capability, set the AgeBased Ratings. z If you block unrated TV programs, be aware that are broadcast without a rating Content-Based Ratings FV Fantasy Violence. D Suggestive Dialogue. R Restricted viewing, parental guidance is turned on again, your Parental Lock settings are...
..., public service announcements, religious programs and weather. V Violence. Press the ENTER button when tuned to children age 7 and older. z To ensure maximum blocking capability, set the AgeBased Ratings. z If you block unrated TV programs, be aware that are broadcast without a rating Content-Based Ratings FV Fantasy Violence. D Suggestive Dialogue. R Restricted viewing, parental guidance is turned on again, your Parental Lock settings are...
Operating Instructions (primary manual)
Page 81
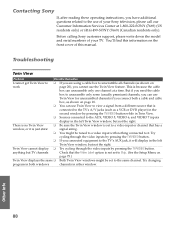
.... Welcome SETUP SETUP Contacting Sony If, after reading these operating instructions, you have additional questions related to the use the Twin View feature. Troubleshooting Twin View Problem Possible Remedies I cannot get Twin View to ❏ If you are using a cable box to unscramble all channels (as a VCR or DVD player) in the second window by pressing the TV/VIDEO button while in Twin View. ❏ Sources connected to the AUX, VIDEO 5, VIDEO 6, and VIDEO 7 inputs display in...
.... Welcome SETUP SETUP Contacting Sony If, after reading these operating instructions, you have additional questions related to the use the Twin View feature. Troubleshooting Twin View Problem Possible Remedies I cannot get Twin View to ❏ If you are using a cable box to unscramble all channels (as a VCR or DVD player) in the second window by pressing the TV/VIDEO button while in Twin View. ❏ Sources connected to the AUX, VIDEO 5, VIDEO 6, and VIDEO 7 inputs display in...
Operating Instructions (primary manual)
Page 82
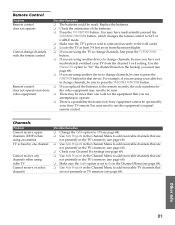
... CABLE mode. ❏ Make sure the TV's power cord is connected securely to the wall outlet. ❏ Locate the TV at least 3-4 feet away from fluorescent lights. ❏ If you are using the TV to change channels, be sure to use the equipment's original remote control. Replace the batteries. ❏ Check the orientation of the batteries. ❏ Press the TV FUNCTION button. Use the Channel Fix option to "fix" the channel based...
... CABLE mode. ❏ Make sure the TV's power cord is connected securely to the wall outlet. ❏ Locate the TV at least 3-4 feet away from fluorescent lights. ❏ If you are using the TV to change channels, be sure to use the equipment's original remote control. Replace the batteries. ❏ Check the orientation of the batteries. ❏ Press the TV FUNCTION button. Use the Channel Fix option to "fix" the channel based...
Operating Instructions (primary manual)
Page 84
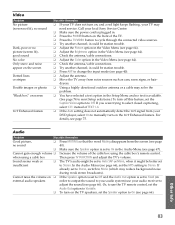
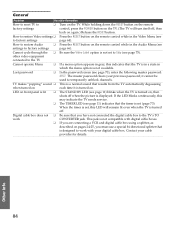
... your DVD player, select On to manually turn on the 16:9 Enhanced feature. If already set the Speaker option to On (see page 66). Welcome SETUP SETUP Video Problem No picture (screen not lit), no sound Dark, poor or no sound 40). ❏ Make sure the Speaker option is set to On in external audio speakers order to output the sound to your audio system) use the TV remote control, set the Audio Out option to change the input mode...
... your DVD player, select On to manually turn on the 16:9 Enhanced feature. If already set the Speaker option to On (see page 66). Welcome SETUP SETUP Video Problem No picture (screen not lit), no sound Dark, poor or no sound 40). ❏ Make sure the Speaker option is set to On in external audio speakers order to output the sound to your audio system) use the TV remote control, set the Audio Out option to change the input mode...
Operating Instructions (primary manual)
Page 85
... the timer is not set to Skip (see to factory settings page 64). How to restore Audio ❏ Press the RESET button on the remote control while in the Audio Menu (see settings to factory settings page 66). Lost password ❏ In the password screen (see page 11) blinks when the TV is turned on pages 24-25, you have not connected the digital cable box to the TV's TO work with your digital cable box. This...
... the timer is not set to Skip (see to factory settings page 64). How to restore Audio ❏ Press the RESET button on the remote control while in the Audio Menu (see settings to factory settings page 66). Lost password ❏ In the password screen (see page 11) blinks when the TV is turned on pages 24-25, you have not connected the digital cable box to the TV's TO work with your digital cable box. This...
Operating Instructions (primary manual)
Page 88
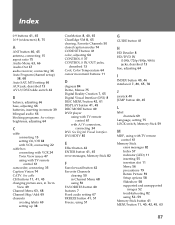
... clearing, Favorite Channels 50 closed caption modes 74 CODE SET button 41 color, adjusting 64 CONTROL S 37 CONTROL S IN/OUT jacks, described 13 Cool, Color Temperature 64 cursor movement buttons 11 D degauss 84 Demo, Menus 75 Digital Reality Creation 7, 65 Digital Visual Interface (DVI) 8 DISC MENU button 42, 61 DISPLAY button 41, 45 DRC MODE button 40 DVD player using with TV remote control 61 with TV remote control 61 Memory Stick error messages 82 Index 57 indicator (LED) 11 inserting...
... clearing, Favorite Channels 50 closed caption modes 74 CODE SET button 41 color, adjusting 64 CONTROL S 37 CONTROL S IN/OUT jacks, described 13 Cool, Color Temperature 64 cursor movement buttons 11 D degauss 84 Demo, Menus 75 Digital Reality Creation 7, 65 Digital Visual Interface (DVI) 8 DISC MENU button 42, 61 DISPLAY button 41, 45 DRC MODE button 40 DVD player using with TV remote control 61 with TV remote control 61 Memory Stick error messages 82 Index 57 indicator (LED) 11 inserting...
Operating Instructions (primary manual)
Page 90
... initial 90 day period for one (1) year (color picture tube- This warranty gives you specific legal rights, and you may not apply to you must be defective, Sony will supply, at no charge, new or rebuilt replacements in material or workmanship, subject to any conditions set up adjustments or signal reception problems. This warranty does not cover cosmetic damage or damage due...
... initial 90 day period for one (1) year (color picture tube- This warranty gives you specific legal rights, and you may not apply to you must be defective, Sony will supply, at no charge, new or rebuilt replacements in material or workmanship, subject to any conditions set up adjustments or signal reception problems. This warranty does not cover cosmetic damage or damage due...


