

Operating Instructions
Page 1
KLV-52V550A KLV-46V550A KLV-40V550A/40V530A KLV-40S550A KLV-32V550A/32V530A © 2009 Sony Corporation LCD Colour TV Operating Instructions 4-135-850-12(1)
KLV-52V550A KLV-46V550A KLV-40V550A/40V530A KLV-40S550A KLV-32V550A/32V530A © 2009 Sony Corporation LCD Colour TV Operating Instructions 4-135-850-12(1)

Operating Instructions
Page 2
... sufficiently stable location, it can slightly change the power consumption. "BRAVIA" and are trademarks of Sony Corporation and Sony Computer Entertainment Inc. "XMB" and "xross media bar" are trademarks or registered trademarks of the KLV-40V550A unless otherwise stated. Notes for Australia and New Zealand model .... Depending upon such changed settings, the power consumption may vary which possibly could exceed the stated energy rating. To reset the TV to reach the television or its controls. 2 GB The typefaces used on furniture to ENERGY RATING qualified settings, select "Home"...
... sufficiently stable location, it can slightly change the power consumption. "BRAVIA" and are trademarks of Sony Corporation and Sony Computer Entertainment Inc. "XMB" and "xross media bar" are trademarks or registered trademarks of the KLV-40V550A unless otherwise stated. Notes for Australia and New Zealand model .... Depending upon such changed settings, the power consumption may vary which possibly could exceed the stated energy rating. To reset the TV to reach the television or its controls. 2 GB The typefaces used on furniture to ENERGY RATING qualified settings, select "Home"...

Operating Instructions
Page 3
... Specifications...36 Troubleshooting...38 Before operating the TV, please read "Safety Information" (page 8). Table of Contents Usin Start-up Guide 4 Safety Information ...8 Precautions ...9 Remote and TV Controls/Indicators 10 Watching TV Watching TV ...15 Using the Favourite List ...17 Usin... Using Optional Equipment Connecting Optional Equipment 18 Viewing Pictures from Connected Equipment 20 Playing back Photo/Music/Video via USB 21 Using BRAVIA Sync with Control ...
... Specifications...36 Troubleshooting...38 Before operating the TV, please read "Safety Information" (page 8). Table of Contents Usin Start-up Guide 4 Safety Information ...8 Precautions ...9 Remote and TV Controls/Indicators 10 Watching TV Watching TV ...15 Using the Favourite List ...17 Usin... Using Optional Equipment Connecting Optional Equipment 18 Viewing Pictures from Connected Equipment 20 Playing back Photo/Music/Video via USB 21 Using BRAVIA Sync with Control ...

Operating Instructions
Page 4
Start-up Guide Before Use To check the accessories AC power cord (For KLV-52/46/40V550A/ KLV-40V530A/KLV-40S550A) Cable holder (1) (For KLV-52/46/40V550A/ KLV-40V530A/KLV-40S550A) Stand (1) and screws (4) (For KLV-46/40/32V550A/ KLV-40/32V530A/KLV-40S550A) Remote RM-GA015 (1) Size AA batteries (R6 type) (2) To insert batteries into the remote Push and lift the cover to open. (For KLV-40S550A) 1: Attaching the stand (For KLV-46/40/32V550A/ KLV-40/32V530A) ~ • If using an electric screwdriver, set the tightening torque at approximately 1.5 N·m (15 kgf·cm). 4 GB
Start-up Guide Before Use To check the accessories AC power cord (For KLV-52/46/40V550A/ KLV-40V530A/KLV-40S550A) Cable holder (1) (For KLV-52/46/40V550A/ KLV-40V530A/KLV-40S550A) Stand (1) and screws (4) (For KLV-46/40/32V550A/ KLV-40/32V530A/KLV-40S550A) Remote RM-GA015 (1) Size AA batteries (R6 type) (2) To insert batteries into the remote Push and lift the cover to open. (For KLV-40S550A) 1: Attaching the stand (For KLV-46/40/32V550A/ KLV-40/32V530A) ~ • If using an electric screwdriver, set the tightening torque at approximately 1.5 N·m (15 kgf·cm). 4 GB

Operating Instructions
Page 5
z • An optional Sony support belt kit is used to purchase a kit. Start-up Guide 2: Connecting an antenna/ cable/VCR Connecting an antenna/cable 3: Preventing the TV from toppling over 8 Antenna cable (not supplied) 8 Connecting an antenna/cable and VCR 8 8 AV cable (not supplied) Antenna cable (...Antenna cable (not supplied) 1 Install a wood screw (4 mm in diameter, not supplied) in the TV stand. 2 Install a machine screw (M4 × 20, not supplied) into the screw hole of the TV. 3 Tie the wood screw and the machine screw with a strong cord (not supplied). Have your ...
z • An optional Sony support belt kit is used to purchase a kit. Start-up Guide 2: Connecting an antenna/ cable/VCR Connecting an antenna/cable 3: Preventing the TV from toppling over 8 Antenna cable (not supplied) 8 Connecting an antenna/cable and VCR 8 8 AV cable (not supplied) Antenna cable (...Antenna cable (not supplied) 1 Install a wood screw (4 mm in diameter, not supplied) in the TV stand. 2 Install a machine screw (M4 × 20, not supplied) into the screw hole of the TV. 3 Tie the wood screw and the machine screw with a strong cord (not supplied). Have your ...
Operating Instructions
Page 6
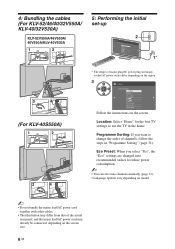
... TV settings to change the order of channels, follow the steps in the home. 4: Bundling the cables (For KLV-52/46/40/32V550A/ KLV-40/32V530A) KLV-52V550A/46V550A/ 40V550A/KLV-40V530A 5: Performing the initial set-up * The shapes of mains plug/AC power plug and mains socket/AC power outlet differ depending on the region. 3 (For KLV-40S550A...
... TV settings to change the order of channels, follow the steps in the home. 4: Bundling the cables (For KLV-52/46/40/32V550A/ KLV-40/32V530A) KLV-52V550A/46V550A/ 40V550A/KLV-40V530A 5: Performing the initial set-up * The shapes of mains plug/AC power plug and mains socket/AC power outlet differ depending on the region. 3 (For KLV-40S550A...

Operating Instructions
Page 7
Start-up Guide Adjusting the viewing angle of the TV. • Do not remove the Table-Top Stand for any reason other than listed below . Front 7 GB Adjust the angle left and right (swivel) Top view Detaching the Table-Top Stand from the TV ~ • Remove the screws guided by the arrow marks of the TV (For KLV-52/46/40/32V550A/ KLV-40/32V530A only) This TV can be adjusted within the angles shown below . - To wall-mount the TV.
Start-up Guide Adjusting the viewing angle of the TV. • Do not remove the Table-Top Stand for any reason other than listed below . Front 7 GB Adjust the angle left and right (swivel) Top view Detaching the Table-Top Stand from the TV ~ • Remove the screws guided by the arrow marks of the TV (For KLV-52/46/40/32V550A/ KLV-40/32V530A only) This TV can be adjusted within the angles shown below . - To wall-mount the TV.

Operating Instructions
Page 8
... you use a Sony wall-mount bracket in order to the TV. • Only qualified service personnel should carry out wall installations. • For safety reasons, it as shown. 8 GB Air circulation is blocked. The diameter and length of fire, electrical shock or damage and/or injuries. KLV-52/46/40/ 32V550A/KLV-40/ 32V530A KLV-40S550A • When...
... you use a Sony wall-mount bracket in order to the TV. • Only qualified service personnel should carry out wall installations. • For safety reasons, it as shown. 8 GB Air circulation is blocked. The diameter and length of fire, electrical shock or damage and/or injuries. KLV-52/46/40/ 32V550A/KLV-40/ 32V530A KLV-40S550A • When...
Operating Instructions
Page 9
...any type of light (red, blue, or green) may result. Follow your dealer or Sony service centre to dripping or splashing and no objects filled with liquids, such as the ...; Do not allow children to disconnect the TV set completely. • However, some TV sets may have unplugged the AC power cord. When: - LCD Screen • Although the LCD screen is not a malfunction. • ...collection systems) This sysmbol is persistent, wipe with a soft cloth slightly moistened with care. Ask your local ordinances and regulations for environmental and safety reasons. • As the TV ...
...any type of light (red, blue, or green) may result. Follow your dealer or Sony service centre to dripping or splashing and no objects filled with liquids, such as the ...; Do not allow children to disconnect the TV set completely. • However, some TV sets may have unplugged the AC power cord. When: - LCD Screen • Although the LCD screen is not a malfunction. • ...collection systems) This sysmbol is persistent, wipe with a soft cloth slightly moistened with care. Ask your local ordinances and regulations for environmental and safety reasons. • As the TV ...
Operating Instructions
Page 10
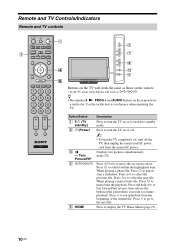
... and hold G/g to fast forward/fast reverse, then release the button at the point where you want to turn the TV on or off. ~ • To turn the TV completely off the TV, then unplug the mains lead/AC power cord from the beginning of the current file. Press to select/confirm the... highlighted item. Press to display the TV Home Menu (page 23). Press F/f/G/g to pause/ start the playback. When playing a photo file: Press to move the on the remote have a tactile dot. Press...
... and hold G/g to fast forward/fast reverse, then release the button at the point where you want to turn the TV on or off. ~ • To turn the TV completely off the TV, then unplug the mains lead/AC power cord from the beginning of the current file. Press to select/confirm the... highlighted item. Press to display the TV Home Menu (page 23). Press F/f/G/g to pause/ start the playback. When playing a photo file: Press to move the on the remote have a tactile dot. Press...

Operating Instructions
Page 11
...restore the sound. When playing a photo/music/video file: Press to stop the playback (the display returns to the file or folder list). 7 PROG +/-/ / In TV mode: Press to remove the display from the screen. Press third time to select the next (+) or previous (-) channel. answers to display a list of the... displayed menu. The listed options vary depending on the TV without sound, press this button. 0 / (Info/ Text reveal) Press once to the previous screen of inputs. qd / (Input In...
...restore the sound. When playing a photo/music/video file: Press to stop the playback (the display returns to the file or folder list). 7 PROG +/-/ / In TV mode: Press to remove the display from the screen. Press third time to select the next (+) or previous (-) channel. answers to display a list of the... displayed menu. The listed options vary depending on the TV without sound, press this button. 0 / (Info/ Text reveal) Press once to the previous screen of inputs. qd / (Input In...
Operating Instructions
Page 12
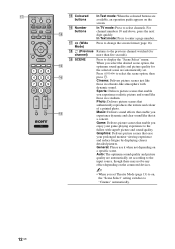
... authentically reproduces the texture and colour of a printed photo. Press F/f/G/g to display the "Scene Select" menu. Press to select the scene option, then press . In TV mode: Press to enter a page number. Sports: Delivers picture scenes that enable you experience realistic picture and sound like those in a stadium. In Text mode...
... authentically reproduces the texture and colour of a printed photo. Press F/f/G/g to display the "Scene Select" menu. Press to select the scene option, then press . In TV mode: Press to enter a page number. Sports: Delivers picture scenes that enable you experience realistic picture and sound like those in a stadium. In Text mode...
Operating Instructions
Page 13
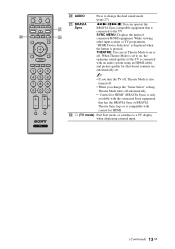
...when the button is compatible with control for HDMI. ws (TV mode) Exit Text mode, or switches to on , the optimum sound quality (if the TV is connected with the connected Sony equipment that is set to the TV. SYNC MENU: Displays the menu of connected HDMI equipment.... HDMI" (BRAVIA Sync) is only available with an audio system using an HDMI cable) and picture quality for film-based contents are automatically set Theatre Mode to a TV display when displaying external input. (Continued) 13 GB wa BRAVIA Sync m/N/X/M/x: You can set . ~ • If you change the dual sound mode ...
...when the button is compatible with control for HDMI. ws (TV mode) Exit Text mode, or switches to on , the optimum sound quality (if the TV is connected with the connected Sony equipment that is set to the TV. SYNC MENU: Displays the menu of connected HDMI equipment.... HDMI" (BRAVIA Sync) is only available with an audio system using an HDMI cable) and picture quality for film-based contents are automatically set Theatre Mode to a TV display when displaying external input. (Continued) 13 GB wa BRAVIA Sync m/N/X/M/x: You can set . ~ • If you change the dual sound mode ...

Operating Instructions
Page 14
... orange when you select "Picture Off" (page 24). The operation guide provides help on . ~ • Make sure that the TV is on how to malfunction. Indicators (For KLV-52/46/40/32V550A/KLV-40/32V530A) (For KLV-40S550A) 12 3 4 5 Indicator Description 1 Light sensor (page 24) Do not put anything over the sensor. Do not put anything over...
... orange when you select "Picture Off" (page 24). The operation guide provides help on . ~ • Make sure that the TV is on how to malfunction. Indicators (For KLV-52/46/40/32V550A/KLV-40/32V530A) (For KLV-40S550A) 12 3 4 5 Indicator Description 1 Light sensor (page 24) Do not put anything over the sensor. Do not put anything over...

Operating Instructions
Page 15
... number displayed on the screen. z • You can access pages quickly and easily (Fastext). to turn on the TV. When the TV is in standby mode (the 1 (standby) indicator on the TV front panel is red), press "/1 on the remote to select the page number, then press . • When four... coloured items appear at the bottom of the Text page, you press /, the display changes cyclically as follows: Text and TV picture t Text t No Text (exit the Text service) To select a page, press the number buttons or /. To reveal hidden information, press . To hold a...
... number displayed on the screen. z • You can access pages quickly and easily (Fastext). to turn on the TV. When the TV is in standby mode (the 1 (standby) indicator on the TV front panel is red), press "/1 on the remote to select the page number, then press . • When four... coloured items appear at the bottom of the Text page, you press /, the display changes cyclically as follows: Text and TV picture t Text t No Text (exit the Text service) To select a page, press the number buttons or /. To reveal hidden information, press . To hold a...
Operating Instructions
Page 16
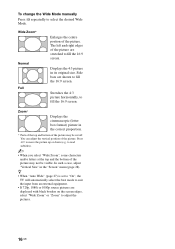
... fill the 16:9 screen. z • When "Auto Wide" (page 27) is set to "On", the TV will automatically select the best mode to suit the input from an external equipment. • If 720p, 1080i or 1080p source pictures are displayed with black borders on the screen edges, select "Wide Zoom" or "Zoom...
... fill the 16:9 screen. z • When "Auto Wide" (page 27) is set to "On", the TV will automatically select the best mode to suit the input from an external equipment. • If 720p, 1080i or 1080p source pictures are displayed with black borders on the screen edges, select "Wide Zoom" or "Zoom...

Operating Instructions
Page 17
Watching TV Using the Favourite List Favourites Favourite List The Favourite feature lets you specify. 1 Press . 2 Perform the desired operation as shown in the following table or ...
Watching TV Using the Favourite List Favourites Favourite List The Favourite feature lets you specify. 1 Press . 2 Perform the desired operation as shown in the following table or ...
Operating Instructions
Page 18
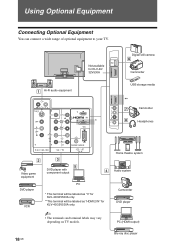
... with component output PC * This terminal will be labeled as "3" for KLV-40/32V530A only. **This terminal will be labeled as "HDMI 2 IN" for KLV-40/32V530A only. ~ • The terminals and terminal labels may vary depending on TV models. 18 GB Audio system Camcorder DVD player PC (HDMI-output) Blu-ray disc player Using Optional...
... with component output PC * This terminal will be labeled as "3" for KLV-40/32V530A only. **This terminal will be labeled as "HDMI 2 IN" for KLV-40/32V530A only. ~ • The terminals and terminal labels may vary depending on TV models. 18 GB Audio system Camcorder DVD player PC (HDMI-output) Blu-ray disc player Using Optional...

Operating Instructions
Page 19
...Video 3/Component 1 Input" menu (page 30). ~ • You cannot use a Sony HDMI cable (high speed type). 3 / 1 or 2 Component video When using the video jack and audio jack ...Connect with ferrite cores. HDMI adaptor interface (not supplied), and connect the equipment's audio out socket/jack to TV sound through a DVI - Connecting other equipment Connect to Connect with 5 / PC IN PC cable with ferrites... with Description 4 HDMI IN 1, 2, 3, or 4 (HDMI IN 4: KLV-52/46/40/ 32V550A/KLV40S550A only) HDMI cable Digital video and audio signals are input from the connected equipment.
...Video 3/Component 1 Input" menu (page 30). ~ • You cannot use a Sony HDMI cable (high speed type). 3 / 1 or 2 Component video When using the video jack and audio jack ...Connect with ferrite cores. HDMI adaptor interface (not supplied), and connect the equipment's audio out socket/jack to TV sound through a DVI - Connecting other equipment Connect to Connect with 5 / PC IN PC cable with ferrites... with Description 4 HDMI IN 1, 2, 3, or 4 (HDMI IN 4: KLV-52/46/40/ 32V550A/KLV40S550A only) HDMI cable Digital video and audio signals are input from the connected equipment.
Operating Instructions
Page 20
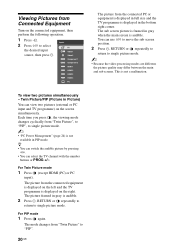
... ~ • "PC Power Management" (page 24) is not available in Picture) You can view two pictures (external or PC input and TV programme) on the screen simultaneously. For PIP mode 1 Press again. Twin Picture/PIP (Picture in PIP mode. The picture framed in the bottom...position. 2 Press , RETURN or repeatedly to return to single picture mode. The picture from the connected equipment is displayed on the left and the TV programme is not a malfunction. Viewing Pictures from Connected Equipment Turn on the connected equipment, then perform the following operation. 1 Press . 2 Press ...
... ~ • "PC Power Management" (page 24) is not available in Picture) You can view two pictures (external or PC input and TV programme) on the screen simultaneously. For PIP mode 1 Press again. Twin Picture/PIP (Picture in PIP mode. The picture framed in the bottom...position. 2 Press , RETURN or repeatedly to return to single picture mode. The picture from the connected equipment is displayed on the left and the TV programme is not a malfunction. Viewing Pictures from Connected Equipment Turn on the connected equipment, then perform the following operation. 1 Press . 2 Press ...