Operating Instructions
Page 3
... AC plug with your projection TV, keep the brightness and contrast functions at a high brightness or contrast setting, the image can be permanently imprinted onto the screen. CAUTION When using the TV for several days, disconnect the power by your dealer. ❑ If any liquid or solid object should fall inside the cabinet, unplug the TV immediately and have any changes or modifications not expressly...
... AC plug with your projection TV, keep the brightness and contrast functions at a high brightness or contrast setting, the image can be permanently imprinted onto the screen. CAUTION When using the TV for several days, disconnect the power by your dealer. ❑ If any liquid or solid object should fall inside the cabinet, unplug the TV immediately and have any changes or modifications not expressly...
Operating Instructions
Page 4
... turning on the installation. A security card provided by your local cable operator. Availability of digital cable television programming in a room where the floor and walls are trademarks of Cable Television Laboratories, Inc. i.LINK is required to view encrypted digital programming. "Dolby" and the double-D symbol are trademarks of programming and signal provided by your local authorities or the Electronics Industries Alliance (http://www.eiae.org). KDS-R50XBR1 KDS-R60XBR1 SONY TV STAND MODEL...
... turning on the installation. A security card provided by your local cable operator. Availability of digital cable television programming in a room where the floor and walls are trademarks of Cable Television Laboratories, Inc. i.LINK is required to view encrypted digital programming. "Dolby" and the double-D symbol are trademarks of programming and signal provided by your local authorities or the Electronics Industries Alliance (http://www.eiae.org). KDS-R50XBR1 KDS-R60XBR1 SONY TV STAND MODEL...

Operating Instructions
Page 5
... servicing to qualified service personnel. WHEN INSTALLING AN OUTDOOR ANTENNA SYSTEM, EXTREME CARE SHOULD BE TAKEN TO KEEP FROM CONTACTING SUCH POWER LINES OR CIRCUITS AS CONTACT WITH THEM IS ALMOST INVARIABLY FATAL. Servicing is required when the apparatus has been damaged in the vicinity of antenna discharge unit, connection to section 54-300 of time. 14) Refer all instructions. 5) Do not use...
... servicing to qualified service personnel. WHEN INSTALLING AN OUTDOOR ANTENNA SYSTEM, EXTREME CARE SHOULD BE TAKEN TO KEEP FROM CONTACTING SUCH POWER LINES OR CIRCUITS AS CONTACT WITH THEM IS ALMOST INVARIABLY FATAL. Servicing is required when the apparatus has been damaged in the vicinity of antenna discharge unit, connection to section 54-300 of time. 14) Refer all instructions. 5) Do not use...
Operating Instructions
Page 6
... number of persons, it may appear white due to reflections from the wall outlet and refer servicing to moisten the cleaning cloth. ❑ Do not use . ❑ In rare instances, the bulb may cause a problem with the cooling system of light (red, blue, or green) may be more noticeable during the night or when the background noise level is low. For the best picture quality, install...
... number of persons, it may appear white due to reflections from the wall outlet and refer servicing to moisten the cleaning cloth. ❑ Do not use . ❑ In rare instances, the bulb may cause a problem with the cooling system of light (red, blue, or green) may be more noticeable during the night or when the background noise level is low. For the best picture quality, install...
Operating Instructions
Page 7
... CableCARD Service 32 Removing the CableCARD Device 33 Setting Up the Channel List 34 Using Initial Setup 34 Connecting Optional Equipment 35 VCR and Cable 36 VCR and Cable Box 37 DVD Player with Component Video Connectors 39 DVD Player with S VIDEO and Audio Connectors 40 Personal Computer 41 Camcorder or PlayStation 42 Audio Receiver 43 Watching the TV Overview 45 Inserting Batteries into the Remote Control.....45 Button Descriptions 46 Programming the Remote Control 48 Using Other...
... CableCARD Service 32 Removing the CableCARD Device 33 Setting Up the Channel List 34 Using Initial Setup 34 Connecting Optional Equipment 35 VCR and Cable 36 VCR and Cable Box 37 DVD Player with Component Video Connectors 39 DVD Player with S VIDEO and Audio Connectors 40 Personal Computer 41 Camcorder or PlayStation 42 Audio Receiver 43 Watching the TV Overview 45 Inserting Batteries into the Remote Control.....45 Button Descriptions 46 Programming the Remote Control 48 Using Other...
Operating Instructions
Page 9
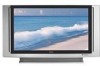
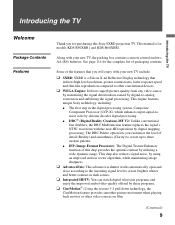
Along with your new TV include: ❑ SXRD: SXRD is for models KDS-R50XBR1 and KDS-R60XBR1. This engine features unique Sony technology, including: ● The first step in dark scenes. ❑ Integrated HDTV: You can watch digital television programs and enjoy the improved audio/video quality offered by digital mapping processing. This manual is a Silicon X-tal Reflective Display technology that you will enjoy with the near-HD...
Along with your new TV include: ❑ SXRD: SXRD is for models KDS-R50XBR1 and KDS-R60XBR1. This engine features unique Sony technology, including: ● The first step in dark scenes. ❑ Integrated HDTV: You can watch digital television programs and enjoy the improved audio/video quality offered by digital mapping processing. This manual is a Silicon X-tal Reflective Display technology that you will enjoy with the near-HD...
Operating Instructions
Page 10
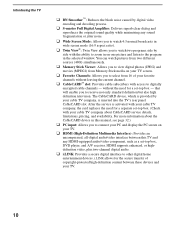
... these devices and your TV. ❑ HDMI (High-Definition Multimedia Interface): Provides an uncompressed, all-digital audio/video interface between this manual, see page 32.) ❑ PC input: Allows you to connect your PC and display the PC screen on one picture and listen to digitally encrypted cable channels - After the service is inserted into the TV's rear panel CableCARD slot. For more information about CableCARD service details, limitations, pricing...
... these devices and your TV. ❑ HDMI (High-Definition Multimedia Interface): Provides an uncompressed, all-digital audio/video interface between this manual, see page 32.) ❑ PC input: Allows you to connect your PC and display the PC screen on one picture and listen to digitally encrypted cable channels - After the service is inserted into the TV's rear panel CableCARD slot. For more information about CableCARD service details, limitations, pricing...
Operating Instructions
Page 16
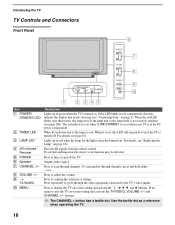
...the PC power saving mode. Receives IR signals from the remote control. Press to the TV's video inputs. Press to exit the TV on and off . Press again to display the TV on page 2). If the LED blinks in red when the lamp for the light source has burned out. Press repeatedly to adjust the volume. Press to scan through channels. Introducing the TV TV Controls and Connectors Front Panel 6 STD/DUO POWER/STANDBY LAMP TIMER POWER POWER/STANDBY TIMER LAMP POWER CHANNEL 3 # VOLUME 3 # TV/VIDEO MENU 7 8 9 0 1 2 34 5 Item 1 POWER/ STANDBY LED 2 TIMER LED 3 LAMP LED 4 (IR...
...the PC power saving mode. Receives IR signals from the remote control. Press to the TV's video inputs. Press to exit the TV on and off . Press again to display the TV on page 2). If the LED blinks in red when the lamp for the light source has burned out. Press repeatedly to adjust the volume. Press to scan through channels. Introducing the TV TV Controls and Connectors Front Panel 6 STD/DUO POWER/STANDBY LAMP TIMER POWER POWER/STANDBY TIMER LAMP POWER CHANNEL 3 # VOLUME 3 # TV/VIDEO MENU 7 8 9 0 1 2 34 5 Item 1 POWER/ STANDBY LED 2 TIMER LED 3 LAMP LED 4 (IR...
Operating Instructions
Page 21
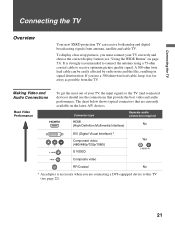
.../1080i) S VIDEO Yes L-AUDIO-R Composite video RF/Coaxial No * An adapter is strongly recommended to connect the antenna using a 75-ohm coaxial cable to the TV (and connected devices) should use a 300-ohm twin lead cable, keep it as far away as possible from antenna, satellite and cable TV. If you must connect your TV, the input signals to receive optimum picture quality signal. To display clear crisp pictures, you use the connections that are connecting a DVI-equipped...
.../1080i) S VIDEO Yes L-AUDIO-R Composite video RF/Coaxial No * An adapter is strongly recommended to connect the antenna using a 75-ohm coaxial cable to the TV (and connected devices) should use a 300-ohm twin lead cable, keep it as far away as possible from antenna, satellite and cable TV. If you must connect your TV, the input signals to receive optimum picture quality signal. To display clear crisp pictures, you use the connections that are connecting a DVI-equipped...
Operating Instructions
Page 25
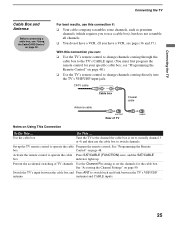
... operate the cable Program the remote control. Activate the remote control to the TV's CABLE input. (You must first program the remote control for the cable box. Do This ... Prevent the accidental switching of TV CABLE Notes on page 32. Connecting the TV Connecting the TV Cable Box and Antenna Before connecting a cable box, see pages 36 and 37.) With this connection you can: ❑ Use the TV's remote control to change channels coming through the cable box to operate the cable Press SAT/CABLE (FUNCTION) once, and the SAT/CABLE box indicator lights...
... operate the cable Program the remote control. Activate the remote control to the TV's CABLE input. (You must first program the remote control for the cable box. Do This ... Prevent the accidental switching of TV CABLE Notes on page 32. Connecting the TV Connecting the TV Cable Box and Antenna Before connecting a cable box, see pages 36 and 37.) With this connection you can: ❑ Use the TV's remote control to change channels coming through the cable box to operate the cable Press SAT/CABLE (FUNCTION) once, and the SAT/CABLE box indicator lights...
Operating Instructions
Page 28
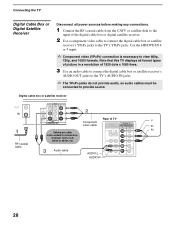
... TV displays all power sources before making any connections. 1 Connect the RF coaxial cable from the CATV or satellite dish to the input of the digital cable box or digital satellite receiver. 2 Use a component video cable to connect the digital cable box or satellite receiver's YPBPR jacks to the TV's YPBPR jacks. Connect red to red, white to view 480p, 720p, and 1080i formats. RF coaxial cable Audio cable AUDIO-L AUDIO-R 28 Connecting the TV Digital Cable Box or Digital Satellite Receiver Disconnect all format types of picture in a resolution...
... TV displays all power sources before making any connections. 1 Connect the RF coaxial cable from the CATV or satellite dish to the input of the digital cable box or digital satellite receiver. 2 Use a component video cable to connect the digital cable box or satellite receiver's YPBPR jacks to the TV's YPBPR jacks. Connect red to red, white to view 480p, 720p, and 1080i formats. RF coaxial cable Audio cable AUDIO-L AUDIO-R 28 Connecting the TV Digital Cable Box or Digital Satellite Receiver Disconnect all format types of picture in a resolution...
Operating Instructions
Page 87
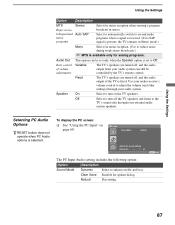
... dialog. Use your audio receiver's volume control to adjust the volume (and other settings) through your external audio system speakers. To display the PC screen: ❑ See "Using the PC Input" on the TV speakers. Off Select to second audio programs when a signal is received. (If no SAP signal is present, the TV remains in stereo. Select to automatically switch to turn on page 60. Fixed The TV's speakers are turned off, and the audio output of volume adjustments The TV's speakers are turned off the TV speakers and...
... dialog. Use your audio receiver's volume control to adjust the volume (and other settings) through your external audio system speakers. To display the PC screen: ❑ See "Using the PC Input" on the TV speakers. Off Select to second audio programs when a signal is received. (If no SAP signal is present, the TV remains in stereo. Select to automatically switch to turn on page 60. Fixed The TV's speakers are turned off, and the audio output of volume adjustments The TV's speakers are turned off the TV speakers and...
Operating Instructions
Page 90
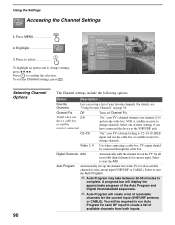
... details, see "Using Favorite Channels" on the TV for all receivable channels for current input. Auto Program Automatically sets up a list of receivable channels for each RF input to change channels. Video 1, 4 Use when connecting a cable box. Using the Settings Accessing the Channel Settings MENU 1. Select to change settings, press V v B b. Select to start the Add. Press to complete. Antenna Channel Program favorite channels Favorite Channels Channel Fix Off Digital Channels Auto Program Show/Hide Channels Label Channels Program Selecting Channel Options 90...
... details, see "Using Favorite Channels" on the TV for all receivable channels for current input. Auto Program Automatically sets up a list of receivable channels for each RF input to change channels. Video 1, 4 Use when connecting a cable box. Using the Settings Accessing the Channel Settings MENU 1. Select to change settings, press V v B b. Select to start the Add. Press to complete. Antenna Channel Program favorite channels Favorite Channels Channel Fix Off Digital Channels Auto Program Show/Hide Channels Label Channels Program Selecting Channel Options 90...

Operating Instructions
Page 97
... TV/VIDEO. The front panel POWER/STANDBY LED shows red. The TV uses more standby power than when this option is turned off . Off Does not allow the i.LINK signal to pass through to select a specific color for the on-screen settings: Gray, Red, Green, Indigo and Purple. Using the Settings 97 Select to display all on-screen settings in your TV skips the selected connection when you to connected i.LINK devices even when the TV is set to view picture...
... TV/VIDEO. The front panel POWER/STANDBY LED shows red. The TV uses more standby power than when this option is turned off . Off Does not allow the i.LINK signal to pass through to select a specific color for the on-screen settings: Gray, Red, Green, Indigo and Purple. Using the Settings 97 Select to display all on-screen settings in your TV skips the selected connection when you to connected i.LINK devices even when the TV is set to view picture...
Operating Instructions
Page 99
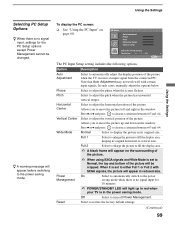
... automatically adjust the display position of the picture when the TV receives an input signal from the connected PC. Setup Auto Adjustment Phase Pitch Horizontal Center Vertical Center Adjust PC setup options Resolution x Hz MENU Exit The PC Input Setup setting includes the following options: Option Auto Adjustment Phase Pitch Horizontal Center Vertical Center Wide Mode Power Management Reset Description Select to adjust the vertical position of the picture. z A warning message will appear in reduced size. In such cases, manually adjust...
... automatically adjust the display position of the picture when the TV receives an input signal from the connected PC. Setup Auto Adjustment Phase Pitch Horizontal Center Vertical Center Adjust PC setup options Resolution x Hz MENU Exit The PC Input Setup setting includes the following options: Option Auto Adjustment Phase Pitch Horizontal Center Vertical Center Wide Mode Power Management Reset Description Select to adjust the vertical position of the picture. z A warning message will appear in reduced size. In such cases, manually adjust...
Operating Instructions
Page 103
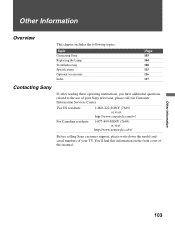
...://www.sonystyle.ca/tv/ Before calling Sony customer support, please write down the model and serial numbers of your Sony television, please call our Customer Information Services Center. Other Information Overview This chapter includes the following topics: Topic Contacting Sony Replacing the Lamp Troubleshooting Specifications Optional accessories: Index Page 103 104 108 115 116 117 Contacting Sony If, after reading these operating instructions, you have additional...
...://www.sonystyle.ca/tv/ Before calling Sony customer support, please write down the model and serial numbers of your Sony television, please call our Customer Information Services Center. Other Information Overview This chapter includes the following topics: Topic Contacting Sony Replacing the Lamp Troubleshooting Specifications Optional accessories: Index Page 103 104 108 115 116 117 Contacting Sony If, after reading these operating instructions, you have additional...
Operating Instructions
Page 108
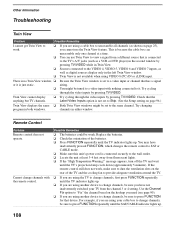
... CABLE mode. ❏ Make sure this unit's power cord is not set to a video input with the remote control. Other Information Troubleshooting Twin View Problem Possible Remedies I cannot get Twin View to work , make sure to dust the ventilation slots on the rear of the batteries. ❏ Press FUNCTION repeatedly until the TV indicator lights up . 108 You might be sure you have not inadvertently switched your cable box to change channels...
... CABLE mode. ❏ Make sure this unit's power cord is not set to a video input with the remote control. Other Information Troubleshooting Twin View Problem Possible Remedies I cannot get Twin View to work , make sure to dust the ventilation slots on the rear of the batteries. ❏ Press FUNCTION repeatedly until the TV indicator lights up . 108 You might be sure you have not inadvertently switched your cable box to change channels...
Operating Instructions
Page 111
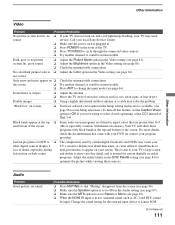
... another channel; Change the sound setting for certain digitally recorded programs. Adjust the reality/clarity in the Audio setting (see page 87). ❏ Make sure the MTS option is set the Caption Vision option to appear on DVD or ❏ other digital sources display a loss of the screen. (this feature, set to cycle through the connected video sources. ❏ Try another channel; Call your screen. Double images. ❏ Using a highly directional outdoor antenna or a cable...
... another channel; Change the sound setting for certain digitally recorded programs. Adjust the reality/clarity in the Audio setting (see page 87). ❏ Make sure the MTS option is set the Caption Vision option to appear on DVD or ❏ other digital sources display a loss of the screen. (this feature, set to cycle through the connected video sources. ❏ Try another channel; Call your screen. Double images. ❏ Using a highly directional outdoor antenna or a cable...
Operating Instructions
Page 113
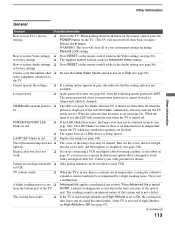
... the remote control, press the POWER button on the remote control while in red. ❏ If the LED blinks three times, the lamp cover may be slanted. Cannot cycle through the other ❏ Be sure the Label Video Inputs option is turned off. When the timer is set High Altitude to the TV. Cannot operate the settings. ❏ If a setting option appears in temperature inside the TV when any ventilation openings are connecting a VCR and digital cable box using...
... the remote control, press the POWER button on the remote control while in red. ❏ If the LED blinks three times, the lamp cover may be slanted. Cannot cycle through the other ❏ Be sure the Label Video Inputs option is turned off. When the timer is set High Altitude to the TV. Cannot operate the settings. ❏ If a setting option appears in temperature inside the TV when any ventilation openings are connecting a VCR and digital cable box using...
Operating Instructions
Page 118
... 67 Program Guide 52 Program Options menu 52 Protect 67 R Ratings setting 94 viewing blocked programs 93 REC button 47 Remote control inserting batteries 45 programming 48-49 Removing channels from the channel list 91 Removing the CableCARD Device 33 Repeat 68 Reset 85 RESET button 47 S S VIDEO jack, described 17, 18 Satellite receiver connecting 27 Satellite receiver, using with cable, connecting 36 Vertical Center 89 Vertical Size 89 VHF/UHF jack, described 18 VIDEO 8 (PC) IN 18 Video inputs, labeling 96 Video settings...
... 67 Program Guide 52 Program Options menu 52 Protect 67 R Ratings setting 94 viewing blocked programs 93 REC button 47 Remote control inserting batteries 45 programming 48-49 Removing channels from the channel list 91 Removing the CableCARD Device 33 Repeat 68 Reset 85 RESET button 47 S S VIDEO jack, described 17, 18 Satellite receiver connecting 27 Satellite receiver, using with cable, connecting 36 Vertical Center 89 Vertical Size 89 VHF/UHF jack, described 18 VIDEO 8 (PC) IN 18 Video inputs, labeling 96 Video settings...


