Operating Instructions
Page 7
...TV 11 Screen 11 Indicators 12 Projection Lamp 12 Installing the TV 13 Carrying Your TV 13 Take Precaution during Installation 13 Preventing the TV from Toppling Over .......... 14 When Installing Your TV against a Wall......... 14 Recommended Viewing Area 15 TV Controls and Connectors 16 Front Panel 16 Front Connectors 17 Rear Panel 18 Connecting the TV...Channels 58 Using the Channel Menu 58 Using the Favorite Channels Guide 59 Using the PC Input 60 Displaying the PC Screen 60 Using the Memory Stick Viewer About Memory Stick 61 Features 61 Memory Stick Compatibility 61 File ...
...TV 11 Screen 11 Indicators 12 Projection Lamp 12 Installing the TV 13 Carrying Your TV 13 Take Precaution during Installation 13 Preventing the TV from Toppling Over .......... 14 When Installing Your TV against a Wall......... 14 Recommended Viewing Area 15 TV Controls and Connectors 16 Front Panel 16 Front Connectors 17 Rear Panel 18 Connecting the TV...Channels 58 Using the Channel Menu 58 Using the Favorite Channels Guide 59 Using the PC Input 60 Displaying the PC Screen 60 Using the Memory Stick Viewer About Memory Stick 61 Features 61 Memory Stick Compatibility 61 File ...
Operating Instructions
Page 46
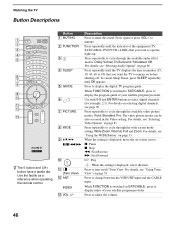
... Press repeatedly to adjust the volume. 46 Use with 0-9 and ENTER buttons to display the digital TV program guide. The video picture modes can be also accessed in minutes (15, 30, 45, 60 or 90) that you want to cycle through the wide screen mode setting: Wide Zoom, Normal,... unmute. Press again or press VOL + to turn on -screen cursor. Press repeatedly until Off appears. To cancel Sleep Timer, press SLEEP repeatedly until the TV displays the time in the Video setting. X: Pause x: Stop m: Fast-Reverse M: Fast-Forward H: Play : When the setting is displayed, move the on...
... Press repeatedly to adjust the volume. 46 Use with 0-9 and ENTER buttons to display the digital TV program guide. The video picture modes can be also accessed in minutes (15, 30, 45, 60 or 90) that you want to cycle through the wide screen mode setting: Wide Zoom, Normal,... unmute. Press again or press VOL + to turn on -screen cursor. Press repeatedly until Off appears. To cancel Sleep Timer, press SLEEP repeatedly until the TV displays the time in the Video setting. X: Pause x: Stop m: Fast-Reverse M: Fast-Forward H: Play : When the setting is displayed, move the on...
Operating Instructions
Page 60
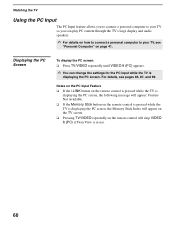
... you can change the settings for the PC input while the TV is in use. 60 Notes on the PC Input Feature ❑ If the i.LINK button on the remote control is pressed while the TV is displaying the PC screen, the following message will appear: Feature Not Available. ❑ If the Memory... Stick button on the remote control is pressed while the TV is displaying...
... you can change the settings for the PC input while the TV is in use. 60 Notes on the PC Input Feature ❑ If the i.LINK button on the remote control is pressed while the TV is displaying the PC screen, the following message will appear: Feature Not Available. ❑ If the Memory... Stick button on the remote control is pressed while the TV is displaying...
Operating Instructions
Page 85
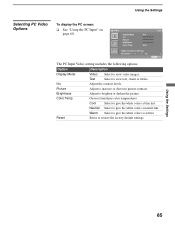
Using the Settings Selecting PC Video Options To display the PC screen: ❑ See "Using the PC Input" on page 60. Color Temp. Choose from three color temperatures: Cool Select to give the white colors a red tint. Warm Select to give the white colors a neutral tint. ...
Using the Settings Selecting PC Video Options To display the PC screen: ❑ See "Using the PC Input" on page 60. Color Temp. Choose from three color temperatures: Cool Select to give the white colors a red tint. Warm Select to give the white colors a neutral tint. ...
Operating Instructions
Page 87
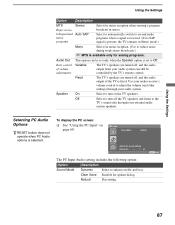
.... To display the PC screen: ❑ See "Using the PC Input" on the TV speakers. Off Select to reduce noise during weak stereo broadcasts.) ✍ MTS is available only for mono reception. (Use to turn on page 60. Clear Voice Suitable for stereo reception when viewing a program broadcast in Stereo mode.) Mono...
.... To display the PC screen: ❑ See "Using the PC Input" on the TV speakers. Off Select to reduce noise during weak stereo broadcasts.) ✍ MTS is available only for mono reception. (Use to turn on page 60. Clear Voice Suitable for stereo reception when viewing a program broadcast in Stereo mode.) Mono...
Operating Instructions
Page 99
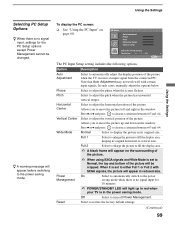
...for 10 minutes. ✍ POWER/STANDBY LED will be changed. On Select to automatically switch to move the picture up in red when your TV is in the window. Select to turn off Power Management. Off Select to adjust the vertical position of the picture. Note that Auto Adjustment ...may not work well with SXGA signals, the picture will appear on page 60. Allows you to move the picture left and right in its original horizontal-to adjust the horizontal position of the picture. ✍ When ...
...for 10 minutes. ✍ POWER/STANDBY LED will be changed. On Select to automatically switch to move the picture up in red when your TV is in the window. Select to turn off Power Management. Off Select to adjust the vertical position of the picture. Note that Auto Adjustment ...may not work well with SXGA signals, the picture will appear on page 60. Allows you to move the picture left and right in its original horizontal-to adjust the horizontal position of the picture. ✍ When ...

Operating Instructions
Page 100
....7 47.8 64 Vertical frequency VESA standard (Hz) 70 -* 70 -* 60 -* 72 ✔ 75 ✔ 85 ✔ 56 ✔ 60 ✔ 72 ✔ 75 ✔ 85 ✔ 60 ✔ 70 ✔ 75 ✔ 85 ✔ 60 ✔ 60 ✔ ✍ This TV does not support Sync on Green or Composite Sync. ✍ If a signal other than in...
....7 47.8 64 Vertical frequency VESA standard (Hz) 70 -* 70 -* 60 -* 72 ✔ 75 ✔ 85 ✔ 56 ✔ 60 ✔ 72 ✔ 75 ✔ 85 ✔ 60 ✔ 70 ✔ 75 ✔ 85 ✔ 60 ✔ 60 ✔ ✍ This TV does not support Sync on Green or Composite Sync. ✍ If a signal other than in...
Operating Instructions
Page 101
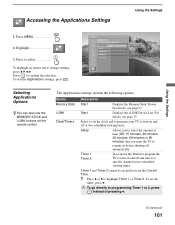
... settings, press . For details, see page 75. Sleep Allows you to select the amount of time (Off, 15 minutes, 30 minutes, 45 minutes, 60 minutes or 90 minutes) that you set the timer, press b. ✍ To go directly to programming Timer 1 or 2, press instead of pressing b.... (Continued) 101 Start Displays the i.LINK Device List. Timer 1 and Timer 2 cannot be set until you want the TV to a specific channel at two scheduled viewing times. Press to select To highlight an option and to confirm the selection. Press to change settings, press...
... settings, press . For details, see page 75. Sleep Allows you to select the amount of time (Off, 15 minutes, 30 minutes, 45 minutes, 60 minutes or 90 minutes) that you set the timer, press b. ✍ To go directly to programming Timer 1 or 2, press instead of pressing b.... (Continued) 101 Start Displays the i.LINK Device List. Timer 1 and Timer 2 cannot be set until you want the TV to a specific channel at two scheduled viewing times. Press to select To highlight an option and to confirm the selection. Press to change settings, press...
Operating Instructions
Page 115
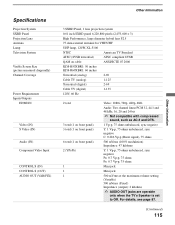
...projection system 0.61 inch SXRD panel 6,220,800 pixels (2,073,600 × 3) High Performance, large diameter hybrid lens F2.5 75 ohm external terminal for VHF/UHF UHP lamp, 120W, XL-5100 NTSC American TV Standard ATSC (8VSB terrestrial) ATSC compliant 8VSB QAM on cable ANSI/SCTE 07 2000 KDS-R50XBR1: 50 inches KDS-R60XBR1: 60... inches Terrestrial (analog) 2-69 Cable TV (analog) 1-125 Terrestrial (digital) 2-69 Cable TV (digital) 1-135 120V, 60 Hz 2 total 3 total (1 on front panel) 3...
...projection system 0.61 inch SXRD panel 6,220,800 pixels (2,073,600 × 3) High Performance, large diameter hybrid lens F2.5 75 ohm external terminal for VHF/UHF UHP lamp, 120W, XL-5100 NTSC American TV Standard ATSC (8VSB terrestrial) ATSC compliant 8VSB QAM on cable ANSI/SCTE 07 2000 KDS-R50XBR1: 50 inches KDS-R60XBR1: 60... inches Terrestrial (analog) 2-69 Cable TV (analog) 1-125 Terrestrial (digital) 2-69 Cable TV (digital) 1-135 120V, 60 Hz 2 total 3 total (1 on front panel) 3...


