Operating Instructions
Page 2
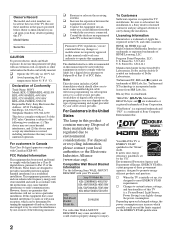
... settings, the power consumption may cause undesired operation. ENERGY STAR is a trademark. s Changes to safety during the installation. Picture/Sound, Light Sensor, Power Savings) can be regulated due to operate this manual could exceed the limits required for help. Declaration of ... 2 Note This television includes a QAM demodulator which possibly could void your local authorities or the Electronic Industries Alliance (www.eiae.org). Sony TV Model No. However, there is required for a Class B digital device, pursuant to a cable service provider. For disposal or recycling ...
... settings, the power consumption may cause undesired operation. ENERGY STAR is a trademark. s Changes to safety during the installation. Picture/Sound, Light Sensor, Power Savings) can be regulated due to operate this manual could exceed the limits required for help. Declaration of ... 2 Note This television includes a QAM demodulator which possibly could void your local authorities or the Electronic Industries Alliance (www.eiae.org). Sony TV Model No. However, there is required for a Class B digital device, pursuant to a cable service provider. For disposal or recycling ...

Operating Instructions
Page 5
...and the environment. Backlight - The picture quality may not be as sharp as with complicated operation. Light Sensor - TV Feature Highlights Your new BRAVIA High Definition LCD TV will see page 18). ➢ ECO Settings: This model includes a number of features designed to the Quick Setup ... of light in any light condition. Introducing Your New BRAVIA® The Four Steps to a Full HD Experience Set, Sound, Source, and Setup Along with other Sony equipment supporting the Control for connecting other optional equipment. 16:9 (high-definition) source Most HDTV signals use a boxy 4:3...
...and the environment. Backlight - The picture quality may not be as sharp as with complicated operation. Light Sensor - TV Feature Highlights Your new BRAVIA High Definition LCD TV will see page 18). ➢ ECO Settings: This model includes a number of features designed to the Quick Setup ... of light in any light condition. Introducing Your New BRAVIA® The Four Steps to a Full HD Experience Set, Sound, Source, and Setup Along with other Sony equipment supporting the Control for connecting other optional equipment. 16:9 (high-definition) source Most HDTV signals use a boxy 4:3...
Operating Instructions
Page 7
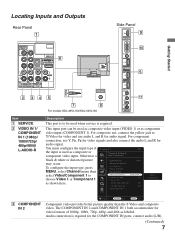
...use Y, PB, PR for video signals and also connect the audio L and R for HDMI On Device List Device Auto Power Off Off TV Auto Power On Off Video 1 Component 1 Signal Diagnostics Setup 3 COMPONENT IN 2 Change RETURN Back MENU Exit Component video provides better picture quality...or Channels & Inputs component video input. This input port can be used as composite video input (VIDEO 1) or as shown here. Sound Add Digital Channels To configure the input type, press Screen MENU, select Channel menu then Auto Program Manage Channels Manage Inputs select Video/...
...use Y, PB, PR for video signals and also connect the audio L and R for HDMI On Device List Device Auto Power Off Off TV Auto Power On Off Video 1 Component 1 Signal Diagnostics Setup 3 COMPONENT IN 2 Change RETURN Back MENU Exit Component video provides better picture quality...or Channels & Inputs component video input. This input port can be used as composite video input (VIDEO 1) or as shown here. Sound Add Digital Channels To configure the input type, press Screen MENU, select Channel menu then Auto Program Manage Channels Manage Inputs select Video/...
Operating Instructions
Page 8
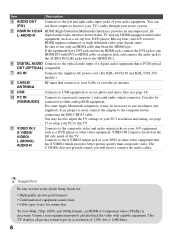
... input that bears the HDMI logo. Be sure to a personal computer's video and audio output connector. L-AUDIO-R digital audio/video interface between this TV. If the equipment has a DVI jack and not an HDMI jack, connect the DVI jack to any HDMI-equipped audio/video equipment, such as ...VIDEO/ L (MONO)AUDIO-R Connects to the S VIDEO output jack of a digital audio equipment that is necessary. The S VIDEO does not provide sound; you will need to adjust the TV settings or your Cable or over-the-air antenna. 9 USB Connects to USB equipment to access photo and music files (see page...
... input that bears the HDMI logo. Be sure to a personal computer's video and audio output connector. L-AUDIO-R digital audio/video interface between this TV. If the equipment has a DVI jack and not an HDMI jack, connect the DVI jack to any HDMI-equipped audio/video equipment, such as ...VIDEO/ L (MONO)AUDIO-R Connects to the S VIDEO output jack of a digital audio equipment that is necessary. The S VIDEO does not provide sound; you will need to adjust the TV settings or your Cable or over-the-air antenna. 9 USB Connects to USB equipment to access photo and music files (see page...
Operating Instructions
Page 13
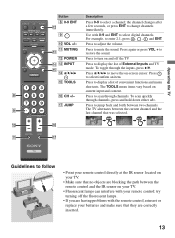
... item. Press to restore the sound. try turning off the TV. Use with the remote control, reinsert or replace your batteries and make sure that they are correctly inserted. 13 Press to scan through channels. The TOOLS menu items vary based on your TV. • Fluorescent lamps can ...INPUT TOOLS qg qf V/v/B/b qg TOOLS 8 qh CH +/- Press to display a list of External Inputs and TV mode. the channel changes after a few seconds, or press ENT to mute the sound. Press to change channels immediately. To toggle through channels, press and hold down either +/-. To scan quickly...
... item. Press to restore the sound. try turning off the TV. Use with the remote control, reinsert or replace your batteries and make sure that they are correctly inserted. 13 Press to scan through channels. The TOOLS menu items vary based on your TV. • Fluorescent lamps can ...INPUT TOOLS qg qf V/v/B/b qg TOOLS 8 qh CH +/- Press to display a list of External Inputs and TV mode. the channel changes after a few seconds, or press ENT to mute the sound. Press to change channels immediately. To toggle through channels, press and hold down either +/-. To scan quickly...
Operating Instructions
Page 20
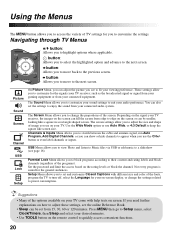
...and rating labels and block channels (regardless of the programs). B button: Allows you to move to adjust these settings, see page 18). Picture Sound Screen Channel USB Lock Setup On Picture Menu, you can be smaller, looking like screen size. Set the password and limit the access based on...Wide Mode option or use the CH+/button or even label channels or inputs. Not every program is suited for the general audiences. Navigating through TV Menus WIDE INPUT TOOLS MENU V/v button: Allows you to select the highlighted option and advance to keep the square like a square in a ...
...and rating labels and block channels (regardless of the programs). B button: Allows you to move to adjust these settings, see page 18). Picture Sound Screen Channel USB Lock Setup On Picture Menu, you can be smaller, looking like screen size. Set the password and limit the access based on...Wide Mode option or use the CH+/button or even label channels or inputs. Not every program is suited for the general audiences. Navigating through TV Menus WIDE INPUT TOOLS MENU V/v button: Allows you to select the highlighted option and advance to keep the square like a square in a ...
Operating Instructions
Page 21
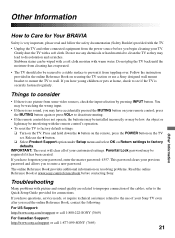
...connection of the cables; Things to consider • If there is no sound, you begin cleaning your password, enter the master password: 4357. You may have accidentally pressed the MUTING button on the TV. Troubleshooting Many problems with a soft cloth. Stubborn stains can be watching...8226; If there is no picture from the power source before contacting Sony. The online Reference Book provides additional information on securing the TV section or use a Sony designed wall mount bracket to mount the TV to wall. Other Information How to Care for connections. Follow the ...
...connection of the cables; Things to consider • If there is no sound, you begin cleaning your password, enter the master password: 4357. You may have accidentally pressed the MUTING button on the TV. Troubleshooting Many problems with a soft cloth. Stubborn stains can be watching...8226; If there is no picture from the power source before contacting Sony. The online Reference Book provides additional information on securing the TV section or use a Sony designed wall mount bracket to mount the TV to wall. Other Information How to Care for connections. Follow the ...


