Operating Instructions
Page 2
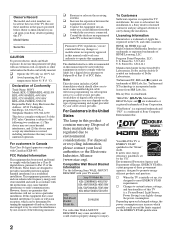
... or registered trademarks of the TV. Sony TV Model No. Be sure to subcontract the installation to a Sony dealer or licensed contractor and pay adequate attention to provide reasonable protection against harmful interference in a residential installation. HDMI, the HDMI logo and High-Definition Multimedia ...equipment and receiver. ❑ Connect the equipment into an outlet on 120 V AC. ❑ Avoid operating the TV at the rear of HDMI Licensing, LLC. Pursuant to FCC regulations, you to receive unscrambled digital cable television programming via subscription service to meet ENERGY...
... or registered trademarks of the TV. Sony TV Model No. Be sure to subcontract the installation to a Sony dealer or licensed contractor and pay adequate attention to provide reasonable protection against harmful interference in a residential installation. HDMI, the HDMI logo and High-Definition Multimedia ...equipment and receiver. ❑ Connect the equipment into an outlet on 120 V AC. ❑ Avoid operating the TV at the rear of HDMI Licensing, LLC. Pursuant to FCC regulations, you to receive unscrambled digital cable television programming via subscription service to meet ENERGY...
Operating Instructions
Page 3
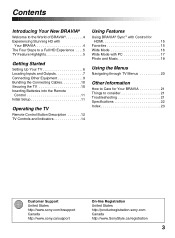
... Inserting Batteries into the Remote Control 11 Initial Setup 11 Operating the TV Remote Control Button Description 12 TV Controls and Indicators 14 Using Features Using BRAVIA® Sync™ with Control for HDMI 15 Favorites 15 Wide Mode 16 Wide Mode with PC 17 Photo and Music ...18 Using the Menus Navigating through TV Menus 20 Other Information How to Care for Your BRAVIA 21 Things to consider 21 Troubleshooting 21 Specifications 22 Index 23 Customer Support United States http://www.sony.com/tvsupport Canada http://www.sony.ca/support On-line Registration United ...
... Inserting Batteries into the Remote Control 11 Initial Setup 11 Operating the TV Remote Control Button Description 12 TV Controls and Indicators 14 Using Features Using BRAVIA® Sync™ with Control for HDMI 15 Favorites 15 Wide Mode 16 Wide Mode with PC 17 Photo and Music ...18 Using the Menus Navigating through TV Menus 20 Other Information How to Care for Your BRAVIA 21 Things to consider 21 Troubleshooting 21 Specifications 22 Index 23 Customer Support United States http://www.sony.com/tvsupport Canada http://www.sony.ca/support On-line Registration United ...

Operating Instructions
Page 5
... Your new BRAVIA High Definition LCD TV will see page 18). ➢ ECO Settings: This model includes a ...automatically adjusts the brightness of the screen resulting in more details on the online Reference Book at your fingertips for HDMI function (page 15). ➢ Motionflow: Enhances the smoothness of picture movement to reduce the blur (For ...the Quick Setup Guide, enclosed separately, for connecting other Sony equipment supporting the Control for easy access to programs and inputs (page 15). ➢ Auto Wide Mode: Set your TV to auto adjust the screen based on the signal resolution...
... Your new BRAVIA High Definition LCD TV will see page 18). ➢ ECO Settings: This model includes a ...automatically adjusts the brightness of the screen resulting in more details on the online Reference Book at your fingertips for HDMI function (page 15). ➢ Motionflow: Enhances the smoothness of picture movement to reduce the blur (For ...the Quick Setup Guide, enclosed separately, for connecting other Sony equipment supporting the Control for easy access to programs and inputs (page 15). ➢ Auto Wide Mode: Set your TV to auto adjust the screen based on the signal resolution...
Operating Instructions
Page 7
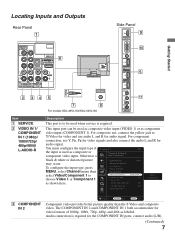
For component connection, use audio L and R for audio signal. Audio connection is required for HDMI On Device List Device Auto Power Off Off TV Auto Power On Off Video 1 Component 1 Signal Diagnostics Setup 3 COMPONENT IN 2 Change RETURN Back MENU Exit Component video provides better picture quality than the S Video ...
For component connection, use audio L and R for audio signal. Audio connection is required for HDMI On Device List Device Auto Power Off Off TV Auto Power On Off Video 1 Component 1 Signal Diagnostics Setup 3 COMPONENT IN 2 Change RETURN Back MENU Exit Component video provides better picture quality than the S Video ...
Operating Instructions
Page 8
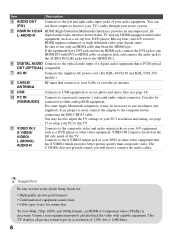
...equipment. L-AUDIO-R digital audio/video interface between this TV. Connect your equipment properly and playback the video with DVI-to-HDMI cable or adapter) jack, and connect the audio jack to the AUDIO IN (L/R) jacks below the HDMI IN 1. 6 DIGITAL AUDIO Connects to the optical ... to the left side panel of equipment connections • Cable types to use these outputs to listen to your TV's audio through your stereo system. 5 HDMI IN 1/2/3/4 HDMI (High-Definition Multimedia Interface) provides an uncompressed, all picture format types in a resolution of your DVD or other...
...equipment. L-AUDIO-R digital audio/video interface between this TV. Connect your equipment properly and playback the video with DVI-to-HDMI cable or adapter) jack, and connect the audio jack to the AUDIO IN (L/R) jacks below the HDMI IN 1. 6 DIGITAL AUDIO Connects to the optical ... to the left side panel of equipment connections • Cable types to use these outputs to listen to your TV's audio through your stereo system. 5 HDMI IN 1/2/3/4 HDMI (High-Definition Multimedia Interface) provides an uncompressed, all picture format types in a resolution of your DVD or other...

Operating Instructions
Page 12
...from the screen when displaying menu items and settings. 7 MENU Press to the audio output of the attached speakers from your TV (see the online Reference Book for HDMI function (not available on the remote control may also operate BRAVIA® Sync™ equipment. See page 16. 6 ... Description 1 DISPLAY 2 CC 3 BRAVIA Sync Press to cycle through the available Wide Mode settings. To change or customize the CC display, see page 15 for HDMI equipment). m (fast reverse): Press to exit. M (fast forward): Press to play a program in a few seconds or press again to play a program ...
...from the screen when displaying menu items and settings. 7 MENU Press to the audio output of the attached speakers from your TV (see the online Reference Book for HDMI function (not available on the remote control may also operate BRAVIA® Sync™ equipment. See page 16. 6 ... Description 1 DISPLAY 2 CC 3 BRAVIA Sync Press to cycle through the available Wide Mode settings. To change or customize the CC display, see page 15 for HDMI equipment). m (fast reverse): Press to exit. M (fast forward): Press to play a program in a few seconds or press again to play a program ...
Operating Instructions
Page 15
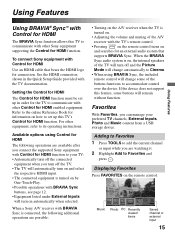
...searches for an external audio system that bears the HDMI logo for connection. To connect Sony equipment with the TV documentation. When the BRAVIA Sync audio system is turned on how to set up this TV's Control for HDMI function. If the device does not support this ...are watching it. 2 Highlight Add to Cinema. • When using Control for HDMI The following additional operations are available after you connect the supported Sony equipment with Control for HDMI function to your preferred TV channels, External Inputs, Photo and Music content from a USB storage device. For...
...searches for an external audio system that bears the HDMI logo for connection. To connect Sony equipment with the TV documentation. When the BRAVIA Sync audio system is turned on how to set up this TV's Control for HDMI function. If the device does not support this ...are watching it. 2 Highlight Add to Cinema. • When using Control for HDMI The following additional operations are available after you connect the supported Sony equipment with Control for HDMI function to your preferred TV channels, External Inputs, Photo and Music content from a USB storage device. For...

Operating Instructions
Page 16
.... 2 Highlight Remove from Favorites and press . ~ • Auto Program will clear your preference. You can manually change the Wide Mode setting while watching TV by pressing the WIDE button on the original source, a black frame or black bars may surround the picture. Full pixel ~ • Normal is available... with 480i or 480p sources only as component video input, HDMI input and digital TV. • Full Pixel is not available. Select Auto Wide and set to Auto Wide Press MENU then go to the Screen menu. ...
.... 2 Highlight Remove from Favorites and press . ~ • Auto Program will clear your preference. You can manually change the Wide Mode setting while watching TV by pressing the WIDE button on the original source, a black frame or black bars may surround the picture. Full pixel ~ • Normal is available... with 480i or 480p sources only as component video input, HDMI input and digital TV. • Full Pixel is not available. Select Auto Wide and set to Auto Wide Press MENU then go to the Screen menu. ...
Operating Instructions
Page 17
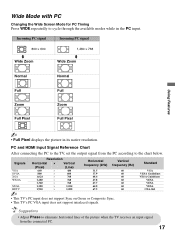
PC and HDMI Input Signal Reference Chart After connecting the PC to the TV, set the output signal from the connected PC. 17 Signals VGA SVGA XGA WXGA SXGA HDTV ~ Resolution Horizontal × Vertical (Pixel) (Line) 640 × 480 ....5 37.9 48.4 47.8 47.7 64.0 67.5 Vertical frequency (Hz) 60 60 60 60 60 60 60 • This TV's PC input does not support Sync on Green or Composite Sync. • This TV's PC VGA input does not support interlaced signals. Incoming PC signal Incoming PC signal 800 × 600 m Wide Zoom...
PC and HDMI Input Signal Reference Chart After connecting the PC to the TV, set the output signal from the connected PC. 17 Signals VGA SVGA XGA WXGA SXGA HDTV ~ Resolution Horizontal × Vertical (Pixel) (Line) 640 × 480 ....5 37.9 48.4 47.8 47.7 64.0 67.5 Vertical frequency (Hz) 60 60 60 60 60 60 60 • This TV's PC input does not support Sync on Green or Composite Sync. • This TV's PC VGA input does not support interlaced signals. Incoming PC signal Incoming PC signal 800 × 600 m Wide Zoom...

Operating Instructions
Page 22
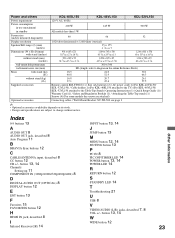
..., Non-differential Huffman coding) and EXIF 2.2. This TV does not support MTP or PTP protocols used by some...and 48 Khz. Screen size (inches measured diagonally) 31.5 (32 class) 40 46 52 54.6 (55 class) Display resolution 1,920 dots (horizontal) × 1,080... 69 Analog Cable: 1 - 135 / Digital Cable: 1 - 135 Panel system LCD (Liquid Crystal Display) Panel Speaker output 10 W + 10 W Input/Output jacks CABLE...480p, 720p, 1080i, 1080p AUDIO: 500 mVrms (Typical) / Impedance: 47 kilohms HDMI IN 1/2/3/4 HDMI: Video: 480i, 480p, 720p, 1080i, 1080p, 1080/24p / Audio: Two channel...
..., Non-differential Huffman coding) and EXIF 2.2. This TV does not support MTP or PTP protocols used by some...and 48 Khz. Screen size (inches measured diagonally) 31.5 (32 class) 40 46 52 54.6 (55 class) Display resolution 1,920 dots (horizontal) × 1,080... 69 Analog Cable: 1 - 135 / Digital Cable: 1 - 135 Panel system LCD (Liquid Crystal Display) Panel Speaker output 10 W + 10 W Input/Output jacks CABLE...480p, 720p, 1080i, 1080p AUDIO: 500 mVrms (Typical) / Impedance: 47 kilohms HDMI IN 1/2/3/4 HDMI: Video: 480i, 480p, 720p, 1080i, 1080p, 1080/24p / Audio: Two channel...
Operating Instructions
Page 23
... size (mm) Mass with stand (kg) (lb.) without stand (kg) (lb.) Supplied accessories Optional accessories 40 46 52 1,920 dots (horizontal) × 1,080 lines (vertical) 35 × 175 1 7/16 × 7...AC power cord (1) (For KDL-46VL150/ KDL-52VL150) / Cable holder (1) (For KDL-40SL150 attached to the TV) (For KDL-46VL150/ KDL-52VL150 attached to the Table-Top Stand) / Operating Instructions (1) / Quick Setup Guide... OUT (OPTICAL) 8 DISPLAY button 12 E ENT button 13 F Favorites 15 FAVORITES button 12 H HDMI IN jack, described 8 I Infrared Receiver (IR) 14 INPUT button 13, 14 J JUMP button ...
... size (mm) Mass with stand (kg) (lb.) without stand (kg) (lb.) Supplied accessories Optional accessories 40 46 52 1,920 dots (horizontal) × 1,080 lines (vertical) 35 × 175 1 7/16 × 7...AC power cord (1) (For KDL-46VL150/ KDL-52VL150) / Cable holder (1) (For KDL-40SL150 attached to the TV) (For KDL-46VL150/ KDL-52VL150 attached to the Table-Top Stand) / Operating Instructions (1) / Quick Setup Guide... OUT (OPTICAL) 8 DISPLAY button 12 E ENT button 13 F Favorites 15 FAVORITES button 12 H HDMI IN jack, described 8 I Infrared Receiver (IR) 14 INPUT button 13, 14 J JUMP button ...


