
Operating Instructions
Page 5
...sony.com/referencebook. 5 The picture quality may not be as sharp as with complicated operation. Light Sensor - Detects the amount of light in your room and automatically adjusts the brightness of the screen resulting in any light condition. TV Feature Highlights Your new BRAVIA High Definition LCD TV..., you get started enjoying your new TV. ➢ BRAVIA Sync: Your BRAVIA TV communicates with your pocketbook and the environment. The 16:9 fills your favorite music (see black bars on the big screen and listen to your BRAVIA screen, maintaining a crisp, clear, vivid picture...
...sony.com/referencebook. 5 The picture quality may not be as sharp as with complicated operation. Light Sensor - Detects the amount of light in your room and automatically adjusts the brightness of the screen resulting in any light condition. TV Feature Highlights Your new BRAVIA High Definition LCD TV..., you get started enjoying your new TV. ➢ BRAVIA Sync: Your BRAVIA TV communicates with your pocketbook and the environment. The 16:9 fills your favorite music (see black bars on the big screen and listen to your BRAVIA screen, maintaining a crisp, clear, vivid picture...
Operating Instructions
Page 7
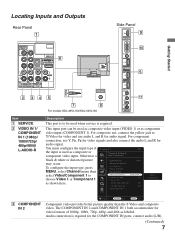
Otherwise a Picture Video/Component 1 black & white or distorted picture Cable/Antenna Cable may occur. ... and 480i as component video input (COMPONENT 1). Sound Add Digital Channels To configure the input type, press Screen MENU, select Channel menu then Auto Program Manage Channels Manage Inputs select Video/Component 1 to Y/Video for video...video input. For component connection, use audio L and R for HDMI On Device List Device Auto Power Off Off TV Auto Power On Off Video 1 Component 1 Signal Diagnostics Setup 3 COMPONENT IN 2 Change RETURN Back MENU Exit ...
Otherwise a Picture Video/Component 1 black & white or distorted picture Cable/Antenna Cable may occur. ... and 480i as component video input (COMPONENT 1). Sound Add Digital Channels To configure the input type, press Screen MENU, select Channel menu then Auto Program Manage Channels Manage Inputs select Video/Component 1 to Y/Video for video...video input. For component connection, use audio L and R for HDMI On Device List Device Auto Power Off Off TV Auto Power On Off Video 1 Component 1 Signal Diagnostics Setup 3 COMPONENT IN 2 Change RETURN Back MENU Exit ...

Operating Instructions
Page 16
... channel or input while you to select the screen display of your remote control. Wide Mode The Wide Mode feature allows you are watching it. 2 Highlight Remove from Favorites and press . ~ • Auto Program will clear your TV channels from high-definition source such as they ... 11). You can manually change the Wide Mode setting while watching TV by pressing the WIDE button on the original source, a black frame or black bars may surround the picture. Based on your preference. Changing the Wide Screen Mode Press WIDE repeatedly to cycle through the available modes. 4:3 ...
... channel or input while you to select the screen display of your remote control. Wide Mode The Wide Mode feature allows you are watching it. 2 Highlight Remove from Favorites and press . ~ • Auto Program will clear your TV channels from high-definition source such as they ... 11). You can manually change the Wide Mode setting while watching TV by pressing the WIDE button on the original source, a black frame or black bars may surround the picture. Based on your preference. Changing the Wide Screen Mode Press WIDE repeatedly to cycle through the available modes. 4:3 ...


