
Operating Instructions
Page 1
3-700-289-11(1) LCD Digital Color TV Operating Instructions KDL-32L4000 KDL-37L4000 © 2008 Sony Corporation
3-700-289-11(1) LCD Digital Color TV Operating Instructions KDL-32L4000 KDL-37L4000 © 2008 Sony Corporation
Operating Instructions
Page 2
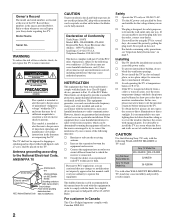
... SU-WL500 SU-FL300M Use with the instructions, may cause instability and possibly result in this manual could void your Sony dealer regarding this TV to install the TV in Canada This Class B digital apparatus complies with the following two conditions: (1) This device may cause undesired operation....: 858-942-2230 This device complies with the limits for help. Safety s Operate the TV only on page 3. CAUTION Use the following measures: s Reorient or relocate the receiving antenna. Sony TV-Stand Model No. It is intended to alert the user to the presence of electric shock...
... SU-WL500 SU-FL300M Use with the instructions, may cause instability and possibly result in this manual could void your Sony dealer regarding this TV to install the TV in Canada This Class B digital apparatus complies with the following two conditions: (1) This device may cause undesired operation....: 858-942-2230 This device complies with the limits for help. Safety s Operate the TV only on page 3. CAUTION Use the following measures: s Reorient or relocate the receiving antenna. Sony TV-Stand Model No. It is intended to alert the user to the presence of electric shock...

Operating Instructions
Page 3
...damaged in the U.S. Availability of digital cable television programming in accordance with one wider than the other countries. "BRAVIA", and Sony Corporation. Install in your area depends on or pinched particularly at plugs, convenience receptacles, and the point where they exit from... use caution when moving the cart/apparatus combination to avoid injury from Dolby Laboratories. Be sure to subcontract the installation to Sony dealer or licensed contractors and pay adequate attention to a cable service provider. Note This television includes a QAM demodulator which ...
...damaged in the U.S. Availability of digital cable television programming in accordance with one wider than the other countries. "BRAVIA", and Sony Corporation. Install in your area depends on or pinched particularly at plugs, convenience receptacles, and the point where they exit from... use caution when moving the cart/apparatus combination to avoid injury from Dolby Laboratories. Be sure to subcontract the installation to Sony dealer or licensed contractors and pay adequate attention to a cable service provider. Note This television includes a QAM demodulator which ...
Operating Instructions
Page 4
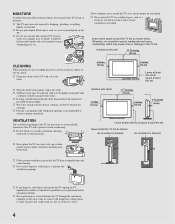
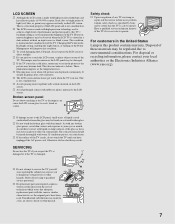
... cleaning, be blocked. Never install the TV set as a bookcase or built-in contact with stand 4 inches (10 cm) 11 7/8 inches (30 cm) 4 inches (10 cm) 2 3/8 inches (6 cm) Leave at least this much space around the set . s Wipe the LCD screen gently with cloth or other similar ...surface where ventilation openings may be sure to unplug the power cord to protect it further. Wall Wall s Unless proper ventilation is provided, the TV may come in cabinet, unless proper ventilation is ...
... cleaning, be blocked. Never install the TV set as a bookcase or built-in contact with stand 4 inches (10 cm) 11 7/8 inches (30 cm) 4 inches (10 cm) 2 3/8 inches (6 cm) Leave at least this much space around the set . s Wipe the LCD screen gently with cloth or other similar ...surface where ventilation openings may be sure to unplug the power cord to protect it further. Wall Wall s Unless proper ventilation is provided, the TV may come in cabinet, unless proper ventilation is ...

Operating Instructions
Page 5
... items susceptible to magnetic fields away from the speaker. s Never install the TV on top of the TV. s Do not install the TV on the LCD panel. The TV should be installed near a radiator or a heating vent. INSTALLATION The TV should not be exposed to rain or direct sunlight in order to avoid damage... and possible fire or electric shock. The TV may cause the TV to fall ...
... items susceptible to magnetic fields away from the speaker. s Never install the TV on top of the TV. s Do not install the TV on the LCD panel. The TV should be installed near a radiator or a heating vent. INSTALLATION The TV should not be exposed to rain or direct sunlight in order to avoid damage... and possible fire or electric shock. The TV may cause the TV to fall ...
Operating Instructions
Page 6
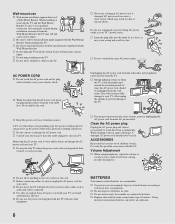
...Mount Bracket. s Do not allow children to suit your TV; s Before connecting cables, be sure to follow the installation guide supplied with your TV. s Use only an original Sony AC power cord with the Wall-Mount Bracket when installing the TV. no brand substitution is left unattended and unused for ...signs of time, the AC power cord should never be connected to avoid dust from the wall outlet will avoid possible damage to your TV. s...
...Mount Bracket. s Do not allow children to suit your TV; s Before connecting cables, be sure to follow the installation guide supplied with your TV. s Use only an original Sony AC power cord with the Wall-Mount Bracket when installing the TV. no brand substitution is left unattended and unused for ...signs of time, the AC power cord should never be connected to avoid dust from the wall outlet will avoid possible damage to your TV. s...
Operating Instructions
Page 7
... the picture or the picture may appear constantly on the LCD screen. Disposal of these may be damaged. As with any TV servicing or repair, ask the service technician to perform routine safety checks as specified by Sony and to certify that adequate replacement parts with the same ...with high-precision technology and to achieve a high level of performance and picture quality, this TV's backlight setting is set to maximize the brightness of the TV. s The LCD screen and enclosure get warm when the TV is used . This is not a malfunction. This is a structural property of liquid ...
... the picture or the picture may appear constantly on the LCD screen. Disposal of these may be damaged. As with any TV servicing or repair, ask the service technician to perform routine safety checks as specified by Sony and to certify that adequate replacement parts with the same ...with high-precision technology and to achieve a high level of performance and picture quality, this TV's backlight setting is set to maximize the brightness of the TV. s The LCD screen and enclosure get warm when the TV is used . This is not a malfunction. This is a structural property of liquid ...

Operating Instructions
Page 9
... 19 Setting Up the Channel List - Initial Setup 20 Basic Operations Remote Control ...21 TV Controls...24 Using the Menus Overview of 10 Assembling the Table-Top Stand 10 Connecting the TV ...12 Cable System or VHF/UHF Antenna System 12 Cable Box/Digital Cable Box 12 ...13 Satellite Receiver and Cable/Antenna 13 VCR, Cable and Antenna 14 When Connecting to Optional Equipment 15 Securing the TV...17 Preventing the TV from Toppling 17 Use a Sony TV Stand 17 Recommended Measures to the World of MENU ...25 Using the Picture Settings 25 Using the Sound Settings ...
... 19 Setting Up the Channel List - Initial Setup 20 Basic Operations Remote Control ...21 TV Controls...24 Using the Menus Overview of 10 Assembling the Table-Top Stand 10 Connecting the TV ...12 Cable System or VHF/UHF Antenna System 12 Cable Box/Digital Cable Box 12 ...13 Satellite Receiver and Cable/Antenna 13 VCR, Cable and Antenna 14 When Connecting to Optional Equipment 15 Securing the TV...17 Preventing the TV from Toppling 17 Use a Sony TV Stand 17 Recommended Measures to the World of MENU ...25 Using the Picture Settings 25 Using the Sound Settings ...
Operating Instructions
Page 10
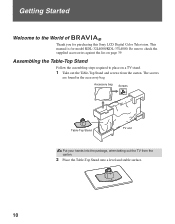
... Put your hands into the package, when taking out the TV from the carton. Assembling the Table-Top Stand Follow the assembling steps required to place on page 39. Be sure to the World of ® ... model KDL-32L4000/KDL-37L4000. The screws are found in the accessory bag. Getting Started Welcome to check the supplied accessories against the list on a TV stand. 1 Take out the Table-Top Stand and screws from the carton. 2 Place the Table-Top Stand onto a level and stable surface. 10 This manual...
... Put your hands into the package, when taking out the TV from the carton. Assembling the Table-Top Stand Follow the assembling steps required to place on page 39. Be sure to the World of ® ... model KDL-32L4000/KDL-37L4000. The screws are found in the accessory bag. Getting Started Welcome to check the supplied accessories against the list on a TV stand. 1 Take out the Table-Top Stand and screws from the carton. 2 Place the Table-Top Stand onto a level and stable surface. 10 This manual...
Operating Instructions
Page 11
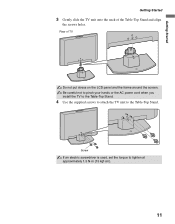
Be careful not to pinch your hands or the AC power cord when you install the TV to the Table-Top Stand. 4 Use the supplied screws to attach the TV unit to tighten at approximately 1.5 N·m {15 kgf·cm}. 11 Screw If an electric screwdriver is used, set the torque to the Table-Top Stand. Getting Started Getting Started 3 Gently slide the TV unit onto the neck of TV Do not put stress on the LCD panel and the frame around the screen. Rear of the Table-Top Stand and align the screws holes.
Be careful not to pinch your hands or the AC power cord when you install the TV to the Table-Top Stand. 4 Use the supplied screws to attach the TV unit to tighten at approximately 1.5 N·m {15 kgf·cm}. 11 Screw If an electric screwdriver is used, set the torque to the Table-Top Stand. Getting Started Getting Started 3 Gently slide the TV unit onto the neck of TV Do not put stress on the LCD panel and the frame around the screen. Rear of the Table-Top Stand and align the screws holes.
Operating Instructions
Page 12
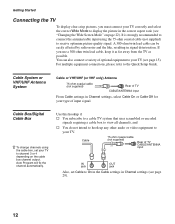
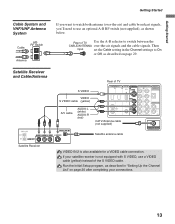
...or VHF/UHF Antenna System Cable or VHF/UHF (or VHF only) Antenna 75-ohm coaxial cable (not supplied) Rear of optional equipment to your TV. Auto Program will fix the channel automatically. Cable Box/Digital Cable Box z To change channels using the 75-ohm coaxial cable (not supplied) ... please refer to receive optimum picture quality signal. Cable 75-ohm coaxial cable (not supplied) Rear of input signal. If you must connect your TV correctly and select the correct Wide Mode to display the picture in Channel settings (see page 15). You can be easily affected by radio noise...
...or VHF/UHF Antenna System Cable or VHF/UHF (or VHF only) Antenna 75-ohm coaxial cable (not supplied) Rear of optional equipment to your TV. Auto Program will fix the channel automatically. Cable Box/Digital Cable Box z To change channels using the 75-ohm coaxial cable (not supplied) ... please refer to receive optimum picture quality signal. Cable 75-ohm coaxial cable (not supplied) Rear of input signal. If you must connect your TV correctly and select the correct Wide Mode to display the picture in Channel settings (see page 15). You can be easily affected by radio noise...
Operating Instructions
Page 13
... the A-B selector to switch between the CABLE/ANTENNA over -the-air) and cable broadcast signals, you'll need to use a VIDEO cable (yellow) instead of TV IN PC IN VIDEO IN COMPONENT IN DIGITAL 1 2 1 1 2 AUDIO OUT RGB S VIDEO (OPTICAL) Y L AUDIO R VIDEO L AUDIO (MONO) AUDIO R PB PR AUDIO OUT L AUDIO R (1080i/720p...
... the A-B selector to switch between the CABLE/ANTENNA over -the-air) and cable broadcast signals, you'll need to use a VIDEO cable (yellow) instead of TV IN PC IN VIDEO IN COMPONENT IN DIGITAL 1 2 1 1 2 AUDIO OUT RGB S VIDEO (OPTICAL) Y L AUDIO R VIDEO L AUDIO (MONO) AUDIO R PB PR AUDIO OUT L AUDIO R (1080i/720p...
Operating Instructions
Page 14
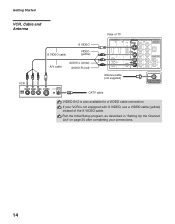
... described in "Setting Up the Channel List" on page 20 after completing your VCR is not equipped with S VIDEO, use a VIDEO cable (yellow) instead of TV IN PC IN VIDEO IN COMPONENT IN DIGITAL 1 2 1 1 2 AUDIO OUT RGB S VIDEO (OPTICAL) Y L AUDIO R VIDEO L AUDIO (MONO) AUDIO R PB PR AUDIO OUT L AUDIO R (1080i/720p...
... described in "Setting Up the Channel List" on page 20 after completing your VCR is not equipped with S VIDEO, use a VIDEO cable (yellow) instead of TV IN PC IN VIDEO IN COMPONENT IN DIGITAL 1 2 1 1 2 AUDIO OUT RGB S VIDEO (OPTICAL) Y L AUDIO R VIDEO L AUDIO (MONO) AUDIO R PB PR AUDIO OUT L AUDIO R (1080i/720p...
Operating Instructions
Page 15
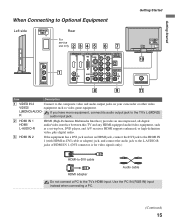
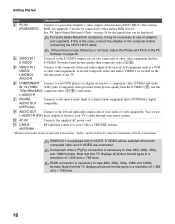
... OUT L AUDIO R (1080i/720p/480p/480i) L AUDIO R (FIX) 8 9 0 CABLE/ANTENNA qa Item Description 1 VIDEO IN 2 Connect to the TV's L (MONO) audio input jack. 2 HDMI IN 1 HDMI/ L-AUDIO-R HDMI (High-Definition Multimedia Interface) provides an uncompressed, all-digital audio/video interface between this... TV and any HDMI-equipped audio/video equipment, such as video game equipment. HDMI supports enhanced, or high-definition video, plus digital ...
... OUT L AUDIO R (1080i/720p/480p/480i) L AUDIO R (FIX) 8 9 0 CABLE/ANTENNA qa Item Description 1 VIDEO IN 2 Connect to the TV's L (MONO) audio input jack. 2 HDMI IN 1 HDMI/ L-AUDIO-R HDMI (High-Definition Multimedia Interface) provides an uncompressed, all-digital audio/video interface between this... TV and any HDMI-equipped audio/video equipment, such as video game equipment. HDMI supports enhanced, or high-definition video, plus digital ...
Operating Instructions
Page 16
...; 768 lines. Note that can use an adapter (not supplied). Component video provides better picture quality than composite video (1/8). If this TV displays all picture format types in a resolution of Dolby Laboratories. You can be selected when both composite video and S VIDEO are trademarks...S VIDEO (5) and the 720p/480p/480i)/ composite video (1/8) connections. Component video (YPBPR) connection is the case, connect the adapter to your TV's audio through your stereo system. 0 AC IN Connects the supplied AC power cord. See "PC Input Signal Reference Chart" on your A/V equipment...
...; 768 lines. Note that can use an adapter (not supplied). Component video provides better picture quality than composite video (1/8). If this TV displays all picture format types in a resolution of Dolby Laboratories. You can be selected when both composite video and S VIDEO are trademarks...S VIDEO (5) and the 720p/480p/480i)/ composite video (1/8) connections. Component video (YPBPR) connection is the case, connect the adapter to your TV's audio through your stereo system. 0 AC IN Connects the supplied AC power cord. See "PC Input Signal Reference Chart" on your A/V equipment...
Operating Instructions
Page 17
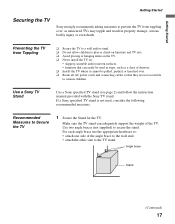
...8226; furniture that they are not accessible to curious children. Getting Started Getting Started Securing the TV Sony strongly recommends taking measures to Secure the TV 1 Secure the Stand for the TV. as a chest of the angle brace to the wall stud. • attach the ...one side of drawers. ❑ Install the TV where it cannot be used , consider the following recommended measures. Use a Sony TV Stand Use a Sony specified TV stand (see page 2) and follow the instruction manual provided with the Sony TV stand. Make sure the TV stand can easily be pulled, pushed, or...
...8226; furniture that they are not accessible to curious children. Getting Started Getting Started Securing the TV Sony strongly recommends taking measures to Secure the TV 1 Secure the Stand for the TV. as a chest of the angle brace to the wall stud. • attach the ...one side of drawers. ❑ Install the TV where it cannot be used , consider the following recommended measures. Use a Sony TV Stand Use a Sony specified TV stand (see page 2) and follow the instruction manual provided with the Sony TV stand. Make sure the TV stand can easily be pulled, pushed, or...
Operating Instructions
Page 18
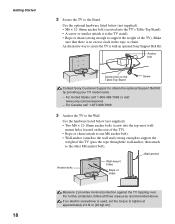
...located on the Table-Top Stand Screw Contact Sony Customer Support to the Stand. For Canada call : 1-800-488-7669 or visit: www.sony.com/accessories - Getting Started 18 2 Secure the TV to obtain the optional Support Belt Kit by providing your TV model name. - If an electric screwdriver... is with an optional Sony Support Belt Kit. For United States call : 1-877-899-...
...located on the Table-Top Stand Screw Contact Sony Customer Support to the Stand. For Canada call : 1-800-488-7669 or visit: www.sony.com/accessories - Getting Started 18 2 Secure the TV to obtain the optional Support Belt Kit by providing your TV model name. - If an electric screwdriver... is with an optional Sony Support Belt Kit. For United States call : 1-877-899-...
Operating Instructions
Page 20
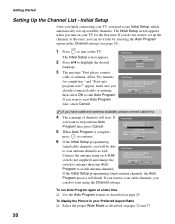
...ais Initial Setup First please connect cable or antenna. Allow 50+ minutes for completion. Press to scan cable channels, you finish connecting your TV for the first time. Cancel found antenna channels, the Auto Program process will finish. Allow 50+ minutes for completion. Initial Setup After ... an A-B RF switch (not supplied) and change the switch to antenna then start Auto Program later, select Cancel. If you turn on your TV, you will start Auto Program. POWER 1 Press to stop and run Initial Setup, which automatically sets up the channels at a later time &#...
...ais Initial Setup First please connect cable or antenna. Allow 50+ minutes for completion. Press to scan cable channels, you finish connecting your TV for the first time. Cancel found antenna channels, the Auto Program process will finish. Allow 50+ minutes for completion. Initial Setup After ... an A-B RF switch (not supplied) and change the switch to antenna then start Auto Program later, select Cancel. If you turn on your TV, you will start Auto Program. POWER 1 Press to stop and run Initial Setup, which automatically sets up the channels at a later time &#...
Operating Instructions
Page 21
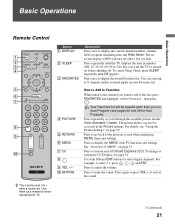
...For details, see page 34. Press to the previous screen when displaying MENU items and settings. Use them as a reference when operating the TV. (Continued) 21 Press to go back to adjust the volume. Press to mute the sound. Press to display the MENU with 0-9 and ... 5 button and CH + have a tactile dot. Press repeatedly to enter 2.1, press 2 , , 1 and ENT. Use with TV functions and settings. To cancel Sleep Timer, press SLEEP repeatedly until the TV displays the time in the Picture settings. Press once to select digital channels. Press again or press VOL + to...
...For details, see page 34. Press to the previous screen when displaying MENU items and settings. Use them as a reference when operating the TV. (Continued) 21 Press to go back to adjust the volume. Press to mute the sound. Press to display the MENU with 0-9 and ... 5 button and CH + have a tactile dot. Press repeatedly to enter 2.1, press 2 , , 1 and ENT. Use with TV functions and settings. To cancel Sleep Timer, press SLEEP repeatedly until the TV displays the time in the Picture settings. Press once to select digital channels. Press again or press VOL + to...
Operating Instructions
Page 22
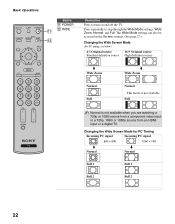
... qs WIDE qs Description Press to step through the Wide Mode settings: Wide Zoom, Normal, and Full. Press repeatedly to turn on and off the TV. The Wide Mode settings can also be accessed in the Screen settings. (See page 27.) Changing the Wide Screen Mode (For PC timing, see below... available when you are watching a 720p or 1080i source from a component video input or a 720p, 1080i or 1080p source from an HDMI input or a digital TV.
... qs WIDE qs Description Press to step through the Wide Mode settings: Wide Zoom, Normal, and Full. Press repeatedly to turn on and off the TV. The Wide Mode settings can also be accessed in the Screen settings. (See page 27.) Changing the Wide Screen Mode (For PC timing, see below... available when you are watching a 720p or 1080i source from a component video input or a 720p, 1080i or 1080p source from an HDMI input or a digital TV.


