Operating Instructions
Page 3
... 39 TV Settings Descriptions 40 Product Support 40 Clock/Timers Settings 40 Picture Settings 41 Sound Settings 43 Screen Settings 44 Channel Settings 46 CC Closed Captions (CC) Settings 47 Parental Lock Settings 47 External Inputs Settings 50 HDMI Settings 50 Network Settings 51 General Setup Settings 51 Initial Setup 52 Other Information Troubleshooting 53 Specifications 57 Index 58 Customer Support United States http://www.sony...
... 39 TV Settings Descriptions 40 Product Support 40 Clock/Timers Settings 40 Picture Settings 41 Sound Settings 43 Screen Settings 44 Channel Settings 46 CC Closed Captions (CC) Settings 47 Parental Lock Settings 47 External Inputs Settings 50 HDMI Settings 50 Network Settings 51 General Setup Settings 51 Initial Setup 52 Other Information Troubleshooting 53 Specifications 57 Index 58 Customer Support United States http://www.sony...

Operating Instructions
Page 4
... setup connections (see pages 21, 44 and 45). 4 The picture quality may not be as sharp as the quality of the signal it receives. http://www.sony.com/HDTV Canada http://www.sonystyle.ca/hd The Four Steps to a Full HD Experience: Set, Sound, Source, and Setup Along with different aspect ratios (the..., you will notice a big difference. When a 4:3 image is only as good as with HD sources. ~ • You can use the Wide Mode function of the TV to adjust the 4:3 image to fit the entire screen (see page 12). Welcome to the World of BRAVIA® Thank you for information on the...
... setup connections (see pages 21, 44 and 45). 4 The picture quality may not be as sharp as the quality of the signal it receives. http://www.sony.com/HDTV Canada http://www.sonystyle.ca/hd The Four Steps to a Full HD Experience: Set, Sound, Source, and Setup Along with different aspect ratios (the..., you will notice a big difference. When a 4:3 image is only as good as with HD sources. ~ • You can use the Wide Mode function of the TV to adjust the 4:3 image to fit the entire screen (see page 12). Welcome to the World of BRAVIA® Thank you for information on the...
Operating Instructions
Page 5
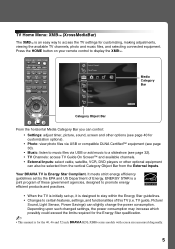
... PLAY SYNC MENU PAUSE STOP THEATER SOUND PICTURE WIDE CC FREEZE Product Support Clock/Timers Settings Sound Screen Channel Media Category Bar TV Category Object Bar From the horizontal Media Category Bar you can control: • Settings: adjust timer, picture, sound, screen and other optional equipment ... players or other options (see page 40 for the 40, 46 and 52 inch BRAVIA KDL-XBR6 series models with screen size measured diagonally. 5 Press the HOME button on your remote control to access the TV settings for the Energy Star qualification. ~ • This manual is Energy Star...
... PLAY SYNC MENU PAUSE STOP THEATER SOUND PICTURE WIDE CC FREEZE Product Support Clock/Timers Settings Sound Screen Channel Media Category Bar TV Category Object Bar From the horizontal Media Category Bar you can control: • Settings: adjust timer, picture, sound, screen and other optional equipment ... players or other options (see page 40 for the 40, 46 and 52 inch BRAVIA KDL-XBR6 series models with screen size measured diagonally. 5 Press the HOME button on your remote control to access the TV settings for the Energy Star qualification. ~ • This manual is Energy Star...
Operating Instructions
Page 7
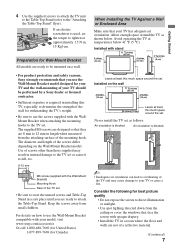
... flyer). Use of the mounting hook. Consider the following for withstanding the TV's weight. • Be sure to use the Wall-Mount Bracket model designed for Wall-Mount Bracket All models are not of the wall for best picture quality • Do not expose the screen to 12 mm in a ...that face the screen with opaque drapery. • Install the TV in a room where the floor and walls are ready to be performed by a Sony dealer or licensed contractor. • Sufficient expertise is required in internal damage to the TV set or cause it to use the Wall-Mount Bracket compatible with your...
... flyer). Use of the mounting hook. Consider the following for withstanding the TV's weight. • Be sure to use the Wall-Mount Bracket model designed for Wall-Mount Bracket All models are not of the wall for best picture quality • Do not expose the screen to 12 mm in a ...that face the screen with opaque drapery. • Install the TV in a room where the floor and walls are ready to be performed by a Sony dealer or licensed contractor. • Sufficient expertise is required in internal damage to the TV set or cause it to use the Wall-Mount Bracket compatible with your...
Operating Instructions
Page 11
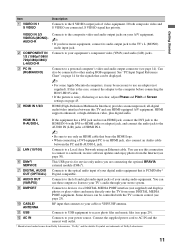
...jack and not an HDMI jack, connect the DVI jack to the HDMI IN 4 (with the TV's remote control (see page 30). Some devices can use this connection to connect to a network,... supplied). Getting Started Item 1 VIDEO IN 1 S VIDEO Description Connects to the S VIDEO output jack of Screen settings on page 45. "Dolby" and the double-D symbol are connected, S VIDEO signal has priority. VIDEO IN ...connect the adapter to the computer before connecting the HD15-HD15 cable. • If the picture is PCM/Dolby* OUT (OPTICAL) Digital compatible. 8 AUDIO OUT (VAR/FIX) Connects to...
...jack and not an HDMI jack, connect the DVI jack to the HDMI IN 4 (with the TV's remote control (see page 30). Some devices can use this connection to connect to a network,... supplied). Getting Started Item 1 VIDEO IN 1 S VIDEO Description Connects to the S VIDEO output jack of Screen settings on page 45. "Dolby" and the double-D symbol are connected, S VIDEO signal has priority. VIDEO IN ...connect the adapter to the computer before connecting the HD15-HD15 cable. • If the picture is PCM/Dolby* OUT (OPTICAL) Digital compatible. 8 AUDIO OUT (VAR/FIX) Connects to...

Operating Instructions
Page 12
... connect the CABLE/ANTENNA input using a 75-ohm coaxial cable to receive optimum picture quality. For the best possible picture, make sure you choose (see page 46). Cable Antenna A-B RF switch A Rear of TV CABLE/ANTENNA HD Cable Box/HD Satellite Box You can enjoy high-definition and...or VHF/UHF (or VHF only) 75-ohm coaxial cable Rear of TV B CABLE/ANTENNA ~ • Be sure to set the Signal Type setting to a high-definition cable service or a high-definition satellite service. 3. Connecting the TV Cable System or VHF/UHF Antenna System You can enjoy high-definition programming ...
... connect the CABLE/ANTENNA input using a 75-ohm coaxial cable to receive optimum picture quality. For the best possible picture, make sure you choose (see page 46). Cable Antenna A-B RF switch A Rear of TV CABLE/ANTENNA HD Cable Box/HD Satellite Box You can enjoy high-definition and...or VHF/UHF (or VHF only) 75-ohm coaxial cable Rear of TV B CABLE/ANTENNA ~ • Be sure to set the Signal Type setting to a high-definition cable service or a high-definition satellite service. 3. Connecting the TV Cable System or VHF/UHF Antenna System You can enjoy high-definition programming ...

Operating Instructions
Page 14
... signals (boldfaced) in the above chart with ferrite core (analog RGB) and audio cable (see page 52). This affects Picture settings, Wide Mode settings, and PIP function. PC Use the TV as a monitor for more than 30 seconds, the TV enters the standby mode automatically (see page 11). • If the PC is recommended to the...
... signals (boldfaced) in the above chart with ferrite core (analog RGB) and audio cable (see page 52). This affects Picture settings, Wide Mode settings, and PIP function. PC Use the TV as a monitor for more than 30 seconds, the TV enters the standby mode automatically (see page 11). • If the PC is recommended to the...

Operating Instructions
Page 19
... replay the current program from the previous chapter mark (if any ) or to the audio output of the attached speakers of information. The picture settings will be set for details). For details, see page 36 for a cinema-like experience and the audio will time out in all Control for more information.... The module may not be switched to live TV cache. Use them as a reference when operating the TV. The banner will be available in about 10 seconds or press again to your dealer or www.sony.com/bravia for HDMI equipment). The buttons listed below can also ...
... replay the current program from the previous chapter mark (if any ) or to the audio output of the attached speakers of information. The picture settings will be set for details). For details, see page 36 for a cinema-like experience and the audio will time out in all Control for more information.... The module may not be switched to live TV cache. Use them as a reference when operating the TV. The banner will be available in about 10 seconds or press again to your dealer or www.sony.com/bravia for HDMI equipment). The buttons listed below can also ...

Operating Instructions
Page 20
Product Support Clock/Timers Settings Sound Screen Channel TV qa 0-9 ENT qs qd MUTING qf VOL +/- Press 0-9 to record. Use with Sony Blu-ray player (BD) see chart on page 34. 9 RETURN 0 HOME Press to go back to change channels immediately. qg DVR/VCR Record Buttons z REC... PAUSE STOP THEATER SOUND PICTURE WIDE CC FREEZE 7 8 9 0 qa qs qd qf VOL MUTING CH JUMP qg qh qj qk REC RECPAUSE RECSTOP BD/DVD TOP MENU MENU F1 F2 Button Description 7 FAVORITES Press once to access the TV Home Menu items such as the TV Settings, Photo, Music, TV channels and External Inputs...
Product Support Clock/Timers Settings Sound Screen Channel TV qa 0-9 ENT qs qd MUTING qf VOL +/- Press 0-9 to record. Use with Sony Blu-ray player (BD) see chart on page 34. 9 RETURN 0 HOME Press to go back to change channels immediately. qg DVR/VCR Record Buttons z REC... PAUSE STOP THEATER SOUND PICTURE WIDE CC FREEZE 7 8 9 0 qa qs qd qf VOL MUTING CH JUMP qg qh qj qk REC RECPAUSE RECSTOP BD/DVD TOP MENU MENU F1 F2 Button Description 7 FAVORITES Press once to access the TV Home Menu items such as the TV Settings, Photo, Music, TV channels and External Inputs...
Operating Instructions
Page 21
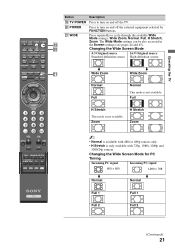
w; Press repeatedly to cycle through the available Wide Mode settings: Wide Zoom, Normal, Full, H Stretch, Zoom. DISPLAY LIGHT POWER TV POWER DVD AMP STB TV FUNCTION PREV REPLAY ADVANCE NEXT PLAY ql w; Zoom H Stretch Zoom VOL MUTING CH JUMP REC RECPAUSE RECSTOP BD/DVD TOP MENU ...24p sources. POWER wa WIDE Press to turn on and off the TV. Changing the Wide Screen Mode 4:3 Original source 16:9 Original source Standard-definition source High-definition source SYNC MENU PAUSE STOP THEATER SOUND PICTURE WIDE CC FREEZE wa m Wide Zoom m Wide Zoom Normal Full Normal...
w; Press repeatedly to cycle through the available Wide Mode settings: Wide Zoom, Normal, Full, H Stretch, Zoom. DISPLAY LIGHT POWER TV POWER DVD AMP STB TV FUNCTION PREV REPLAY ADVANCE NEXT PLAY ql w; Zoom H Stretch Zoom VOL MUTING CH JUMP REC RECPAUSE RECSTOP BD/DVD TOP MENU ...24p sources. POWER wa WIDE Press to turn on and off the TV. Changing the Wide Screen Mode 4:3 Original source 16:9 Original source Standard-definition source High-definition source SYNC MENU PAUSE STOP THEATER SOUND PICTURE WIDE CC FREEZE wa m Wide Zoom m Wide Zoom Normal Full Normal...
Operating Instructions
Page 22
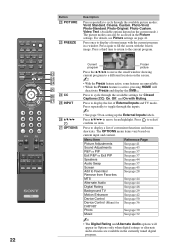
...ratings or alternate audio streams are unavailable. • While the Freeze feature is active, pressing HOME will appear in the Picture settings. Press to the current program. For details, see Picture settings on current input and content. Press a third time to return to select/ confirm an item. Press to display the... in a window. The OPTIONS menu items vary based on page 41. DISPLAY LIGHT POWER TV POWER DVD AMP STB TV FUNCTION PREV REPLAY ADVANCE NEXT PLAY SYNC MENU PAUSE STOP THEATER SOUND PICTURE WIDE CC FREEZE VOL MUTING CH JUMP REC RECPAUSE RECSTOP BD/DVD TOP MENU MENU F1 ...
...ratings or alternate audio streams are unavailable. • While the Freeze feature is active, pressing HOME will appear in the Picture settings. Press to the current program. For details, see Picture settings on current input and content. Press a third time to return to select/ confirm an item. Press to display the... in a window. The OPTIONS menu items vary based on page 41. DISPLAY LIGHT POWER TV POWER DVD AMP STB TV FUNCTION PREV REPLAY ADVANCE NEXT PLAY SYNC MENU PAUSE STOP THEATER SOUND PICTURE WIDE CC FREEZE VOL MUTING CH JUMP REC RECPAUSE RECSTOP BD/DVD TOP MENU MENU F1 ...
Operating Instructions
Page 24
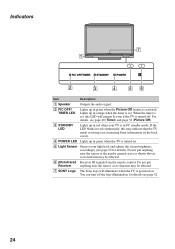
For details, see page 40 (Timer) and page 52 (Picture Off). 3 STANDBY LED Lights up in green when the TV is turned on. 5 Light Sensor Senses room light level and adjusts the screen brightness accordingly (see page 52 for details see contacting Sony information on . Do not put Receiver anything near the ...the nearby general area (as shown above), as its function may be affected. 7 SONY Logo The Sony logo will remain lit even if the TV is turned off the logo illumination, for details). When the timer is set . You can turn off . If the LED blinks in red continuously, this ...
For details, see page 40 (Timer) and page 52 (Picture Off). 3 STANDBY LED Lights up in green when the TV is turned on. 5 Light Sensor Senses room light level and adjusts the screen brightness accordingly (see page 52 for details see contacting Sony information on . Do not put Receiver anything near the ...the nearby general area (as shown above), as its function may be affected. 7 SONY Logo The Sony logo will remain lit even if the TV is turned off the logo illumination, for details). When the timer is set . You can turn off . If the LED blinks in red continuously, this ...

Operating Instructions
Page 25
...Sony equipment. If successfully programmed, the FUNCTION button blinks twice; DVD 5 seconds (default) STB 15 seconds AMP 10 seconds TV 20 seconds Reset the Remote Control To reset the remote control to the factory default settings, press SOUND, TV POWER, and then . Operating the TV DISPLAY LIGHT POWER TV POWER DVD AMP STB TV... 2 FUNCTION PREV REPLAY ADVANCE NEXT PLAY SYNC MENU PAUSE STOP THEATER SOUND PICTURE WIDE CC FREEZE 2 4 ...
...Sony equipment. If successfully programmed, the FUNCTION button blinks twice; DVD 5 seconds (default) STB 15 seconds AMP 10 seconds TV 20 seconds Reset the Remote Control To reset the remote control to the factory default settings, press SOUND, TV POWER, and then . Operating the TV DISPLAY LIGHT POWER TV POWER DVD AMP STB TV... 2 FUNCTION PREV REPLAY ADVANCE NEXT PLAY SYNC MENU PAUSE STOP THEATER SOUND PICTURE WIDE CC FREEZE 2 4 ...

Operating Instructions
Page 31
...from a DLNA Certified media server. Repeat Select On to view photos in which files will display the following Options menu. Sets the Slideshow settings. Tracks must be added in Music to shuffle the photo order during the slideshow. View Select to delete a photo. ... slideshow. File Actions Select to protect a photo from a USB connected equipment. Protection Select to modify file settings for selection (see page 32). Information Select to optimize picture display quality or display speed. Add to Favorites Select to add a photo, folder, or equipment to remove...
...from a DLNA Certified media server. Repeat Select On to view photos in which files will display the following Options menu. Sets the Slideshow settings. Tracks must be added in Music to shuffle the photo order during the slideshow. View Select to delete a photo. ... slideshow. File Actions Select to protect a photo from a USB connected equipment. Protection Select to modify file settings for selection (see page 32). Information Select to optimize picture display quality or display speed. Add to Favorites Select to add a photo, folder, or equipment to remove...

Operating Instructions
Page 32
... Select to make sound adjustments (see page 41 Picture Adjustments). Sound Adjustments Select to music MP3 files directly from Favorites see page 31. • Photos cannot be displayed in the TV. A sample USB icon is selected below. Music Listen to make adjustments to photos ... be stored in a List View. Speakers Select to set sound to TV Speakers or Audio System. ~ • For Display Size, Playback Method, Photo Settings, Start Slideshow, Rotate and Save, Delete, Information, Add to Favorites, and Remove from a Sony connected USB equipment (not supplied) or add music to...
... Select to make sound adjustments (see page 41 Picture Adjustments). Sound Adjustments Select to music MP3 files directly from Favorites see page 31. • Photos cannot be displayed in the TV. A sample USB icon is selected below. Music Listen to make adjustments to photos ... be stored in a List View. Speakers Select to set sound to TV Speakers or Audio System. ~ • For Display Size, Playback Method, Photo Settings, Start Slideshow, Rotate and Save, Delete, Information, Add to Favorites, and Remove from a Sony connected USB equipment (not supplied) or add music to...

Operating Instructions
Page 41
... white colors a reddish tint. ~ • The option Warm 1, 2 is not available for home use. Using TV Settings Picture Settings Picture Adjustments Picture Mode Vivid For Video Standard For enhanced picture contrast and sharpness. Recommended for Reduction DVDs, Blu-ray and digital TV channels. (Continued) 41 Color Increases or decreases color intensity. Hue Increases or decreases the green tones...
... white colors a reddish tint. ~ • The option Warm 1, 2 is not available for home use. Using TV Settings Picture Settings Picture Adjustments Picture Mode Vivid For Video Standard For enhanced picture contrast and sharpness. Recommended for Reduction DVDs, Blu-ray and digital TV channels. (Continued) 41 Color Increases or decreases color intensity. Hue Increases or decreases the green tones...
Operating Instructions
Page 42
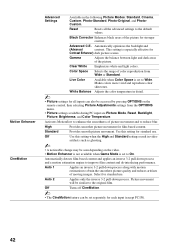
... smoothness of moving images. Select for standard use . Motion Enhancer CineMotion Advanced Settings Available in detail. ~ • Picture settings for all the advanced settings to the default values. Advanced C.E. Clear White Emphasizes white and light colors. Use this setting when the High and Standard settings result in video artifacts such as ghosting. ~ • A noticeable change may...
... smoothness of moving images. Select for standard use . Motion Enhancer CineMotion Advanced Settings Available in detail. ~ • Picture settings for all the advanced settings to the default values. Advanced C.E. Clear White Emphasizes white and light colors. Use this setting when the High and Standard settings result in video artifacts such as ghosting. ~ • A noticeable change may...

Operating Instructions
Page 43
... OPTIONS on the Speakers setting. Select Off to optimize the image quality of video (moving pictures) or photo (still image) content. Video-A The TV will bypass the emphasis. ~ • Only available when in Standard mode. Sound Settings Available Sound settings depend on the remote .... Conversely, if you can turn up this feature. Selecting Off will automatically set the picture settings for video or still image content when Sony optional equipment that supports Video-A mode is set the picture settings for photos. ~ • Game Mode and Video/Photo Optimizer features are ...
... OPTIONS on the Speakers setting. Select Off to optimize the image quality of video (moving pictures) or photo (still image) content. Video-A The TV will bypass the emphasis. ~ • Only available when in Standard mode. Sound Settings Available Sound settings depend on the remote .... Conversely, if you can turn up this feature. Selecting Off will automatically set the picture settings for video or still image content when Sony optional equipment that supports Video-A mode is set the picture settings for photos. ~ • Game Mode and Video/Photo Optimizer features are ...
Operating Instructions
Page 52
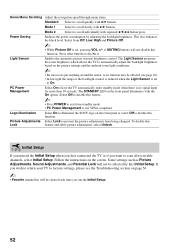
...run the Initial Setup. 52 Light Sensor Enables the automatic picture (screen) brightness control. The STANDBY LED on the screen. Initial Setup If you missed the Initial Setup when you first connected the TV or if you wish to return your TV to factory settings, please see page 18).... brightness based on the picture settings and the ambient room light conditions. ~ • Be sure not to put anything around the sensor, as Picture Adjustments, Sound Adjustments, and Parental Lock will not disable this Initial Setup. Logo Illumination Select On to illuminate the SONY logo on page 56....
...run the Initial Setup. 52 Light Sensor Enables the automatic picture (screen) brightness control. The STANDBY LED on the screen. Initial Setup If you missed the Initial Setup when you first connected the TV or if you wish to return your TV to factory settings, please see page 18).... brightness based on the picture settings and the ambient room light conditions. ~ • Be sure not to put anything around the sensor, as Picture Adjustments, Sound Adjustments, and Parental Lock will not disable this Initial Setup. Logo Illumination Select On to illuminate the SONY logo on page 56....

Operating Instructions
Page 54
... noise • Make sure that the antenna is • The TV may not be used with BRAVIA Sync (see page 19). Condition Explanation/Solution No color / Dark picture / Color • Press PICTURE to select the desired Picture Mode (see page 52). Turn off your network settings. Cannot control second AV receiver • Only one A/V receiver may...
... noise • Make sure that the antenna is • The TV may not be used with BRAVIA Sync (see page 19). Condition Explanation/Solution No color / Dark picture / Color • Press PICTURE to select the desired Picture Mode (see page 52). Turn off your network settings. Cannot control second AV receiver • Only one A/V receiver may...


