Operating Instructions
Page 3
... 25 How to a Full HD Experience: Set, Sound, Source, and Setup 4 Picture Quality and Aspect Ratio 4 TV Home Menu: XMB™ (XrossMediaBar)..........5 Getting Started 1. Setting Up the Channel List - Contents Welcome to the World of optional equipment connection diagrams. Customer Support http://www.sony.com/tvsupport Canada http://www.sony.ca/support On-line Registration United...
... 25 How to a Full HD Experience: Set, Sound, Source, and Setup 4 Picture Quality and Aspect Ratio 4 TV Home Menu: XMB™ (XrossMediaBar)..........5 Getting Started 1. Setting Up the Channel List - Contents Welcome to the World of optional equipment connection diagrams. Customer Support http://www.sony.com/tvsupport Canada http://www.sony.ca/support On-line Registration United...

Operating Instructions
Page 4
... your BRAVIA TV set, a complete HD system requires an HD sound system, a source of HD programming and proper setup connections. The Quick Setup Guide, enclosed separately, illustrates how to connect other HD compatible external equipment Contact your cable or satellite provider for purchasing this Sony BRAVIA®...Blu-ray Disc™ player or other optional equipment. To learn more about HDTV, visit: U.S.A. Picture Quality and Aspect Ratio You can use a wide screen aspect ratio of 16:9. The picture quality may not be as sharp as the quality of the signal it receives. The 16:9 ...
... your BRAVIA TV set, a complete HD system requires an HD sound system, a source of HD programming and proper setup connections. The Quick Setup Guide, enclosed separately, illustrates how to connect other HD compatible external equipment Contact your cable or satellite provider for purchasing this Sony BRAVIA®...Blu-ray Disc™ player or other optional equipment. To learn more about HDTV, visit: U.S.A. Picture Quality and Aspect Ratio You can use a wide screen aspect ratio of 16:9. The picture quality may not be as sharp as the quality of the signal it receives. The 16:9 ...
Operating Instructions
Page 5
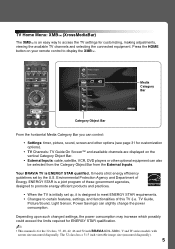
...of these government agencies, designed to access the TV settings for the 32 class, 37, 40, 42, 46 and 52 inch BRAVIA KDL-XBR6, V and W series models with screen size measured diagonally. TV Home Menu: XMB™ (XrossMediaBar) The ...XMB™ is ENERGY STAR qualified. It meets strict energy efficiency guidelines set up, it is for customizing, making adjustments, viewing the available TV channels and selecting the connected equipment. TV Guide, Picture...
...of these government agencies, designed to access the TV settings for the 32 class, 37, 40, 42, 46 and 52 inch BRAVIA KDL-XBR6, V and W series models with screen size measured diagonally. TV Home Menu: XMB™ (XrossMediaBar) The ...XMB™ is ENERGY STAR qualified. It meets strict energy efficiency guidelines set up, it is for customizing, making adjustments, viewing the available TV channels and selecting the connected equipment. TV Guide, Picture...
Operating Instructions
Page 8
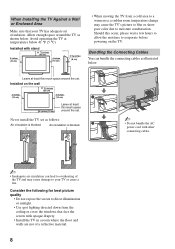
... Do not bundle the AC power cord with opaque drapery. • Install the TV in a room where the floor and walls are not of the TV and may cause the TV's picture to blur or show poor color due to your TV has adequate air circulation. Installed with stand 11 7/8 inches (30 cm) 4... the Connecting Cables You can lead to overheating of a reflective material. 8 Allow enough space around the set as shown below. Consider the following for best picture quality • Do not expose the screen to evaporate before powering on the wall 4 inches (10 cm) 11 7/8 inches (30 cm) 4 inches (10 cm)...
... Do not bundle the AC power cord with opaque drapery. • Install the TV in a room where the floor and walls are not of the TV and may cause the TV's picture to blur or show poor color due to your TV has adequate air circulation. Installed with stand 11 7/8 inches (30 cm) 4... the Connecting Cables You can lead to overheating of a reflective material. 8 Allow enough space around the set as shown below. Consider the following for best picture quality • Do not expose the screen to evaporate before powering on the wall 4 inches (10 cm) 11 7/8 inches (30 cm) 4 inches (10 cm)...
Operating Instructions
Page 11
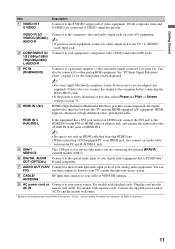
...also connect an Audio cable between this is the case, connect the adapter to the computer before connecting the HD15-HD15 cable. • If the picture is noisy, flickering or not clear, adjust Phase and Pitch of video equipment. VIDEO IN 2/3 VIDEO/L(MONO)AUDIO-R 2 COMPONENT IN 1/2 (1080p/...for service only unless you have mono equipment, connect its audio output jack to the TV's L (MONO) audio input jack. Getting Started Item 1 VIDEO IN 1 S VIDEO Description Connects to the S VIDEO output jack of Screen settings on page 36. If both composite video and S VIDEO are connected, S VIDEO...
...also connect an Audio cable between this is the case, connect the adapter to the computer before connecting the HD15-HD15 cable. • If the picture is noisy, flickering or not clear, adjust Phase and Pitch of video equipment. VIDEO IN 2/3 VIDEO/L(MONO)AUDIO-R 2 COMPONENT IN 1/2 (1080p/...for service only unless you have mono equipment, connect its audio output jack to the TV's L (MONO) audio input jack. Getting Started Item 1 VIDEO IN 1 S VIDEO Description Connects to the S VIDEO output jack of Screen settings on page 36. If both composite video and S VIDEO are connected, S VIDEO...
Operating Instructions
Page 12
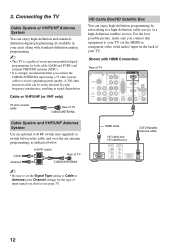
... standard-definition analog programming. ~ • This TV is strongly recommended that you connect this equipment to your TV. A 300-ohm twin lead cable can enjoy high-definition programming by radio frequency interference, resulting in the Channel settings for both cable (QAM and 8VSB) and external...Use an optional A-B RF switch (not supplied) to receive optimum picture quality. Cable or VHF/UHF (or VHF only) 75-ohm coaxial cable Rear of TV B CABLE/ANTENNA ~ • Be sure to set the Signal Type setting to a high-definition cable service or a high-definition satellite service...
... standard-definition analog programming. ~ • This TV is strongly recommended that you connect this equipment to your TV. A 300-ohm twin lead cable can enjoy high-definition programming by radio frequency interference, resulting in the Channel settings for both cable (QAM and 8VSB) and external...Use an optional A-B RF switch (not supplied) to receive optimum picture quality. Cable or VHF/UHF (or VHF only) 75-ohm coaxial cable Rear of TV B CABLE/ANTENNA ~ • Be sure to set the Signal Type setting to a high-definition cable service or a high-definition satellite service...
Operating Instructions
Page 14
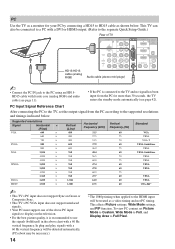
...VESA Guidelines VESA VESA Guidelines VESA VESA VESA VESA VESA VESA CEA-861* ~ • This TV's PC input does not support Sync on the television. • For the best picture quality, it is connected to the TV and no signal has been input from the PC according to the HDMI input will be...to Custom, Wide Mode to Full, and Display Area to HD15 cable as shown below . This affects Picture settings, Wide Mode settings, and PIP function. PC Use the TV as a monitor for more than 30 seconds, the TV enters the standby mode automatically (see page 11). • If the PC is recommended to use ...
...VESA Guidelines VESA VESA Guidelines VESA VESA VESA VESA VESA VESA CEA-861* ~ • This TV's PC input does not support Sync on the television. • For the best picture quality, it is connected to the TV and no signal has been input from the PC according to the HDMI input will be...to Custom, Wide Mode to Full, and Display Area to HD15 cable as shown below . This affects Picture settings, Wide Mode settings, and PIP function. PC Use the TV as a monitor for more than 30 seconds, the TV enters the standby mode automatically (see page 11). • If the PC is recommended to use ...
Operating Instructions
Page 19
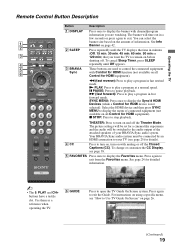
... press SLEEP 4 repeatedly until the TV displays the time in a few seconds or press again to control the connected equipment 6 Sync with muting or off the Theater Mode. x STOP: Press to open the TV Guide On Screen system. The picture settings will be set for HDMI device is not selected).... Use them as a reference when operating the TV. 6 GUIDE Press to stop playback. N PLAY: Press to play a program in fast...
... press SLEEP 4 repeatedly until the TV displays the time in a few seconds or press again to control the connected equipment 6 Sync with muting or off the Theater Mode. x STOP: Press to open the TV Guide On Screen system. The picture settings will be set for HDMI device is not selected).... Use them as a reference when operating the TV. 6 GUIDE Press to stop playback. N PLAY: Press to play a program in fast...

Operating Instructions
Page 20
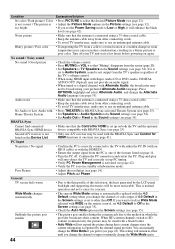
...8226; While the Freeze feature is active, pressing HOME will deactivate Freeze and display the XMB™. Freeze qs Current Frozen program picture Press the V/v/B/b to move focus/highlight. qg FREEZE Press once to fill the screen with the current program in a window. ... Press V/v/B/b to select digital channels. Product Support Clock/Timers Settings Sound Screen qg Channel TV qh 9 DMex Press to select a channel; Press 0-9 to access features in all regions. See your dealer or www.sony.com/bravia for more information. Press to the previous screen or...
...8226; While the Freeze feature is active, pressing HOME will deactivate Freeze and display the XMB™. Freeze qs Current Frozen program picture Press the V/v/B/b to move focus/highlight. qg FREEZE Press once to fill the screen with the current program in a window. ... Press V/v/B/b to select digital channels. Product Support Clock/Timers Settings Sound Screen qg Channel TV qh 9 DMex Press to select a channel; Press 0-9 to access features in all regions. See your dealer or www.sony.com/bravia for more information. Press to the previous screen or...

Operating Instructions
Page 21
...-Standard, Photo-Original, PhotoCustom, Video, Text. (Available options depend on the current mode.) The picture modes can also be accessed in the currently tuned digital program. For details, see Picture settings on current input and content. Operating the TV Button Description qk OPTIONS Press to Favorites/ Remove from Favorites See page 24 qk MTS...
...-Standard, Photo-Original, PhotoCustom, Video, Text. (Available options depend on the current mode.) The picture modes can also be accessed in the currently tuned digital program. For details, see Picture settings on current input and content. Operating the TV Button Description qk OPTIONS Press to Favorites/ Remove from Favorites See page 24 qk MTS...
Operating Instructions
Page 23
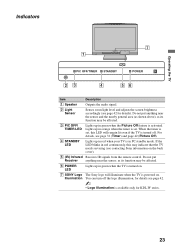
... may indicate that the TV needs servicing (see contacting Sony information on . Do not put Receiver anything near the sensor, as its function may be affected. 3 PIC OFF/ TIMER LED Lights up in red continuously, this LED will illuminate when the TV is in green when the Picture Off feature is set. Lights up in...
... may indicate that the TV needs servicing (see contacting Sony information on . Do not put Receiver anything near the sensor, as its function may be affected. 3 PIC OFF/ TIMER LED Lights up in red continuously, this LED will illuminate when the TV is in green when the Picture Off feature is set. Lights up in...
Operating Instructions
Page 30
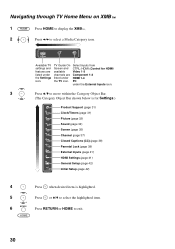
...CTRL: HDMI (Control for Settings.) Product Support (page 31) Clock/Timers (page 31) Picture (page 32) Sound (page 34) Screen (page 35) Channel (page 37) CC Closed Captions (CC) (page 38) Parental Lock (page 38) External Inputs (page 41) HDMI Settings (page 41) General Setup.... 5 Press or V/v to select the highlighted item. 6 Press RETURN or HOME to exit. 30 TV Guide On Screen and available channels are listed under the Settings icon. Settings Available TV settings and features are listed under the External Inputs icon. 3 Press V/v to select a Media Category icon....
...CTRL: HDMI (Control for Settings.) Product Support (page 31) Clock/Timers (page 31) Picture (page 32) Sound (page 34) Screen (page 35) Channel (page 37) CC Closed Captions (CC) (page 38) Parental Lock (page 38) External Inputs (page 41) HDMI Settings (page 41) General Setup.... 5 Press or V/v to select the highlighted item. 6 Press RETURN or HOME to exit. 30 TV Guide On Screen and available channels are listed under the Settings icon. Settings Available TV settings and features are listed under the External Inputs icon. 3 Press V/v to select a Media Category icon....
Operating Instructions
Page 32
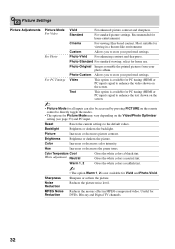
... color intensity. Cinema For viewing film-based content. select for Reduction DVDs, Blu-ray and Digital TV channels. 32 Useful for home use. For Photo Photo-Vivid For enhancing contrast and sharpness. Picture Settings Picture Adjustments Picture Mode Vivid For Video Standard For enhanced picture contrast and sharpness. Recommended for home entertainment. Reset Resets the current...
... color intensity. Cinema For viewing film-based content. select for Reduction DVDs, Blu-ray and Digital TV channels. 32 Useful for home use. For Photo Photo-Vivid For enhancing contrast and sharpness. Picture Settings Picture Adjustments Picture Mode Vivid For Video Standard For enhanced picture contrast and sharpness. Recommended for home entertainment. Reset Resets the current...
Operating Instructions
Page 33
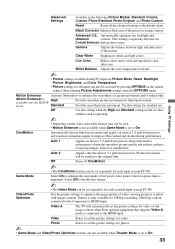
... smoothness of the picture. This setting is important. Picture movement will automatically set the picture settings for photos. ~ • Game Mode and Video/Photo Optimizer features are Picture Mode, Reset, Backlight, Picture, Brightness, and Color Temperature. • Picture settings for all the advanced settings to the original film. Advanced C.E. Video-A The TV will be set the picture settings for KDL-W series. Using TV Settings Advanced Settings Available in video...
... smoothness of the picture. This setting is important. Picture movement will automatically set the picture settings for photos. ~ • Game Mode and Video/Photo Optimizer features are Picture Mode, Reset, Backlight, Picture, Brightness, and Color Temperature. • Picture settings for all the advanced settings to the original film. Advanced C.E. Video-A The TV will be set the picture settings for KDL-W series. Using TV Settings Advanced Settings Available in video...
Operating Instructions
Page 35
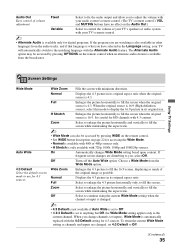
... source is available from the Wide Mode option. H Stretch Enlarges the picture horizontally to fill the screen. Full Select to enlarge the 4:3 picture horizontally only, to fill the screen when the original source is set 4:3 Default to Off. (Continued) 35 Using TV Settings Screen Settings Wide Mode Auto Wide 4:3 Default Select the default screen mode to...
... source is available from the Wide Mode option. H Stretch Enlarges the picture horizontally to fill the screen. Full Select to enlarge the 4:3 picture horizontally only, to fill the screen when the original source is set 4:3 Default to Off. (Continued) 35 Using TV Settings Screen Settings Wide Mode Auto Wide 4:3 Default Select the default screen mode to...
Operating Instructions
Page 36
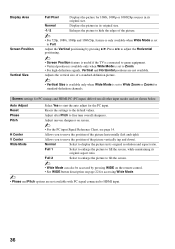
... its original size. -1/-2 Enlarges the picture to hide the edges of a standard-definition picture. ~ • Vertical Size is available only when Wide Mode is set to HDMI input. 36 Press B/b to adjust the Horizontal positioning. ~ • Screen Position feature is useful if the TV is connected to game equipment. • Vertical position is available...
... its original size. -1/-2 Enlarges the picture to hide the edges of a standard-definition picture. ~ • Vertical Size is available only when Wide Mode is set to HDMI input. 36 Press B/b to adjust the Horizontal positioning. ~ • Screen Position feature is useful if the TV is connected to game equipment. • Vertical position is available...
Operating Instructions
Page 42
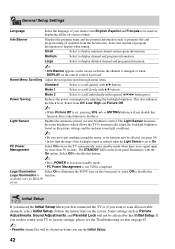
.... The Light Sensor measures the room brightness which allows the TV to automatically adjust the backlight brightness based on the picture settings and the ambient room light conditions. ~ • Be ...Light Sensor Enables the automatic picture (screen) brightness control. or MUTING buttons will be used for KDL-W series. PC Power Management Select On to have the TV automatically enter standby mode when ...TV or if you wish to return your choice from the broadcaster). If you want to scan all the on-screen settings. Logo Illumination Select On to illuminate the SONY...
.... The Light Sensor measures the room brightness which allows the TV to automatically adjust the backlight brightness based on the picture settings and the ambient room light conditions. ~ • Be ...Light Sensor Enables the automatic picture (screen) brightness control. or MUTING buttons will be used for KDL-W series. PC Power Management Select On to have the TV automatically enter standby mode when ...TV or if you wish to return your choice from the broadcaster). If you want to scan all the on-screen settings. Logo Illumination Select On to illuminate the SONY...
Operating Instructions
Page 43
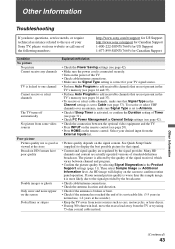
...1-800-222-SONY(7669) for US Support 1-877-899-SONY(7669) for Canadian Support Condition No picture No picture Cannot receive any channels TV is locked to one channel Cannot receive or select channels The TV turns off automatically No picture from some video sources Poor picture Picture quality not ... See Quick Setup Guide (supplied) to display the best possible picture for that Signal Type in General Setup settings (see page 42). • Check the connection between channel and program. • Confirm the picture quality by the signal provider. Other Information (Continued) 43 Other...
...1-800-222-SONY(7669) for US Support 1-877-899-SONY(7669) for Canadian Support Condition No picture No picture Cannot receive any channels TV is locked to one channel Cannot receive or select channels The TV turns off automatically No picture from some video sources Poor picture Picture quality not ... See Quick Setup Guide (supplied) to display the best possible picture for that Signal Type in General Setup settings (see page 42). • Check the connection between channel and program. • Confirm the picture quality by the signal provider. Other Information (Continued) 43 Other...
Operating Instructions
Page 44
... sure that "Muting" disappears from the TV's speakers regardless of the formats listed on again. If it will remain in standby or hibernation mode. Home Theater System • Set Speakers to Audio System in the Picture settings (see page 42). • Verify the PC is regulated by the LCD panel backlight and supporting electronics will...
... sure that "Muting" disappears from the TV's speakers regardless of the formats listed on again. If it will remain in standby or hibernation mode. Home Theater System • Set Speakers to Audio System in the Picture settings (see page 42). • Verify the PC is regulated by the LCD panel backlight and supporting electronics will...
Quick Setup Guide
Page 1
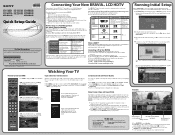
... sound and picture settings to match the content you are the standard for the OSD (on screen display) from here or use the 0-9 number buttons on your remote control. 7 8 Cable 8.1 KFMB-DT 9 10 10.1 TV 11 XMB™ (XrossMediaBar) with your BRAVIA TV set up your BRAVIA: ■ Register online at : http://www.sony.com/tvsupport...
... sound and picture settings to match the content you are the standard for the OSD (on screen display) from here or use the 0-9 number buttons on your remote control. 7 8 Cable 8.1 KFMB-DT 9 10 10.1 TV 11 XMB™ (XrossMediaBar) with your BRAVIA TV set up your BRAVIA: ■ Register online at : http://www.sony.com/tvsupport...


