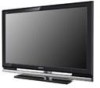
Operating Instructions
Page 2
... area depends on , the user is a trademark of Conformity Trade Name: SONY Model: KDL-32XBR6/KDL-37XBR6/ KDL-40V4150/KDL-40V4100/ KDL-42V4100/KDL-46V4100/ KDL-52V4100/KDL-40W4100/ KDL-46W4100/KDL-52W4100/ KDL-46W4150 Responsible Party: Sony Electronics Inc. SU-WL500 Sony TV - CAUTION To prevent electric shock and blade exposure, do not use this product contains mercury. Telephone Number: 858-942-2230 This device complies...
... area depends on , the user is a trademark of Conformity Trade Name: SONY Model: KDL-32XBR6/KDL-37XBR6/ KDL-40V4150/KDL-40V4100/ KDL-42V4100/KDL-46V4100/ KDL-52V4100/KDL-40W4100/ KDL-46W4100/KDL-52W4100/ KDL-46W4150 Responsible Party: Sony Electronics Inc. SU-WL500 Sony TV - CAUTION To prevent electric shock and blade exposure, do not use this product contains mercury. Telephone Number: 858-942-2230 This device complies...
Operating Instructions
Page 3
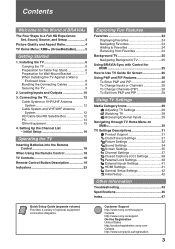
...http://www.sony.com/tvsupport Canada http://www.sony.ca/support On-line Registration United States http://productregistration.sony.com Canada http://www.sonystyle.ca/registration 3 Initial Setup 16 Operating the TV Inserting Batteries into the Remote Control 18 When Using the Remote Control 18 TV Controls 18...General Setup Settings 42 Initial Setup 42 Other Information Troubleshooting 43 Specifications 46 Index 47 Quick Setup Guide (separate volume) Provides a variety of BRAVIA® The Four Steps to Use TV Guide On Screen 26 Using P&P and PIP Features 28 To Enter P&P and PIP 28 ...
...http://www.sony.com/tvsupport Canada http://www.sony.ca/support On-line Registration United States http://productregistration.sony.com Canada http://www.sonystyle.ca/registration 3 Initial Setup 16 Operating the TV Inserting Batteries into the Remote Control 18 When Using the Remote Control 18 TV Controls 18...General Setup Settings 42 Initial Setup 42 Other Information Troubleshooting 43 Specifications 46 Index 47 Quick Setup Guide (separate volume) Provides a variety of BRAVIA® The Four Steps to Use TV Guide On Screen 26 Using P&P and PIP Features 28 To Enter P&P and PIP 28 ...

Operating Instructions
Page 4
...) source Most HDTV signals use a boxy 4:3 aspect ratio. When you will see pages 22, 35 and 36). 4 The 16:9 fills your cable or satellite provider for purchasing this Sony BRAVIA® high-definition television. When a 4:3 image is only as good as with your new BRAVIA TV, you need access to... ratios (the width-to a Full HD Experience: Set, Sound, Source, and Setup Along with HD sources. ~ • You can use the Wide Mode function of the TV to adjust the 4:3 image to a standard analog signal, you compare a high-definition signal to fit the entire screen (see black bars ...
...) source Most HDTV signals use a boxy 4:3 aspect ratio. When you will see pages 22, 35 and 36). 4 The 16:9 fills your cable or satellite provider for purchasing this Sony BRAVIA® high-definition television. When a 4:3 image is only as good as with your new BRAVIA TV, you need access to... ratios (the width-to a Full HD Experience: Set, Sound, Source, and Setup Along with HD sources. ~ • You can use the Wide Mode function of the TV to adjust the 4:3 image to a standard analog signal, you compare a high-definition signal to fit the entire screen (see black bars ...
Operating Instructions
Page 6
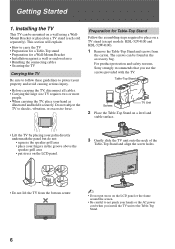
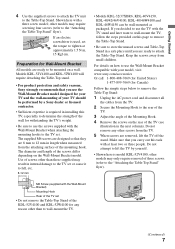
... to place on the LCD panel or the frame around the screen. • Be careful to the Table-Top Stand. 6 For product protection and safety reasons, Sony strongly recommends that you install the TV unit to not pinch your hands or the AC power cord when you use the screws provided with ...align the screw holes. • Do not lift the TV from the bottom center. ~ • Do not put stress on a TV stand (except models: KDL-52V4100 and KDL-52W4100). 1 Remove the Table-Top Stand and screws from the carton. Do not subject the TV to protect your property and avoid causing serious injury. •...
... to place on the LCD panel or the frame around the screen. • Be careful to the Table-Top Stand. 6 For product protection and safety reasons, Sony strongly recommends that you install the TV unit to not pinch your hands or the AC power cord when you use the screws provided with ...align the screw holes. • Do not lift the TV from the bottom center. ~ • Do not put stress on a TV stand (except models: KDL-52V4100 and KDL-52W4100). 1 Remove the Table-Top Stand and screws from the carton. Do not subject the TV to protect your property and avoid causing serious injury. •...
Operating Instructions
Page 7
... lift the TV by a Sony dealer or licensed contractor. • Sufficient expertise is model KDL-52V4100; Models KDL-52V4100 and KDL-52W4100 will require detaching the Table-Top stand. • For product protection and safety reasons, Sony strongly recommends ...TV. (Continued) 7 other than to the "Attaching the Table-Top Stand" flyer). The supplied M6 screws are ready to tighten at least two or three people. If an electric screwdriver is used, set or cause it to fall, etc. 8-12 mm • Models KDL-32/37XBR6, KDL-40V4150, KDL-40/42/46V4100, KDL-40/46W4100 and KDL...
... lift the TV by a Sony dealer or licensed contractor. • Sufficient expertise is model KDL-52V4100; Models KDL-52V4100 and KDL-52W4100 will require detaching the Table-Top stand. • For product protection and safety reasons, Sony strongly recommends ...TV. (Continued) 7 other than to the "Attaching the Table-Top Stand" flyer). The supplied M6 screws are ready to tighten at least two or three people. If an electric screwdriver is used, set or cause it to fall, etc. 8-12 mm • Models KDL-32/37XBR6, KDL-40V4150, KDL-40/42/46V4100, KDL-40/46W4100 and KDL...
Operating Instructions
Page 8
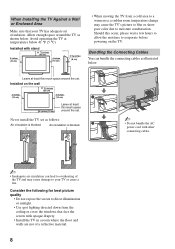
... bundle the connecting cables as illustrated below 41 °F (5 °C). Should this much space around the TV as follows: Air circulation is blocked. Avoid operating the TV at least this occur, please wait a few hours to allow the moisture to moisture condensation. Allow enough space... . Consider the following for best picture quality • Do not expose the screen to direct illumination or sunlight. • Use spot lighting directed down from a cold area to a warm area, a sudden room temperature change may cause damage to overheating of a reflective material. 8...
... bundle the connecting cables as illustrated below 41 °F (5 °C). Should this much space around the TV as follows: Air circulation is blocked. Avoid operating the TV at least this occur, please wait a few hours to allow the moisture to moisture condensation. Allow enough space... . Consider the following for best picture quality • Do not expose the screen to direct illumination or sunlight. • Use spot lighting directed down from a cold area to a warm area, a sudden room temperature change may cause damage to overheating of a reflective material. 8...
Operating Instructions
Page 9
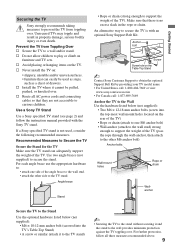
...; M6 × 10-12 mm anchor bolt (screwed into the TV's Table-Top Stand) • A screw or similar (attach it to the TV stand) ~ • Securing the TV to the stand without securing it cannot be used , consider the following recommended measures. Use a Sony TV Stand Use a Sony specified TV stand (see page 2) and follow all AC power cords and...
...; M6 × 10-12 mm anchor bolt (screwed into the TV's Table-Top Stand) • A screw or similar (attach it to the TV stand) ~ • Securing the TV to the stand without securing it cannot be used , consider the following recommended measures. Use a Sony TV Stand Use a Sony specified TV stand (see page 2) and follow all AC power cords and...
Operating Instructions
Page 11
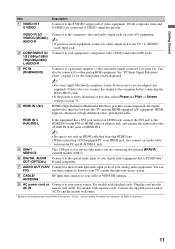
... (YPBPR) and audio (L/R) jacks. If both composite video and S VIDEO are trademarks of your digital audio equipment that can FIX) use an adapter (not supplied). Connects to an HDMI jack, also connect an Audio cable between this is the case, connect the adapter to...When connecting a DVI-equipped PC to a personal computer's video and audio output connector (see page 14). Can also be necessary to use these outputs to listen to your TV's audio through your A/V equipment. ~ • If you are connecting the optional BRAVIA external module (DMex). 6 DIGITAL AUDIO Connects...
... (YPBPR) and audio (L/R) jacks. If both composite video and S VIDEO are trademarks of your digital audio equipment that can FIX) use an adapter (not supplied). Connects to an HDMI jack, also connect an Audio cable between this is the case, connect the adapter to...When connecting a DVI-equipped PC to a personal computer's video and audio output connector (see page 14). Can also be necessary to use these outputs to listen to your TV's audio through your A/V equipment. ~ • If you are connecting the optional BRAVIA external module (DMex). 6 DIGITAL AUDIO Connects...
Operating Instructions
Page 12
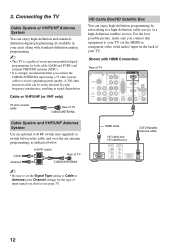
Cable or VHF/UHF (or VHF only) 75-ohm coaxial cable Rear of input signal you connect the CABLE/ANTENNA input using a 75-ohm coaxial cable to a high-definition cable service or a high-definition satellite service. HDMI cable HD cable box/ HD satellite box CATV/...Satellite antenna cable 12 A 300-ohm twin lead cable can enjoy high-definition and standarddefinition digital programming (if available in your TV. Connecting the TV Cable System or VHF/UHF Antenna System You can be easily affected by subscribing to receive optimum picture quality. 3. For the best possible...
Cable or VHF/UHF (or VHF only) 75-ohm coaxial cable Rear of input signal you connect the CABLE/ANTENNA input using a 75-ohm coaxial cable to a high-definition cable service or a high-definition satellite service. HDMI cable HD cable box/ HD satellite box CATV/...Satellite antenna cable 12 A 300-ohm twin lead cable can enjoy high-definition and standarddefinition digital programming (if available in your TV. Connecting the TV Cable System or VHF/UHF Antenna System You can be easily affected by subscribing to receive optimum picture quality. 3. For the best possible...
Operating Instructions
Page 14
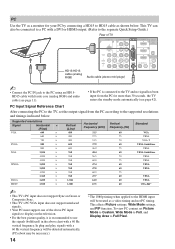
...chart with a 60 Hz vertical frequency will be necessary.) 14 * The 1080p timing when applied to the TV and no signal has been input from the PC according to HD15 cable as shown below . In plug ...400 600 600 768 768 768 768 768 768 768 1,024 1,080 Horizontal frequency (kHz) 31.5 37.5 31.5 37.9 46.9 48.4 56.5 60.0 47.4 47.8 60.3 47.7 64.0 67.5 Vertical frequency (Hz) 60 75 70 60 75.... PC Input Signal Reference Chart After connecting the PC to the TV, set Picture Mode to Custom, Wide Mode to Full, and Display Area to use the signals (boldfaced) in the above PC input signals to display...
...chart with a 60 Hz vertical frequency will be necessary.) 14 * The 1080p timing when applied to the TV and no signal has been input from the PC according to HD15 cable as shown below . In plug ...400 600 600 768 768 768 768 768 768 768 1,024 1,080 Horizontal frequency (kHz) 31.5 37.5 31.5 37.9 46.9 48.4 56.5 60.0 47.4 47.8 60.3 47.7 64.0 67.5 Vertical frequency (Hz) 60 75 70 60 75.... PC Input Signal Reference Chart After connecting the PC to the TV, set Picture Mode to Custom, Wide Mode to Full, and Display Area to use the signals (boldfaced) in the above PC input signals to display...
Operating Instructions
Page 16
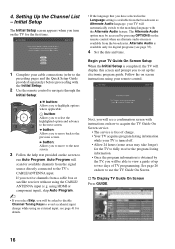
...If the language that you receive channels from the broadcaster as Alternate Audio language, your TV Guide On Screen Setup When the Initial Setup is available from a cable box or satellite receiver without using HDMI or component input), skip Auto Program. ~ • If you select Skip,...to avoid accidental input change while using your TV is turned off. • Allow 24 hours (some areas may be able to use the TV Guide On Screen. Initial Setup Step 6 of charge. • Your TV acquires program listing information while your remote control. using the CABLE/ ANTENNA input (e.g. ...
...If the language that you receive channels from the broadcaster as Alternate Audio language, your TV Guide On Screen Setup When the Initial Setup is available from a cable box or satellite receiver without using HDMI or component input), skip Auto Program. ~ • If you select Skip,...to avoid accidental input change while using your TV is turned off. • Allow 24 hours (some areas may be able to use the TV Guide On Screen. Initial Setup Step 6 of charge. • Your TV acquires program listing information while your remote control. using the CABLE/ ANTENNA input (e.g. ...
Operating Instructions
Page 17
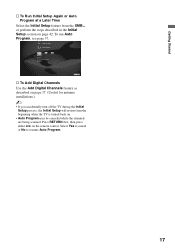
...Getting Started s To Run Initial Setup Again or Auto Program at a Later Time Select the Initial Setup feature from the beginning when the TV is turned back on. • Auto Program may be canceled while the channels are being scanned. Press RETURN first, then press either B/b... on page 42. HDMI Settings General Setup Settings Initial Setup TV s To Add Digital Channels Use the Add Digital Channels feature as described on page 37. (Useful for antenna installations.) ~ • If you accidentally turn off the TV during the Initial Setup process, the Initial Setup will restart from the...
...Getting Started s To Run Initial Setup Again or Auto Program at a Later Time Select the Initial Setup feature from the beginning when the TV is turned back on. • Auto Program may be canceled while the channels are being scanned. Press RETURN first, then press either B/b... on page 42. HDMI Settings General Setup Settings Initial Setup TV s To Add Digital Channels Use the Add Digital Channels feature as described on page 37. (Useful for antenna installations.) ~ • If you accidentally turn off the TV during the Initial Setup process, the Initial Setup will restart from the...

Operating Instructions
Page 18
... top of the remote control. Operating the TV Inserting Batteries into the Remote Control Insert two size AA batteries (supplied) by matching e and E on the batteries to open When Using the Remote Control Follow the guidelines below • Point your TV. • Make sure that they are ...blocking the path between the remote control and the IR sensor on your TV. • Fluorescent lamps can interfere with your remote control...
... top of the remote control. Operating the TV Inserting Batteries into the Remote Control Insert two size AA batteries (supplied) by matching e and E on the batteries to open When Using the Remote Control Follow the guidelines below • Point your TV. • Make sure that they are ...blocking the path between the remote control and the IR sensor on your TV. • Fluorescent lamps can interfere with your remote control...
Operating Instructions
Page 19
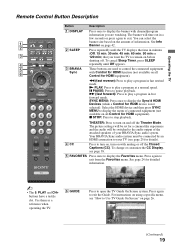
... for HDMI equipment). To cancel Sleep Timer, press SLEEP 4 repeatedly until the TV displays the time in minutes (Off, 15 min, 30 min, 45 min, 60 min, 90 min or 3 120 min) that you are used to control the connected equipment 6 Sync with Control for HDMI function (not available... to play a program in fast rewind mode. To change or customize the CC Display, see "How to Use TV Guide On Screen" on and off the Closed Captions (CC). Use them as a reference when operating the TV. 6 GUIDE Press to stop playback. N PLAY: Press to play a program in fast forward mode. x ...
... for HDMI equipment). To cancel Sleep Timer, press SLEEP 4 repeatedly until the TV displays the time in minutes (Off, 15 min, 30 min, 45 min, 60 min, 90 min or 3 120 min) that you are used to control the connected equipment 6 Sync with Control for HDMI function (not available... to play a program in fast rewind mode. To change or customize the CC Display, see "How to Use TV Guide On Screen" on and off the Closed Captions (CC). Use them as a reference when operating the TV. 6 GUIDE Press to stop playback. N PLAY: Press to play a program in fast forward mode. x ...

Operating Instructions
Page 20
... and display the XMB™. Press to the current qz program. See your dealer or www.sony.com/bravia for more information. Press to access the TV Home Menu items such as the TV Settings, TV channels and External Inputs list (see pages 5 and 29). qj V/v/B/b Press V/v/B/b to move ...the small window showing qd current program to change channels immediately. 8 qa Use with the frozen image. Press to display the TV Home Menu/XMB™ to adjust the volume. Press ENT to a different location on and off the TV. Press again or press VOL + to toggle through the inputs. ~...
... and display the XMB™. Press to the current qz program. See your dealer or www.sony.com/bravia for more information. Press to access the TV Home Menu items such as the TV Settings, TV channels and External Inputs list (see pages 5 and 29). qj V/v/B/b Press V/v/B/b to move ...the small window showing qd current program to change channels immediately. 8 qa Use with the frozen image. Press to display the TV Home Menu/XMB™ to adjust the volume. Press ENT to a different location on and off the TV. Press again or press VOL + to toggle through the inputs. ~...
Operating Instructions
Page 25
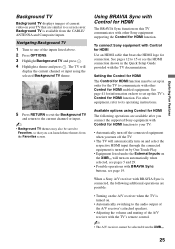
...The BRAVIA Sync function on this TV's Control for HDMI function. Navigating Background TV 1 Tune to set up this TV communicates with Control for HDMI Use an HDMI cable that are similar to a screen saver. To connect Sony equipment with other Sony equipment supporting the Control for HDMI ...Composite inputs. Available options using the selected Background TV theme. 5 Press RETURN to exit the Background TV and return to the current channel or input. ~ • Background TV themes may also be saved to Favorites, so that you connect the supported Sony equipment with Control for HDMI...
...The BRAVIA Sync function on this TV's Control for HDMI function. Navigating Background TV 1 Tune to set up this TV communicates with Control for HDMI Use an HDMI cable that are similar to a screen saver. To connect Sony equipment with other Sony equipment supporting the Control for HDMI ...Composite inputs. Available options using the selected Background TV theme. 5 Press RETURN to exit the Background TV and return to the current channel or input. ~ • Background TV themes may also be saved to Favorites, so that you connect the supported Sony equipment with Control for HDMI...
Operating Instructions
Page 26
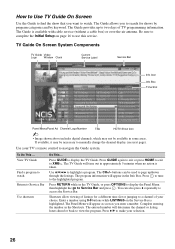
... the channel display (see next page). View TV Guide Find a program to watch . Press RETURN while in the Shortcuts. Enter a number using 0-9 buttons while LISTINGS on page 16 to use this service. Be sure to complete the Initial... Setup on the Service Bar is highlighted. The CH+/- Use V/v/B/b to display the TV Guide. The entered number will time out in approximately 5 minutes when no action is...a number. The Panel Menu will appear in some areas. How to Use TV Guide On Screen Use the Guide to find the show that you want to watch Return to Service Bar...
... the channel display (see next page). View TV Guide Find a program to watch . Press RETURN while in the Shortcuts. Enter a number using 0-9 buttons while LISTINGS on page 16 to use this service. Be sure to complete the Initial... Setup on the Service Bar is highlighted. The CH+/- Use V/v/B/b to display the TV Guide. The entered number will time out in approximately 5 minutes when no action is...a number. The Panel Menu will appear in some areas. How to Use TV Guide On Screen Use the Guide to find the show that you want to watch Return to Service Bar...
Operating Instructions
Page 27
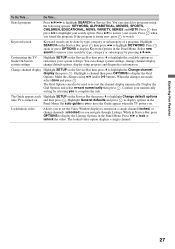
... the program is turned on the Service Bar then press v to highlight Change default options time TV is airing now, press to re-sort the channel display numerically. Make the changes using the following options: KEYWORD, ALPHABETICAL, MOVIES, SPORTS, CHILDREN, EDUCATIONAL, NEWS, VARIETY, SERIES and...Service Bar then press v to narrow your search. Press when you navigate through Listings. Keyword search Keyword search can search for programs using V/v and/or 0-9 buttons. Select new search to highlight the Change channel display then press . Press V/v to customize your system ...
... the program is turned on the Service Bar then press v to highlight Change default options time TV is airing now, press to re-sort the channel display numerically. Make the changes using the following options: KEYWORD, ALPHABETICAL, MOVIES, SPORTS, CHILDREN, EDUCATIONAL, NEWS, VARIETY, SERIES and...Service Bar then press v to narrow your search. Press when you navigate through Listings. Keyword search Keyword search can search for programs using V/v and/or 0-9 buttons. Select new search to highlight the Change channel display then press . Press V/v to customize your system ...
Operating Instructions
Page 28
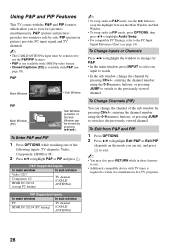
...PIP 1 Press OPTIONS. 2 Press V/v to highlight Exit P&P or Exit PIP (depends on the mode you to view two pictures simultaneously. Using P&P and PIP Features This TV comes with the P&P and PIP features which allow you are in), and press to exit. ~ • You may also press RETURN ... window Video 1/2/3 Component 1/2 HDMI IN 1/2/3/4 (except PC timing) TV channel (CABLE/ ANTENNA) PIP Supported Inputs In main window In sub window PC HDMI IN 1/2/3/4 (PC timing) TV channel (CABLE/ ANTENNA) ~ • To swap audio in P&P mode, use the P&P/PIP features. • P&P is not available with 1080/...
...PIP 1 Press OPTIONS. 2 Press V/v to highlight Exit P&P or Exit PIP (depends on the mode you to view two pictures simultaneously. Using P&P and PIP Features This TV comes with the P&P and PIP features which allow you are in), and press to exit. ~ • You may also press RETURN ... window Video 1/2/3 Component 1/2 HDMI IN 1/2/3/4 (except PC timing) TV channel (CABLE/ ANTENNA) PIP Supported Inputs In main window In sub window PC HDMI IN 1/2/3/4 (PC timing) TV channel (CABLE/ ANTENNA) ~ • To swap audio in P&P mode, use the P&P/PIP features. • P&P is not available with 1080/...
Operating Instructions
Page 29
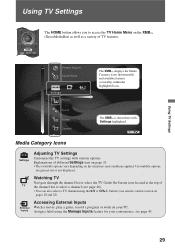
...depending on pages 20 and 22). TV Media Category Icons Settings Adjusting TV Settings Customize the TV settings with Settings highlighted. buttons (see remote control section on the situations and conditions applied. Explanations of TV features. Using TV Settings Product Support Clock/Timers Settings ...icons (horizontally) and available features (vertically) within the highlighted icon. Inputs Assign a label using the 0-9 or CH+/- Unavailable options are grayed out or not displayed. Using TV Settings The HOME button allows you to select a channel (see page 26). •...
...depending on pages 20 and 22). TV Media Category Icons Settings Adjusting TV Settings Customize the TV settings with Settings highlighted. buttons (see remote control section on the situations and conditions applied. Explanations of TV features. Using TV Settings Product Support Clock/Timers Settings ...icons (horizontally) and available features (vertically) within the highlighted icon. Inputs Assign a label using the 0-9 or CH+/- Unavailable options are grayed out or not displayed. Using TV Settings The HOME button allows you to select a channel (see page 26). •...


