Limited Warranty (U.S. Only)
Page 1
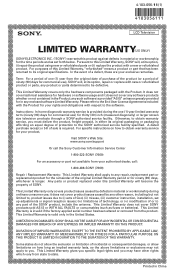
... period or for ninety (90) days, whichever is valid only in China 4-103-056-11(1) x S® LCD Television LIMITED WARRANTY(US ONLY) SONY ELECTRONICS INC. ("SONY") warrants this product against defects in material or workmanship for the time periods and as fuses or batteries). Term:... Pursuant to the software. It does not cover technical assistance for thirty (30) inch (measured diagonally) or larger screen size television products through a SONY-authorized service facility. For specific instructions on how long an implied warranty lasts, so the above limitations or exclusions may...
... period or for ninety (90) days, whichever is valid only in China 4-103-056-11(1) x S® LCD Television LIMITED WARRANTY(US ONLY) SONY ELECTRONICS INC. ("SONY") warrants this product against defects in material or workmanship for the time periods and as fuses or batteries). Term:... Pursuant to the software. It does not cover technical assistance for thirty (30) inch (measured diagonally) or larger screen size television products through a SONY-authorized service facility. For specific instructions on how long an implied warranty lasts, so the above limitations or exclusions may...
Operating Instructions
Page 2
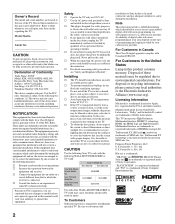
...by your area depends on a circuit different from that face the screen with other countries. This equipment generates, uses and can be using the TV for disconnection. Never pull on 120 V AC. KDL-40SL140 KDL-46SL140 SU-WL500 SU-FL300M SU-FL300L SU-FL71M Use with opaque ... should allow you will not occur in Canada This Class B digital apparatus complies with the following measures: s Reorient or relocate the receiving antenna. Sony TV Stand Model No. Be sure to subcontract the installation to Sony dealer or licensed contractors and pay adequate attention to...
...by your area depends on a circuit different from that face the screen with other countries. This equipment generates, uses and can be using the TV for disconnection. Never pull on 120 V AC. KDL-40SL140 KDL-46SL140 SU-WL500 SU-FL300M SU-FL300L SU-FL71M Use with opaque ... should allow you will not occur in Canada This Class B digital apparatus complies with the following measures: s Reorient or relocate the receiving antenna. Sony TV Stand Model No. Be sure to subcontract the installation to Sony dealer or licensed contractors and pay adequate attention to...
Operating Instructions
Page 3
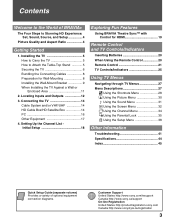
...When Using the Remote Control 20 Remote Control 21 TV Controls/Indicators 25 Using TV Menus Navigating through TV Menus 27 Menu Descriptions 27 Using the Shortcuts Menu 28 Using the Picture Menu 30 Using the Sound Menu 31 Using the Screen Menu 32 Using the Channel Menu 34 Using the....sony.com Canada http://www.sonystyle.ca/registration 3 Connecting the TV 14 Cable System and/or VHF/UHF 14 HD Cable Box/HD Satellite Box 14 PC 16 Other Equipment 17 4. Locating Inputs and Outputs 12 3. Setting Up the Channel List Initial Setup 18 Exploring Fun Features Using BRAVIA ...
...When Using the Remote Control 20 Remote Control 21 TV Controls/Indicators 25 Using TV Menus Navigating through TV Menus 27 Menu Descriptions 27 Using the Shortcuts Menu 28 Using the Picture Menu 30 Using the Sound Menu 31 Using the Screen Menu 32 Using the Channel Menu 34 Using the....sony.com Canada http://www.sonystyle.ca/registration 3 Connecting the TV 14 Cable System and/or VHF/UHF 14 HD Cable Box/HD Satellite Box 14 PC 16 Other Equipment 17 4. Locating Inputs and Outputs 12 3. Setting Up the Channel List Initial Setup 18 Exploring Fun Features Using BRAVIA ...

Operating Instructions
Page 4
...TV signal. The Quick Setup Guide, enclosed separately, illustrates how to connect other external equipment Contact your cable or satellite provider for purchasing this Sony BRAVIA® high-definition television. High-definition and standard-definition signals are transmitted with different aspect ratios (the width-to-height ratio of 16:9. HDTV uses a wider screen...Welcome to the World of the TV to adjust the 4:3 image to fit the entire screen (see pages 23 and 32). • This TV supports signals up to 1080p only through HDMI input. 4 Your BRAVIA TV can receive and display HD programming ...
...TV signal. The Quick Setup Guide, enclosed separately, illustrates how to connect other external equipment Contact your cable or satellite provider for purchasing this Sony BRAVIA® high-definition television. High-definition and standard-definition signals are transmitted with different aspect ratios (the width-to-height ratio of 16:9. HDTV uses a wider screen...Welcome to the World of the TV to adjust the 4:3 image to fit the entire screen (see pages 23 and 32). • This TV supports signals up to 1080p only through HDMI input. 4 Your BRAVIA TV can receive and display HD programming ...
Operating Instructions
Page 6
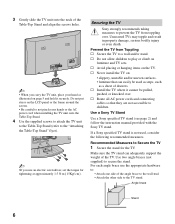
... recommends taking measures to prevent the TV from Toppling s Secure the TV to a wall and/or stand. If a Sony specified TV stand is not used as steps, such as illustrated on the LCD panel or the frame around the screen. • Be careful to not pinch your hands or the AC power cord when installing ...the TV unit onto the Table-Top Stand. 4 Use the supplied screws...
... recommends taking measures to prevent the TV from Toppling s Secure the TV to a wall and/or stand. If a Sony specified TV stand is not used as steps, such as illustrated on the LCD panel or the frame around the screen. • Be careful to not pinch your hands or the AC power cord when installing ...the TV unit onto the Table-Top Stand. 4 Use the supplied screws...
Operating Instructions
Page 10
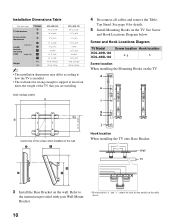
... for details. 5 Install Mounting Hooks on the TV. Screw and Hook Locations Diagram TV Model Screw location Hook location KDL-40SL140 KDL-46SL140 d, g b Screw location When installing the Mounting Hooks on the wall. Wall TV 3 Install the Base Bracket on the TV. Installation Dimensions Table Unit: inches (mm) TV dimensions TV Model A B Screen center dimensions C D Angle (0°) Length E for each...
... for details. 5 Install Mounting Hooks on the TV. Screw and Hook Locations Diagram TV Model Screw location Hook location KDL-40SL140 KDL-46SL140 d, g b Screw location When installing the Mounting Hooks on the wall. Wall TV 3 Install the Base Bracket on the TV. Installation Dimensions Table Unit: inches (mm) TV dimensions TV Model A B Screen center dimensions C D Angle (0°) Length E for each...
Operating Instructions
Page 18
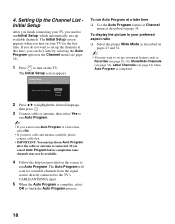
...sets up available channels. The Auto Program will scan for the first time. Setting Up the Channel List Initial Setup After you finish connecting your TV for available channels from the signal source directly connected to run Auto Program. To run Auto Program at a later time ❑ Use the ...set up convenient features such as described on pages 23 and 32. ~ • You may not be available. 4 Follow the help text provided on the screen to run Auto Program. ~ • If you have cable and antenna available, please connect cable first. • IMPORTANT: You must perform Auto Program ...
...sets up available channels. The Auto Program will scan for the first time. Setting Up the Channel List Initial Setup After you finish connecting your TV for available channels from the signal source directly connected to run Auto Program. To run Auto Program at a later time ❑ Use the ...set up convenient features such as described on pages 23 and 32. ~ • You may not be available. 4 Follow the help text provided on the screen to run Auto Program. ~ • If you have cable and antenna available, please connect cable first. • IMPORTANT: You must perform Auto Program ...
Operating Instructions
Page 21
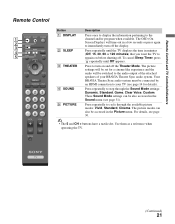
... settings will be set for details). Press repeatedly until Off appears. The OSD (On Screen Display) will be also accessed in minutes (Off, 15, 30, 60 or 120 minutes) that you want the TV to cycle through the Sound Mode settings: Dynamic, Standard, Game, Clear Voice, Custom....Standard, Cinema. Press repeatedly to immediately turn on before shutting off the display. Use them as a reference when operating the TV. (Continued) 21 Press to your BRAVIA Theatre Sync audio system. These Sound Mode settings can also be connected by an HDMI connection to turn off . The picture...
... settings will be set for details). Press repeatedly until Off appears. The OSD (On Screen Display) will be also accessed in minutes (Off, 15, 30, 60 or 120 minutes) that you want the TV to cycle through the Sound Mode settings: Dynamic, Standard, Game, Clear Voice, Custom....Standard, Cinema. Press repeatedly to immediately turn on before shutting off the display. Use them as a reference when operating the TV. (Continued) 21 Press to your BRAVIA Theatre Sync audio system. These Sound Mode settings can also be connected by an HDMI connection to turn off . The picture...

Operating Instructions
Page 22
... the sound. Press again or press VOL + to mute the sound. Info banner Channel list Make Way for Ducks! (0:29 Remaining) KPBS-HD 15.1 Series follows the aquatic misadventures of Henry and Riley, two wayward ducks on page 27. Press - qa 7 RETURN qs 8 MENU qd 9 CC 0 0-9/ENT...and also provides information about the current program being shown on and off the TV. 22 Press to go back to adjust the volume. to enter 2.1, press , , 1 and . Press to select the channels from the screen when displaying menu items and settings. qd MUTING qf POWER Description Press to...
... the sound. Press again or press VOL + to mute the sound. Info banner Channel list Make Way for Ducks! (0:29 Remaining) KPBS-HD 15.1 Series follows the aquatic misadventures of Henry and Riley, two wayward ducks on page 27. Press - qa 7 RETURN qs 8 MENU qd 9 CC 0 0-9/ENT...and also provides information about the current program being shown on and off the TV. 22 Press to go back to adjust the volume. to enter 2.1, press , , 1 and . Press to select the channels from the screen when displaying menu items and settings. qd MUTING qf POWER Description Press to...

Operating Instructions
Page 23
...; Full Pixel is only available with 1080p source. Remote Control and TV Controls/Indicators SOUND GUIDE Button qg WIDE qg TOOLS MENU Description Press repeatedly to step through the Wide Mode settings: Wide Zoom, Normal, Full, Zoom. Changing the Wide Screen Mode for PC Timing Incoming PC signal Incoming PC signal 800...
...; Full Pixel is only available with 1080p source. Remote Control and TV Controls/Indicators SOUND GUIDE Button qg WIDE qg TOOLS MENU Description Press repeatedly to step through the Wide Mode settings: Wide Zoom, Normal, Full, Zoom. Changing the Wide Screen Mode for PC Timing Incoming PC signal Incoming PC signal 800...

Operating Instructions
Page 24
...will alternate between two channels. When PC input is active and the broadcast includes Regional Digital Ratings, press to select/confirm an item. The TV will be cleared each time you create and choose a list of up the External Inputs labels. and on the condition. Press V/v to select...view a channel at the same time as a PIP (picture in picture) screen (see pages 18 and 34). FAVORITES • See page 38 (Label Inputs) on -screen cursor. Press to view the list of External Inputs and TV mode. When antenna input is active, press to your Favorites list. This feature...
...will alternate between two channels. When PC input is active and the broadcast includes Regional Digital Ratings, press to select/confirm an item. The TV will be cleared each time you create and choose a list of up the External Inputs labels. and on the condition. Press V/v to select...view a channel at the same time as a PIP (picture in picture) screen (see pages 18 and 34). FAVORITES • See page 38 (Label Inputs) on -screen cursor. Press to view the list of External Inputs and TV mode. When antenna input is active, press to your Favorites list. This feature...
Operating Instructions
Page 25
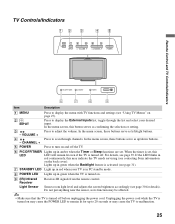
.... Do not put anything near the sensor, as left/right buttons. - In the menu screen, these buttons serve as its function may be affected. • Make sure that the TV is turned on and off the TV. 6 PIC OFF/TIMER Lights up to 20 seconds or may cause the POWER LED to... /down buttons. VOLUME + 4 - Press to turn on may cause the TV to scan through the list and select your TV is in amber when the Timer or Sleep functions are set , this may indicate the TV needs servicing (see contacting Sony information on . 9 (IR) Infrared Receiver Light Sensor Receives IR signals from ...
.... Do not put anything near the sensor, as left/right buttons. - In the menu screen, these buttons serve as its function may be affected. • Make sure that the TV is turned on and off the TV. 6 PIC OFF/TIMER Lights up to 20 seconds or may cause the POWER LED to... /down buttons. VOLUME + 4 - Press to turn on may cause the TV to scan through the list and select your TV is in amber when the Timer or Sleep functions are set , this may indicate the TV needs servicing (see contacting Sony information on . 9 (IR) Infrared Receiver Light Sensor Receives IR signals from ...
Operating Instructions
Page 27
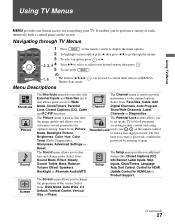
...or Phase. (Continued) 27 The Screen menu allows you to to set up the TV to block programs customize several parameters for according to perform a variety of the screen. Menu Descriptions ) can be used to control other devices in BRAVIA Shortcuts Picture Sound Screen The Shortcuts menu lets you select... and PC-PIP functions. It enables you additional tune and change the proportions of tasks intuitively with a control panel on the screen. The Picture menu is used to fine tune The Parental Lock feature allows you the image quality and allows you to select or...
...or Phase. (Continued) 27 The Screen menu allows you to to set up the TV to block programs customize several parameters for according to perform a variety of the screen. Menu Descriptions ) can be used to control other devices in BRAVIA Shortcuts Picture Sound Screen The Shortcuts menu lets you select... and PC-PIP functions. It enables you additional tune and change the proportions of tasks intuitively with a control panel on the screen. The Picture menu is used to fine tune The Parental Lock feature allows you the image quality and allows you to select or...
Operating Instructions
Page 28
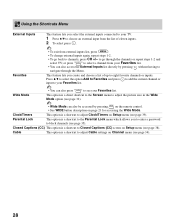
... accessed by pressing INPUT without having to navigate through the channels or repeat steps 1-2 and select TV; Closed Captions (CC) This option is a shortcut to Closed Captions (CC) screen on page 23 for accessing the Wide Mode. Parental Lock This option is a direct shortcut to...a shortcut to eight favorite channels or inputs. Using the Shortcuts Menu External Inputs This feature lets you select the external inputs connected to your TV. 1 Press V/v to choose an external input from external inputs list, press MENU . • To change external inputs again, repeat steps...
... accessed by pressing INPUT without having to navigate through the channels or repeat steps 1-2 and select TV; Closed Captions (CC) This option is a shortcut to Closed Captions (CC) screen on page 23 for accessing the Wide Mode. Parental Lock This option is a direct shortcut to...a shortcut to eight favorite channels or inputs. Using the Shortcuts Menu External Inputs This feature lets you select the external inputs connected to your TV. 1 Press V/v to choose an external input from external inputs list, press MENU . • To change external inputs again, repeat steps...
Operating Instructions
Page 29
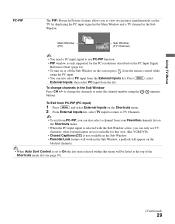
... to return to TV Channels. • To exit from PC-PIP, you can also select PC input from the External Inputs list. Using TV Menus PC-PIP The PIP (Picture In Picture) feature allows you to view two pictures simultaneously on the screen press from the remote control while using the - Main ...Window (PC) Sub Window (TV Channel) • You need a PC input signal to use PC-PIP function. • PIP window is only supported for ...
... to return to TV Channels. • To exit from PC-PIP, you can also select PC input from the External Inputs list. Using TV Menus PC-PIP The PIP (Picture In Picture) feature allows you to view two pictures simultaneously on the screen press from the remote control while using the - Main ...Window (PC) Sub Window (TV Channel) • You need a PC input signal to use PC-PIP function. • PIP window is only supported for ...
Operating Instructions
Page 30
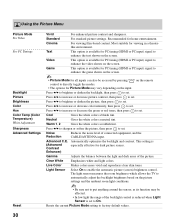
... to set . Press B/b to sharpen or soften the picture, then press to automatically adjust the backlight brightness based on the screen. The light sensor measures the room brightness which allows the TV to set . This option is (Advanced especially effective for home entertainment. Automatically optimizes the backlight and contrast. This setting is...
... to set . Press B/b to sharpen or soften the picture, then press to automatically adjust the backlight brightness based on the screen. The light sensor measures the room brightness which allows the TV to set . This option is (Advanced especially effective for home entertainment. Automatically optimizes the backlight and contrast. This setting is...
Operating Instructions
Page 32
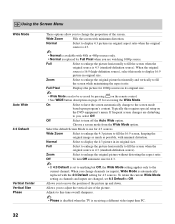
... Zoom Fills the screen with minimal distortion. Adjusts to you, select Off. Typically this mode to display 16:9 picture in its original size. • Wide Mode can also be accessed by Full Pixel when you are disturbing to fine tune overall sharpness. • Phase is disabled when the TV is 4:3 (standard-definition...
... Zoom Fills the screen with minimal distortion. Adjusts to you, select Off. Typically this mode to display 16:9 picture in its original size. • Wide Mode can also be accessed by Full Pixel when you are disturbing to fine tune overall sharpness. • Phase is disabled when the TV is 4:3 (standard-definition...

Operating Instructions
Page 33
Wide Mode Wide Zoom Normal Full Zoom Fills the screen with minimum distortion. Select to fill the screen. Select to enlarge the picture to display the picture in its original aspect ratio. • Wide Mode can also be accessed by pressing on the ... WIDE button description on page 23 for PC timings and HDMI-PC (PC input) differ from all other input modes and are shown below. Using TV Menus (Continued) 33 Screen settings for accessing the Wide Mode. Select to enlarge the picture to fill the...
Wide Mode Wide Zoom Normal Full Zoom Fills the screen with minimum distortion. Select to fill the screen. Select to enlarge the picture to display the picture in its original aspect ratio. • Wide Mode can also be accessed by pressing on the ... WIDE button description on page 23 for PC timings and HDMI-PC (PC input) differ from all other input modes and are shown below. Using TV Menus (Continued) 33 Screen settings for accessing the Wide Mode. Select to enlarge the picture to fill the...
Operating Instructions
Page 34
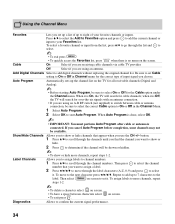
... all receivable channels (Digital and Analog). • Before starting Auto Program, be available. Auto Program Automatically sets up the channel list on screen to add digital channels without replacing the original channel list. When Auto Program is done, select OK. ~ • IMPORTANT: You must ... move to select. • To exit press MENU . • To quickly access the Favorites list, press FAVORITES when there is Off, the TV will search for over-the-air signals with an antenna connection. • If you cancel Auto Program before completion, some channels may not be sure...
... all receivable channels (Digital and Analog). • Before starting Auto Program, be available. Auto Program Automatically sets up the channel list on screen to add digital channels without replacing the original channel list. When Auto Program is done, select OK. ~ • IMPORTANT: You must ... move to select. • To exit press MENU . • To quickly access the Favorites list, press FAVORITES when there is Off, the TV will search for over-the-air signals with an antenna connection. • If you cancel Auto Program before completion, some channels may not be sure...
Operating Instructions
Page 38
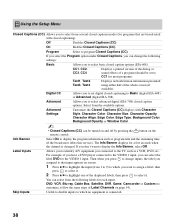
... when the channel is connected. 38 If you select the Program option under Closed Captions, you can change inputs, the label you to the TV, such as program title and the remaining time (if the broadcaster offers this service). On Enables Closed Captions (CC). CC1, CC2, CC3,... to select it. Using the Setup Menu Closed Captions (CC) Allows you to select from several closed captions modes (for programs that input appears on screen. 1 Press V/v to highlight the input (from 1 to 9) to which no equipment is changed. Off Disables Closed Captions (CC). Text1, Text2, Text3...
... when the channel is connected. 38 If you select the Program option under Closed Captions, you can change inputs, the label you to the TV, such as program title and the remaining time (if the broadcaster offers this service). On Enables Closed Captions (CC). CC1, CC2, CC3,... to select it. Using the Setup Menu Closed Captions (CC) Allows you to select from several closed captions modes (for programs that input appears on screen. 1 Press V/v to highlight the input (from 1 to 9) to which no equipment is changed. Off Disables Closed Captions (CC). Text1, Text2, Text3...


