Operating Instructions
Page 2
...area depends on a circuit different from that any damages in connection with the limits for help. This equipment generates, uses and can be liable for installing the specified TV. s Connect the equipment into an outlet on the type of programming and...of Conformity Trade Name: SONY Model: KDL-40XBR6/KDL-46XBR6/ KDL-52XBR6 Responsible Party: Sony Electronics Inc. Sony TV Model No. KDL40XBR6 46XBR6 52XBR6 Sony Wall-Mount Bracket Model No. Refer to safety during the installation. s Operate the TV only on , the user is a trademark of Sony Corporation. NOTIFICATION This equipment...
...area depends on a circuit different from that any damages in connection with the limits for help. This equipment generates, uses and can be liable for installing the specified TV. s Connect the equipment into an outlet on the type of programming and...of Conformity Trade Name: SONY Model: KDL-40XBR6/KDL-46XBR6/ KDL-52XBR6 Responsible Party: Sony Electronics Inc. Sony TV Model No. KDL40XBR6 46XBR6 52XBR6 Sony Wall-Mount Bracket Model No. Refer to safety during the installation. s Operate the TV only on , the user is a trademark of Sony Corporation. NOTIFICATION This equipment...
Operating Instructions
Page 3
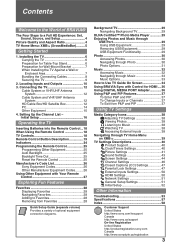
...TV Against a Wall or Enclosed Area 7 Bundling the Connecting Cables 8 Securing the TV 9 2. Contents Welcome to the World of optional equipment connection diagrams. Background TV 29 Navigating Background TV...Accessing Music 32 Navigating through TV Home Menu on XMB 39 TV Settings Descriptions 40 Product Support 40 Clock/Timers Settings 40 Picture Settings 41 Sound Settings...sony.com/tvsupport Canada http://www.sony.ca/support On-line Registration United States http://productregistration.sony.com Canada http://www.sonystyle.ca/registration 3 Installing the TV 6 Carrying the TV...
...TV Against a Wall or Enclosed Area 7 Bundling the Connecting Cables 8 Securing the TV 9 2. Contents Welcome to the World of optional equipment connection diagrams. Background TV 29 Navigating Background TV...Accessing Music 32 Navigating through TV Home Menu on XMB 39 TV Settings Descriptions 40 Product Support 40 Clock/Timers Settings 40 Picture Settings 41 Sound Settings...sony.com/tvsupport Canada http://www.sony.ca/support On-line Registration United States http://productregistration.sony.com Canada http://www.sonystyle.ca/registration 3 Installing the TV 6 Carrying the TV...

Operating Instructions
Page 4
...HD-quality antenna • HD cable subscription • HD satellite subscription • Blu-ray Disc™ player or other optional equipment. http://www.sony.com/HDTV Canada http://www.sonystyle.ca/hd The Four Steps to a Full HD Experience: Set, Sound, Source, and Setup Along with different ..., a complete HD system requires an HD sound system, a source of HD programming and proper setup connections. Welcome to the World of BRAVIA® Thank you see on your BRAVIA TV is displayed on an HDTV, you will notice a big difference. To experience the stunning detail of 16:9. The Quick...
...HD-quality antenna • HD cable subscription • HD satellite subscription • Blu-ray Disc™ player or other optional equipment. http://www.sony.com/HDTV Canada http://www.sonystyle.ca/hd The Four Steps to a Full HD Experience: Set, Sound, Source, and Setup Along with different ..., a complete HD system requires an HD sound system, a source of HD programming and proper setup connections. Welcome to the World of BRAVIA® Thank you see on your BRAVIA TV is displayed on an HDTV, you will notice a big difference. To experience the stunning detail of 16:9. The Quick...
Operating Instructions
Page 5
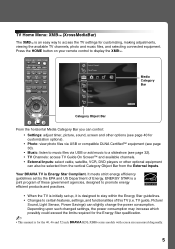
...; Settings: adjust timer, picture, sound, screen and other options (see page 40 for customizing, making adjustments, viewing the available TV channels, photo and music files, and selecting connected equipment. Your BRAVIA TV is an easy way to access the TV settings for customization options). • Photo: view photo files via USB or ...and functionalities of Energy. Depending upon such changed settings, the power consumption may increase which possibly could exceed the limits required for the 40, 46 and 52 inch BRAVIA KDL-XBR6 series models with screen size measured diagonally. 5
...; Settings: adjust timer, picture, sound, screen and other options (see page 40 for customizing, making adjustments, viewing the available TV channels, photo and music files, and selecting connected equipment. Your BRAVIA TV is an easy way to access the TV settings for customization options). • Photo: view photo files via USB or ...and functionalities of Energy. Depending upon such changed settings, the power consumption may increase which possibly could exceed the limits required for the 40, 46 and 52 inch BRAVIA KDL-XBR6 series models with screen size measured diagonally. 5

Operating Instructions
Page 6
... a TV stand (except model, KDL-52XBR6). 1 Remove the Table-Top Stand and screws from the bottom center. ~ • Do not put stress on the LCD panel or the frame around the screen. • Be careful to the Table-Top Stand. 6 For product protection and safety reasons, Sony strongly recommends that you install the TV unit...
... a TV stand (except model, KDL-52XBR6). 1 Remove the Table-Top Stand and screws from the bottom center. ~ • Do not put stress on the LCD panel or the frame around the screen. • Be careful to the Table-Top Stand. 6 For product protection and safety reasons, Sony strongly recommends that you install the TV unit...

Operating Instructions
Page 8
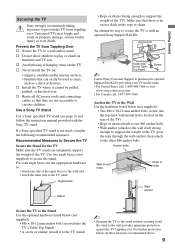
Should this occur, please wait a few hours to allow the moisture to moisture condensation. • When moving the TV from a cold area to a warm area, a sudden room temperature change may cause the TV's picture to blur or show poor color due to evaporate before powering on the TV. AC IN ~ • Do not bundle the AC power cord with other connecting cables. 8 Bundling the Connecting Cables You can bundle the connecting cables as illustrated below.
Should this occur, please wait a few hours to allow the moisture to moisture condensation. • When moving the TV from a cold area to a warm area, a sudden room temperature change may cause the TV's picture to blur or show poor color due to evaporate before powering on the TV. AC IN ~ • Do not bundle the AC power cord with other connecting cables. 8 Bundling the Connecting Cables You can bundle the connecting cables as illustrated below.
Operating Instructions
Page 9
... (not supplied) to the wall provides minimum protection against the TV toppling over . For further protection, follow the instruction manual provided with an optional Sony Support Belt Kit. Use a Sony TV Stand Use a Sony specified TV stand (see page 2) and follow all AC power cords and connecting cables so that can adequately support the weight of drawers...
... (not supplied) to the wall provides minimum protection against the TV toppling over . For further protection, follow the instruction manual provided with an optional Sony Support Belt Kit. Use a Sony TV Stand Use a Sony specified TV stand (see page 2) and follow all AC power cords and connecting cables so that can adequately support the weight of drawers...

Operating Instructions
Page 10
Locating Inputs and Outputs 5 Rear of TV VIDEO IN 1 3 1 S VIDEO VIDEO L (MONO) AUDIO R COMPONENT IN PC IN 1 2 Y RGB P B IN DIGITAL 1 AUDIO OUT (OPTICAL) 3 P R L AUDIO R AUDIO (1080p/1080i/720p/480p/480i ) 4 AUDIO OUT R .../ANTENNA 0 Side Panel qa IN 4 2 qs AC IN VIDEO IN 2 VIDEO L (MONO) 1 AUDIO R ~ • This TV displays all video input signals in a resolution of 1,920 dots × 1,080 lines. • An HDMI or Component video (YPBPR) connection is required to view 480i, 480p, 720p, 1080i and 1080p video formats. 1080/24p is...
Locating Inputs and Outputs 5 Rear of TV VIDEO IN 1 3 1 S VIDEO VIDEO L (MONO) AUDIO R COMPONENT IN PC IN 1 2 Y RGB P B IN DIGITAL 1 AUDIO OUT (OPTICAL) 3 P R L AUDIO R AUDIO (1080p/1080i/720p/480p/480i ) 4 AUDIO OUT R .../ANTENNA 0 Side Panel qa IN 4 2 qs AC IN VIDEO IN 2 VIDEO L (MONO) 1 AUDIO R ~ • This TV displays all video input signals in a resolution of 1,920 dots × 1,080 lines. • An HDMI or Component video (YPBPR) connection is required to view 480i, 480p, 720p, 1080i and 1080p video formats. 1080/24p is...
Operating Instructions
Page 11
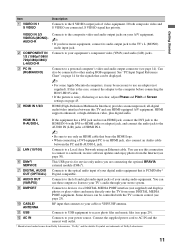
... (High-Definition Multimedia Interface) provides an uncompressed, all-digital audio/video interface between the PC and R-AUDIO-L jack. 5 LAN (10/100) 6 DMex/ SERVICE Connects to the TV's L (MONO) audio input jack. Some devices can use only an HDMI cable that bears the HDMI logo. • When... it may be necessary to use these outputs to listen to access photo files and music files (see page 14). qa USB Connects to USB equipment to your TV's audio through your analog audio equipment. See "PC Input Signal Reference Chart" on page 14 for service only unless you have ...
... (High-Definition Multimedia Interface) provides an uncompressed, all-digital audio/video interface between the PC and R-AUDIO-L jack. 5 LAN (10/100) 6 DMex/ SERVICE Connects to the TV's L (MONO) audio input jack. Some devices can use only an HDMI cable that bears the HDMI logo. • When... it may be necessary to use these outputs to listen to access photo files and music files (see page 14). qa USB Connects to USB equipment to your TV's audio through your analog audio equipment. See "PC Input Signal Reference Chart" on page 14 for service only unless you have ...

Operating Instructions
Page 12
... and over-the-air antenna programming, as indicated below. For the best possible picture, make sure you choose (see page 46). Connecting the TV Cable System or VHF/UHF Antenna System You can enjoy high-definition and standarddefinition digital programming (if available in your... TV via the HDMI or component video (with HDMI Connection Rear of TV B CABLE/ANTENNA ~ • Be sure to set the Signal Type setting to a high-definition cable service or a ...
... and over-the-air antenna programming, as indicated below. For the best possible picture, make sure you choose (see page 46). Connecting the TV Cable System or VHF/UHF Antenna System You can enjoy high-definition and standarddefinition digital programming (if available in your... TV via the HDMI or component video (with HDMI Connection Rear of TV B CABLE/ANTENNA ~ • Be sure to set the Signal Type setting to a high-definition cable service or a ...

Operating Instructions
Page 13
Getting Started Shown with DVI Connection Rear of TV VIDEO IN 1 3 S VIDEO VIDEO L (MONO) AUDIO R DVI-to-HDMI cable COMPONENT IN PC IN 1 2 Y RGB PB IN DIGITAL 1 AUDIO OUT (OPTICAL) 3 PR L AUDIO R AUDIO (1080p/... equipment has a DVI jack and not an HDMI jack, connect the DVI jack to the HDMI IN 4 (with Component Connection Rear of HDMI IN 4. Shown with DVI-to-HDMI cable or adapter) jack and connect the audio jack to the AUDIO IN (L/R) jacks of TV VIDEO IN 1 3 S VIDEO VIDEO L (MONO) AUDIO R COMPONENT IN PC...
Getting Started Shown with DVI Connection Rear of TV VIDEO IN 1 3 S VIDEO VIDEO L (MONO) AUDIO R DVI-to-HDMI cable COMPONENT IN PC IN 1 2 Y RGB PB IN DIGITAL 1 AUDIO OUT (OPTICAL) 3 PR L AUDIO R AUDIO (1080p/... equipment has a DVI jack and not an HDMI jack, connect the DVI jack to the HDMI IN 4 (with Component Connection Rear of HDMI IN 4. Shown with DVI-to-HDMI cable or adapter) jack and connect the audio jack to the AUDIO IN (L/R) jacks of TV VIDEO IN 1 3 S VIDEO VIDEO L (MONO) AUDIO R COMPONENT IN PC...

Operating Instructions
Page 14
.../480i) IN DIGITAL 1 AUDIO OUT (OPTICAL) 3 4 AUDIO OUT R AUDIO L L AUDIO R (VAR/FIX) Audio cable (stereo mini plugs) ~ • Connect the PC IN jack to Full Pixel. 14 This TV can also be treated as shown below . This affects Picture settings, Wide Mode settings, and PIP function. To view PC content...(boldfaced) in the above chart with ferrite core (analog RGB) and audio cable (see page 52). PC Input Signal Reference Chart After connecting the PC to the TV, set Picture Mode to Custom, Wide Mode to Full, and Display Area to the PC using an HD15HD15 cable with a 60 Hz ...
.../480i) IN DIGITAL 1 AUDIO OUT (OPTICAL) 3 4 AUDIO OUT R AUDIO L L AUDIO R (VAR/FIX) Audio cable (stereo mini plugs) ~ • Connect the PC IN jack to Full Pixel. 14 This TV can also be treated as shown below . This affects Picture settings, Wide Mode settings, and PIP function. To view PC content...(boldfaced) in the above chart with ferrite core (analog RGB) and audio cable (see page 52). PC Input Signal Reference Chart After connecting the PC to the TV, set Picture Mode to Custom, Wide Mode to Full, and Display Area to the PC using an HD15HD15 cable with a 60 Hz ...
Operating Instructions
Page 15
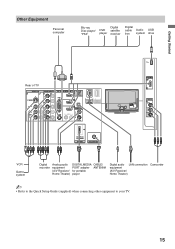
Getting Started Other Equipment Personal computer Blu-ray Disc player/ "PS3" DVD player Digital satellite receiver Digital cable Audio USB box system drive Rear of TV VIDEO IN 1 3 S VIDEO VIDEO L (MONO) AUDIO R COMPONENT IN PC IN 1 2 Y RGB PB IN DIGITAL 1 AUDIO OUT (OPTICAL) 3 PR L AUDIO R AUDIO ...system Digital recorder Analog audio equipment (A/V Receiver/ Home Theater) DIGITAL MEDIA CABLE/ PORT adapter ANTENNA for portable player Digital audio LAN connection equipment (A/V Receiver/ Home Theater) Camcorder ~ • Refer to the Quick Setup Guide (supplied) when...
Getting Started Other Equipment Personal computer Blu-ray Disc player/ "PS3" DVD player Digital satellite receiver Digital cable Audio USB box system drive Rear of TV VIDEO IN 1 3 S VIDEO VIDEO L (MONO) AUDIO R COMPONENT IN PC IN 1 2 Y RGB PB IN DIGITAL 1 AUDIO OUT (OPTICAL) 3 PR L AUDIO R AUDIO ...system Digital recorder Analog audio equipment (A/V Receiver/ Home Theater) DIGITAL MEDIA CABLE/ PORT adapter ANTENNA for portable player Digital audio LAN connection equipment (A/V Receiver/ Home Theater) Camcorder ~ • Refer to the Quick Setup Guide (supplied) when...

Operating Instructions
Page 16
... fully receive the program listing information. • Once the program information is free of charge. • Your TV acquires program listing information while your cable connections (refer to the preceding pages and the Quick Setup Guide provided separately) before proceeding with the Initial Setup. 2 Use the remote control to navigate through ...
... fully receive the program listing information. • Once the program information is free of charge. • Your TV acquires program listing information while your cable connections (refer to the preceding pages and the Quick Setup Guide provided separately) before proceeding with the Initial Setup. 2 Use the remote control to navigate through ...

Operating Instructions
Page 19
... (fast reverse): Press to the audio output of the attached speakers of time. The picture settings will be set period of your dealer or www.sony.com/bravia for details). The sound modes can also be available in the Sound settings. Press to the DVD, AMP, or STB FUNCTION buttons of... connected equipment (not available on the amount of the live TV when playing back a recorded program. The buttons listed below can select the banner size based on all Control for a ...
... (fast reverse): Press to the audio output of the attached speakers of time. The picture settings will be set period of your dealer or www.sony.com/bravia for details). The sound modes can also be available in the Sound settings. Press to the DVD, AMP, or STB FUNCTION buttons of... connected equipment (not available on the amount of the live TV when playing back a recorded program. The buttons listed below can select the banner size based on all Control for a ...

Operating Instructions
Page 20
... On Screen" on page 26. Product Support Clock/Timers Settings Sound Screen Channel TV qa 0-9 ENT qs qd MUTING qf VOL +/- the channel changes after two seconds. Use with Sony Blu-ray player (BD) see pages 5 and 38). Press again or press VOL + to record. Pressing this button alone starts...REC RECPAUSE RECSTOP BD/DVD TOP MENU MENU F1 F2 Button Description 7 FAVORITES Press once to display the top menu of the connected equipment. Press again to open the TV Guide On Screen system. See page 28 for detailed information. 8 GUIDE Press to exit from the screen when displaying menu ...
... On Screen" on page 26. Product Support Clock/Timers Settings Sound Screen Channel TV qa 0-9 ENT qs qd MUTING qf VOL +/- the channel changes after two seconds. Use with Sony Blu-ray player (BD) see pages 5 and 38). Press again or press VOL + to record. Pressing this button alone starts...REC RECPAUSE RECSTOP BD/DVD TOP MENU MENU F1 F2 Button Description 7 FAVORITES Press once to display the top menu of the connected equipment. Press again to open the TV Guide On Screen system. See page 28 for detailed information. 8 GUIDE Press to exit from the screen when displaying menu ...
Operating Instructions
Page 23
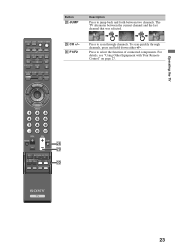
..., press and hold down either +/-. VOL MUTING CH JUMP REC RECPAUSE RECSTOP BD/DVD TOP MENU MENU F1 F2 wk wl e; 23 The TV alternates between two channels. e; Press to jump back and forth between the current channel and the last channel that was selected. JUMP JUMP wl... details, see "Using Other Equipment with Your Remote Control" on page 27. To scan quickly through channels. Operating the TV DISPLAY LIGHT POWER TV POWER DVD AMP STB TV FUNCTION PREV REPLAY ADVANCE NEXT PLAY SYNC MENU PAUSE STOP THEATER SOUND PICTURE WIDE CC FREEZE Button wk JUMP Description Press to...
..., press and hold down either +/-. VOL MUTING CH JUMP REC RECPAUSE RECSTOP BD/DVD TOP MENU MENU F1 F2 wk wl e; 23 The TV alternates between two channels. e; Press to jump back and forth between the current channel and the last channel that was selected. JUMP JUMP wl... details, see "Using Other Equipment with Your Remote Control" on page 27. To scan quickly through channels. Operating the TV DISPLAY LIGHT POWER TV POWER DVD AMP STB TV FUNCTION PREV REPLAY ADVANCE NEXT PLAY SYNC MENU PAUSE STOP THEATER SOUND PICTURE WIDE CC FREEZE Button wk JUMP Description Press to...

Operating Instructions
Page 27
...For selecting between DVD/ F2 VCR in the External Inputs menu. DVD or BD Input VIDEO 1 or A/V Input SAT or Cable Input TV or Tuner Input 27 See page 25 for the equipment you have programmed on /off . Previous, Skip backward Replay Advance, Skip > ...JUMP Last channel Volume Control VOL +/- Operating the TV Using Other Equipment with Your Remote Control Remote control tips are provided below for programming equipment to see your equipment. Button functionality may differ depending on your connected equipment in combo units Equipment Control POWER Turn on...
...For selecting between DVD/ F2 VCR in the External Inputs menu. DVD or BD Input VIDEO 1 or A/V Input SAT or Cable Input TV or Tuner Input 27 See page 25 for the equipment you have programmed on /off . Previous, Skip backward Replay Advance, Skip > ...JUMP Last channel Volume Control VOL +/- Operating the TV Using Other Equipment with Your Remote Control Remote control tips are provided below for programming equipment to see your equipment. Button functionality may differ depending on your connected equipment in combo units Equipment Control POWER Turn on...
Operating Instructions
Page 29
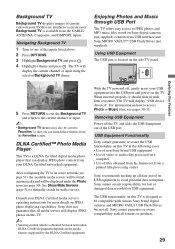
... JPEG photos and MP3 music files stored on Sony digital cameras (not supplied) connected via USB interface and Sony MICRO VAULT™ USB Flash Drives (not supplied). Sony cannot accept responsibility for lost or damaged data recorded on this TV in with all . Enjoying Photos and Music ...through USB Port The TV offers easy access to ...
... JPEG photos and MP3 music files stored on Sony digital cameras (not supplied) connected via USB interface and Sony MICRO VAULT™ USB Flash Drives (not supplied). Sony cannot accept responsibility for lost or damaged data recorded on this TV in with all . Enjoying Photos and Music ...through USB Port The TV offers easy access to ...

Operating Instructions
Page 30
... display resolution range is shown below with USB selected). DLNA Certified media server USB Samples Photo US0013A92B6949: server: 4 After locating your TV must be connected and configured to an active network (see page 51). • The TV can display a maximum photo file size of 8 megabytes from Sony USB connected equipment and DLNA Certified media servers.
... display resolution range is shown below with USB selected). DLNA Certified media server USB Samples Photo US0013A92B6949: server: 4 After locating your TV must be connected and configured to an active network (see page 51). • The TV can display a maximum photo file size of 8 megabytes from Sony USB connected equipment and DLNA Certified media servers.

