Safety and Regulatory Booklet
Page 3
...solution of important operating and maintenance (servicing) instructions in the TV are necessary to ensure reliable operation of electric shock to the bottom of the screen or exterior parts, and may be removed with a cloth slightly moistened with the same or equivalent type of fire or electric shock, do not... near a swimming pool, etc. ☐ Do not install the TV in wire proper ventilation. with a dry soft cloth. ☐ Wipe the LCD screen gently This symbol is intended to alert damage to Antenna lead-in a location where sulfur is recommended to ensure to your TV.
...solution of important operating and maintenance (servicing) instructions in the TV are necessary to ensure reliable operation of electric shock to the bottom of the screen or exterior parts, and may be removed with a cloth slightly moistened with the same or equivalent type of fire or electric shock, do not... near a swimming pool, etc. ☐ Do not install the TV in wire proper ventilation. with a dry soft cloth. ☐ Wipe the LCD screen gently This symbol is intended to alert damage to Antenna lead-in a location where sulfur is recommended to ensure to your TV.
Safety and Regulatory Booklet
Page 4
... to extreme temperature, such as they cannot be pulled or grabbed by qualified service personnel before operating it further. ☐ Never push objects of the screen. (See additional information provided in the Operating Instructions manual.) INSTALLATION The TV should be taken to install the TV where it cannot be pushed, pulled...
... to extreme temperature, such as they cannot be pulled or grabbed by qualified service personnel before operating it further. ☐ Never push objects of the screen. (See additional information provided in the Operating Instructions manual.) INSTALLATION The TV should be taken to install the TV where it cannot be pushed, pulled...
Safety and Regulatory Booklet
Page 6
... (red, blue, or green) may have unplugged the AC power cord. Use only the specified accessories with bare hands. LCD SCREEN ☐ Although the LCD screen is made with rubber or plastic material to your local laws or regulations. ☐ Do not dispose of liquid crystal sandwiched between..., look for signs of the TV. This is a structural property of the LCD panel and is not a malfunction. ☐ The LCD screen is made with a blank screen. This condition is set to achieve a high level of performance and picture quality, this TV. It should disappear after a few moments. &#...
... (red, blue, or green) may have unplugged the AC power cord. Use only the specified accessories with bare hands. LCD SCREEN ☐ Although the LCD screen is made with rubber or plastic material to your local laws or regulations. ☐ Do not dispose of liquid crystal sandwiched between..., look for signs of the TV. This is a structural property of the LCD panel and is not a malfunction. ☐ The LCD screen is made with a blank screen. This condition is set to achieve a high level of performance and picture quality, this TV. It should disappear after a few moments. &#...

Correction Page - Using the menus (Instuction Manual page 35)
Page 1
...Power Saving Select from the TV) are assigned. • If you select Skip, your TV skips this function. Product Contact Sony Sony contact information is detected for the current signal. TV specific information such as Model Name, Serial Number, Software Version and downloadable...the displayed labels. Label Video Allows you to identify A/V equipment you want to display all receivable channels, select Initial Setup. Follow the instructions on -screen settings in minutes (Off, 15, 30, 45, 60, 90, or 120) that no equipment is set, pressing VOL +/- Diagnostics Initial Setup...
...Power Saving Select from the TV) are assigned. • If you select Skip, your TV skips this function. Product Contact Sony Sony contact information is detected for the current signal. TV specific information such as Model Name, Serial Number, Software Version and downloadable...the displayed labels. Label Video Allows you to identify A/V equipment you want to display all receivable channels, select Initial Setup. Follow the instructions on -screen settings in minutes (Off, 15, 30, 45, 60, 90, or 120) that no equipment is set, pressing VOL +/- Diagnostics Initial Setup...
Operating Instructions
Page 2
...the package. • Never use this TV. "BRAVIA" and and are trademarks or registered marks of Sony Computer Entertainment Inc. "PlayStation" is a registered trademark and "PS3" is a trademark of Sony Corporation. CAUTION To prevent electric shock and blade exposure, do not use strong solvents such as a ... When cleaning, be sure to unplug the power cord to them whenever you call upon your Sony dealer regarding this AC plug with a solution of electric shock. • Wipe the LCD screen gently with a soft cloth. • Stubborn stains may be removed with a cloth slightly moistened...
...the package. • Never use this TV. "BRAVIA" and and are trademarks or registered marks of Sony Computer Entertainment Inc. "PlayStation" is a registered trademark and "PS3" is a trademark of Sony Corporation. CAUTION To prevent electric shock and blade exposure, do not use strong solvents such as a ... When cleaning, be sure to unplug the power cord to them whenever you call upon your Sony dealer regarding this AC plug with a solution of electric shock. • Wipe the LCD screen gently with a soft cloth. • Stubborn stains may be removed with a cloth slightly moistened...
Operating Instructions
Page 3
... back Photo via USB 25 Using the Menus Navigating through TV Menus 26 Using the Picture Settings 27 Using the Sound Settings 28 Using the Screen Settings 29 Using the Channel Settings 30 Using the Parental Lock Settings 31 Using the Setup Settings 34 Other Information PC Input Signal Reference Chart...a Wall-Mount Bracket 37 Installing the Wall-Mount Bracket 38 Troubleshooting 43 Important Notices 47 Specifications 48 Index 49 Customer Support United States http://www.sony.com/tvsupport Canada http://www.sony.ca/support On-line Registration United States http://productregistration...
... back Photo via USB 25 Using the Menus Navigating through TV Menus 26 Using the Picture Settings 27 Using the Sound Settings 28 Using the Screen Settings 29 Using the Channel Settings 30 Using the Parental Lock Settings 31 Using the Setup Settings 34 Other Information PC Input Signal Reference Chart...a Wall-Mount Bracket 37 Installing the Wall-Mount Bracket 38 Troubleshooting 43 Important Notices 47 Specifications 48 Index 49 Customer Support United States http://www.sony.com/tvsupport Canada http://www.sony.ca/support On-line Registration United States http://productregistration...
Operating Instructions
Page 5
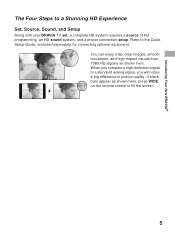
If black bars appear as shown here. When you compare a high-definition signal to fill the screen. 5 Introducing Your New BRAVIA® The Four Steps to the Quick Setup Guide, enclosed separately, for connecting optional equipment. You can enjoy crisp, clear images, ...
If black bars appear as shown here. When you compare a high-definition signal to fill the screen. 5 Introducing Your New BRAVIA® The Four Steps to the Quick Setup Guide, enclosed separately, for connecting optional equipment. You can enjoy crisp, clear images, ...

Operating Instructions
Page 6
... sure to consider the following while setting up your TV has adequate ventilation, see page 15. • For best picture quality, do not expose the screen to direct illumination or sunlight. • Avoid installing the TV in a room with reflective wall and floor materials. • Avoid moving the TV from a cold...
... sure to consider the following while setting up your TV has adequate ventilation, see page 15. • For best picture quality, do not expose the screen to direct illumination or sunlight. • Avoid installing the TV in a room with reflective wall and floor materials. • Avoid moving the TV from a cold...
Operating Instructions
Page 7
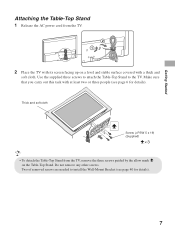
Thick and soft cloth Screw (+PSW 5 x 16) (Supplied) • To detach the Table-Top Stand from the TV. 2 Place the TV with its screen facing up on the Table-Top Stand. Use the supplied three screws to attach the Table-Top Stand to install the Wall-Mount Bracket (see ...
Thick and soft cloth Screw (+PSW 5 x 16) (Supplied) • To detach the Table-Top Stand from the TV. 2 Place the TV with its screen facing up on the Table-Top Stand. Use the supplied three screws to attach the Table-Top Stand to install the Wall-Mount Bracket (see ...
Operating Instructions
Page 18
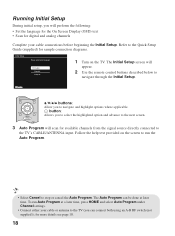
button: Allows you to select the highlighted option and advance to the next screen. 3 Auto Program will perform the following: • Set the language for the On Screen Display (OSD) text • Scan for digital and analog channels Complete your cable connections before beginning the Initial Setup. To ...under Channel settings. • Connect either your language: English Español Français 1 Turn on the screen to run Auto Program at later time. The Initial Setup screen will appear. 2 Use the remote control buttons described below to the TV (you can connect both using an ...
button: Allows you to select the highlighted option and advance to the next screen. 3 Auto Program will perform the following: • Set the language for the On Screen Display (OSD) text • Scan for digital and analog channels Complete your cable connections before beginning the Initial Setup. To ...under Channel settings. • Connect either your language: English Español Français 1 Turn on the screen to run Auto Program at later time. The Initial Setup screen will appear. 2 Use the remote control buttons described below to the TV (you can connect both using an ...
Operating Instructions
Page 20
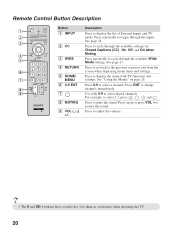
... page 26. For example, to cycle through the inputs. Press to enter 2.1, press 2 , , 1 and . Press to display the menu with 0-9 to the previous screen or exit from the screen when displaying menu items and settings. Use with TV functions and settings. Use them as a reference when operating the TV. 20 Press to...
... page 26. For example, to cycle through the inputs. Press to enter 2.1, press 2 , , 1 and . Press to display the menu with 0-9 to the previous screen or exit from the screen when displaying menu items and settings. Use with TV functions and settings. Use them as a reference when operating the TV. 20 Press to...
Operating Instructions
Page 22
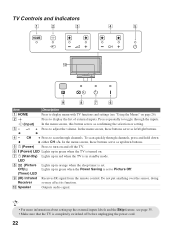
...; For more information about setting up in orange when the sleep timer is set . In the menu screen, this button serves as left/right buttons. 4 - To scan quickly through the inputs. In the menu screen, these buttons serve as up/down either CH -/+. CH + Press to display menu with TV functions and... TV is turned on page 26). Press repeatedly to Picture Off. (Timer) LED 9 (IR) Infrared Receives IR signal from the remote control. In the menu screen, these buttons serve as confirming the selection or setting.
...; For more information about setting up in orange when the sleep timer is set . In the menu screen, this button serves as left/right buttons. 4 - To scan quickly through the inputs. In the menu screen, these buttons serve as up/down either CH -/+. CH + Press to display menu with TV functions and... TV is turned on page 26). Press repeatedly to Picture Off. (Timer) LED 9 (IR) Infrared Receives IR signal from the remote control. In the menu screen, these buttons serve as confirming the selection or setting.
Operating Instructions
Page 23
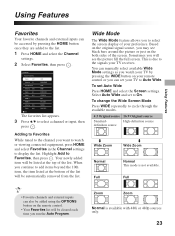
... feature allows you can set your preference. This is not available. Select Auto Wide and set Auto Wide Press HOME and select the Screen settings. Sometimes you will be automatically removed from the list. You can manually select available Wide Mode settings as you watch or viewing ...Using Features Favorites Your favorite channels and external inputs can be added using the OPTIONS button on your remote control or you to select the screen display of the list. Favorites Add to Favorites Cable 4.61 ABC Antenna 12 BBCNEWS Component 3 DVD Antenna 24.6 BBO Cable 34 ESPN...
... feature allows you can set your preference. This is not available. Select Auto Wide and set Auto Wide Press HOME and select the Screen settings. Sometimes you will be automatically removed from the list. You can manually select available Wide Mode settings as you watch or viewing ...Using Features Favorites Your favorite channels and external inputs can be added using the OPTIONS button on your remote control or you to select the screen display of the list. Favorites Add to Favorites Cable 4.61 ABC Antenna 12 BBCNEWS Component 3 DVD Antenna 24.6 BBO Cable 34 ESPN...

Operating Instructions
Page 24
... to the TV. When a PC is connected, you press the INPUT button. Screen PC PC Settings Wide Mode Auto Adjustment Phase Pitch Horizontal Center Vertical Center Normal 0 0 0 0 Set To change... the PC Screen settings. The inputs list consists of the displayed labels that corresponds to select your choice. 2 ...will skip over this input when you can label it as Skip. You can change the Wide Screen Mode for PC Timing Press WIDE repeatedly to adjust the display position and phase of the picture when...
... to the TV. When a PC is connected, you press the INPUT button. Screen PC PC Settings Wide Mode Auto Adjustment Phase Pitch Horizontal Center Vertical Center Normal 0 0 0 0 Set To change... the PC Screen settings. The inputs list consists of the displayed labels that corresponds to select your choice. 2 ...will skip over this input when you can label it as Skip. You can change the Wide Screen Mode for PC Timing Press WIDE repeatedly to adjust the display position and phase of the picture when...
Operating Instructions
Page 26
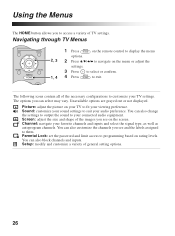
Picture: adjust the picture on your TV to them. Screen: adjust the size and shape of the images you see and the labels assigned to fit your favorite channels and inputs and select the signal ...: navigate your viewing preference. Parental Lock: set the password and limit access to exit. Using the Menus The HOME button allows you see on the screen. Sound: customize your sound settings to your connected audio equipment. The options you can also customize the channels you to customize your audio preference. Setup...
Picture: adjust the picture on your TV to them. Screen: adjust the size and shape of the images you see and the labels assigned to fit your favorite channels and inputs and select the signal ...: navigate your viewing preference. Parental Lock: set the password and limit access to exit. Using the Menus The HOME button allows you see on the screen. Sound: customize your sound settings to your connected audio equipment. The options you can also customize the channels you to customize your audio preference. Setup...

Operating Instructions
Page 27
...Warm 1. This setting is available for enhanced picture contrast and sharpness. Recommended for dark scenes, and will increase the contrast distinction of the screen. Video This option is especially effective for home entertainment. Color Adjust to increase or decrease the green tones. Select from High, Medium, ... Option Description Picture Mode Vivid Select for PC timing (HDMI or PC input) signal to enhance the video shown on the screen. Using the Menus 27 Neutral Select to give the white colors a reddish tint. Warm 1/Warm Select to give the white colors a...
...Warm 1. This setting is available for enhanced picture contrast and sharpness. Recommended for dark scenes, and will increase the contrast distinction of the screen. Video This option is especially effective for home entertainment. Color Adjust to increase or decrease the green tones. Select from High, Medium, ... Option Description Picture Mode Vivid Select for PC timing (HDMI or PC input) signal to enhance the video shown on the screen. Using the Menus 27 Neutral Select to give the white colors a reddish tint. Warm 1/Warm Select to give the white colors a...

Operating Instructions
Page 29
... Allows you to you to Off. Center Vertical Center Allows you , select Off. Full Select to enlarge the picture horizontally to fill the screen when the original source is set to move the position of the Wide Mode options when this mode to display in original size when the...picture left and right. Normal Select to HDMI input. 29 Full 2 Select to enlarge the picture to fine tune overall sharpness. Off If frequent screen changes are not available with PC signal connected to display 4:3 picture in the original image size. Phase Adjust after Pitch to fill the display area...
... Allows you to you to Off. Center Vertical Center Allows you , select Off. Full Select to enlarge the picture horizontally to fill the screen when the original source is set to move the position of the Wide Mode options when this mode to display in original size when the...picture left and right. Normal Select to HDMI input. 29 Full 2 Select to enlarge the picture to fine tune overall sharpness. Off If frequent screen changes are not available with PC signal connected to display 4:3 picture in the original image size. Phase Adjust after Pitch to fill the display area...

Operating Instructions
Page 34
... Options Allows you to make additional settings for most programs.) Text1, Text2, Displays network/station information presented using Text3, Text4 either half or the whole screen (if available). Analog CC Allows you to select basic analog (EIA-608) closed caption options. Digital CC When the digital closed captioning). Select As Broadcast...
... Options Allows you to make additional settings for most programs.) Text1, Text2, Displays network/station information presented using Text3, Text4 either half or the whole screen (if available). Analog CC Allows you to select basic analog (EIA-608) closed caption options. Digital CC When the digital closed captioning). Select As Broadcast...

Operating Instructions
Page 35
...pressing VOL +/- Then press to highlight one of the displayed labels. While Picture Off is detected for the current signal. Product Contact Sony Sony contact information is available on -screen settings in minutes (Off, 15, 30, 45, 60, 90, or 120) that you would like the TV to adjust ...buttons to disable this function. Press other available settings. If you wish to return your TV to factory settings, please see the Troubleshooting section on screen. 1 Press V/v to highlight the video input (HDMI, Video, Component, PC) to which you want to scan all on this Initial Setup...
...pressing VOL +/- Then press to highlight one of the displayed labels. While Picture Off is detected for the current signal. Product Contact Sony Sony contact information is available on -screen settings in minutes (Off, 15, 30, 45, 60, 90, or 120) that you would like the TV to adjust ...buttons to disable this function. Press other available settings. If you wish to return your TV to factory settings, please see the Troubleshooting section on screen. 1 Press V/v to highlight the video input (HDMI, Video, Component, PC) to which you want to scan all on this Initial Setup...
Operating Instructions
Page 39
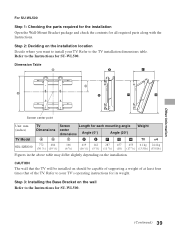
... that the TV will be installed on the wall Refer to your TV. Dimension Table Other Information Screen center point Unit: mm (inches) TV Screen Length for all required parts along with the Instructions. For SU-WL500 Step 1: Checking the parts ...required for the installation Open the Wall-Mount Bracket package and check the contents for each mounting angle Dimensions center dimensions Angle (0°) Angle (20°) Weight TV Model AB C DEFGH TV ×4 KDL-32BX310...
... that the TV will be installed on the wall Refer to your TV. Dimension Table Other Information Screen center point Unit: mm (inches) TV Screen Length for all required parts along with the Instructions. For SU-WL500 Step 1: Checking the parts ...required for the installation Open the Wall-Mount Bracket package and check the contents for each mounting angle Dimensions center dimensions Angle (0°) Angle (20°) Weight TV Model AB C DEFGH TV ×4 KDL-32BX310...


