Operating Instructions
Page 3
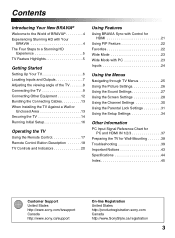
...TV Using the Remote Control 17 Remote Control Button Description 18 TV Controls and Indicators 20 Using Features Using BRAVIA Sync with Control for HDMI 21 Using PIP Feature 22 Favorites 22 Wide Mode 23 Wide Mode with PC 23 Inputs 24 Using the Menus Navigating through TV Menus 25 Using the Picture Settings 26...Preparing the TV for Wall-Mounting 38 Troubleshooting 39 Important Notices 43 Specifications 44 Index 45 Customer Support United States http://www.sony.com/tvsupport Canada http://www.sony.ca/support On-line Registration United States http://productregistration.sony.com ...
...TV Using the Remote Control 17 Remote Control Button Description 18 TV Controls and Indicators 20 Using Features Using BRAVIA Sync with Control for HDMI 21 Using PIP Feature 22 Favorites 22 Wide Mode 23 Wide Mode with PC 23 Inputs 24 Using the Menus Navigating through TV Menus 25 Using the Picture Settings 26...Preparing the TV for Wall-Mounting 38 Troubleshooting 39 Important Notices 43 Specifications 44 Index 45 Customer Support United States http://www.sony.com/tvsupport Canada http://www.sony.ca/support On-line Registration United States http://productregistration.sony.com ...
Operating Instructions
Page 5
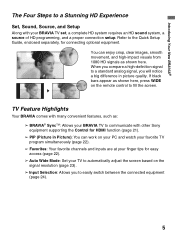
... Highlights Your BRAVIA comes with many convenient features, such as: ➢ BRAVIA® SyncTM: Allows your BRAVIA TV to communicate with other Sony equipment supporting the Control for HDMI function (page 21). ➢ PIP (Picture in picture quality. You can work on the signal resolution (page 23). ... You can enjoy crisp, clear images, smooth movement, and high-impact visuals from 1080 HD signals as shown here, press WIDE on the remote control to a standard analog signal, you compare a high-definition signal to fill the screen. Refer to the Quick Setup Guide, enclosed separately,...
... Highlights Your BRAVIA comes with many convenient features, such as: ➢ BRAVIA® SyncTM: Allows your BRAVIA TV to communicate with other Sony equipment supporting the Control for HDMI function (page 21). ➢ PIP (Picture in picture quality. You can work on the signal resolution (page 23). ... You can enjoy crisp, clear images, smooth movement, and high-impact visuals from 1080 HD signals as shown here, press WIDE on the remote control to a standard analog signal, you compare a high-definition signal to fill the screen. Refer to the Quick Setup Guide, enclosed separately,...

Operating Instructions
Page 16
... to the next screen. 3 Auto Program will scan for available channels from the signal source directly connected to the TV (you will appear. 2 Use the remote control buttons described below to the Quick Setup Guide (supplied) for more details, see page 9. • Select your ...cable or antenna to the TV's CABLE/ANTENNA input. for sample connection diagrams. Initial Setup Please select your cable connections before beginning...
... to the next screen. 3 Auto Program will scan for available channels from the signal source directly connected to the TV (you will appear. 2 Use the remote control buttons described below to the Quick Setup Guide (supplied) for more details, see page 9. • Select your ...cable or antenna to the TV's CABLE/ANTENNA input. for sample connection diagrams. Initial Setup Please select your cable connections before beginning...
Operating Instructions
Page 17
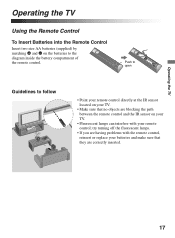
...If you are having problems with your remote control; Operating the TV Operating the TV Using the Remote Control To Insert Batteries into the Remote Control Insert two size AA batteries (supplied) by matching e and E on your TV. • Fluorescent lamps can interfere with the remote control, reinsert or replace your batteries and ... 17 Push to open Guidelines to follow • Point your remote control directly at the IR sensor located on your TV. • Make sure that they are blocking the path between the remote control and the IR sensor on the batteries to the diagram inside the...
...If you are having problems with your remote control; Operating the TV Operating the TV Using the Remote Control To Insert Batteries into the Remote Control Insert two size AA batteries (supplied) by matching e and E on your TV. • Fluorescent lamps can interfere with the remote control, reinsert or replace your batteries and ... 17 Push to open Guidelines to follow • Point your remote control directly at the IR sensor located on your TV. • Make sure that they are blocking the path between the remote control and the IR sensor on the batteries to the diagram inside the...
Operating Instructions
Page 18
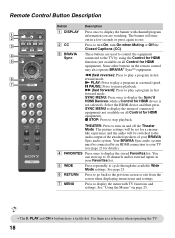
...m (fast reverse): Press to display the menu with channel/program information you are used to control the equipment connected to the TV by an HDMI connection to turn On, turn on the remote control may also operate BRAVIA® SyncTM equipment. See page 23. 6 RETURN Press to go ... to play a program in fast rewind mode. These buttons are watching. X PAUSE: Press to play a program in fast forward mode. Remote Control Button Description 1 2 3 DISPLAY CC POWER 4 5 WIDE INPUT 6 7 TOOLS Button Description 1 DISPLAY 2 CC 3 BRAVIA Sync Press once to display the ...
...m (fast reverse): Press to display the menu with channel/program information you are used to control the equipment connected to the TV by an HDMI connection to turn On, turn on the remote control may also operate BRAVIA® SyncTM equipment. See page 23. 6 RETURN Press to go ... to play a program in fast rewind mode. These buttons are watching. X PAUSE: Press to play a program in fast forward mode. Remote Control Button Description 1 2 3 DISPLAY CC POWER 4 5 WIDE INPUT 6 7 TOOLS Button Description 1 DISPLAY 2 CC 3 BRAVIA Sync Press once to display the ...
Operating Instructions
Page 20
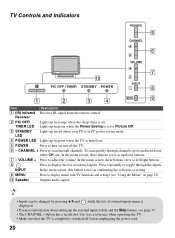
... Indicators POWER 5 CHANNEL 6 VOLUME 0 PIC OFF / TIMER STANDBY POWER 7 INPUT 8 MENU 9 1 2 3 4 Item Description 1 (IR) Infrared Receives IR signal from the remote control. VOLUME + Press to display menu with TV functions and settings (see page 35. • The CHANNEL + button has a tactile dot. Use it as up in orange when the sleep timer is...
... Indicators POWER 5 CHANNEL 6 VOLUME 0 PIC OFF / TIMER STANDBY POWER 7 INPUT 8 MENU 9 1 2 3 4 Item Description 1 (IR) Infrared Receives IR signal from the remote control. VOLUME + Press to display menu with TV functions and settings (see page 35. • The CHANNEL + button has a tactile dot. Use it as up in orange when the sleep timer is...
Operating Instructions
Page 21
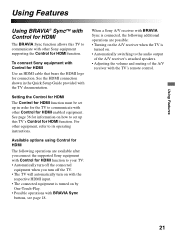
...Sony equipment with the TV's remote control. 21 When a Sony A/V receiver with BRAVIA Sync is connected, the following operations are possible: • Turning on the A/V receiver when the TV is turned on how to set up this TV to communicate with other Sony equipment supporting the Control for HDMI function. See the HDMI connection shown in order for the TV... after you connect the supported Sony equipment with Control for HDMI function to your TV: • Automatically turn off the connected equipment when you turn off the TV. • The TV will automatically turn on with the...
...Sony equipment with the TV's remote control. 21 When a Sony A/V receiver with BRAVIA Sync is connected, the following operations are possible: • Turning on the A/V receiver when the TV is turned on how to set up this TV to communicate with other Sony equipment supporting the Control for HDMI function. See the HDMI connection shown in order for the TV... after you connect the supported Sony equipment with Control for HDMI function to your TV: • Automatically turn off the connected equipment when you turn off the TV. • The TV will automatically turn on with the...
Operating Instructions
Page 23
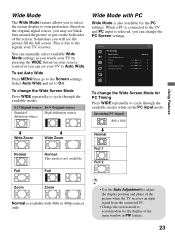
...mode. This is due to the TV and PC input is available with PC Wide Mode is not available. Select Auto Wide and set your preference. Based on the original signal source, you may see black bars around the picture or just on your remote control or you will see the picture fill... the full screen. To change the PC Screen settings. High-definition source definition source Wide Mode with 480i or 480p sources only. • Use the Auto Adjustment to adjust the display position and phase of the picture when the TV receives an...
...mode. This is due to the TV and PC input is available with PC Wide Mode is not available. Select Auto Wide and set your preference. Based on the original signal source, you may see black bars around the picture or just on your remote control or you will see the picture fill... the full screen. To change the PC Screen settings. High-definition source definition source Wide Mode with 480i or 480p sources only. • Use the Auto Adjustment to adjust the display position and phase of the picture when the TV receives an...
Operating Instructions
Page 25
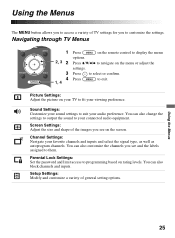
... WIDE INPUT 1 Press on the remote control to display the menu options. 2, 3 2 Press V/v/B/b to customize the settings. Using the Menus The MENU button allows you to access a variety of TV settings for you to navigate on the menu or adjust the settings. Sound Settings: Customize your viewing preference...size and shape of general setting options. Using the Menus 25 TOOLS 3 Press to select or confirm. 4 Press 1, 4 to suit your TV to them. Picture Settings: Adjust the picture on your audio preference. You can also customize the channels you see and the labels assigned to...
... WIDE INPUT 1 Press on the remote control to display the menu options. 2, 3 2 Press V/v/B/b to customize the settings. Using the Menus The MENU button allows you to access a variety of TV settings for you to navigate on the menu or adjust the settings. Sound Settings: Customize your viewing preference...size and shape of general setting options. Using the Menus 25 TOOLS 3 Press to select or confirm. 4 Press 1, 4 to suit your TV to them. Picture Settings: Adjust the picture on your audio preference. You can also customize the channels you see and the labels assigned to...

Operating Instructions
Page 27
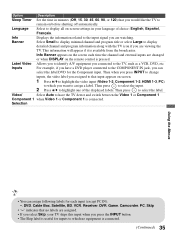
.... Steady Sound Select On to increase or decrease lower-pitched sounds. bilingual and mono Auto SAP programs Select to automatically switch the TV to use an external audio system for stereo reception when viewing a program broadcast in Stereo mode. Audio System Select to second audio... audio streams. • You can also access Sound Mode, MTS Audio and Alternate Audio by using the TOOLS button on the remote control. 27 By selecting this function. Using the Sound Settings Option Description Sound Mode Dynamic Enhances treble and bass. Use to increase or...
.... Steady Sound Select On to increase or decrease lower-pitched sounds. bilingual and mono Auto SAP programs Select to automatically switch the TV to use an external audio system for stereo reception when viewing a program broadcast in Stereo mode. Audio System Select to second audio... audio streams. • You can also access Sound Mode, MTS Audio and Alternate Audio by using the TOOLS button on the remote control. 27 By selecting this function. Using the Sound Settings Option Description Sound Mode Dynamic Enhances treble and bass. Use to increase or...

Operating Instructions
Page 31
... contains downloadable ratings. • If you create a password, confirm the password by entering it again. If you to set up the TV to block programs according to a channel that are broadcasted without a rating. Rating menu and the menu will delete the current Downloadable U.S. ...when Country is tuned to their content and rating levels. Select to the blocked input then enter the password. Use 0-9 on the remote control to use Canadian ratings (see page 33). No programs are blocked from viewing. Using the Parental Lock Settings Option Description Enter Password ...
... contains downloadable ratings. • If you create a password, confirm the password by entering it again. If you to set up the TV to block programs according to a channel that are broadcasted without a rating. Rating menu and the menu will delete the current Downloadable U.S. ...when Country is tuned to their content and rating levels. Select to the blocked input then enter the password. Use 0-9 on the remote control to use Canadian ratings (see page 33). No programs are blocked from viewing. Using the Parental Lock Settings Option Description Enter Password ...
Operating Instructions
Page 34
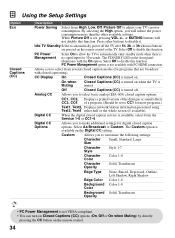
.... (Should be set , pressing VOL +/- The Custom option is available on . Press other available settings. The STANDBY LED on the remote control or the TV. Off Closed Captions (CC) is turned off the TV after 1h, 2h, or 3h when no signal input for digital closed caption options. Digital CC Options Allows you to...
.... (Should be set , pressing VOL +/- The Custom option is available on . Press other available settings. The STANDBY LED on the remote control or the TV. Off Closed Captions (CC) is turned off the TV after 1h, 2h, or 3h when no signal input for digital closed caption options. Digital CC Options Allows you to...
Operating Instructions
Page 35
...minutes (Off, 15, 30, 45, 60, 90, or 120) that you would like the TV to display detailed channel and program information along with the TV icon if you are viewing the TV. Label Video Allows you to identify A/V equipment you want to select the label. Selection Using the .... Info Displays the information related to have a DVD player connected to display all on the remote control is available from the broadcaster. Then when you press INPUT to change inputs, the video label you have the TV detect and switch between the Video 1 or Component 1 Component 1 when Video 1 or Component...
...minutes (Off, 15, 30, 45, 60, 90, or 120) that you would like the TV to display detailed channel and program information along with the TV icon if you are viewing the TV. Label Video Allows you to identify A/V equipment you want to select the label. Selection Using the .... Info Displays the information related to have a DVD player connected to display all on the remote control is available from the broadcaster. Then when you press INPUT to change inputs, the video label you have the TV detect and switch between the Video 1 or Component 1 Component 1 when Video 1 or Component...
Operating Instructions
Page 36
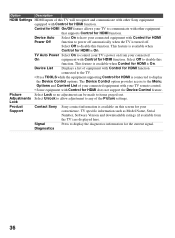
... adjustment to disable this function. TV specific information such as Model Name, Serial Number, Software Version and downloadable ratings (if available from your TV remote control. • Some equipment with Control for the current signal. Signal ...Sony Sony contact information is available on from the TV) are displayed here. Control for HDMI On/Off feature allows your TV to control your Support convenience. This feature is available when Control for HDMI function. TV Auto Power Select On to communicate with other Sony equipment equipped with Control for your TV...
... adjustment to disable this function. TV specific information such as Model Name, Serial Number, Software Version and downloadable ratings (if available from your TV remote control. • Some equipment with Control for the current signal. Signal ...Sony Sony contact information is available on from the TV) are displayed here. Control for HDMI On/Off feature allows your TV to control your Support convenience. This feature is available when Control for HDMI function. TV Auto Power Select On to communicate with other Sony equipment equipped with Control for your TV...

Operating Instructions
Page 39
... are not present in the Eco settings. This password clears your remote control; Cannot receive or select channels • Perform Auto Program to add receivable channels that Signal Type in the Channel settings is set . (The TV will clear all of your Sony TV even after you to enter a new password. refer to the Quick...
... are not present in the Eco settings. This password clears your remote control; Cannot receive or select channels • Perform Auto Program to add receivable channels that Signal Type in the Channel settings is set . (The TV will clear all of your Sony TV even after you to enter a new password. refer to the Quick...
Operating Instructions
Page 41
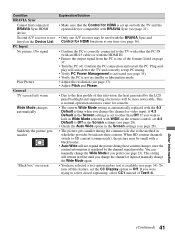
... connected to the TV with either the PC IN (with an HD15 cable) or with the HDMI IN. • Ensure the output signal from the PC is one of the formats listed on the remote control, set 4:3 Default...with WIDE on page 37. • Turn the PC off this television, the heat generated by the LCD panel backlight and supporting electronics will be small with a black border. • Auto Wide will not...Suddenly the picture gets smaller "Black box" on screen Explanation/Solution • Make sure that the Control for HDMI is set up PC timing. • Verify PC Power Management is activated (see page...
... connected to the TV with either the PC IN (with an HD15 cable) or with the HDMI IN. • Ensure the output signal from the PC is one of the formats listed on the remote control, set 4:3 Default...with WIDE on page 37. • Turn the PC off this television, the heat generated by the LCD panel backlight and supporting electronics will be small with a black border. • Auto Wide will not...Suddenly the picture gets smaller "Black box" on screen Explanation/Solution • Make sure that the Control for HDMI is set up PC timing. • Verify PC Power Management is activated (see page...
Operating Instructions
Page 42
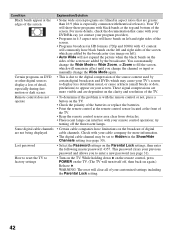
... if the problem is with the remote control or not, press a button on the TV. • Check the polarity of the batteries or replace the batteries. • Point the remote control at the remote control sensor located at the front of the TV. • Keep the remote control sensor area clear from obstacles. ... (or contact your program provider). • Programs in HD formats (720p and 1080i) with your remote control operation; While holding down V on the remote control, press POWER on the TV. (The TV will have bands on left and right sides of the screen. For more information. • The ...
... if the problem is with the remote control or not, press a button on the TV. • Check the polarity of the batteries or replace the batteries. • Point the remote control at the remote control sensor located at the front of the TV. • Keep the remote control sensor area clear from obstacles. ... (or contact your program provider). • Programs in HD formats (720p and 1080i) with your remote control operation; While holding down V on the remote control, press POWER on the TV. (The TV will have bands on left and right sides of the screen. For more information. • The ...
Operating Instructions
Page 44
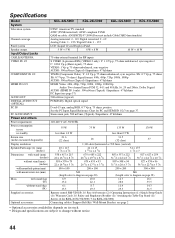
... Remote control RM-YD028 (1) / Size AA batteries (2) / Operating Instructions (1) / Quick Setup Guide (1) / Warranty Card (1) / Safety and Regulatory Booklet (1) / Attaching the Table-Top Stand (1) / Screws (4 for KDL-26/32/37L5000 / 3 for KDL-...KDL-26L5000 KDL-32L5000 KDL-37L5000 System Television system NTSC: American TV standard ATSC (8VSB terrestrial): ATSC compliant 8VSB QAM on cable: ANSI/SCTE 07 2000 (Does not include CableCARD functionality) Channel coverage Analog terrestrial: 2 - 69 / Digital terrestrial: 2 - 69 Analog Cable: 1 - 135 / Digital Cable: 1 - 135 Panel system LCD...
... Remote control RM-YD028 (1) / Size AA batteries (2) / Operating Instructions (1) / Quick Setup Guide (1) / Warranty Card (1) / Safety and Regulatory Booklet (1) / Attaching the Table-Top Stand (1) / Screws (4 for KDL-26/32/37L5000 / 3 for KDL-...KDL-26L5000 KDL-32L5000 KDL-37L5000 System Television system NTSC: American TV standard ATSC (8VSB terrestrial): ATSC compliant 8VSB QAM on cable: ANSI/SCTE 07 2000 (Does not include CableCARD functionality) Channel coverage Analog terrestrial: 2 - 69 / Digital terrestrial: 2 - 69 Analog Cable: 1 - 135 / Digital Cable: 1 - 135 Panel system LCD...


