
Limited Warranty (U.S. Only)
Page 1
... for defective parts for removal and installation is available from the date of purchase, labor for a period of the Product, including the antenna. After 90 days from Sony authorized service facilities or a Sony Service Center at no charge, new or rebuilt replacements in either its option, at your convenience, Sony Electronics Inc. This warranty does not cover customer instruction, installation, set up adjustments or signal reception problems. This...
... for defective parts for removal and installation is available from the date of purchase, labor for a period of the Product, including the antenna. After 90 days from Sony authorized service facilities or a Sony Service Center at no charge, new or rebuilt replacements in either its option, at your convenience, Sony Electronics Inc. This warranty does not cover customer instruction, installation, set up adjustments or signal reception problems. This...

Operating Instructions
Page 2
... recorder. Use of the music beyond this model manufactured for a Class B digital device, pursuant to Part 15 of the connected IC recorder. The IC recorder is not functioning normally. Content information is written in this manual could void your authority to operate this equipment does cause harmful interference to radio or television reception, which the receiver is encouraged to try to problems...
... recorder. Use of the music beyond this model manufactured for a Class B digital device, pursuant to Part 15 of the connected IC recorder. The IC recorder is not functioning normally. Content information is written in this manual could void your authority to operate this equipment does cause harmful interference to radio or television reception, which the receiver is encouraged to try to problems...
Operating Instructions
Page 3
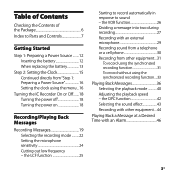
... to Parts and Controls 7 Getting Started Step 1: Preparing a Power Source.........12 Inserting the battery 12 When replacing the battery 13 Step 2: Setting the Clock 15 Continued directly from other equipment...31 To record using the synchronized recording function 31 To record without using the menu...16 Turning the IC Recorder On or Off.......18 Turning the power off 18 Turning the power on 18 Recording/Playing Back Messages Recording Messages 19 Selecting the recording mode...........22 Setting the microphone sensitivity 24 Cutting out low...
... to Parts and Controls 7 Getting Started Step 1: Preparing a Power Source.........12 Inserting the battery 12 When replacing the battery 13 Step 2: Setting the Clock 15 Continued directly from other equipment...31 To record using the synchronized recording function 31 To record without using the menu...16 Turning the IC Recorder On or Off.......18 Turning the power off 18 Turning the power on 18 Recording/Playing Back Messages Recording Messages 19 Selecting the recording mode...........22 Setting the microphone sensitivity 24 Cutting out low...
Operating Instructions
Page 4
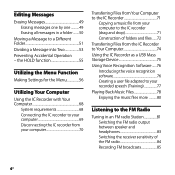
... the IC recorder from your computer 70 Transferring Files from Your Computer to the IC Recorder 71 Copying a music file from the IC Recorder to Your Computer 74 Using the IC Recorder as a USB Mass Storage Device 75 Using Voice Recognition Software.......76 Introducing the voice recognition software 76 Creating a user file adapted to your recorded speech (Training 77 Playing Back Music Files 78 Enjoying the music files more ...........80 Listening to a Different Folder 51 Dividing a Message into Two...
... the IC recorder from your computer 70 Transferring Files from Your Computer to the IC Recorder 71 Copying a music file from the IC Recorder to Your Computer 74 Using the IC Recorder as a USB Mass Storage Device 75 Using Voice Recognition Software.......76 Introducing the voice recognition software 76 Creating a user file adapted to your recorded speech (Training 77 Playing Back Music Files 78 Enjoying the music files more ...........80 Listening to a Different Folder 51 Dividing a Message into Two...
Operating Instructions
Page 10
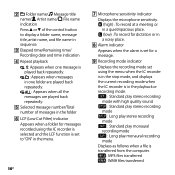
...low) : To record for dictation or in a noisy place. Alarm indicator Appears when the alarm is set for a message. Recording mode indicator Displays the recording mode set using the menu when the IC recorder is in the stop mode, and displays the current recording mode when the IC recorder is in the playback or recording mode. : Standard play stereo recording mode with high quality sound : Standard play stereo recording mode : Long play stereo recording mode : Standard play monaural recording mode : Long play monaural recording mode Displays as follows when a file is transferred...
...low) : To record for dictation or in a noisy place. Alarm indicator Appears when the alarm is set for a message. Recording mode indicator Displays the recording mode set using the menu when the IC recorder is in the stop mode, and displays the current recording mode when the IC recorder is in the playback or recording mode. : Standard play stereo recording mode with high quality sound : Standard play stereo recording mode : Long play stereo recording mode : Standard play monaural recording mode : Long play monaural recording mode Displays as follows when a file is transferred...
Operating Instructions
Page 13
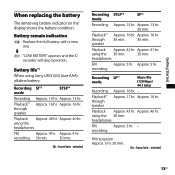
.... 40 hr. Getting Started When replacing the battery The remaining battery indicator on the display shows the battery condition. Approx. 5 hr. using the 30 min. 30 min. Approx. 13 hr. 30 min. Playback*2 through speaker Approx. 16 hr. Approx. 40 hr. recording 30 min. 30 min. (hr. : hours/min. : minutes) Recording STLP*5 SP*6 mode Recording Approx. 15 hr. recording Recording LP*7 mode Music file (128 kbps/ 44...
.... 40 hr. Getting Started When replacing the battery The remaining battery indicator on the display shows the battery condition. Approx. 5 hr. using the 30 min. 30 min. Approx. 13 hr. 30 min. Playback*2 through speaker Approx. 16 hr. Approx. 40 hr. recording 30 min. 30 min. (hr. : hours/min. : minutes) Recording STLP*5 SP*6 mode Recording Approx. 15 hr. recording Recording LP*7 mode Music file (128 kbps/ 44...

Operating Instructions
Page 18
... using the IC recorder, you have turned on Slide the HOLD switch in the stop mode. The IC recorder is turned on, and an accessing animation is displayed. When you are not going to use the IC recorder for a long time, we recommend to show the display.) 18GB Turning the IC Recorder On or Off Turning the power off Slide the HOLD switch in the direction of the arrow. Turning the power on the IC recorder...
... using the IC recorder, you have turned on Slide the HOLD switch in the stop mode. The IC recorder is turned on, and an accessing animation is displayed. When you are not going to use the IC recorder for a long time, we recommend to show the display.) 18GB Turning the IC Recorder On or Off Turning the power off Slide the HOLD switch in the direction of the arrow. Turning the power on the IC recorder...

Operating Instructions
Page 19
... new message will be automatically recorded after the last recorded message. Speak into the built-in the stop mode. Recording/Playback Messages Recording/Playing Back Messages Recording Messages Built-in microphones (headphone) jack Operation indicator , /MENU HOLD ENT 1 Select a folder. Press /MENU to display the folder selection window. Press or on the control button to select the folder in which you want to press and hold (record/pause...
... new message will be automatically recorded after the last recorded message. Speak into the built-in the stop mode. Recording/Playback Messages Recording/Playing Back Messages Recording Messages Built-in microphones (headphone) jack Operation indicator , /MENU HOLD ENT 1 Select a folder. Press /MENU to display the folder selection window. Press or on the control button to select the folder in which you want to press and hold (record/pause...

Operating Instructions
Page 20
...; While the operation indicator is flashing or is lit in a folder transferred from a computer. If you press (record/pause) when you can prevent inadvertent operations by sliding the HOLD switch in the direction of all the buttons so that you have selected a folder, the folder will be automatically changed to check the remaining battery/charging indicator (page 13). To avoid replacing battery during a long recording session, use a USB AC adaptor...
...; While the operation indicator is flashing or is lit in a folder transferred from a computer. If you press (record/pause) when you can prevent inadvertent operations by sliding the HOLD switch in the direction of all the buttons so that you have selected a folder, the folder will be automatically changed to check the remaining battery/charging indicator (page 13). To avoid replacing battery during a long recording session, use a USB AC adaptor...

Operating Instructions
Page 28
... DIVIDE during recording pause. Notes You need a certain amount of the second message may be recorded as two messages, however recording continues without stopping. Message 1 Message 2 Message 3 Message is not a malfunction. For more information, see "System Limitations" on the display and the new message number is added at the point of division, the end of the first message and the beginning of free space in that folder. Once a message...
... DIVIDE during recording pause. Notes You need a certain amount of the second message may be recorded as two messages, however recording continues without stopping. Message 1 Message 2 Message 3 Message is not a malfunction. For more information, see "System Limitations" on the display and the new message number is added at the point of division, the end of the first message and the beginning of free space in that folder. Once a message...

Operating Instructions
Page 31
... make music files without using the synchronized recording function 1 Press and hold /MENU to enter the menu mode. The menu mode window will be displayed. 2 Press or on the control button to the IC recorder. To record using the computer by recording the sound from other equipment connected to select "DETAIL MENU," and then press ENT. Recording/Playback Messages Recording from other equipment Tape recorder, etc. To the (microphone) jack , ENT /MENU 2 seconds and the IC recorder starts recording...
... make music files without using the synchronized recording function 1 Press and hold /MENU to enter the menu mode. The menu mode window will be displayed. 2 Press or on the control button to the IC recorder. To record using the computer by recording the sound from other equipment connected to select "DETAIL MENU," and then press ENT. Recording/Playback Messages Recording from other equipment Tape recorder, etc. To the (microphone) jack , ENT /MENU 2 seconds and the IC recorder starts recording...

Operating Instructions
Page 34
... cut off and the sound from the connected equipment is in the display window. 7 Press or on the component connected to the IC recorder. 34GB Connect the audio output connector (stereo mini-plug) of the IC recorder using an audio connecting cable*. 4 Press or on the control button to select "OFF," and then press ENT. 5 Press (stop) to exit the menu mode. 6 Connect other equipment to the (microphone) jack...
... cut off and the sound from the connected equipment is in the display window. 7 Press or on the component connected to the IC recorder. 34GB Connect the audio output connector (stereo mini-plug) of the IC recorder using an audio connecting cable*. 4 Press or on the control button to select "OFF," and then press ENT. 5 Press (stop) to exit the menu mode. 6 Connect other equipment to the (microphone) jack...

Operating Instructions
Page 50
... ENT. 4 Press or on the control button to enter the menu mode. To erase a part of one message Divide the message into two messages first, and then proceed with the same steps again from the beginning. /MENU 1 Select the folder containing the messages you want to erase when the IC recorder is in the stop mode. 2 Press and hold /MENU to select "EXECUTE," and then press ENT.
... ENT. 4 Press or on the control button to enter the menu mode. To erase a part of one message Divide the message into two messages first, and then proceed with the same steps again from the beginning. /MENU 1 Select the folder containing the messages you want to erase when the IC recorder is in the stop mode. 2 Press and hold /MENU to select "EXECUTE," and then press ENT.

Operating Instructions
Page 61
Changes the display mode. - OFF*: The VOR function does not work. ELAPSE*: Elapsed playback time of one message REMAIN: During stop or playback, the remaining time of the playback in a range from +100% to -50%. setting. -30%* Note You can adjust the speed of the message During recording, the available recording time REC DATE: Date recorded REC TIME: Time recorded Sets the DPC (Digital Pitch Control) function. 42 When you set the DPC (SPEED CTRL) switch to "ON," you can only adjust the playback speed between 0 and -50% when messages are...
Changes the display mode. - OFF*: The VOR function does not work. ELAPSE*: Elapsed playback time of one message REMAIN: During stop or playback, the remaining time of the playback in a range from +100% to -50%. setting. -30%* Note You can adjust the speed of the message During recording, the available recording time REC DATE: Date recorded REC TIME: Time recorded Sets the DPC (Digital Pitch Control) function. 42 When you set the DPC (SPEED CTRL) switch to "ON," you can only adjust the playback speed between 0 and -50% when messages are...
Operating Instructions
Page 73
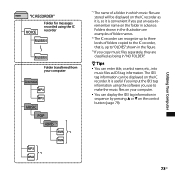
... to make the music files on your computer Conversation MUSIC POP OLDIES *1 *2 *1 The name of a folder in which music files are classified as ID3 tag information. Folders shown in the illustration are examples of folder names. *2 The IC recorder can recognize up to three levels of folders copied to the IC recorder, that is useful if you input the ID3 tag information using the IC recorder FOLDER01 FOLDER05 Folder transferred...
... to make the music files on your computer Conversation MUSIC POP OLDIES *1 *2 *1 The name of a folder in which music files are classified as ID3 tag information. Folders shown in the illustration are examples of folder names. *2 The IC recorder can recognize up to three levels of folders copied to the IC recorder, that is useful if you input the ID3 tag information using the IC recorder FOLDER01 FOLDER05 Folder transferred...
Operating Instructions
Page 77
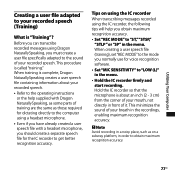
... Creating a user file adapted to your recorded speech. Before you can transcribe recorded messages using the IC recorder, the following tips will help supplied with Dragon NaturallySpeaking, as some parts of training are the same as on using the IC recorder When transcribing messages recorded using Dragon NaturallySpeaking, you obtain maximum recognition accuracy. Set "REC MODE" to "ST,""STSP," "STLP" or "SP" in the menu. Hold the IC recorder firmly and start recording. When training...
... Creating a user file adapted to your recorded speech. Before you can transcribe recorded messages using the IC recorder, the following tips will help supplied with Dragon NaturallySpeaking, as some parts of training are the same as on using the IC recorder When transcribing messages recorded using Dragon NaturallySpeaking, you obtain maximum recognition accuracy. Set "REC MODE" to "ST,""STSP," "STLP" or "SP" in the menu. Hold the IC recorder firmly and start recording. When training...
Operating Instructions
Page 93
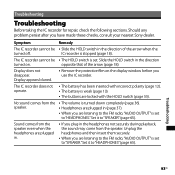
...; The battery is weak (page 13). The buttons are listening to "HEADPHONES." opposite that of the arrow when the turned off. Troubleshooting Troubleshooting Before taking the IC recorder for repair, check the following sections. Set it to "HEADPHONES" (page 65). Should any problem persist after you use the IC recorder. The IC recorder cannot be Slide the HOLD switch in the direction of...
...; The battery is weak (page 13). The buttons are listening to "HEADPHONES." opposite that of the arrow when the turned off. Troubleshooting Troubleshooting Before taking the IC recorder for repair, check the following sections. Set it to "HEADPHONES" (page 65). Should any problem persist after you use the IC recorder. The IC recorder cannot be Slide the HOLD switch in the direction of...

Operating Instructions
Page 95
... on the operation modes (stop mode, playback mode, and recording mode) (pages 58, 59). CTRL) switch to use the IC recorder for long time without using the IC recorder. Even if you do not intend to "OFF" or display the menu and adjust the speed in the menu mode. The menu items displayed are fewer menu items displayed in DPC again (pages 42, 61). Symptom Remedy When recording from other equipment, the input level is too...
... on the operation modes (stop mode, playback mode, and recording mode) (pages 58, 59). CTRL) switch to use the IC recorder for long time without using the IC recorder. Even if you do not intend to "OFF" or display the menu and adjust the speed in the menu mode. The menu items displayed are fewer menu items displayed in DPC again (pages 42, 61). Symptom Remedy When recording from other equipment, the input level is too...

Operating Instructions
Page 98
... folder or the total number of the selected file is damaged. The IC recorder cannot be turned on using the computer because there is exhausted. Error messages Error message BATTERY LOWER-LEVEL LOW BATTERY MEMORY FULL FILE FULL FILE DAMAGED FORMAT ERROR PROCESS ERROR SET DATE&TIME NO FILE Cause/Remedy You cannot format the memory or erase all the files in a folder because of the control file required for operation. Replace the old battery with a new one . Battery is no copy of insufficient battery power...
... folder or the total number of the selected file is damaged. The IC recorder cannot be turned on using the computer because there is exhausted. Error messages Error message BATTERY LOWER-LEVEL LOW BATTERY MEMORY FULL FILE FULL FILE DAMAGED FORMAT ERROR PROCESS ERROR SET DATE&TIME NO FILE Cause/Remedy You cannot format the memory or erase all the files in a folder because of the control file required for operation. Replace the old battery with a new one . Battery is no copy of insufficient battery power...
Operating Instructions
Page 104
....1 kHz *3 WMA Ver. 8 Class2A is compatible, however, MBR (Multi Bit Rate), Lossless, Professional, and Voice are not supported. *4The NoiseSubstitution function is not supported, therefore, playback becomes simple playback with a new one in the midst of recording. For details on the battery life, refer to replace the battery with 32 kbps bit rate. Specifications IC recorder section Capacity (User available capacity) ICD-UX71/UX71F: 1 GB (approx. 986 MB =1,034...
....1 kHz *3 WMA Ver. 8 Class2A is compatible, however, MBR (Multi Bit Rate), Lossless, Professional, and Voice are not supported. *4The NoiseSubstitution function is not supported, therefore, playback becomes simple playback with a new one in the midst of recording. For details on the battery life, refer to replace the battery with 32 kbps bit rate. Specifications IC recorder section Capacity (User available capacity) ICD-UX71/UX71F: 1 GB (approx. 986 MB =1,034...


